


一、Tomcat 安装后本身提供了一个server,端口配置默认是8080,对应目录为:webapps
二、Tomcat 6.0 配置多个端口,其实也就是给Tomcat增加几个server,并设置对应目录。下面以增加两个端口号为例
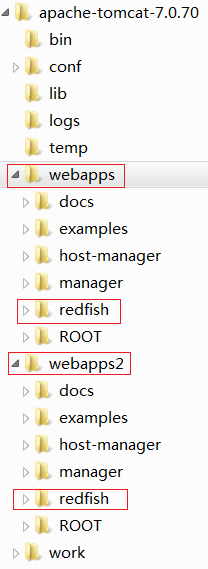
web的目录结构如下:即使webapp下的web应用名称相同,现在可以根据端口号不同而实现 分别访问 。
二、Tomcat 6.0 配置多个端口,其实也就是给Tomcat增加几个server,并设置对应目录。下面以增加两个端口号为例
打开 conf下的server.xml文件 并修改,修改后server.xml文件 如下
<?xml version='1.0' encoding='utf-8'?>

<Server port="8005" shutdown="SHUTDOWN">
  <Listener className="org.apache.catalina.startup.VersionLoggerListener" />

  <Listener className="org.apache.catalina.core.AprLifecycleListener" SSLEngine="on" />
  <!--Initialize Jasper prior to webapps are loaded. Documentation at /docs/jasper-howto.html -->
  <Listener className="org.apache.catalina.core.JasperListener" />
  <!-- Prevent memory leaks due to use of particular java/javax APIs-->
  <Listener className="org.apache.catalina.core.JreMemoryLeakPreventionListener" />
  <Listener className="org.apache.catalina.mbeans.GlobalResourcesLifecycleListener" />
  <Listener className="org.apache.catalina.core.ThreadLocalLeakPreventionListener" />

  <!-- Global JNDI resources
       Documentation at /docs/jndi-resources-howto.html
  -->
  <GlobalNamingResources>
    <!-- Editable user database that can also be used by
         UserDatabaseRealm to authenticate users
    -->
    <Resource name="UserDatabase" auth="Container"
              type="org.apache.catalina.UserDatabase"
              description="User database that can be updated and saved"
              factory="org.apache.catalina.users.MemoryUserDatabaseFactory"
              pathname="conf/tomcat-users.xml" />
  </GlobalNamingResources>

  <!-- A "Service" is a collection of one or more "Connectors" that share
       a single "Container" Note:  A "Service" is not itself a "Container",
       so you may not define subcomponents such as "Valves" at this level.
       Documentation at /docs/config/service.html
   -->
   <!-- 原来的web服务 -->
  <Service name="Catalina">

    <Connector port="8080" protocol="HTTP/1.1"
               connectionTimeout="20000"
               redirectPort="8443" />

    <Connector port="8009" protocol="AJP/1.3" redirectPort="8443" />

    <Engine name="Catalina" defaultHost="localhost">

      <Realm className="org.apache.catalina.realm.LockOutRealm">

        <Realm className="org.apache.catalina.realm.UserDatabaseRealm"
               resourceName="UserDatabase"/>
      </Realm>

      <Host name="localhost"  appBase="webapps"
            unpackWARs="true" autoDeploy="true">

        <Valve className="org.apache.catalina.valves.AccessLogValve" directory="logs"
               prefix="localhost_access_log." suffix=".txt"
               pattern="%h %l %u %t "%r" %s %b" />

      </Host>
    </Engine>
  </Service>

  <!-- 新增加的web服务, name要修改-->
  <Service name="Catalina2">
    <!--  此处的port要修改 -->
    <Connector port="8282" protocol="HTTP/1.1"
               connectionTimeout="20000"
               redirectPort="8443" />


    <!--  此处的portbn 要修改 -->
    <Connector port="8019" protocol="AJP/1.3" redirectPort="8443" />


   <!--  此处的name也要修改--->
    <Engine name="Catalina2" defaultHost="localhost">


      <Realm className="org.apache.catalina.realm.LockOutRealm">

        <Realm className="org.apache.catalina.realm.UserDatabaseRealm"
               resourceName="UserDatabase"/>
      </Realm>

	 <!-- 此处的appBase也要修改-->
      <Host name="localhost"  appBase="webapps2"
            unpackWARs="true" autoDeploy="true">


        <Valve className="org.apache.catalina.valves.AccessLogValve" directory="logs"
               prefix="localhost_access_log." suffix=".txt"
               pattern="%h %l %u %t "%r" %s %b" />

      </Host>
    </Engine>
  </Service>

</Server>
web的目录结构如下:即使webapp下的web应用名称相同,现在可以根据端口号不同而实现 分别访问 。


 1100
1100

 被折叠的 条评论
为什么被折叠?
被折叠的 条评论
为什么被折叠?
 到【灌水乐园】发言


