


AI驱动的前端UI组件生成器(Next.js,GPT4,Langchain和CopilotKit)
本文译者为 360 奇舞团前端开发工程师
原文标题:AI-Powered Frontend UI Components Generator (Next.js, GPT4, Langchain, & CopilotKit)
原文作者:Bonnie
原文地址:https://dev.to/tcms/ai-powered-frontend-ui-components-generator-nextjs-gpt4-langchain-copilotkit-1hac
前言
本文将教您如何构建一个AI驱动的前端UI组件生成器,它可以帮助您生成Next.js Tailwind CSS UI组件,并提供实现教程。 我们将涵盖以下内容:
使用Next.js、TypeScript和Tailwind CSS构建UI组件生成器Web应用程序。
使用CopilotKit将AI功能集成到UI组件生成器中。
集成嵌入式代码编辑器,以对生成的代码进行更改。
前提条件
为了充分理解本教程,您需要对React或Next.js有基本的了解。 以下是构建AI驱动的UI组件生成器所需的工具:
Ace Code Editor - 一个使用JavaScript编写的可嵌入代码编辑器,具有与原生编辑器相匹配的功能和性能。。
Langchain - 提供一个框架,使AI代理能够搜索网络并研究任何主题。
OpenAI API - 提供一个API密钥,使您能够使用ChatGPT模型执行各种任务。
Tavily AI - 一个搜索引擎,使AI代理能够在应用程序中进行研究并访问实时知识。。
CopilotKit - 一个用于构建自定义AI聊天机器人、应用内AI代理和文本区域的开源协作框架。
项目设置和包安装
首先,在终端中运行下面的代码片段来创建一个Next.js应用程序:
npx create-next-app@latest aiuigenerator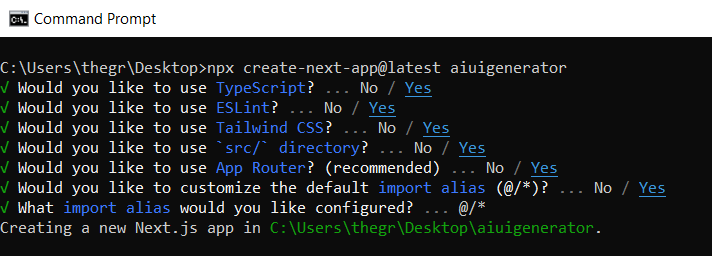
接下来,安装Ace代码编辑器和Langchain包及其依赖项。
npm install react-ace @langchain/langgraph最后,安装CopilotKit。这些包使我们能够从React状态中检索数据并将AI协同助手添加到应用程序中。
npm install @copilotkit/react-ui @copilotkit/react-textarea @copilotkit/react-core @copilotkit/backend恭喜!您现在已经准备好构建一个由人工智能驱动的博客了。
构建UI组件生成器前端界面
在这个部分中,我将带您逐步完成创建UI组件生成器前端的过程,使用静态内容来定义生成器的用户界面。
首先,打开您的代码编辑器,前往/[root]/src/app目录,并创建一个名为components的文件夹。在components文件夹内,创建两个文件,分别命名为Header.tsx和CodeTutorial.tsx。
在Header.tsx文件中,添加以下代码,定义一个名为Header的函数组件,用于渲染生成器的导航栏。
"use client";

import Link from "next/link";

export default function Header() {
  return (
    <>
      <header className="flex flex-wrap sm:justify-start sm:flex-nowrap z-50 w-full bg-gray-800 border-b border-gray-200 text-sm py-3 sm:py-0 ">
        <nav
          className="relative max-w-7xl w-full mx-auto px-4 sm:flex sm:items-center sm:justify-between sm:px-6 lg:px-8"
          aria-label="Global">
          <div className="flex items-center justify-between">
            <Link
              className="w-full flex-none text-xl text-white font-semibold p-6"
              href="/"
              aria-label="Brand">
              AI-UI-Components-Generator
            </Link>
          </div>
        </nav>
      </header>
    </>
  );
}在CodeTutorial.tsx文件中,添加以下代码,定义一个名为CodeTutorial的函数组件,用于渲染生成器的主页,显示生成的UI组件、嵌入式代码编辑器和生成的实现教程。
"use client";

import Markdown from "react-markdown";
import { useState } from "react";
import AceEditor from "react-ace";
import React from "react";

export default function CodeTutorial() {
  const [code, setCode] = useState<string[]>([
    `<h1 class="text-red-500">Hello World</h1>`,
  ]);
  const [codeToDisplay, setCodeToDisplay] = useState<string>(code[0] || "");
  const [codeTutorial, setCodeTutorial] = useState(``);

  function onChange(newCode: any) {
    setCodeToDisplay(newCode);
  }

  return (
    <>
      <main className=" min-h-screen px-4">
        <div className="w-full h-full min-h-[70vh] flex justify-between gap-x-1 ">
          <div className="w-2/3 min-h-[60vh] rounded-lg bg-white shadow-lg p-2 border mt-8 overflow-auto">
            <div
              className="w-full min-h-[60vh] rounded-lg"
              dangerouslySetInnerHTML={{ __html: codeToDisplay }}
            />
          </div>
          <AceEditor
            placeholder="Placeholder Text"
            mode="html"
            theme="monokai"
            name="blah2"
            className="w-[50%] min-h-[60vh] p-2 mt-8 rounded-lg"
            onChange={onChange}
            fontSize={14}
            lineHeight={19}
            showPrintMargin={true}
            showGutter={true}
            highlightActiveLine={true}
            value={codeToDisplay}
            setOptions={{
              enableBasicAutocompletion: true,
              enableLiveAutocompletion: true,
              enableSnippets: false,
              showLineNumbers: true,
              tabSize: 2,
            }}
          />
        </div>
        <div className="w-10/12 mx-auto">
          <div className="mt-8">
            <h1 className="text-white text-center text-xl font-semibold p-6">
              Code Tutorial
            </h1>
            {codeTutorial ? (
              <Markdown className="text-white">{codeTutorial}</Markdown>
            ) : (
              <div className="text-white">
                The Code Tutorial Will Appear Here
              </div>
            )}
          </div>
        </div>
      </main>
    </>
  );
}接下来,进入/[root]/src/page.tsx文件,并添加以下代码,导入CodeTutorial和Header组件,并定义一个名为Home的函数组件。
import React from "react";
import Header from "./components/Header";
import CodeTutorial from "./components/CodeTutorial";

export default function Home() {
  return (
    <>
      <Header />
      <CodeTutorial />
    </>
  );
}
接下来,删除 globals.css 文件中的 CSS 代码,并添加以下 CSS 代码。
@tailwind base;
@tailwind components;
@tailwind utilities;

body {
  height: 100vh;
  background-color: rgb(16, 23, 42);
}

pre {
  margin: 1rem;
  padding: 1rem;
  border-radius: 10px;
  background-color: black;
  overflow: auto;
}

h2,
p {
  padding-bottom: 1rem;
  padding-top: 1rem;
}

code {
  margin-bottom: 2rem;
}
最后,在命令行中运行 npm run dev 命令,然后导航至 http://localhost:3000/。
现在您应该在浏览器上查看UI组件生成器的前端界面,如下所示:
使用 CopilotKit 将人工智能功能集成到组件生成器中
在这个部分,您将学习如何在UI组件生成器中添加一个AI copilot,使用CopilotKit生成UI组件代码和实现教程。
CopilotKit提供了前端和后端两个包。它们可以让您将React状态连接起来,并使用AI代理在后端处理应用程序数据。
首先,让我们将CopilotKit的React组件添加到博客前端。
将CopilotKit添加到博客前端
在这里,我将引导您完成将UI组件生成器与CopilotKit前端集成的过程,以促进UI组件代码和实现教程的生成。
首先,请使用以下代码片段,在 /[root]/src/app/components/CodeTutorial.tsx 文件的顶部导入 useMakeCopilotReadable 和 useCopilotAction自定义钩子。
import {
  useCopilotAction,
  useMakeCopilotReadable,
} from "@copilotkit/react-core";
在 CodeTutorial 函数内部,状态变量下面,添加以下代码,该代码使用 useMakeCopilotReadable 钩子(hook)来添加将作为应用内聊天机器人上下文的代码。该钩子使得代码对于copilot易于可读。
useMakeCopilotReadable(codeToDisplay);在上述代码下方,添加以下代码,该代码使用useCopilotAction钩子来设置一个名为generateCodeAndImplementationTutorial的动作,该动作将启用生成UI组件代码和实现教程的功能。
该动作接收两个参数,分别名为code和tutorial,用于生成UI组件代码和实现教程。
该动作包含一个处理函数,该函数根据给定的提示生成UI组件代码和实现教程。
在处理函数内部,codeToDisplay状态被更新为新生成的代码,而codeTutorial状态被更新为新生成的教程,如下所示。
useCopilotAction(
    {
      name: "generateCodeAndImplementationTutorial",
      description:
        "Create Code Snippet with React.js(Next.js), tailwindcss and an implementation tutorial of the code generated.",
      parameters: [
        {
          name: "code",
          type: "string",
          description: "Code to be generated",
          required: true,
        },
        {
          name: "tutorial",
          type: "string",
          description:
            "Markdown of step by step guide tutorial on how to use the generated code accompanied with the code. Include introduction, prerequisites and what happens at every step accompanied with code generated earlier. Don't forget to add how to render the code on browser.",
          required: true,
        },
      ],
      handler: async ({ code, tutorial }) => {
        setCode((prev) => [...prev, code]);
        setCodeToDisplay(code);
        setCodeTutorial(tutorial);
      },
    },
    [codeToDisplay, codeTutorial]
);接下来,进入/[root]/src/app/page.tsx文件,并在顶部使用以下代码导入CopilotKit前端包和样式。
import { CopilotKit } from "@copilotkit/react-core";
  import { CopilotSidebar } from "@copilotkit/react-ui";
import "@copilotkit/react-ui/styles.css";然后,使用CopilotKit来包裹CopilotSidebar和CodeTutorial组件,如下所示。CopilotKit组件指定了CopilotKit后端端点的URL(/api/copilotkit/),而CopilotSidebar渲染了应用内聊天机器人,你可以通过它给出提示来生成UI组件代码和实现教程。
export default function Home() {
return (
<>
<Header />
<CopilotKit url="/api/copilotkit">
<CopilotSidebar
instructions="Help the user generate code. Ask the user if to generate its tutorial."
defaultOpen={true}
labels={{
title: "Code & Tutorial Generator",
initial: "Hi! 👋 I can help you generate code and its tutorial.",
}}>
<CodeTutorial />
</CopilotSidebar>
</CopilotKit>
</>
);
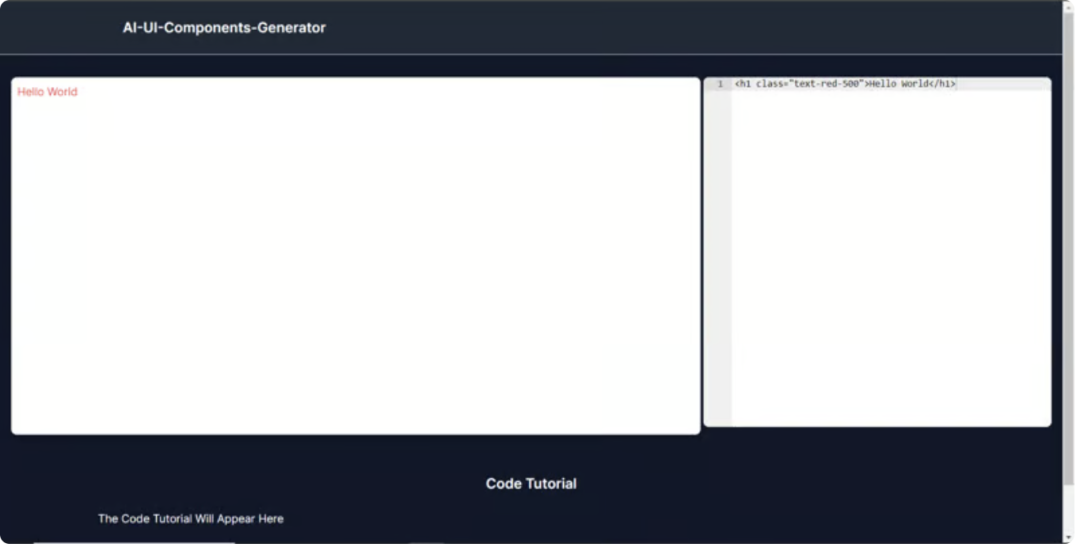
}接下来,运行开发服务器并在浏览器中导航到http://localhost:3000。你应该会看到应用内聊天机器人已经被集成到了UI组件生成器中。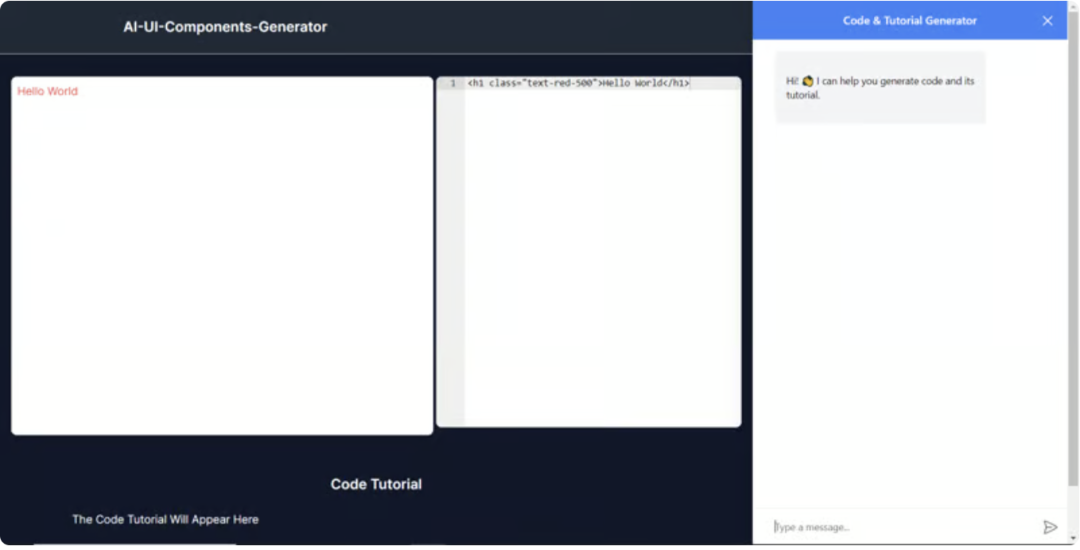
将CopilotKit后端添加到博客
在这里,我将引导您完成将UI组件生成器与CopilotKit后端集成的过程,该后端负责处理来自前端的请求,并提供函数调用以及各种大型语言模型(LLM)后端,例如GPT。
此外,我们还将集成一个名为Tavily的AI agent,它能够在网上研究任何主题。
要开始,请在项目的根目录下创建一个名为.env.local的文件。然后,在文件中添加以下环境变量,这些变量将存储您的ChatGPT和Tavily搜索API密钥。
OPENAI_API_KEY="Your ChatGPT API key"
TAVILY_API_KEY="Your Tavily Search API key"
要获取ChatGPT API密钥,请导航到 https://platform.openai.com/api-keys。
要获取Tavily搜索API密钥,请访问 https://app.tavily.com/home。
之后,前往/[root]/src/app目录并创建一个名为api的文件夹。在api文件夹中,创建一个名为copilotkit的文件夹。
在copilotkit文件夹中,创建一个名为research.ts的文件。然后导航到这个research.ts gist文件,复制代码,并将其添加到research.ts文件中。
接下来,在/[root]/src/app/api/copilotkit文件夹中创建一个名为route.ts的文件。该文件将包含设置后端功能以处理POST请求的代码。它条件性地包含一个“research”动作,该动作对给定主题进行研究。
现在,在文件的顶部导入以下模块:
import { CopilotBackend, OpenAIAdapter } from "@copilotkit/backend"; // For backend functionality with CopilotKit.
import { researchWithLangGraph } from "./research"; // Import a custom function for conducting research.
import { AnnotatedFunction } from "@copilotkit/shared"; // For annotating functions with metadata.
在上述代码下方,定义一个运行时环境变量和一个名为researchAction的函数,该函数使用以下代码研究某个特定主题。
// Define a runtime environment variable, indicating the environment where the code is expected to run.
export const runtime = "edge";

// Define an annotated function for research. This object includes metadata and an implementation for the function.
const researchAction: AnnotatedFunction<any> = {
  name: "research", // Function name.
  description: "Call this function to conduct research on a certain topic. Respect other notes about when to call this function", // Function description.
  argumentAnnotations: [ // Annotations for arguments that the function accepts.
    {
      name: "topic", // Argument name.
      type: "string", // Argument type.
      description: "The topic to research. 5 characters or longer.", // Argument description.
      required: true, // Indicates that the argument is required.
    },
  ],
  implementation: async (topic) => { // The actual function implementation.
    console.log("Researching topic: ", topic); // Log the research topic.
    return await researchWithLangGraph(topic); // Call the research function and return its result.
  },
};
然后在上述代码下方添加以下代码,定义一个处理POST请求的异步函数。
// Define an asynchronous function that handles POST requests.
export async function POST(req: Request): Promise<Response> {
  const actions: AnnotatedFunction<any>[] = []; // Initialize an array to hold actions.

  // Check if a specific environment variable is set, indicating access to certain functionality.
  if (process.env.TAVILY_API_KEY) {
    actions.push(researchAction); // Add the research action to the actions array if the condition is true.
  }

  // Instantiate CopilotBackend with the actions defined above.
  const copilotKit = new CopilotBackend({
    actions: actions,
  });

  // Use the CopilotBackend instance to generate a response for the incoming request using an OpenAIAdapter.
  return copilotKit.response(req, new OpenAIAdapter());
}
如何生成UI组件
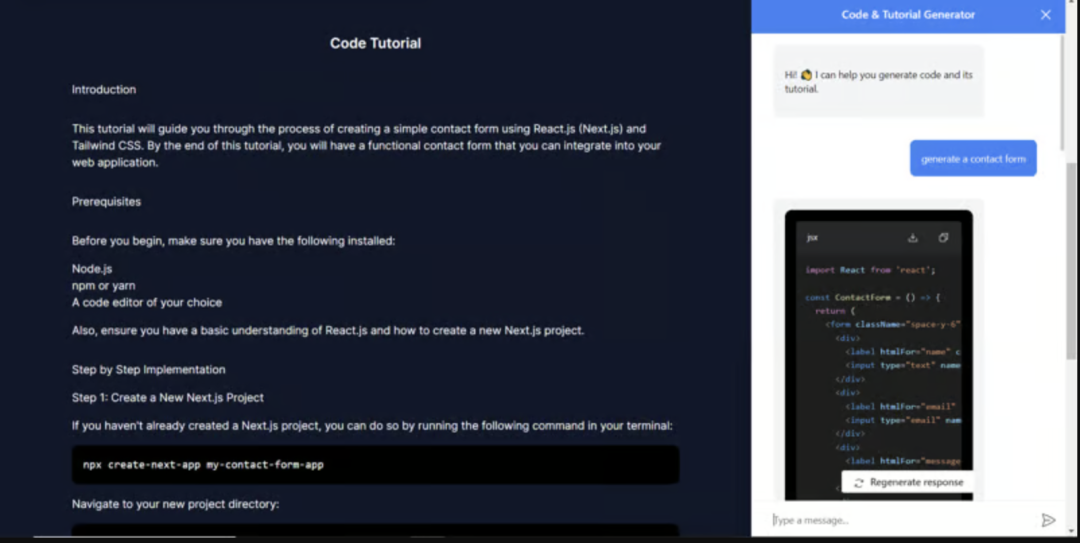
现在请转到您之前集成的应用内聊天机器人,并给它一个提示,例如:“生成一个联系表单”。 一旦生成完成,您应该会看到生成的联系表单组件以及其使用教程,如下所示。您还可以使用嵌入式代码编辑器修改生成的代码。
恭喜!您已经完成了这个教程的项目。
结论
CopilotKit是一个令人惊叹的工具,它允许您在几分钟内将AI副驾驶添加到您的产品中。无论您对AI聊天机器人和助手感兴趣,还是希望自动化复杂任务,CopilotKit都能让这一切变得简单。
如果您需要构建一个AI产品或将其集成到您的软件应用程序中,您应该考虑使用CopilotKit。
您可以在GitHub上找到本教程的源代码:https://github.com/TheGreatBonnie/AIPoweredUIComponentsGenerator
参考链接
https://ace.c9.io/
https://www.langchain.com/
https://platform.openai.com/api-keys
https://tavily.com/
https://github.com/CopilotKit
- END -
如果您关注前端+AI 相关领域可以扫码加群交流

关于奇舞团
奇舞团是 360 集团最大的大前端团队,代表集团参与 W3C 和 ECMA 会员(TC39)工作。奇舞团非常重视人才培养,有工程师、讲师、翻译官、业务接口人、团队 Leader 等多种发展方向供员工选择,并辅以提供相应的技术力、专业力、通用力、领导力等培训课程。奇舞团以开放和求贤的心态欢迎各种优秀人才关注和加入奇舞团。


 被折叠的 条评论
为什么被折叠?
被折叠的 条评论
为什么被折叠?
 到【灌水乐园】发言


