


 本文详细介绍如何在SpringBoot项目中使用Redis哨兵模式,包括环境搭建、配置及代码测试,实现高可用的Redis集群。
今天小七给大伙介绍一下,如何在Spring Boot项目中使用redis,大家都知道搭建redis有4种方式,分别是单节点实例、主从模式、sentinel模式、cluster模式。今天来给大伙介绍一下sentinel模式的环境搭建以及如何集成到Spring Boot中。
先来简单介绍一下sentinel模式,也就是哨兵模式。哨兵模式是一种特殊的模式,首先Redis提供了哨兵的命令,哨兵是一个独立的进程,作为进程,它会独立运行。其原理是哨兵通过发送命令,等待Redis服务器响应,从而监控运行的多个Redis实例。
哨兵有两个作用:
- 通过发送命令,让Redis服务器返回监控其运行状态,包括主服务器和从服务器;
- 当哨兵监测到master宕机,会自动将slave切换成master,然后通过发布订阅模式通知其他的从服务器,修改配置文件,让它们切换主机。
下面,小七分以下几个步骤给大家介绍一下:
(一)Windows下哨兵模式的安装
因为redis官网没有提供windows安装,所以咱们从下面的地址下载即可,https://github.com/microsoftarchive/redis/releases/tag/win-3.2.100。
下载Redis-x64-3.2.100.zip后,进行解压,文件夹内容如下:
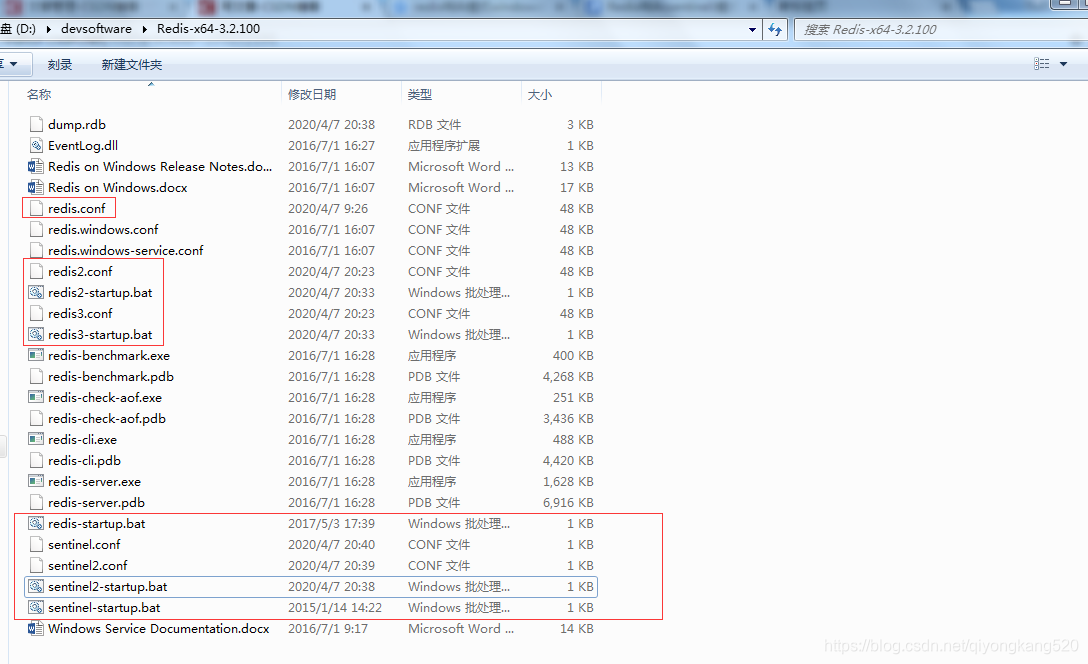
标红的10个文件是小七新加的,下面小七来分别介绍一下:
主节点:redis.conf、redis-startup.bat
从节点1:redis2.conf、redis2-startup.bat
从节点2:redis3.conf、redis3-startup.bat
哨兵1:sentinel.conf、sentinel-startup.bat
哨兵2:sentinel2.conf、sentinel2-startup.bat
说明一下,.conf是配置文件,.bat是方便启动弄的一个批处理文件。
redis.conf、redis2.conf、redis3.conf直接拷贝redis.windows.conf即可,需要改下里面的端口,然后从节点需要指定主节点。
redis.conf(主):
port 6379
redis2.conf(从1):
port 6380
slaveof 127.0.0.1 6379
redis3.conf(从2):
port 6381
slaveof 127.0.0.1 6379
然后,再来看下相应的批处理文件,如下:
redis-startup.bat:
redis-server.exe redis.conf
redis2-startup.bat:
redis-server.exe redis2.conf
redis3-startup.bat:
redis-server.exe redis3.conf
下面,再来看看哨兵的配置文件。
sentinel.conf:
#当前Sentinel服务运行的端口
port 26379
#关闭保护模式
protected-mode no
# 哨兵监听的主服务器
sentinel monitor myMaster 127.0.0.1 6379 2
# 3s内myMaster无响应,则认为myMaster宕机了
sentinel down-after-milliseconds myMaster 3000
# 执行故障转移时,最多有1个从服务器同时对新的主服务器进行同步
sentinel parallel-syncs myMaster 1
#如果10秒后,myMaster仍没启动过来,则启动failover
sentinel failover-timeout myMaster 10000
sentinel2.conf:
#当前Sentinel服务运行的端口
port 36379
#关闭保护模式
protected-mode no
# 哨兵监听的主服务器
sentinel monitor myMaster 127.0.0.1 6379 2
# 3s内myMaster无响应,则认为myMaster宕机了
sentinel down-after-milliseconds myMaster 3000
# 执行故障转移时,最多有1个从服务器同时对新的主服务器进行同步
sentinel parallel-syncs myMaster 1
#如果10秒后,myMaster仍没启动过来,则启动failover
sentinel failover-timeout myMaster 10000
两个哨兵的配置除了端口不一样,其它都一样即可。
然后,相应的批处理文件如下。
sentinel-startup.bat:
redis-server.exe sentinel.conf --sentinel
sentinel2-startup.bat:
redis-server.exe sentinel2.conf --sentinel
好啦,接下来按以下顺序执行,直接双击即可:
redis-startup.bat
redis2-startup.bat
redis3-startup.bat
sentinel-startup.bat
sentinel2-startup.bat
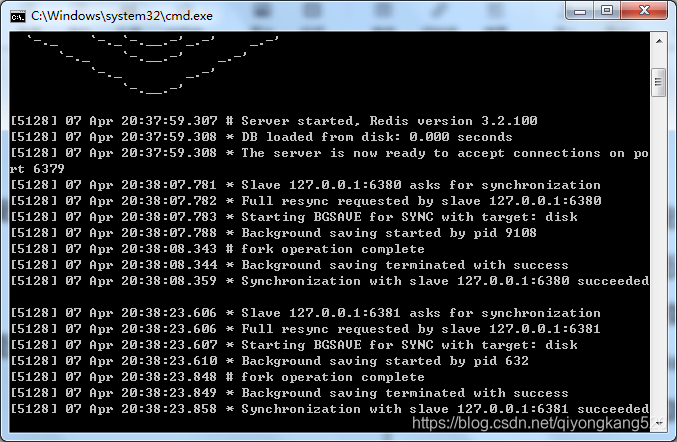
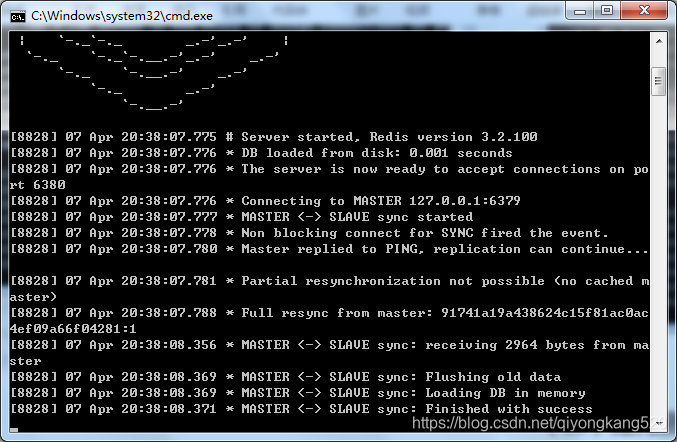
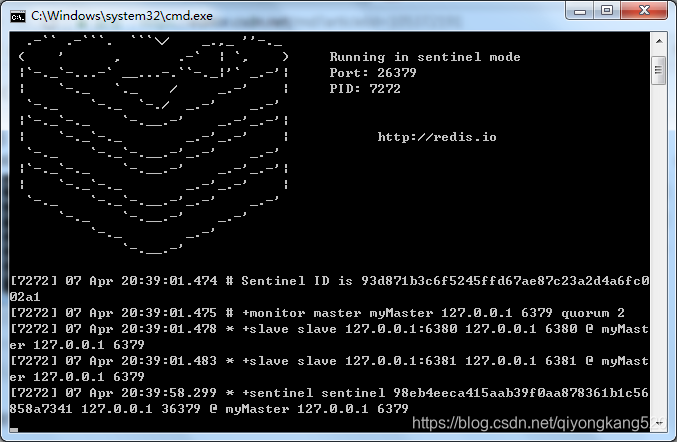
下面,小七截个图看看启动日志:
主节点:
从1:
哨1:
(二)如何测试哨兵模式是否正常启动
先来检查一些Master是否正常,用redis客户端连上,命令如下:
redis-cli.exe -h 127.0.0.1 -p 6379
然后,执行命令:
info replication
结果如下:
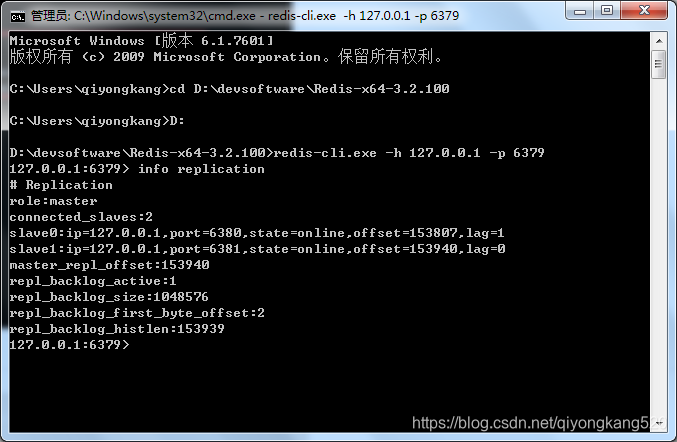
说明主从节点启动都是正常的。
下面再来看看哨兵是否正常,执行以下命令连上sentinel:
redis-cli.exe -h 127.0.0.1 -p 26379
接着执行:
info sentinel
结果如下:
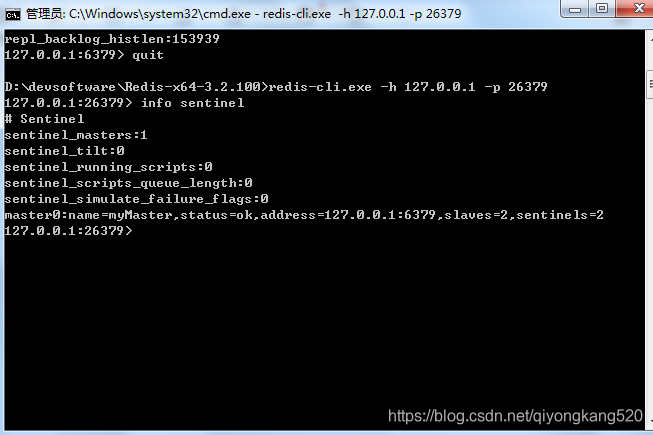
OK,一切正常,说明哨兵模式启动没有问题。
然后,我们把主节点给关掉,再来看看哨兵的日志:
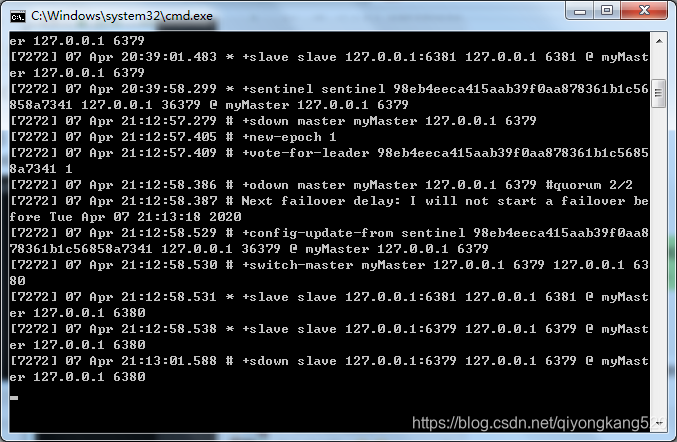
可以看到,自动选举了一个从节点为主节点了,说明哨兵的作用生效了。
(三)pom.xml依赖配置
这个小七直接贴出来,如下:
<!-- redis -->
    <dependency>
      <groupId>org.springframework.boot</groupId>
      <artifactId>spring-boot-starter-data-redis</artifactId>
    </dependency>

    <!-- Jedis 客户端 -->
    <dependency>
      <groupId>redis.clients</groupId>
      <artifactId>jedis</artifactId>
    </dependency>

    <dependency>
      <groupId>org.apache.commons</groupId>
      <artifactId>commons-pool2</artifactId>
    </dependency>
这里注意,Spring Boot2.X默认选择使用lettuce客户端,下面简单介绍一下:
Lettuce是一个高性能基于Java编写的Redis驱动框架,底层集成了Project Reactor提供天然的反应式编程,通信框架集成了Netty使用了非阻塞IO,5.x版本之后融合了JDK1.8的异步编程特性,在保证高性能的同时提供了十分丰富易用的API。
commons-pool2是用于连接池。
(四)代码测试是否能连接哨兵模式
下面,咱们再来写个测试代码,看能否连接到哨兵模式,代码如下:
   @Test
    public void testConnectSentinel() {
        Set<String> sentinels = new HashSet<>();
        sentinels.add("127.0.0.1:26379");
        sentinels.add("127.0.0.1:36379");
        String clusterName = "myMaster";
        JedisSentinelPool redisSentinelPool = new JedisSentinelPool(clusterName, sentinels);
        Jedis jedis = null;
        try {
            jedis = redisSentinelPool.getResource();
            jedis.set("name01", "aaa");
            System.out.println(jedis.get("name01"));
        } catch (Exception e) {
            e.printStackTrace();
        } finally {
            jedis.close();
            redisSentinelPool.close();
        }
    }
运行结果如下:

咱们也可以下载一个Redis GUI来看一下,如下图:
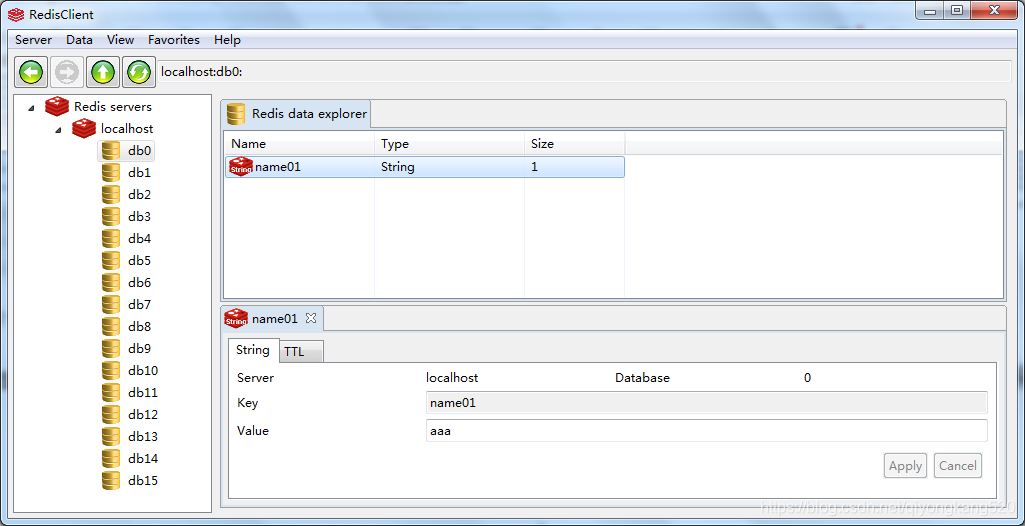
说明连接哨兵模式没有问题。
(五)Spring Boot中如何配置哨兵模式
首先,咱们看一下.yml配置,如下图:
spring:
  redis:
#    host: 127.0.0.1
#    port: 6379
    password:
    database: 0  # Redis数据库索引(默认为0)
    timeout: 2000ms  # 连接超时时间(毫秒)默认是2000ms
    lettuce:
      pool:
        max-active: 200  # 连接池最大连接数(使用负值表示没有限制)
        max-wait: -1ms # 连接池最大阻塞等待时间(使用负值表示没有限制)
        max-idle: 100 # 连接池中的最大空闲连接
        min-idle: 50 # 连接池中的最小空闲连接
      shutdown-timeout: 100ms
    sentinel:  # 哨兵模式
      master: myMaster
      nodes: 127.0.0.1:26379,127.0.0.1:36379
这里如果不想使用哨兵模式,把sentinel注释,放开host和port就可以啦。
(六)自定义redis的key和value的序列化和反序列化
因为redis是以键值对的方式保存数据,保存的时候会进行序列化,如果不指定的话,就会按对象默认的序列化方式进行,这时咱们去redis查看的时候,会完全看不懂是啥。一般,这咱们可以JSON格式进行序列化和反序列化,容易进行管理。
首先,咱们新建一个配置类RedisConfig,代码如下:
package org.qyk.springboot.redis;

import com.fasterxml.jackson.annotation.JsonAutoDetect;
import com.fasterxml.jackson.annotation.JsonTypeInfo;
import com.fasterxml.jackson.annotation.PropertyAccessor;
import com.fasterxml.jackson.databind.ObjectMapper;
import com.fasterxml.jackson.databind.jsontype.impl.LaissezFaireSubTypeValidator;
import org.springframework.cache.annotation.CachingConfigurerSupport;
import org.springframework.cache.annotation.EnableCaching;
import org.springframework.cache.interceptor.KeyGenerator;
import org.springframework.context.annotation.Bean;
import org.springframework.context.annotation.Configuration;
import org.springframework.data.redis.connection.RedisConnectionFactory;
import org.springframework.data.redis.core.RedisTemplate;
import org.springframework.data.redis.serializer.Jackson2JsonRedisSerializer;
import org.springframework.data.redis.serializer.StringRedisSerializer;

/**
 * <Change to the actual description of this class>
 *
 * @version 1.0
 * <pre>
 * Author       Date            Changes
 * yongkang.qi   2020年04月06日   Created
 *
 * </pre>
 * @since 1.7
 */
@Configuration
@EnableCaching //开启注解
public class RedisConfig extends CachingConfigurerSupport {

    @Bean
    public RedisTemplate<String, Object> redisTemplate(RedisConnectionFactory redisConnectionFactory) {
        RedisTemplate<String, Object> template = new RedisTemplate<>();
        // 配置连接工厂
        template.setConnectionFactory(redisConnectionFactory);

        //使用Jackson2JsonRedisSerializer来序列化和反序列化redis的value值(默认使用JDK的序列化方式)
        Jackson2JsonRedisSerializer jacksonSerial = new Jackson2JsonRedisSerializer(Object.class);

        ObjectMapper om = new ObjectMapper();
        // 指定要序列化的域,field,get和set,以及修饰符范围,ANY是都有包括private和public
        om.setVisibility(PropertyAccessor.ALL, JsonAutoDetect.Visibility.ANY);
        // 指定序列化输入的类型,类必须是非final修饰的,final修饰的类,比如String,Integer等会跑出异常
        om.activateDefaultTyping(LaissezFaireSubTypeValidator.instance, ObjectMapper.DefaultTyping.NON_FINAL, JsonTypeInfo.As.PROPERTY);
        jacksonSerial.setObjectMapper(om);

        // 值采用json序列化
        template.setValueSerializer(jacksonSerial);
        //使用StringRedisSerializer来序列化和反序列化redis的key值
        template.setKeySerializer(new StringRedisSerializer());

        // 设置hash key 和value序列化模式
        template.setHashKeySerializer(new StringRedisSerializer());
        template.setHashValueSerializer(jacksonSerial);
        template.afterPropertiesSet();

        return template;
    }

    @Bean
    public KeyGenerator keyGenerator() {
        return (target, method, params) -> {
            StringBuilder sb = new StringBuilder();
            sb.append(target.getClass().getName());
            sb.append(method.getName());
            for (Object obj : params) {
                sb.append(obj.toString());
            }
            return sb.toString();
        };
    }
}
这里,主要是看redisTemplate这个方法即可。
咱们写个单元测试类,如下:
package org.qyk.springboot.redis;

import java.util.*;

import com.alibaba.fastjson.JSON;
import org.junit.Assert;
import org.junit.Test;
import org.junit.runner.RunWith;
import org.qyk.springboot.dao3.PersonDao;
import org.qyk.springboot.entity.PersonEntity;
import org.springframework.beans.factory.annotation.Autowired;
import org.springframework.boot.test.context.SpringBootTest;
import org.springframework.data.redis.core.RedisTemplate;
import org.springframework.data.redis.core.StringRedisTemplate;
import org.springframework.test.context.junit4.SpringRunner;
import redis.clients.jedis.Jedis;
import redis.clients.jedis.JedisSentinelPool;

import javax.annotation.Resource;

/**
 * <Change to the actual description of this class>
 *
 * @version 1.0
 * <pre>
 * Author       Date            Changes
 * yongkang.qi   2020年04月06日   Created
 *
 * </pre>
 * @since 1.7
 */
@RunWith(SpringRunner.class)
@SpringBootTest
public class RedisTest {
    @Autowired
    private StringRedisTemplate stringRedisTemplate;
    @Autowired
    private RedisTemplate<String, Object> redisTemplate;
    @Resource
    private PersonDao personDao;

    @Test
    public void testConnectSentinel() {
        Set<String> sentinels = new HashSet<>();
        sentinels.add("127.0.0.1:26379");
        sentinels.add("127.0.0.1:36379");
        String clusterName = "myMaster";
        JedisSentinelPool redisSentinelPool = new JedisSentinelPool(clusterName, sentinels);
        Jedis jedis = null;
        try {
            jedis = redisSentinelPool.getResource();
            jedis.set("name01", "aaa");
            System.out.println(jedis.get("name01"));
        } catch (Exception e) {
            e.printStackTrace();
        } finally {
            jedis.close();
            redisSentinelPool.close();
        }
    }

    @Test
    public void testStringRedisTemplate() {
        stringRedisTemplate.opsForValue().set("name02", "小七2");
        Assert.assertEquals("小七2", stringRedisTemplate.opsForValue().get("name02"));
    }

    @Test
    public void testRedisTemplate() {
        PersonEntity entity = new PersonEntity();
        entity.setUsername("小七");
        entity.setAge(18);
        entity.setBirth(new Date());
        redisTemplate.opsForValue().set("name03", entity);
//        PersonEntity entity = (PersonEntity) redisTemplate.opsForValue().get("name03");
//        System.out.println(JSON.toJSONString(entity));
    }

    @Test
    public void testCacheable() {
        List<Map<String, Object>> maps = personDao.queryList("%%");
        System.out.println(JSON.toJSONString(maps));
    }

}
运行一下testRedisTemplate方法,然后我们来看一下图形化界面,结果如下:
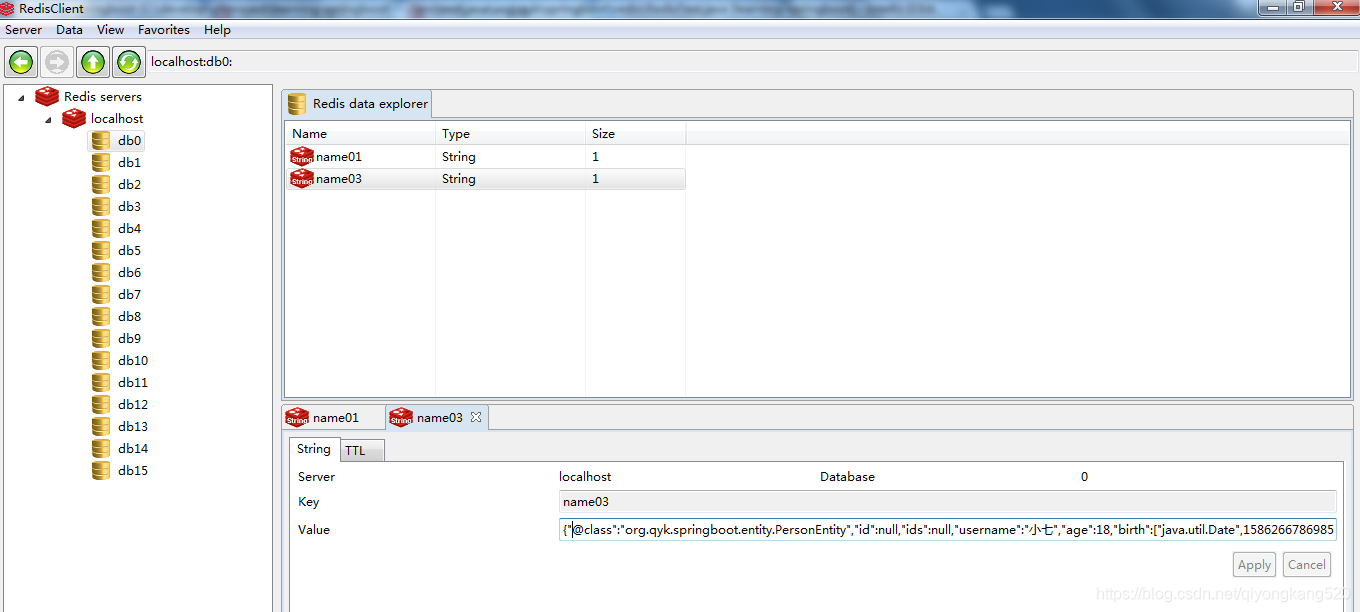
这里可以看到,key和value都是按咱们自定义的序列化方式进行保存的。
(七)如何给方法添加缓存
有的时候,咱们可能需要给某个查询方法增加缓存,无须一直查询数据库,提升查询速度。那么这个时候该怎么办呢,Spring Boot提供了注解的方式,使用起来非常方便。
首先咱们先配置一下keyGenerator,就是RedisConfig类的keyGenerator,待会儿演示一下就知道是干嘛用的了。
然后咱们要开启缓存注解,也就是@EnableCaching,在RedisConfig加上既可以。
下面,咱们来给一个方法加上缓存,如下:

即加上@Cacheable(value = “sampleCache”)就行了。
下面咱们运行一下单元测试类中的testCacheable方法,然后检查一下缓存,如下:
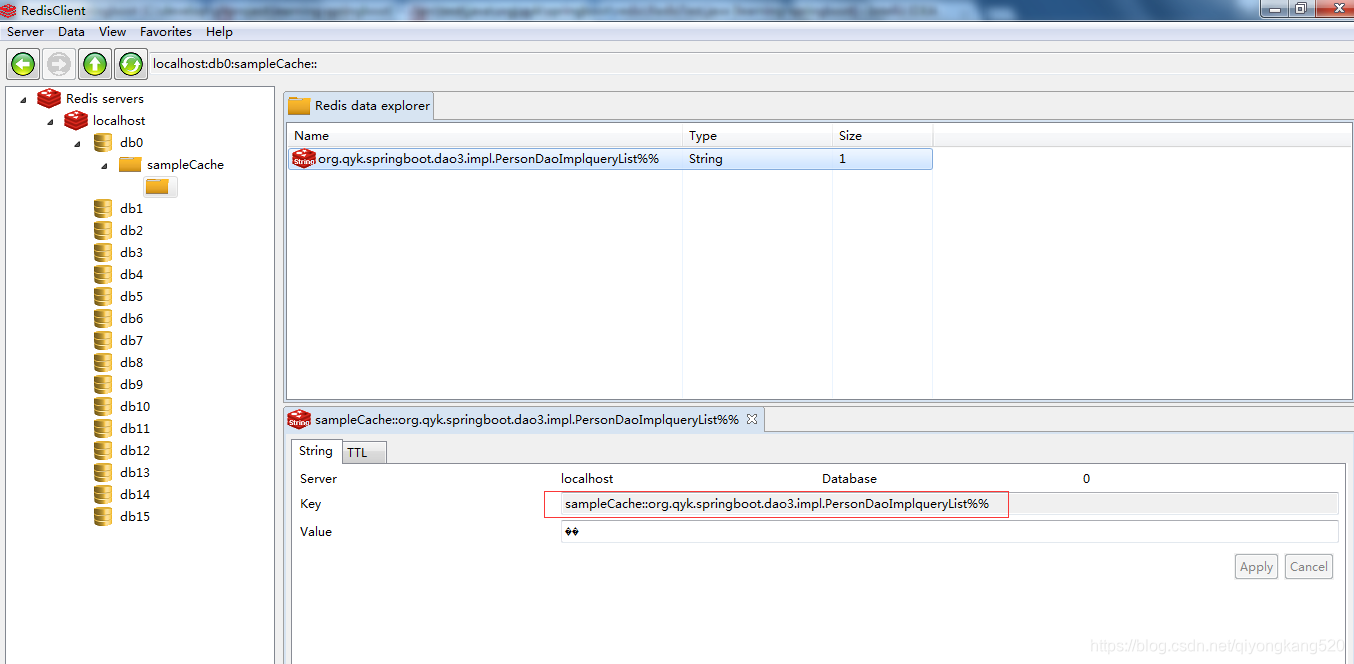
看到上面的key,大家就应该能明白keyGenerator的作用了吧。
然后,咱们再来运行一次,就会发现queryList的代码没有被再执行,直接取了缓存中的值。这个小七就不演示了。
(八)结语
好了,今天就可以介绍到这里了。其实,涉及到redis的技术点还是相当多的,小七主要是给大伙介绍在Spring Boot项目中集成redis,具体的详细使用,大家可以去自己研究研究。总之,Spring Boot大大提升了咱们集成使用一些技术框架的效率,减少了很多繁琐的配置,用起来确实很舒服,不过,就是得多查查改如何使用~


 3622
3622

 被折叠的 条评论
为什么被折叠?
被折叠的 条评论
为什么被折叠?
 到【灌水乐园】发言


