


- extends AuthorizingRealm
- doGetAuthorizationInfo 授权方法
- doGetAuthenticationInfo 认证方法
SpringBoot与Shiro整合
- https://blog.csdn.net/fangliangke/article/details/128818634
一,Shiro 体系结构
Apache Shiro是一个强大且易用的Java安全框架,执行身份验证、授权、密码和会话管理。使用Shiro的易于理解的API,您可以快速、轻松地获得任何应用程序,从最小的移动应用程序到最大的网络和企业应用程序。
Authentication 认证 ---- 用户登录
Authorization 授权 ---- 用户具有哪些权限
Cryptography 安全数据加密
Session Management 会话管理
Web Integration web系统集成
Interations 集成其它应用,spring、缓存框架
- 认证
- 授权
- 加密
- Session 会话管理
- 系统集成 Web
Cryptography
/krɪpˈtɒɡrəfi
n.
密码学;密码使用法

cryptic
ˈkrɪptɪk/
adj.
神秘的,含义模糊的;[动] 隐藏的

二,构建spring boot工程
建立Maven项目


修改pom.xml
- 继承Spring Boot 父工程
	<parent>
        <groupId>org.springframework.boot</groupId>
        <artifactId>spring-boot-starter-parent</artifactId>
        <version>2.5.3</version>
        <relativePath/>
    </parent>
- 添加web支持
<dependency>
    <groupId>org.springframework.boot</groupId>
    <artifactId>spring-boot-starter-web</artifactId>
</dependency>
编写spring Boot启动类
package com.example;

import org.springframework.boot.SpringApplication;
import org.springframework.boot.autoconfigure.SpringBootApplication;

/**
 * @Description: SpringBoot启动类
 */
@SpringBootApplication
public class Application {
    public static void main(String[] args) {
        SpringApplication.run(Application.class, args);
    }
}
编写测试Controller类
package com.example.controller;

import org.springframework.stereotype.Controller;
import org.springframework.web.bind.annotation.GetMapping;
import org.springframework.web.bind.annotation.ResponseBody;

/**
 * @Description:控制层
 */
@Controller
public class TestController {
    /**
     * 测试方法
     */
    @GetMapping("/hello")
    @ResponseBody
    public String hello(){
        System.out.println("UserController.hello()");
        return "ok";
    }
}
启动,测试

三,引入thymeleaf页面模块
修改pom.xml
- 添加thymeleaf依赖
<dependency>
     <groupId>org.springframework.boot</groupId>
     <artifactId>spring-boot-starter-thymeleaf</artifactId>
 </dependency>
在Controller添加测试方法
/**
     * 测试thymeleaf
     */
    @RequestMapping("/test")
    public String testThymeleaf(Model model){
        //把数据存入model
        model.addAttribute("name", "张三");
        //返回test.html
        return "test";
    }
建立test.html页面
- 在src/main/resource目录下创建templates目录,然后创建test.html页面
<!DOCTYPE html>
<html lang="en">
<head>
    <meta charset="UTF-8">
    <title>Title</title>
</head>
<body>
    <h3 th:text="${name}"></h3>
</body>
</html>
启动,测试

四, Spring Boot与Shiro整合实现用户认证
核心API
- Subject: 用户主体(把操作交给SecurityManager)
- SecurityManager:安全管理器(关联Realm)
- Realm:Shiro连接数据的桥梁
修改pom.xml
- 添加shiro与spring整合依赖
<dependency>
    <groupId>org.apache.shiro</groupId>
    <artifactId>shiro-spring</artifactId>
    <version>1.10.1</version>
</dependency>
创建Realm类AuthorizingRealm
package com.example.shiro;

import org.apache.shiro.authc.AuthenticationException;
import org.apache.shiro.authc.AuthenticationInfo;
import org.apache.shiro.authc.AuthenticationToken;
import org.apache.shiro.authz.AuthorizationInfo;
import org.apache.shiro.realm.AuthorizingRealm;
import org.apache.shiro.subject.PrincipalCollection;

/**
 * @Description:自定义Realm 处理登录 权限
 */
public class UserRleam extends AuthorizingRealm {
    /**
     * 执行授权逻辑
     */
    @Override
    protected AuthorizationInfo doGetAuthorizationInfo(PrincipalCollection principalCollection) {
        System.out.println("执行授权逻辑");
        return null;
    }
    /**
     * 执行认证逻辑
     */
    @Override
    protected AuthenticationInfo doGetAuthenticationInfo(AuthenticationToken authenticationToken) throws AuthenticationException {
        System.out.println("执行认证逻辑");
        return null;
    }
}
编写Shiro配置类
package com.example.shiro;

import org.apache.shiro.spring.web.ShiroFilterFactoryBean;
import org.apache.shiro.web.mgt.DefaultWebSecurityManager;
import org.springframework.context.annotation.Bean;
import org.springframework.context.annotation.Configuration;

import java.util.LinkedHashMap;
import java.util.Map;

/**
 * @Description:shiro配置类
 */
@Configuration
public class ShiroConfig {
    /**
     * 创建ShiroFilterFactoryBean
     */
    @Bean
    public ShiroFilterFactoryBean getShiroFilterFactoryBean(DefaultWebSecurityManager securityManager){
        ShiroFilterFactoryBean shiroFilterFactoryBean = new ShiroFilterFactoryBean();

        //设置安全管理器
        shiroFilterFactoryBean.setSecurityManager(securityManager);

        //添加Shiro内置过滤器
        /**
         * Shiro内置过滤器,可以实现权限相关的拦截器
         *    常用的过滤器:
         *       anon: 无需认证(登录)可以访问
         *       authc: 必须认证才可以访问
         *       user: 如果使用rememberMe的功能可以直接访问
         *       perms: 该资源必须得到资源权限才可以访问
         *       role: 该资源必须得到角色权限才可以访问
         */
        Map<String,String> filterMap = new LinkedHashMap<String,String>();

        filterMap.put("/hello", "anon");
        filterMap.put("/login", "anon");

        filterMap.put("/**", "authc");

        //要求登陆时的链接,非必须。
        shiroFilterFactoryBean.setLoginUrl("/login");

        shiroFilterFactoryBean.setFilterChainDefinitionMap(filterMap);
        return shiroFilterFactoryBean;
    }

    /**
     * 创建DefaultWebSecurityManager
     */
    @Bean
    public DefaultWebSecurityManager getDefaultWebSecurityManager(UserRealm userRealm){
        DefaultWebSecurityManager securityManager = new DefaultWebSecurityManager();
        //关联realm
        securityManager.setRealm(userRealm);
        return securityManager;
    }

    /**
     * 创建Realm
     */
    @Bean
    public UserRealm getRealm(){
        return new UserRealm();
    }
}
1. 配置哪些要登录 ShiroFilterFactoryBean
        //添加Shiro内置过滤器
        /**
         * Shiro内置过滤器,可以实现权限相关的拦截器
         *    常用的过滤器:
         *       anon: 无需认证(登录)可以访问
         *       authc: 必须认证才可以访问
         *       user: 如果使用rememberMe的功能可以直接访问
         *       perms: 该资源必须得到资源权限才可以访问
         *       role: 该资源必须得到角色权限才可以访问
         */
        Map<String, String> filterMap = new LinkedHashMap<String, String>();

        filterMap.put("/login", "anon");
        filterMap.put("/**", "authc");

        //要求登陆时的链接,非必须。
        sffb.setLoginUrl("/login");

        sffb.setFilterChainDefinitionMap(filterMap);
创建登录页面
- 在src/main/resource目录下创建templates目录,然后创建login.html页面
<!DOCTYPE html>
<html lang="en">
<head>
    <meta charset="UTF-8">
    <title>登陆页面</title>
</head>
<body>
<h3>登录</h3>
<form method="post" action="login">
    用户名:<input type="text" name="username"/><br/>
    密码:<input type="password" name="password"/><br/>
    <input type="submit" value="登录"/>
</form>
</body>
</html>
编写Controller的登录逻辑
- 在TestController.java类中添加方法
	/**
     * 登陆页面跳转
     */
    @GetMapping("/login")
    public String login(){
        return "login";
    }

    /**
     * 登录逻辑处理
     */
    @PostMapping("/login")
    public String login(String username,String password,Model model){
        /**
         * 使用Shiro编写认证操作
         */
        //1.获取Subject
        Subject subject = SecurityUtils.getSubject();
        //2.封装用户数据
        UsernamePasswordToken token = new UsernamePasswordToken(username,password);

        //3.执行登录方法
        try {
            subject.login(token);

            //登录成功
            //跳转到test.html
            return "redirect:/test";
        } catch (UnknownAccountException e) {
            //e.printStackTrace();
            //登录失败:用户名不存在
            System.out.println("用户名不存在");
            return "login";
        }catch (IncorrectCredentialsException e) {
            //e.printStackTrace();
            //登录失败:密码错误
            System.out.println("密码错误");
            return "login";
        }
    }
2. 执行登录逻辑SecurityUtils
		//1.获取Subject
        Subject subject = SecurityUtils.getSubject();
        //2.封装用户数据
        UsernamePasswordToken token = new UsernamePasswordToken(username,password);

        //3.执行登录方法
        subject.login(token);

        //登录成功
        //跳转到test.html
        return "redirect:/test";

        UnknownAccountException e 用户名不存在
        IncorrectCredentialsException e 密码错误
编写Realm的认证逻辑判断
- 修改 UserRealm
package com.example.shiro;

import org.apache.shiro.authc.*;
import org.apache.shiro.authz.AuthorizationInfo;
import org.apache.shiro.realm.AuthorizingRealm;
import org.apache.shiro.subject.PrincipalCollection;

/**
 * @Description:自定义Realm 处理登录 权限
 */
public class UserRealm extends AuthorizingRealm {
    /**
     * 执行授权逻辑
     */
    @Override
    protected AuthorizationInfo doGetAuthorizationInfo(PrincipalCollection principalCollection) {
        System.out.println("执行授权逻辑");
        return null;
    }
    /**
     * 执行认证逻辑
     */
    @Override
    protected AuthenticationInfo doGetAuthenticationInfo(AuthenticationToken authenticationToken) throws AuthenticationException {
        System.out.println("执行认证逻辑");

        //假设数据库的用户名和密码
        String username = "aaa";
        String password = "123";

        //编写shiro判断逻辑,判断用户名和密码
        //1.判断用户名
        UsernamePasswordToken token = (UsernamePasswordToken)authenticationToken;
        if(!token.getUsername().equals(username)){
            //用户名不存在
            return null;//shiro底层会抛出UnKnowAccountException
        }

        //2.判断密码
        /**
         *  对比密码
         * 参数1:主体对象,按需要传,登陆成功后该参数可通过SecurityUtils.getSubject().getPrincipal()获取。
         * 参数2:从对象中取密码,users.getPassword()是这个用户的数据库中的密码 是用来和authenticationToken里的密码比对
         * 参数3:盐,可以为空
         * 参数4:当前realm的名字
         */
        return new SimpleAuthenticationInfo("flk好帅", password,null, getName());
    }
}
3. 认证逻辑
doGetAuthenticationInfo(AuthenticationToken at) throws AuthenticationException {

        //假设数据库的用户名和密码
        String username = "aaa";
        String password = "123";

        //编写shiro判断逻辑,判断用户名和密码
        //1.判断用户名
        UsernamePasswordToken token = (UsernamePasswordToken)at;

        if(!token.getUsername().equals(username)){
            //用户名不存在
            return null;//shiro底层会抛出UnKnowAccountException
        }

        //2.判断密码
        /**
         *  对比密码
         * 参数1:主体对象,按需要传,登陆成功后该参数可通过SecurityUtils.getSubject().getPrincipal()获取。

         * 参数2:从对象中取密码,
         	users.getPassword()是这个用户的数据库中的密码 是用来和							authenticationToken里的密码比对

         * 参数3:盐,可以为空
         * 参数4:当前realm的名字
         */
        return new SimpleAuthenticationInfo("flk好帅", password,null, getName());
    }
启动,测试
- 先访问localhost:8080/hello

由于在shiro过滤器中添加了filterMap.put(“/hello”, “anon”);,所以无需认证(登录)就可以访问/hello
- 访问localhost:8080/test
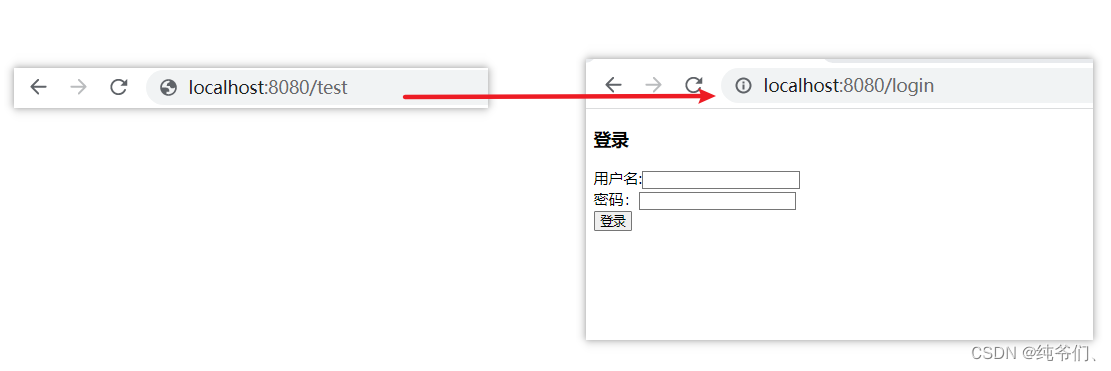
由于在shiro过滤器中添加了filterMap.put(“/**”, “authc”);,所以必须认证才可以访问/test,页面便跳转到登陆页面/login
- 输入正确的账号和密码
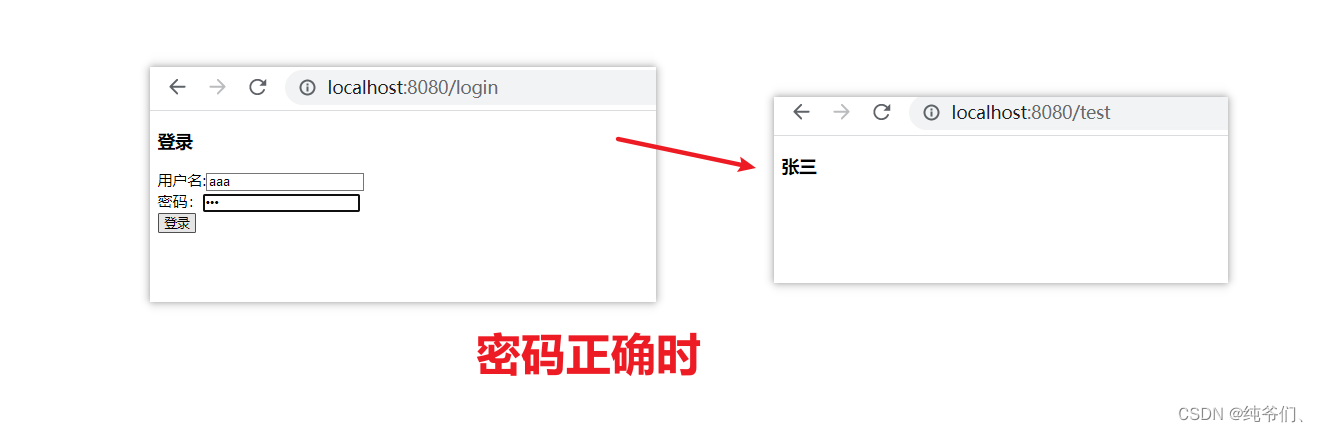
- 可以正常进入到test.html。
- 输入错误的账号或密码
控制台

账号或密码不正常,根据controller层的判断逻辑会跳转到登陆页面/login
五,Spring Boot整合MyBatis实现登录
导入mybatis相关的依赖
1. druid connector mybatis-spring
		<!-- 阿里数据库连接池 -->
        <dependency>
            <groupId>com.alibaba</groupId>
            <artifactId>druid-spring-boot-starter</artifactId>
            <version>1.2.15</version>
        </dependency>

        <!--  mysql      -->
        <dependency>
            <groupId>mysql</groupId>
            <artifactId>mysql-connector-java</artifactId>
        </dependency>

        <!-- SpringBoot的Mybatis启动器 -->
        <dependency>
            <groupId>org.mybatis.spring.boot</groupId>
            <artifactId>mybatis-spring-boot-starter</artifactId>
            <version>2.1.3</version>
        </dependency>
配置application.yml
driver-class type 包别名 Mapper.xml logging.level
在src/main/resources目录下创建application.yml文件,并添加配置
spring:
  datasource:
    driver-class-name: com.mysql.jdbc.Driver
    url: jdbc:mysql://localhost:3306/test
    username: root
    password: admin
    type: com.alibaba.druid.pool.DruidDataSource

# MyBatis
mybatis:
  # 搜索指定包别名
  type-aliases-package: com.example.domain
  # 配置mapper的扫描,找到所有的mapper.xml映射文件
  mapperLocations: classpath*:mapper/**/*Mapper.xml

# 日志配置
logging:
  level:
    com.example: debug
创建数据库,并创建表
- 表结构:
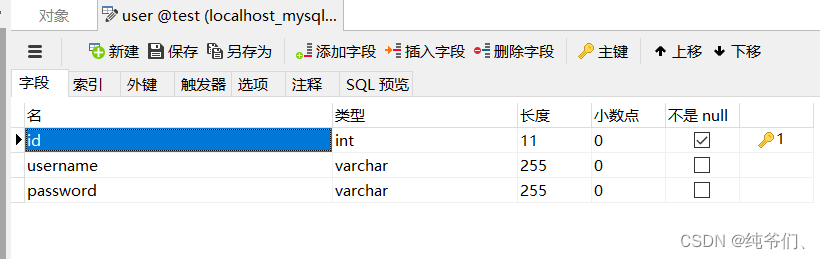
- 再插入一条数据:

添加User.java
package com.example.domain;

/**
 * @Description:User类
 */
public class User {
    private Integer id;
    private String username;
    private String password;

    public Integer getId() {
        return id;
    }

    public void setId(Integer id) {
        this.id = id;
    }

    public String getUsername() {
        return username;
    }

    public void setUsername(String username) {
        this.username = username;
    }

    public String getPassword() {
        return password;
    }

    public void setPassword(String password) {
        this.password = password;
    }
}
添加UserMapper.java
package com.example.mapper;

import com.example.domain.User;
import org.apache.ibatis.annotations.Param;
import org.springframework.stereotype.Repository;

/**
 * @Description:Usermapper
 */
public interface UserMapper {
    User findByUsername(@Param("username") String username);
}
添加UserMapper.xml
在src/main/resources/mapper目录下
<?xml version="1.0" encoding="UTF-8" ?>
<!DOCTYPE mapper
        PUBLIC "-//mybatis.org//DTD Mapper 3.0//EN"
        "http://mybatis.org/dtd/mybatis-3-mapper.dtd">

<mapper namespace="com.example.mapper.UserMapper">
    <select id="findByUsername" parameterType="string" resultType="user">
        SELECT 	id,
                  username,
                  password
        FROM
            user where username = #{username}
    </select>
</mapper>
添加Service层
- 接口
package com.example.service;

import com.example.domain.User;

/**
 * @Description:IUserService
 */
public interface IUserService {
	/**
     * 根据用户名查询用户
     * @param username 用户名
     * @return
     */
    User findByUsername (String username);
}
- 实现
package com.example.service.impl;

import com.example.domain.User;
import com.example.mapper.UserMapper;
import com.example.service.IUserService;
import org.springframework.beans.factory.annotation.Autowired;
import org.springframework.stereotype.Service;

/**
 * @Description:UserServiceImpl
 */
@Service
public class UserServiceImpl implements IUserService {
    @Autowired
    private UserMapper userMapper;

    @Override
    public User findByUsername(String username) {
        return userMapper.findByUsername(username);
    }
}
在启动类Application.java中添加@MapperScan注解
import org.mybatis.spring.annotation.MapperScan;

@SpringBootApplication
//@MapperScan指定要变成实现类的接口所在的包,然后包下面的所有接口在编译之后都会生成相应的实现类
@MapperScan("com.example.mapper")
public class Application { }
修改UserRealm中doGetAuthenticationInfo方法的认证逻辑
package com.example.shiro;

import com.example.domain.User;
import com.example.service.IUserService;
import org.apache.shiro.authc.*;
import org.apache.shiro.authz.AuthorizationInfo;
import org.apache.shiro.realm.AuthorizingRealm;
import org.apache.shiro.subject.PrincipalCollection;
import org.springframework.beans.factory.annotation.Autowired;

/**
 * @Description:自定义Realm 处理登录 权限
 */
public class UserRealm extends AuthorizingRealm {
    @Autowired
    private IUserService userService;

    /**
     * 执行授权逻辑
     */
    @Override
    protected AuthorizationInfo doGetAuthorizationInfo(PrincipalCollection principalCollection) {
        System.out.println("执行授权逻辑");
        return null;
    }
    /**
     * 执行认证逻辑
     */
    @Override
    protected AuthenticationInfo doGetAuthenticationInfo(AuthenticationToken authenticationToken) throws AuthenticationException {
        System.out.println("执行认证逻辑");

        //假设数据库的用户名和密码
//        String username = "aaa";
//        String password = "123";

        //编写shiro判断逻辑,判断用户名和密码
        //1.判断用户名
        UsernamePasswordToken token = (UsernamePasswordToken)authenticationToken;

        //从数据库中获取用户信息
        User user = userService.findByUsername(token.getUsername());

        if(user == null){
            //用户名不存在
            return null;//shiro底层会抛出UnKnowAccountException
        }

        //2.判断密码
        /**
         *  对比密码
         * 参数1:主体对象,按需要传,登陆成功后该参数可通过SecurityUtils.getSubject().getPrincipal()获取。
         * 参数2:从对象中取密码,users.getPassword()是这个用户的数据库中的密码 是用来和authenticationToken里的密码比对
         * 参数3:盐,可以为空
         * 参数4:当前realm的名字
         */
        return new SimpleAuthenticationInfo("flk好帅", user.getPassword(),null, getName());
    }
}
启动,测试
- 输入账号密码
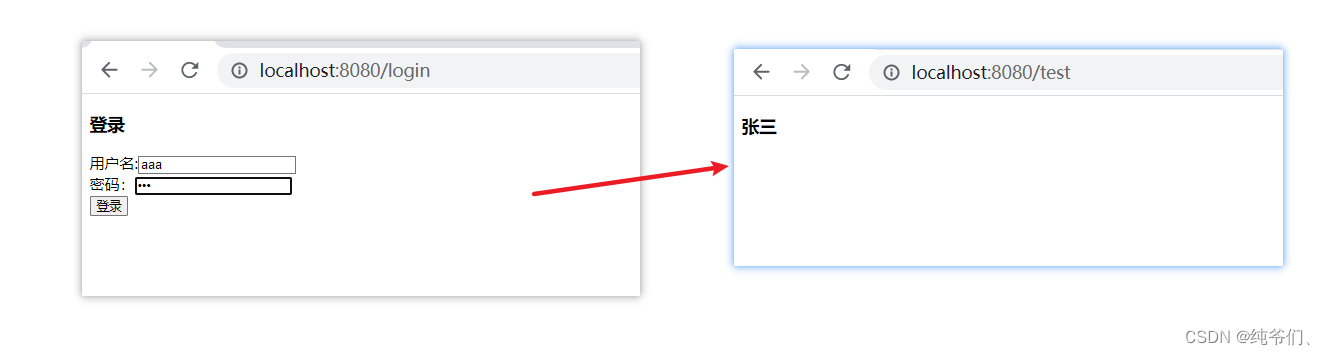
- 控制台成功打印日志

六,Spring Boot与Shiro整合实现用户授权
修改pom.xml starter-aop
- 添加aop依赖,方便开启shiro注解
- 必须添加,否则授权没用
		<dependency>
            <groupId>org.springframework.boot</groupId>
            <artifactId>spring-boot-starter-aop</artifactId>
        </dependency>
修改ShiroConfig.java
- 开启Shiro注解
    /**
     * 开启Shiro注解
     */
    @Bean
    public AuthorizationAttributeSourceAdvisor getAuthorizationAttributeSourceAdvisor(DefaultWebSecurityManager d) {

        AuthorizationAttributeSourceAdvisor a = new AuthorizationAttributeSourceAdvisor();

        a.setSecurityManager(d);

        return a;
    }
完善UserRealm的doGetAuthorizationInfo授权逻辑
/**
     * 执行授权逻辑
     */
    @Override
    protected AuthorizationInfo doGetAuthorizationInfo(PrincipalCollection principalCollection) {
        System.out.println("执行授权逻辑");
        //给资源进行授权
        SimpleAuthorizationInfo info = new SimpleAuthorizationInfo();

        //假设数据库的aaa用户的权限只有user:add
        info.addStringPermission("user:add");
        //info.addStringPermission("user:update");

        return info;
    }
添加两个页面
- 在src/main/resource目录下创建templates目录,然后创建add.html页面
<!DOCTYPE html>
<html lang="en">
<head>
    <meta charset="UTF-8">
    <title>add</title>
</head>
<body>
<h3>addPage</h3>
</body>
</html>
- 在src/main/resource目录下创建templates目录,然后创建update.html页面
<!DOCTYPE html>
<html lang="en">
<head>
    <meta charset="UTF-8">
    <title>update</title>
</head>
<body>
<h3>updatePage</h3>
</body>
</html>
修改test.html页面
- 添加add.html和update.html的跳转链接
<!DOCTYPE html>
<html lang="en">
<head>
    <meta charset="UTF-8">
    <title>Title</title>
</head>
<body>
    <h3 th:text="${name}"></h3>
    <div>
        进入添加页面: <a href="/add">添加</a><br/>
    </div>
    <div>
        进入更新功能: <a href="/update">更新</a><br/>
    </div>
</body>
</html>
修改TestController.java添加页面跳转方法
    /**
     * 添加页面跳转
     */
    //需要user:add权限才能访问
    @RequiresPermissions("user:add")
    @GetMapping("/add")
    public String add(){
        return "add";
    }

    /**
     * 添加页面跳转
     */
    //需要user:update权限才能访问
    @RequiresPermissions("user:update")
    @GetMapping("/update")
    public String update(){
        return "update";
    }
启动,测试
- 登陆成功后,进入add添加页面
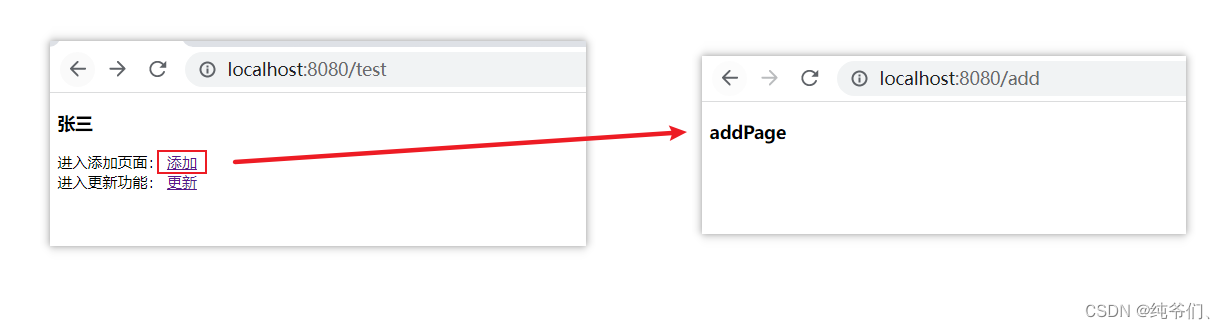
成功进入,因为它有user:add这个权限。
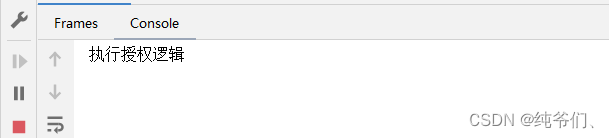
– 控制台打印:
登陆成功后,进入update更新页面
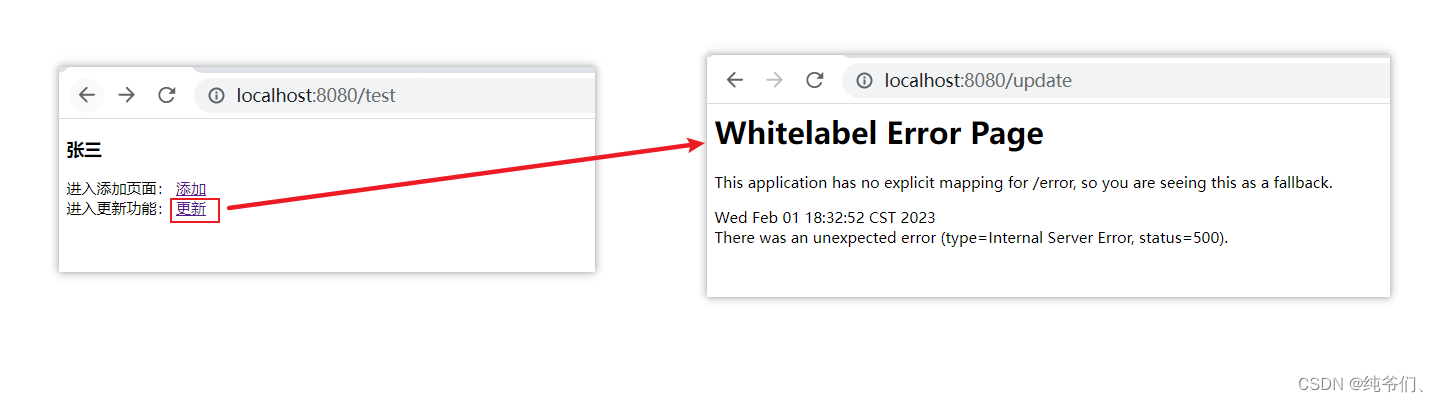
失败进入,因为它没有user:update这个权限。
– 控制台打印:

(后续可以做全局异常捕获跳转到提示页面,我这边没有去弄。。。)
2024-05-02 22:31:27.506 ERROR 108948 --- [nio-8080-exec-7] o.a.c.c.C.[.[.[/].[dispatcherServlet]    : Servlet.service() for servlet [dispatcherServlet] in context with path [] threw exception [Request processing failed; nested exception is org.apache.shiro.authz.UnauthorizedException: Subject does not have permission [user:update]] with root cause

org.apache.shiro.authz.AuthorizationException: Not authorized to invoke method: public java.lang.String com.example.controller.TestController.update()
全局异常处理
@RestControllerAdvice
public class ExceptionAdvice {
    @ExceptionHandler(UnauthorizedException.class)
    public String handlerUnauthorizedException() {
        System.out.println("执行了AuthenticationException");
        return "hahaha"; //这里用了模版,返回的是String,不会转为模版
    }
    //返回通用的:Result<?>
}
七,thymeleaf和shiro标签整合使用
修改pom.xml
添加thymeleaf与shiro的扩展
		<dependency>
            <groupId>com.github.theborakompanioni</groupId>
            <artifactId>thymeleaf-extras-shiro</artifactId>
            <version>2.0.0</version>
        </dependency>
修改ShiroConfig.java
配置ShiroDialect,用于thymeleaf和shiro标签配合使用
/**
     * 配置ShiroDialect,用于thymeleaf和shiro标签配合使用
     */
    @Bean
    public ShiroDialect getShiroDialect(){
        return new ShiroDialect();
    }
修改test.html页面
<!DOCTYPE html>
<html lang="en">
<head>
    <meta charset="UTF-8">
    <title>Title</title>
</head>
<body>
    <h3 th:text="${name}"></h3>
    <div shiro:hasPermission="user:add">
        进入添加页面: <a href="/add">添加</a><br/>
    </div>
    <div shiro:hasPermission="user:update">
        进入更新功能: <a href="/update">更新</a><br/>
    </div>
</body>
</html>
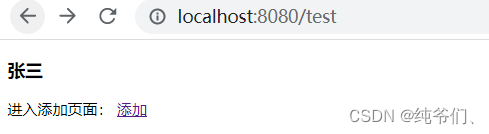
启动,测试
- 登陆成功后,没有权限的标签就看不见啦~


 663
663

 被折叠的 条评论
为什么被折叠?
被折叠的 条评论
为什么被折叠?
 到【灌水乐园】发言


