


在开始之前,本片文章使用得是Rxjava和retrofit结合,介绍的文件的上传和下载的实现,如果还不太了解和使用Rxjava和Retrofit的基本使用的同学,可以先了解完这部分内容以后,在阅读本篇文章。
#retrofit的注解字段的介绍和使用:
1.@GET请求的参数解析:标记是GET请求。
    /**
     * 首页Banner
     * http://www.wanandroid.com/banner/json
     * @return BannerResponse
     */
    @GET("/banner/json")
    Observable<DataResponse<List<Banner>>> getHomeBanners();
#####1.1@query 封装GET请求参数的字段
    /**
     * 知识体系下的文章
     * http://www.wanandroid.com/article/list/json?cid=168
     *
     * @param page page
     * @param cid  cid
     */
    @GET("/article/list/json")
    Observable<DataResponse<Article>> getKnowledgeSystemArticles( @Query("cid") int cid);
1.2 @queryMap 和 @ Query的使用一样,只是当参数不固定或者参数比较多的时候调用
   @GET("/friend/json")
    Observable<DataResponse<Article>> getFile(@QueryMap Map<String,String> params);
调用处的代码:
Map<String,String> options = new HashMap<String,String>();
options.put("name",trainName);
options.put("key",KEY);
Call<Movie> movie = service.getFile(options);
1.3 @Path:url中的占位符,相当于动态的改变url, 当然别掉了{}将动态的配置参数包起来.
    /**
     * 搜索
     * http://www.wanandroid.com/article/query/0/json
     *
     * @param page page
     * @param k    POST search key
     */
    @POST("/article/query/{page}/json")
    @FormUrlEncoded
    Observable<DataResponse<Article>> getSearchArticles(@Path("page") int page, @Field("k") String k);
2.@POST请求的参数解析
2.1@FormUrlEncoded
在post请求中配置该参数,说明该请求将表单的形式传递参数,它不能用于get请求。
@FormUrlEncoded将会自动将请求参数的类型调整为application/x-www-form-urlencoded,假如content传递的参数为Good Luck,那么最后得到的请求体就是
content=Good+Luck
FormUrlEncoded不能用于Get请求
2.2 @Field标记POST请求中,键值对参数的key,例:username,和password,当调用的loing()方法时,自动封装到请求参数中
@Field注解将每一个请求参数都存放至请求体中,还可以添加encoded参数,该参数为boolean型,具体的用法为
@Field(value = "book", encoded = true) String book
encoded参数为true的话,key-value-pair将会被编码,即将中文和特殊字符进行编码转换
    /**
     * 登录
     *
     * @param username username
     * @param password password
     * @return Deferred<User>
     */
    @POST("/user/login")
    @FormUrlEncoded
    Observable<DataResponse<User>> login(@Field("username") String username, @Field("password") String password);
2.3 @FiledMap:这个跟Field差不多,将所有的参数用Map的方式进行传递
@FormUrlEncoded
@POST("voice")
Call<Vioce> sendVoiceMessage(@FieldMap Map<String,String> options);
调用处的代码:
Map<String,String> options = new HashMap<String,String>();
options.put("valicode","123456");
options.put("to","18772351259");
options.put("key",voice_KEY);
Call<Vioce> voice = service.sendVoiceMessage(options);
####2.4 @Body :将所有的参数封住到一个自定义的对象,如果参数过多,统一封装到类中应该会更好,便于维护代码。
@FormUrlEncoded
@POST("voice")
Call<Vioce> sendVoiceMessage(@Body AddParams params);

public class AddParams{
    String valicode;
    String to;
    String key;

    public void setKey(String key) {
        this.key = key;
    }

    public void setTo(String to) {
        this.to = to;
    }

    public void setValicode(String valicode) {
        this.valicode = valicode;
    }
3、(单、多)文件上传实现及参数解析
3.1 @Part:配合@Multipart用于文件上传
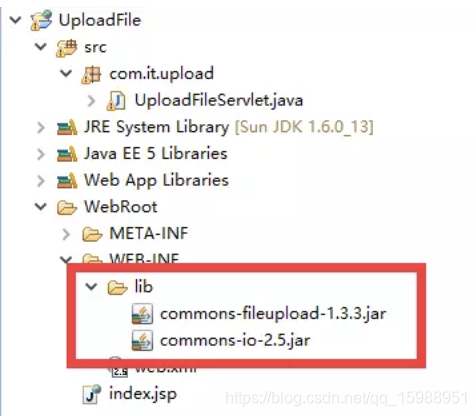
在介绍文件上传之前,为了一些比较喜欢骚动的同学,我也贴出java后台的接受代码,方便我们更好的理解文件上传的详细过程。也方便后面的介绍。但是这个Servlet需要借助2个jar包。
public class UploadFileServlet extends HttpServlet {
public void doGet(HttpServletRequest request, HttpServletResponse response)
throws ServletException, IOException {
response.getWriter().write("this is the post request! ");
}
public void doPost(HttpServletRequest request, HttpServletResponse response)
throws ServletException, IOException {
response.setContentType("text/html");
PrintWriter out = response.getWriter();
// 创建文件项目工厂对象
DiskFileItemFactory factory = new DiskFileItemFactory();
// 设置文件上传路径
String upload = "f:";
// 获取系统默认的临时文件保存路径,该路径为Tomcat根目录下的temp文件夹
String temp = System.getProperty("java.io.tmpdir");
// 设置缓冲区大小为 5M
factory.setSizeThreshold(1024 * 1024 * 5);
// 设置临时文件夹为temp
factory.setRepository(new File(temp));
// 用工厂实例化上传组件,ServletFileUpload 用来解析文件上传请求
ServletFileUpload servletFileUpload = new ServletFileUpload(factory);
// 解析结果放在List中
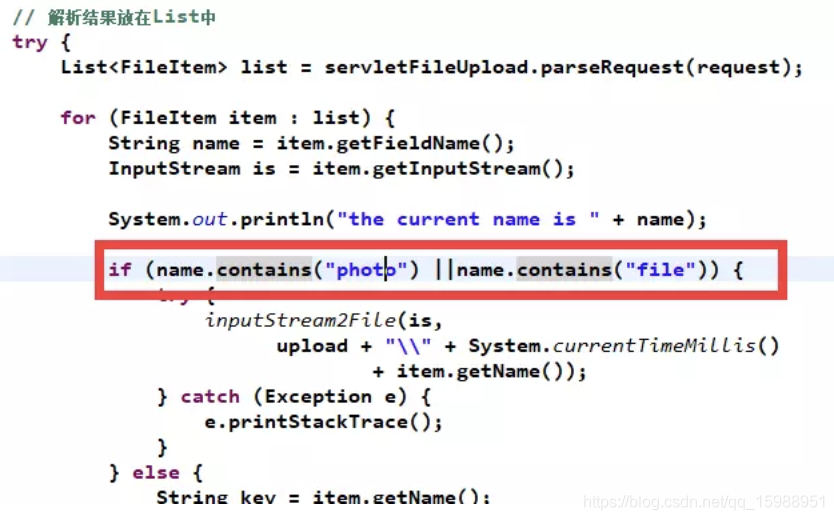
try {
List<FileItem> list = servletFileUpload.parseRequest(request);
for (FileItem item : list) {
String name = item.getFieldName();
InputStream is = item.getInputStream();
System.out.println("the current name is " + name);
if (name.contains("photo") ||name.contains("file")) {
try {
inputStream2File(is,
upload + "\\" + System.currentTimeMillis()
+ item.getName());
} catch (Exception e) {
e.printStackTrace();
}
} else {
String key = item.getName();
String value = item.getString();
// System.out.println(value );
// System.out.println(key + "---" + value);
}
}
out.write("success");
} catch (FileUploadException e) {
e.printStackTrace();
out.write("failure");
}
out.flush();
out.close();
}
// 流转化成字符串
public static String inputStream2String(InputStream is) throws IOException {
ByteArrayOutputStream baos = new ByteArrayOutputStream();
int i = -1;
while ((i = is.read()) != -1) {
baos.write(i);
}
return baos.toString();
}
// 流转化成文件
public static void inputStream2File(InputStream is, String savePath)
throws Exception {
System.out.println("the file path is :" + savePath);
File file = new File(savePath);
InputStream inputSteam = is;
BufferedInputStream fis = new BufferedInputStream(inputSteam);
FileOutputStream fos = new FileOutputStream(file);
int f;
while ((f = fis.read()) != -1) {
fos.write(f);
}
fos.flush();
fos.close();
fis.close();
inputSteam.close();
}
}
    @Multipart
    @POST("UploadServlet")
    Call<ResponseBody> upLoadPrefectFile( @Part("description") RequestBody description,@Part MultipartBody.Part file);
在Activity中的代码:
        final RequestBody requestBody = createPartFromString("this is des!");
        retrofit2.Call call = RetrofitHelper.getUpLoadFileAPI().upLoadPrefectFile(requestBody, prepareFilePart(new File("/sdcard/1.zip"), "file"));
        call.enqueue(new retrofit2.Callback() {
            @Override
            public void onResponse(retrofit2.Call call, retrofit2.Response response) {

                String s = response.body().toString();
                String s1 = response.message().toString();
                Log.d("TAG", "onResponse: " + s1);
                Toast.makeText(TestUploadFileActivity.this, "上传成功!" + s, Toast.LENGTH_SHORT).show();
            }

            @Override
            public void onFailure(retrofit2.Call call, Throwable t) {

                String s = t.getMessage().toString();
                Log.d(TAG, s);
                Toast.makeText(TestUploadFileActivity.this, "上传失败!" + s, Toast.LENGTH_SHORT).show();
            }
        });
在上面的代码中出现了,我们也贴出该方法的代码:
   @NonNull
    private MultipartBody.Part prepareFilePart(File file, String partName) {

        // 为file建立RequestBody实例
        RequestBody requestFile =
                RequestBody.create(MediaType.parse(MULTIPART_FORM_DATA), file);

        // MultipartBody.Part借助文件名完成最终的上传
        return MultipartBody.Part.createFormData(partName, file.getName(), requestFile);
    }
这里解释一下 MultipartBody.Part.createFormData()方法的使用和参数说明。第一个参数partName为与后台协调的进行文件检索的名称,也可以这样理解,如果是txt文件,我们标记为txt,如果是照片,标记为jpg,其他文件标记为file,方便后台管理和存储文件。
我们在看看partName在后台是如何进行区分和使用的?
根据检索出不同的文件类型,进行不同的操作。
3.1.1了解 multipart/form-data
我们这里这是简单的介绍一下:
RequestBody requestFile =
RequestBody.create(MediaType.parse(“multipart/form-data”), file);
这里在看看我们构建RequestBody的代码:这里参数至于为什么使用MediaType.parse(“multipart/form-data”),需要我们了解http的传输协议:
在最初的http协议中,没有定义上传文件的Method,为了实现这个功能,http协议组改造了post请求,添加了一种post规范,设定这种规范的Content-Type为multipart/form-data;boundary=bound,其中{bound}是定义的分隔符,用于分割各项内容(文件,key-value对),不然服务器无法正确识别各项内容。post body里需要用到,尽量保证随机唯一。
3.1.2 post格式如下:
–${bound}
Content-Disposition: form-data; name=”Filename”

HTTP.pdf
–${bound}
Content-Disposition: form-data; name=”file000”; filename=”HTTP协议详解.pdf”
Content-Type: application/octet-stream

%PDF-1.5
file content
%%EOF

–${bound}
Content-Disposition: form-data; name=”Upload”

Submit Query
–${bound}–
${bound}是Content-Type里boundary的值
#####3.1.3 Retrofit2 对multipart/form-data的封装
Retrofit其实是个网络代理框架,负责封装请求,然后把请求分发给http协议具体实现者-httpclient。retrofit默认的httpclient是okhttp。
既然Retrofit不实现http,为啥还用它呢。因为他方便!!
Retrofit会根据注解封装网络请求,待httpclient请求完成后,把原始response内容通过转化器(converter)转化成我们需要的对象(object)。
具体怎么使用 retrofit2,请参考: Retrofit2官网
那么Retrofit和okhttp怎么封装这些multipart/form-data上传数据呢
在retrofit中:
@retrofit2.http.Multipart: 标记一个请求是multipart/form-data类型,需要和@retrofit2.http.POST一同使用,并且方法参数必须是@retrofit2.http.Part注解。
@retrofit2.http.Part: 代表Multipart里的一项数据,即用${bound}分隔的内容块。
在okhttp3中:
okhttp3.MultipartBody: multipart/form-data的抽象封装,继承okhttp3.RequestBody
okhttp3.MultipartBody.Part: multipart/form-data里的一项数据。
以上内容摘自 一叶扁舟的博客
3.2 多文件上传:(2种方式:)
3.2.1 第一种是方式:文件个数固定
    @Multipart
    @POST("UploadServlet")
    Call<ResponseBody> uploadMultipleFiles(
            @Part("description") RequestBody description,
            @Part MultipartBody.Part file1,
            @Part MultipartBody.Part file2);
3.2.2 第二种是方式:文件个数不固定
    @Multipart
    @POST("UploadServlet")
    Call<ResponseBody> uploadMapFile(@PartMap Map<String, RequestBody> params);
这里我们只展示文件个数不固定的上传方法的使用:
        File file=new File("/sdcard/img.jpg");
        File file1=new File("/sdcard/ic.jpg");
        File file2=new File("/sdcard/1.txt");

        RequestBody requestBody = RequestBody.create(MediaType.parse("multipart/form-data"), file);
        RequestBody requestBody1 = RequestBody.create(MediaType.parse("multipart/form-data"), file1);
        RequestBody requestBody2 = RequestBody.create(MediaType.parse("multipart/form-data"), file2);

        Map<String, RequestBody> params=new HashMap<>() ;
        params.put("file\"; filename=\""+ file.getName(), requestBody);
        params.put("file\"; filename=\""+ file1.getName(), requestBody1);
        params.put("file\"; filename=\""+ file2.getName(), requestBody2);

        retrofit2.Call call = RetrofitHelper.getUpLoadFileAPI().uploadMapFile(params);
        call.enqueue(new retrofit2.Callback() {
            @Override
            public void onResponse(retrofit2.Call call, retrofit2.Response response) {
                Toast.makeText(TestUploadFileActivity.this, "上传成功!", Toast.LENGTH_SHORT).show();
            }

            @Override
            public void onFailure(retrofit2.Call call, Throwable t) {
                Log.d("Tag",t.getMessage().toString());
                Toast.makeText(TestUploadFileActivity.this, "上传失败!", Toast.LENGTH_SHORT).show();
            }
        });
4、文件的下载
我们都实现了文件的上传了,还不能坚持一下,把文件下载搞定?那必须的必啊!下载文件其实就一个普通的GET 请求,只不过我们处理好IO操作,将response.body()进行保存为自己想要的位置或者处理。
    @GET("u=107188706,3427188039&fm=27&gp=0.jpg")
    Call<ResponseBody> downloadFile();
Activity中的使用:
                Call<ResponseBody> call = RetrofitHelper.getDownloadApi().downloadFile();
                call.enqueue(new Callback<ResponseBody>() {
                    @Override
                    public void onResponse(Call<ResponseBody> call, Response<ResponseBody> response) {
                        boolean writtenToDisk = writeResponseBodyToDisk(response.body());

                        btnDownload.setText(writtenToDisk ? "success" : "false");
                    }

                    @Override
                    public void onFailure(Call<ResponseBody> call, Throwable t) {
                        Toast.makeText(TestUploadFileActivity.this, "fail", Toast.LENGTH_SHORT).show();
                    }
                });
writeResponseBodyToDisk()方法的具体实现:
 private boolean writeResponseBodyToDisk(ResponseBody body) {
        try {
            // todo change the file location/name according to your needs
            File futureStudioIconFile = new File(Environment.getExternalStorageDirectory() + File.separator + "taylor.png");

            Log.d(TAG, "writeResponseBodyToDisk: " + Environment.getExternalStorageDirectory().getAbsolutePath());

            InputStream inputStream = null;
            OutputStream outputStream = null;

            try {
                byte[] fileReader = new byte[4096];

                long fileSize = body.contentLength();
                long fileSizeDownloaded = 0;

                inputStream = body.byteStream();
                outputStream = new FileOutputStream(futureStudioIconFile);

                while (true) {
                    int read = inputStream.read(fileReader);

                    if (read == -1) {
                        break;
                    }

                    outputStream.write(fileReader, 0, read);

                    fileSizeDownloaded += read;

                    Log.d(TAG, "file download: " + fileSizeDownloaded + " of " + fileSize);
                }

                outputStream.flush();

                return true;
            } catch (IOException e) {
                return false;
            } finally {
                if (inputStream != null) {
                    inputStream.close();
                }

                if (outputStream != null) {
                    outputStream.close();
                }
            }
        } catch (IOException e) {
            return false;
        }
    }
5、其他细节问题总结
5.1 @Header:添加http header
@GET("user")
Call<User> getUser(@Header("Authorization") String authorization);
等同于:
@Headers("Authorization: authorization")//这里authorization就是上面方法里传进来变量的值
@GET("widget/list")
Call<User> getUser()
5.2为某个请求设置完整的URL
假如说你的某一个请求不是以baseUrl开头该怎么办呢?别着急,办法很简单,看下面这个例子你就懂了
public interface BlueService {
    @GET
    public Call<ResponseBody> profilePicture(@Url String url);
}

Retrofit retrofit = Retrofit.Builder()
    .baseUrl("https://your.api.url/");
    .build();

BlueService service = retrofit.create(BlueService.class);
service.profilePicture("https://s3.amazon.com/profile-picture/path");
还有一些添加Header的具体的用法:
Header


 1万+
1万+


 被折叠的 条评论
为什么被折叠?
被折叠的 条评论
为什么被折叠?
 到【灌水乐园】发言


