


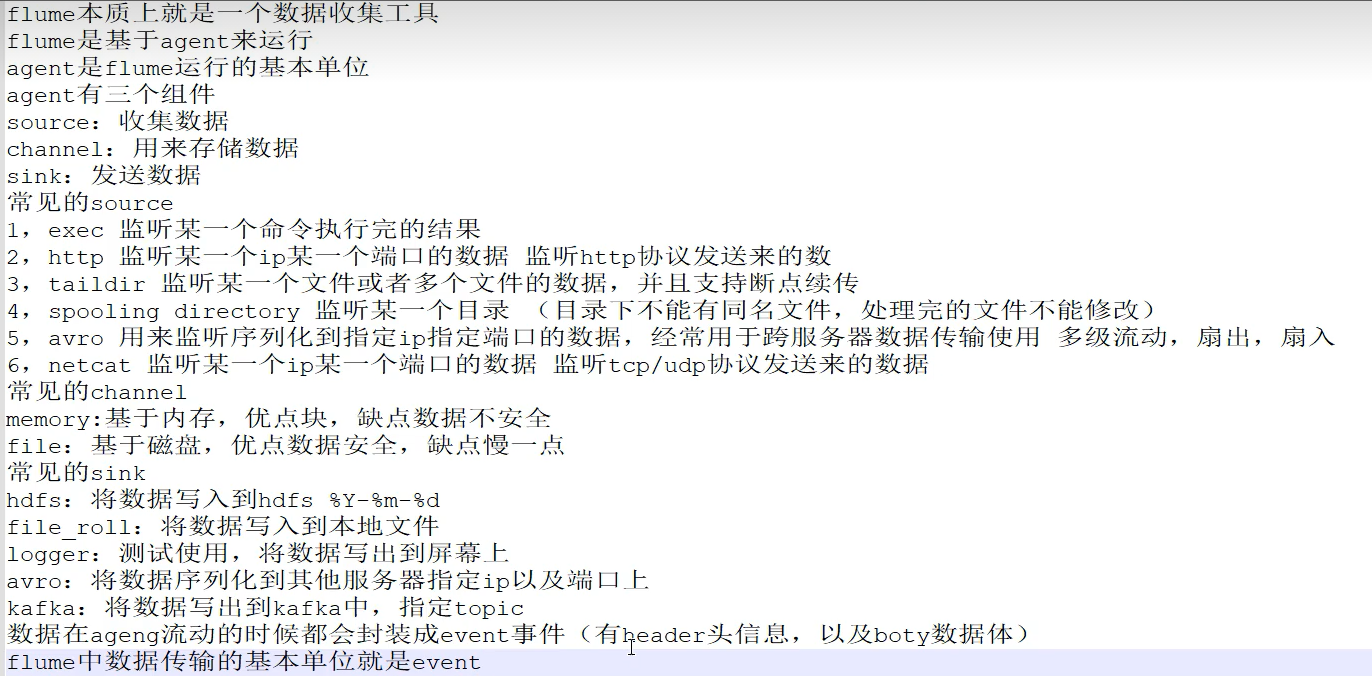
1、Flume介绍
三大组件:Source、Channel、Sink
Source:
从Client上收集数据并对数据进行格式化,以Event(事件)的形式传递给单个或者多个Event
Channel:
短暂的存储容器,将从Source接收到的Event进行缓存直接被Sink消费掉,Channel是Source和Sink之间的桥梁,Channel是一个完整的事务,能保证了数据在收发时的一致性,并且一个Channel可以同时和任意数量的Source和Sink建立连接。
Sink:
从Channel中消费数据(Event)并传递到存储容器(Hbase、HDFS)或其他的Source中。
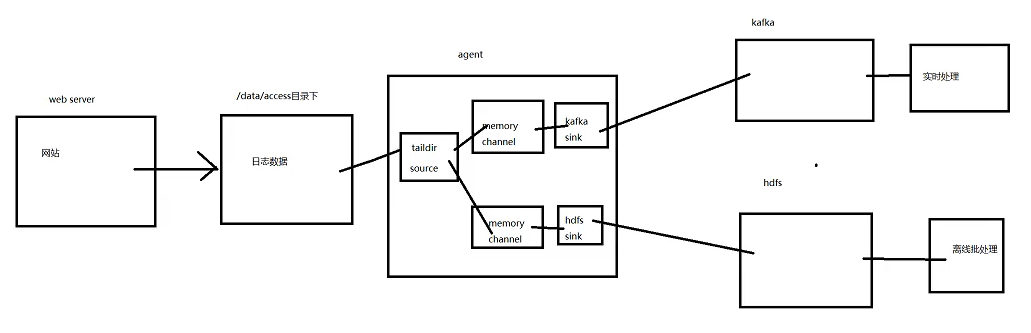
工作流程:
把数据从数据源(Source)收集过来,在将收集到的数据送到指定的目的地(Sink)
为了保证输送过程一定成功,在送到目的地(Sink)之前,会先缓存数据(Channel),待数据真正到达目的地(Sink)后,flume在删除自己缓存的数据。
什么是Event?
- event将传输的数据进行封装,是flume传输数据的基本单位,如果是文本文件,通常是一行记录。
- event也是事务的基本单位
- event从source,流向channel,再到sink,本身为一个字节数组,并可以携带headers信息。
Agent
Flume以Agent最小的独立运行单元,Agent依赖于JVM,一个Agent的运行伴随一个JVM实例的产生。
一台机器可以运行多个Agent,一个Agent中可以包含多个Source、channel、sink。
1.1、Source组件
| 常用的source类型 | 描述 |
| Avro Source | 监听Avro端口并且以外部Avro客户端接受Event,需指定被监听IP和端口号 |
| Exec Source | 可以通过指定的Linux操作命令对日志进行读取,使用exec时需指定使用的命令 |
| Spooling Directory Source | 读取目录里的文件,当出现新文件时会读取该文件并获取数据(文件在读取过程中不能修改) |
| NetCat Source | 监听指定的端口并将接收到的数据每一行转换为一个事件 |
| Kafka Source | 作为消费者,从Kafka的topic读取消息 |
| Http Source | 接受Http的GET和POST请求作为Flume的事件 |
| Taildir Source | 监控目录里的正则匹配文件,并支持断点续传 |
1.2、Channel组件
| 常用的Channel类型 | 描述 |
| Memory Channel | 存储Event在内存队列中,如果宕机可能会造成数据的丢失,具有很高的吞吐量 |
| JDBC Channel | 将Event存储在持久化的数据库中 |
| Kafka Channel | 将Event存储在Kafka中,Kafka提供了高可用和复制性,当Kafka或Agent崩溃时数据也不会丢失 |
| File Channel | 将Event持久化在本地文件系统里(性能较差)但可以保证数据不会丢失 |
| Spillable Memory Channel | Event数据存储在内存和磁盘上,当内存队列满了将会持久化到磁盘文件 |
1.3、Sink组件
| 常用的sink类型 | 描述 |
| Logger sink | 将数据写到Flume的log中,通常用于测试或调试 |
| Avro sink | 将数据发送到其他Avri source |
| File Roll Sink | 将数据放到本地文件系统中,根据时间或者大小生成文件 |
| Kafka Sink | 将文件写入Kafka中 |
| HBase Sink | 将数据写入HBase中 |
| AsyncHBase Sink | 使用异步的方式将数据写入HBase |
| Hive Sink | 将数据写入Hive |
| HDFS Sink | 将数据写入HDFS |
| ElasticSearch Sink | 将数据写入ElasticSearch |
| MorphlineSolr Sink | 将数据吸入Solr |
2、安装Flume
2.1、先安装jdk
2.2、安装flume
配置flume运行大小
cd /usr/local/flume/conf
cp flume-env.sh.template flume-env.sh
vim flume-env.sh
export JAVA_OPTS="-Xms512m -Xmx1024m -Dcom.sum.management.jmxremote"
2.3、编写flume
a1.sources=r1
a1.sinks=k1
a1.channels=c1

#定义source
a1.sources.r1.type=netcat
a1.sources.r1.bind=linux-27309
a1.soruces.r1.port=44444

#定义channel
a1.channels.c1.type=memory
a1.channels.c1.capacity=10000
a1.channels.c1.transactionCapacity = 100

#定义sink
a1.sinks.k1.type=logger

#绑定
a1.sources.r1.channels=c1
a1.sinks.k1.channel=c1
2.4、运行flume
flume-ng agent -n a1 -c /usr/local/flume/conf/ -f ./demo.agent -Dflume.root.logger=INFO,console2.5、测试
telnet localhost 44444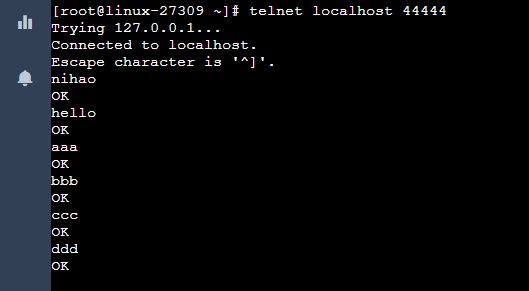
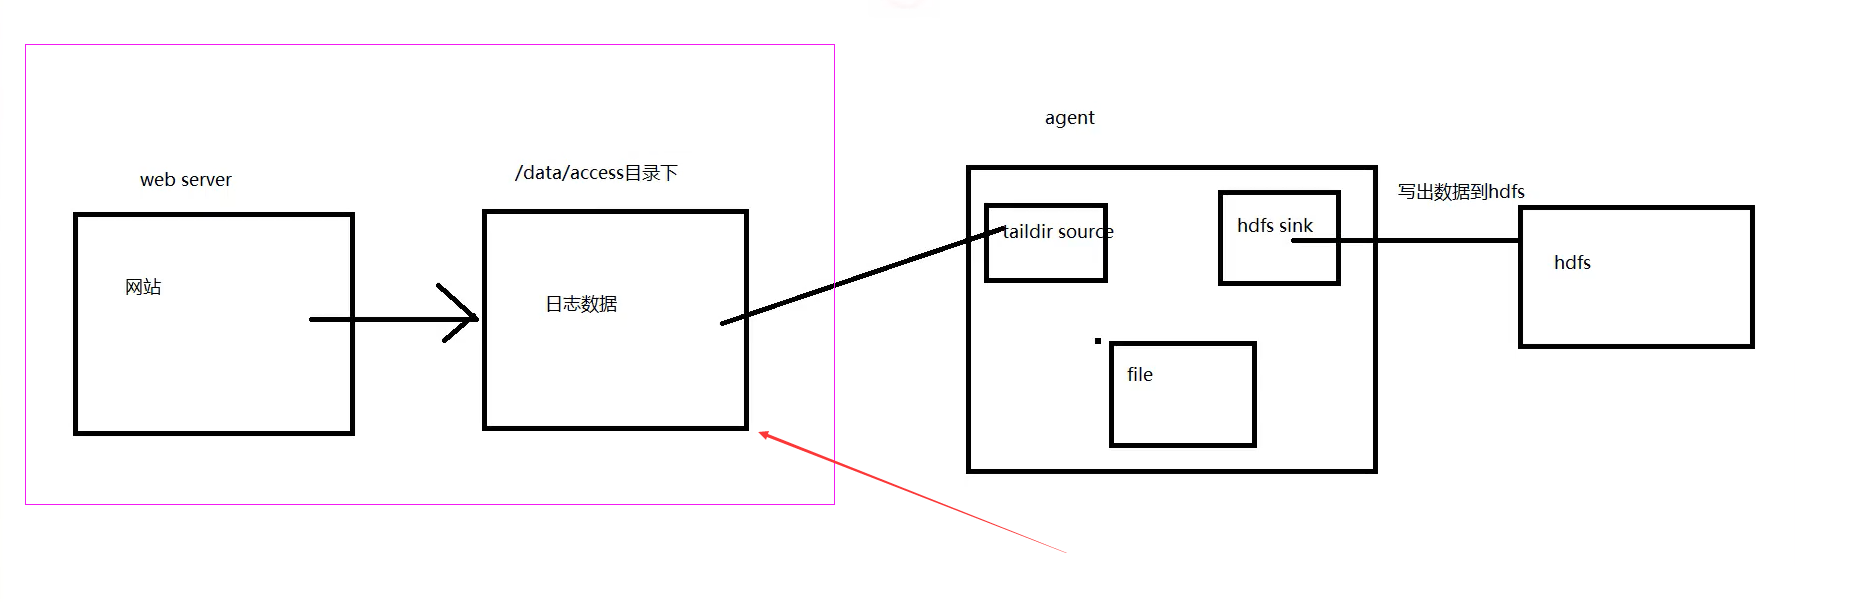
3、实战Flume收集数据到hdfs
要求:数据采集
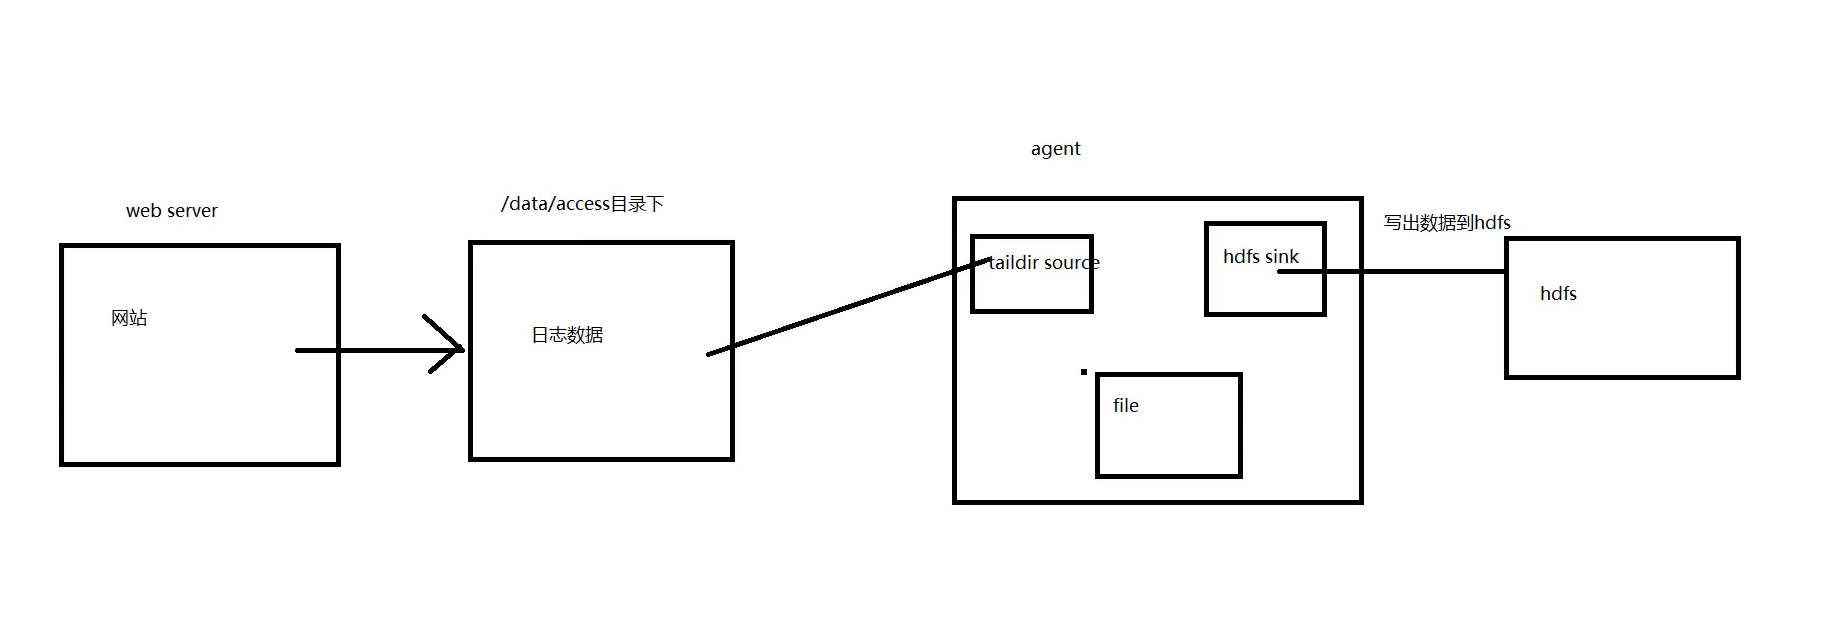
通过nginx先记录用户访问数据
3.1、安装nginx
(1)解压nginx压缩包
tar -zxvf nginx-1.22.1.tar.gz -C /usr/local/(2)到nginx目录下的configure编译
./configure(3)安装
make && make install(4)配置nginx的conf文件
#user  nobody;
worker_processes  1;

#error_log  logs/error.log;
#error_log  logs/error.log  notice;
#error_log  logs/error.log  info;

#pid        logs/nginx.pid;


events {
    worker_connections  1024;
}


http {
    include       mime.types;
    default_type  application/octet-stream;

    log_format  main  '$remote_addr - $remote_user [$time_local] "$request" '
                      '$status $body_bytes_sent "$http_referer" '
                      '"$http_user_agent" "$http_x_forwarded_for"';

    access_log  /data/access/access.log  main; ## 配置日志记录的位置

    sendfile        on;
    #tcp_nopush     on;

    #keepalive_timeout  0;
    keepalive_timeout  65;

    #gzip  on;

    server {
        listen       80;
        server_name  localhost;

        #charset koi8-r;

        #access_log  logs/host.access.log  main;

        location / {
            root   html;
            index  index.html index.htm;
        }

        #error_page  404              /404.html;

        # redirect server error pages to the static page /50x.html
        #
        error_page   500 502 503 504  /50x.html;
        location = /50x.html {
            root   html;
        }

        # proxy the PHP scripts to Apache listening on 127.0.0.1:80
        #
        #location ~ \.php$ {
        #    proxy_pass   http://127.0.0.1;
        #}

        # pass the PHP scripts to FastCGI server listening on 127.0.0.1:9000
        #
        #location ~ \.php$ {
        #    root           html;
        #    fastcgi_pass   127.0.0.1:9000;
        #    fastcgi_index  index.php;
        #    fastcgi_param  SCRIPT_FILENAME  /scripts$fastcgi_script_name;
        #    include        fastcgi_params;
        #}

        # deny access to .htaccess files, if Apache's document root
        # concurs with nginx's one
        #
        #location ~ /\.ht {
        #    deny  all;
        #}
    }


    # another virtual host using mix of IP-, name-, and port-based configuration
    #
    #server {
    #    listen       8000;
    #    listen       somename:8080;
    #    server_name  somename  alias  another.alias;

    #    location / {
    #        root   html;
    #        index  index.html index.htm;
    #    }
    #}


    # HTTPS server
    #
    #server {
    #    listen       443 ssl;
    #    server_name  localhost;

    #    ssl_certificate      cert.pem;
    #    ssl_certificate_key  cert.key;

    #    ssl_session_cache    shared:SSL:1m;
    #    ssl_session_timeout  5m;

    #    ssl_ciphers  HIGH:!aNULL:!MD5;
    #    ssl_prefer_server_ciphers  on;

    #    location / {
    #        root   html;
    #        index  index.html index.htm;
    #    }
    #}

}
(5)到nginx的sbin目录下启动nginx
./nginx3.2、安装hadoop
tar -zxvf hadoop-2.7.3.tar.gz -C /opt3.3、启动flume
(1)编写agent
a1.sources=r1
a1.sinks=k1
a1.channels=c1


a1.sources.r1.type=taildir
a1.sources.r1.positionFile=/data/flume/taildir_position.json
a1.sources.r1.filegroups=f1
a1.sources.r1.filegroups.f1=/data/access/access.log
a1.sources.r1.interceptors=i1
a1.sources.r1.interceptors.i1.type=timestamp

a1.channels.c1.type=memory
a1.channels.c1.capacity=10000
a1.channels.c1.transactionCapacity=100

a1.sinks.k1.type=hdfs
a1.sinks.k1.hdfs.path=/data/hainiu/access_log/%Y/%m%d
a1.sinks.k1.hdfs.rollInterval=300
a1.sinks.k1.hdfs.rollSize=0
a1.sinks.k1.hdfs.rollCount=0
a1.sinks.k1.hdfs.filePrefix=access_%Y%m%d
a1.sinks.k1.hdfs.fileSuffix=.log.snappy
a1.sinks.k1.hdfs.fileType=CompressedStream
a1.sinks.k1.hdfs.codeC=snappy

a1.sources.r1.channels=c1
a1.sinks.k1.channel=c1
(2)启动agent
flume-ng agent -n a1 -c /usr/local/flume/conf/ -f ./access.agent -Dflume.root.logger=INFO,console4、实战Flume收集数据到Kafka
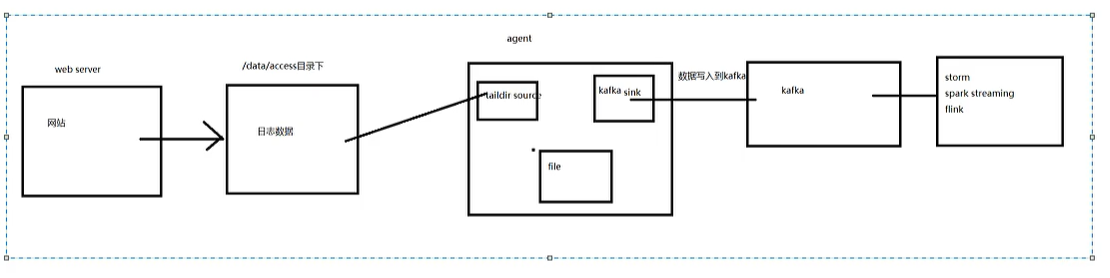
(1)配置agent
kafka.agent
a1.sources=r1
a1.sinks=k1
a1.channels=c1


a1.sources.r1.type=TAILDIR
a1.sources.r1.positionFile=/data/flume/data/taildir_position_access.json
a1.sources.r1.filegroups=f1
a1.sources.r1.filegroups.f1=/data/access/access.log


a1.channels.c1.type=memory
a1.channels.c1.capacity=10000
a1.channels.c1.transactionCapacity=100


a1.sinks.k1.type=org.apache.flume.sink.kafka.KafkaSink
a1.sinks.k1.kafka.bootstrap.servers=kafka1-52837:9092
a1.sinks.k1.kafka.topic=access

a1.sources.r1.channels=c1
a1.sinks.k1.channel=c1
(2)启动nginx
(3)启动flume
flume-ng agent -n a1 -c /usr/local/flume/conf/ -f ./kafka.agent -Dflume.root.logger=INFO,console(4)启动kafka消费者
kafka-console-consumer.sh --bootstrap-server kafka1-52837:9092 --topic access5、实战Flume收集数据到hdfs和kafka
(1)启动kafka
kafka-console-consumer.sh --bootstrap-server kafka1-52837:9092 --topic accesscomplex(2)编写accesscomplex的agent
accesscomplex.agent
a1.sources=r1
a1.channels=c1 c2
a1.sinks=k1 k2

a1.sources.r1.type=taildir
a1.sources.r1.positionFile=/data/flume/position.json
a1.sources.r1.filegroups=f1
a1.sources.r1.filegroups.f1=/data/access/access.log
a1.sources.r1.interceptors=i1
a1.sources.r1.interceptors.i1.type.timestamp=true

a1.channels.c1.type=memory
a1.channels.c1.capacity=10000
a1.channels.c1.transactionCapacity=100

a1.sinks.k1.type=hdfs
a1.sinks.k1.hdfs.path=/data/hainiu/access_log/%Y/%m%d
a1.sinks.k1.hdfs.rollInterval=300
a1.sinks.k1.hdfs.rollSize=0
a1.sinks.k1.hdfs.rollCount=0
a1.sinks.k1.hdfs.filePrefix=access_%Y%m%d
a1.sinks.k1.hdfs.fileSuffix=.log.snappy
a1.sinks.k1.hdfs.fileType=CompressedStream
a1.sinks.k1.hdfs.codeC=snappy

a1.sinks.k2.type=org.apache.flume.sink.kafka.KafkaSink
a1.sinks.k2.kafka.bootstrap.servers=kafka1-52837:9092
a1.sinks.k2.kafka.topic=accesscomplex

a1.sources.r1.channels=c1 c2
a1.sinks.k1.channel=c1
a1.sinks.k2.channel=c2
(3)重启nginx
/usr/local/nginx/sbin/nginx -s reload6、扩展
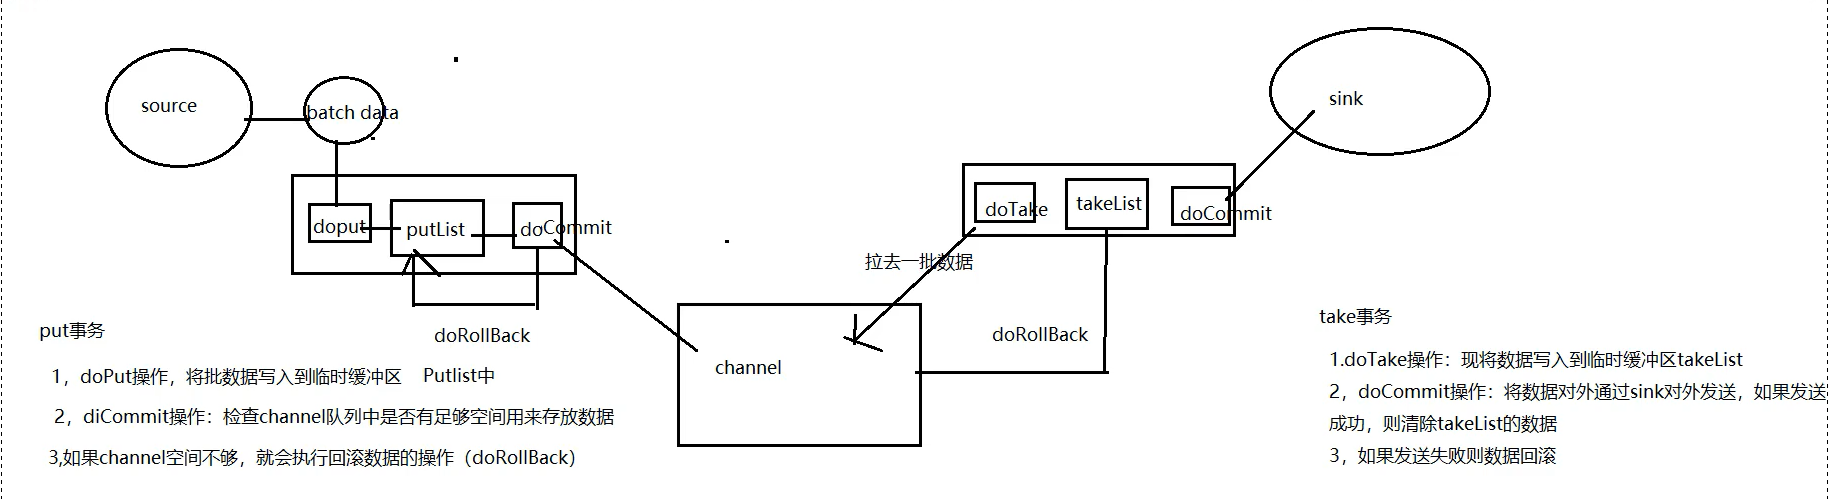
一、put事务
1、doPut操作,将批数据写入到临时缓存区,Putlist中
2、doCommit操作:检查channel队列中是否有足够空间用来存放数据
3、如果channel空间不够,就会执行回滚数据的操作(doRollBack)
二、take事务
1、doTake操作,将数据写入临时缓存区,Takelist中
2、doCommit操作:将数据对外通过sink对外发送,如果发送成功,则清楚takelist的数据
3、如果发送失败则数据回滚
7、总结


 764
764

 被折叠的 条评论
为什么被折叠?
被折叠的 条评论
为什么被折叠?
 到【灌水乐园】发言


