


众所知周,Vert.x 是一个异步无阻塞的网络框架,其参照物是 node.js。基本上 node.js 能干的事情,Vert.x 都能干。Vert.x 利用 Netty4 的 EventLoop 来做单线程的事件循环,所以跑在 Vert.x 上的业务不能做 CPU 密集型的运算,这样会导致整个线程被阻塞。
Springboot 是应用非常广泛的 java 快速开发框架,它提供了与数据库,websocket,消息系统等等各种集成。业务中已经使用了 springboot,如果又有需要使用 vert.x,最好是将这两者集成,而不是 Vert.x 单独作为一个程序。
如何集成 Vert.x 与 Springboot?非常简单,我们只需要创建一个 Vert.x Server,让它在 springboot 启动的时候自动启动即可。
第一步, 设置 Vert.x server 端口,创建一个简单的配置类,它从环境变量获取我们 Vert.x Server 的端口,如果环境变量没有设置,就使用默认的 8081.
package com.yq.springboot;

import org.springframework.beans.factory.annotation.Autowired;
import org.springframework.context.annotation.Configuration;
import org.springframework.core.env.Environment;

/**
 * A configuration bean.
 * @author <a href="http://escoffier.me">Clement Escoffier</a>
 */
@Configuration
public class AppConfiguration {

    @Autowired
    Environment environment;

    public int httpPort() {
        return environment.getProperty("http.port", Integer.class, 8081);
    }

}
第二步,创建 Vert.x server我们需要创建一个简单的 WebServer, 这里直接使用 Vert.x 自带的 StaticHandler,也可以自己创建新的 Handler,这里只是演示,就直接使用 Vert.x 自带的 StaticHandler。
package com.yq.springboot;

import io.vertx.core.AbstractVerticle;
import io.vertx.ext.web.Router;
import io.vertx.ext.web.handler.StaticHandler;
import org.springframework.beans.factory.annotation.Autowired;
import org.springframework.stereotype.Component;

@Component
public class StaticServer extends AbstractVerticle {

    @Autowired
    AppConfiguration configuration;

    @Override
    public void start() throws Exception {
        Router router = Router.router(vertx);

        // Serve the static pages
        router.route().handler(StaticHandler.create());

        vertx.createHttpServer().requestHandler(router::accept).listen(configuration.httpPort());
    }
}
第三步,设置静态页面我们使用了 StaticHandler,可以查看源码,发现只需要创建 webroot 目录,创建 index.html 页面即可,
@VertxGen
public interface StaticHandler extends Handler<RoutingContext> {
    String DEFAULT_WEB_ROOT = "webroot";
    boolean DEFAULT_FILES_READ_ONLY = true;
    long DEFAULT_MAX_AGE_SECONDS = 86400L;
    boolean DEFAULT_CACHING_ENABLED = true;
    boolean DEFAULT_DIRECTORY_LISTING = false;
    String DEFAULT_DIRECTORY_TEMPLATE = "vertx-web-directory.html";
    boolean DEFAULT_INCLUDE_HIDDEN = true;
    long DEFAULT_CACHE_ENTRY_TIMEOUT = 30000L;
    String DEFAULT_INDEX_PAGE = "/index.html";
我们在 <project_path>ertxDemosrcmain esourceswebroot 下面创建 index.html, 详细路径可参看这里的源代码。index.html
<html>
<head>
</head>
<body>
<h1>Static web server. Click on some links below</h1>

<br>
<br>
<a href="page1.html">Static Page 1</a>
<a href="page2.html">Static Page 2</a>

</body>
</html>
第四步 在 springboot,添加 postConstruct 注解在启动类中加上,当我们启动时部署 Vertx staticServer 的代码。备注:@PostConstruct 修饰的方法会在服务器加载 Servle 的时候运行,并且只会被服务器执行一次
package com.yq;

import com.yq.springboot.StaticServer;
import io.vertx.core.Vertx;
import org.springframework.beans.factory.annotation.Autowired;
import org.springframework.boot.SpringApplication;
import org.springframework.boot.autoconfigure.SpringBootApplication;

import javax.annotation.PostConstruct;

@SpringBootApplication
public class VertxApplication {

    @Autowired
    private StaticServer staticServer;

    public static void main(String[] args) {
        SpringApplication.run(VertxApplication.class, args);
    }

    @PostConstruct
    public void deployVerticle() {
        Vertx.vertx().deployVerticle(staticServer);
    }
}
启动程序后再网页打开 http://127.0.0.1:8081 效果图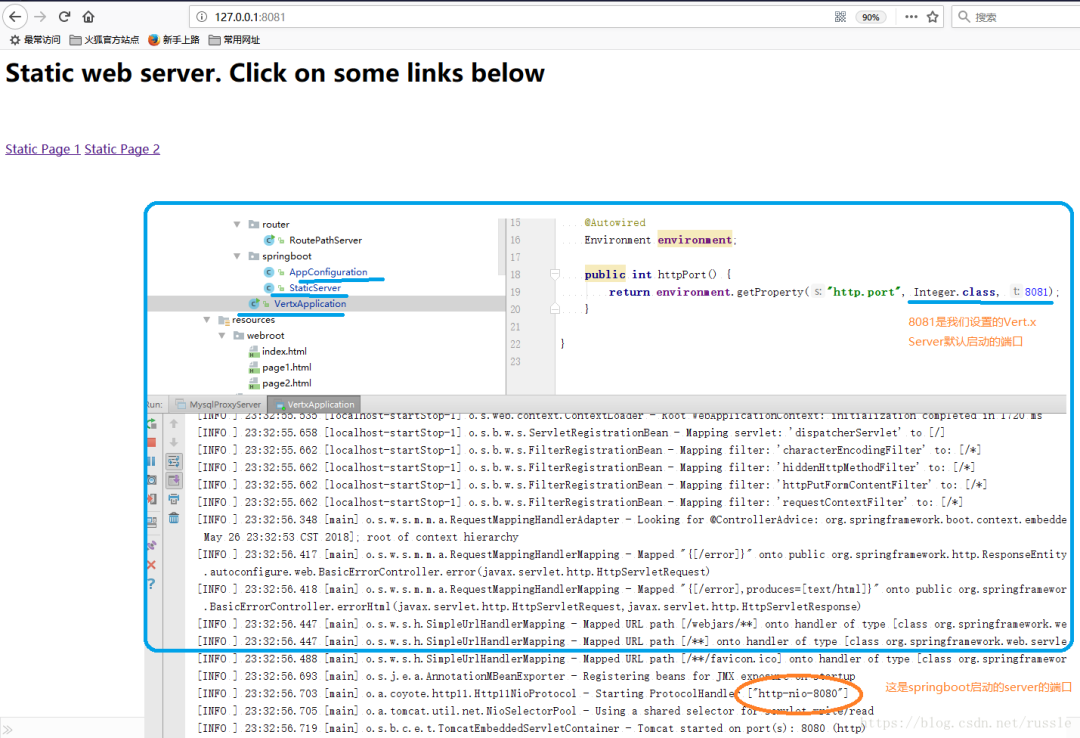
代码放在这里:
“https://github.com/yqbjtu/java8study/tree/master/vertxDemo
”
作者:毛毛的猫毛
来源链接:
https://blog.csdn.net/m0_67400973/article/details/124456758


 5585
5585


 被折叠的 条评论
为什么被折叠?
被折叠的 条评论
为什么被折叠?
 到【灌水乐园】发言


