


通过本文聊聊怎么将别人用大量数据集训练好的模型、或者模型的权重为我们服务。
迁移学习是什么?可以参考民间知乎大神的答案,我理解的就是借力。
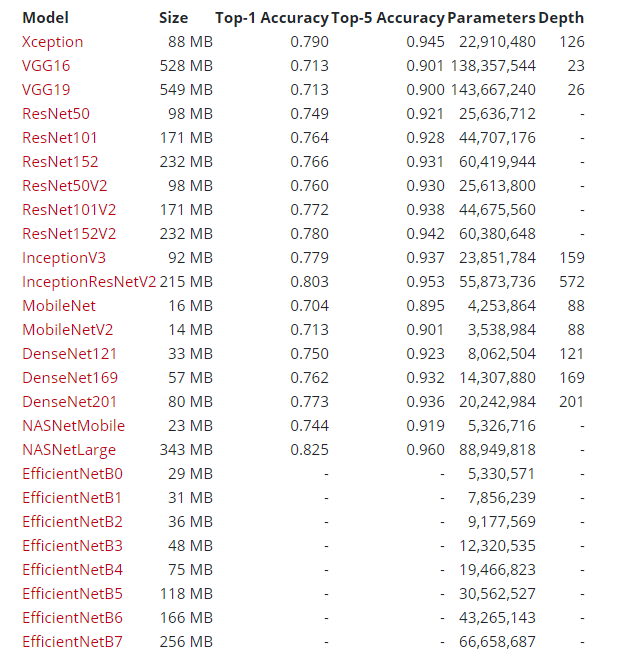
keras目前提供以下可以使用的模型,直接或者间接使用这些模型能省不少事。
keras中applications的代码结构是这样的:
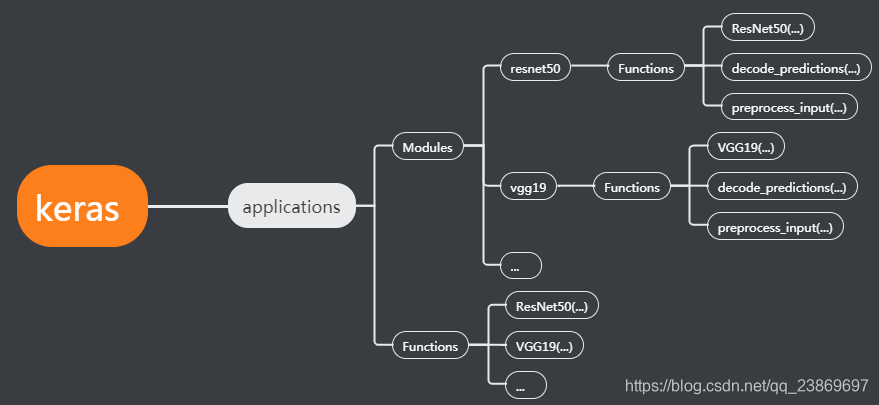
其中两处的Functions是一样的,调用某个模型时,直接调用指定模块的函数,就能实例化一个模型。比如使用ResNet50
from tensorflow.keras.applications.resnet50 import ResNet50
一般定义如下:
tf.keras.applications.ResNet50(
    include_top=True,
    weights="imagenet",
    input_tensor=None,
    input_shape=None,
    pooling=None,
    classes=1000,
    **kwargs
)
几个重要的参数设定:
| 参数 | 解析 |
|---|---|
| include_top | true 或者 false,表示是否包括网络最后的全连接层 |
| weight | 有三种选择:None(随机初始化),‘imagenet’(在imagenet上进行预训练),或要加载的权重文件的路径。 |
| input_shape | 只有include_top=false时可用,这时指定的输入shape的宽和高不能小于32,且必须有3个通道。 |
| pooling | 只有include_top=false时可用,一般将这个模型作为特征提取器时会这么用,值为None时直接返回一个4D tensor;值为avg时,表示平均池化,返回一个2D tensor;值为max,表示使用最大池化,返回一个2D tensor。 |
返回一个模型实例
decode_predictions()
除了模型之外,模块中还包含了输入、输出处理的函数,保证给模型正确的输入、输出,比如resnet50模块中的decode_predictions() 用于解码ImageNet模型的预测结果,一般带两个参数:
| 参数 | 解析 |
|---|---|
| preds | Numpy数组编码的批预测 |
| top | 整数,返回多少个概率大的值。默认为5。 |
返回指定top个类的预测元组(class_name, class_description, score)。
preprocess_input()
用于预处理编码一批图像的张量或Numpy数组,图像从RGB转换为BGR,然后每个颜色通道相对于ImageNet数据集以零为中心,没有缩放。这个函数一般带两个参数
| 参数 | 解析 |
|---|---|
| x | 浮点型的numpy.array或者tf.Tensor,3D或4D, 且具有3种颜色通道,数值范围[0,255] |
| data_format | 可选的图像张量/数组数据格式,默认为None,可通过tf.keras.backend.image_data_format()做全局设置,通道优先 |
返回一个类型为float32的 numpy.array 或者 tf.Tensor。
官方例子
(1)直接使用训练好的模型做预测
比如调用ResNet50,其定义如下:
# 导入相应的模块和函数
from tensorflow.keras.applications.resnet50 import ResNet50
from tensorflow.keras.preprocessing import image
from tensorflow.keras.applications.resnet50 import preprocess_input, decode_predictions
import numpy as np

# 实例化一个ResNet50模型
model = ResNet50(weights='imagenet')

img_path = 'elephant.jpg'
img = image.load_img(img_path, target_size=(224, 224))
x = image.img_to_array(img)
# 维度扩充使其满足preprocess_input输入参数的要求
x = np.expand_dims(x, axis=0)
x = preprocess_input(x)

preds = model.predict(x)
# decode the results into a list of tuples (class, description, probability)
# (one such list for each sample in the batch)
print('Predicted:', decode_predictions(preds, top=3)[0])
# Predicted: [(u'n02504013', u'Indian_elephant', 0.82658225), (u'n01871265', u'tusker', 0.1122357), (u'n02504458', u'African_elephant', 0.061040461)]
(2) VGG16提取特征
用作特征提取器时,不需要最后的全连接层,所以实例化模型时参数 include_top=False,根据需要修改其他参数的值达到目的。
from tensorflow.keras.applications.vgg16 import VGG16
from tensorflow.keras.preprocessing import image
from tensorflow.keras.applications.vgg16 import preprocess_input
import numpy as np
# 用作特征提取器时,不需要最后的全连接层
model = VGG16(weights='imagenet', include_top=False)

img_path = 'elephant.jpg'
img = image.load_img(img_path, target_size=(224, 224))
x = image.img_to_array(img)
x = np.expand_dims(x, axis=0)
x = preprocess_input(x)

features = model.predict(x)
(3)从VGG19任意中间层提取特征
使用到Model的get_layer()方法,输入指定层的名字或者索引即可获得该层的实例。
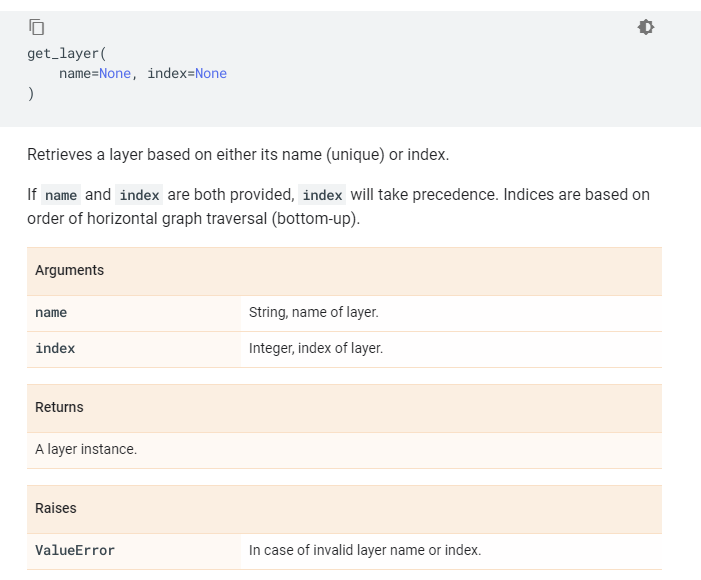
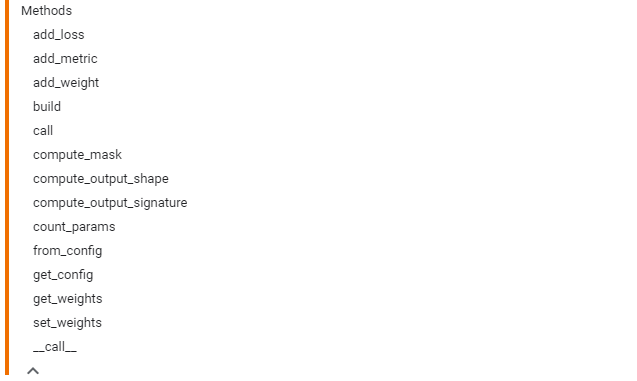
这里的层是一个层类的实例,该Layer类有以下属性和方法:
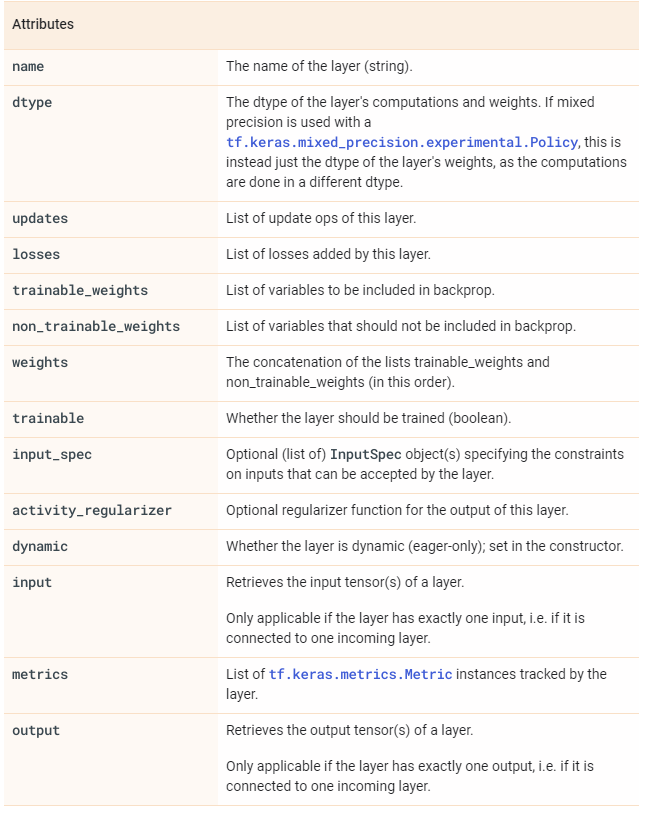
我们需要的是取其输出,所以使用model.get_layer().output
如下:
from tensorflow.keras.applications.vgg19 import VGG19
from tensorflow.keras.preprocessing import image
from tensorflow.keras.applications.vgg19 import preprocess_input
from tensorflow.keras.models import Model
import numpy as np

base_model = VGG19(weights='imagenet')
# 提取指定输入-到指定层特征
model = Model(inputs=base_model.input, outputs=base_model.get_layer('block4_pool').output)

img_path = 'elephant.jpg'
img = image.load_img(img_path, target_size=(224, 224))
x = image.img_to_array(img)
x = np.expand_dims(x, axis=0)
x = preprocess_input(x)

block4_pool_features = model.predict(x)
(4)以InceptionV3为例增加新的类别并细调模型
输出类别不同,我们需要修改模型的最后几个连接层;
重新细调模型,我们可以指定哪些层可以被训练,哪些不能被训练。可通过修改Layer类中属性trainable的值实现。
from tensorflow.keras.applications.inception_v3 import InceptionV3
from tensorflow.keras.preprocessing import image
from tensorflow.keras.models import Model
from tensorflow.keras.layers import Dense, GlobalAveragePooling2D

# create the base pre-trained model
# 需要的数据类别与模型的类别不一致,在导入模型是,不需要最后的几个全连接层
base_model = InceptionV3(weights='imagenet', include_top=False)

# 修改最后几层
# add a global spatial average pooling layer
x = base_model.output
x = GlobalAveragePooling2D()(x)
# let's add a fully-connected layer
x = Dense(1024, activation='relu')(x)
# and a logistic layer -- let's say we have 200 classes
predictions = Dense(200, activation='softmax')(x)
# 使用函数式API
model = Model(inputs=base_model.input, outputs=predictions)

# 紧训练最后添加到层,使InceptionV3的其它层不可训,修改层的trainable属性
for layer in base_model.layers:
    layer.trainable = False

# compile the model (should be done *after* setting layers to non-trainable)
model.compile(optimizer='rmsprop', loss='categorical_crossentropy')

# train the model on the new data for a few epochs
model.fit(...)

# 经过上面的训练后,模型已经基本训练好,下面再指定需要细调的层,开始细调

# 通过model的layers属性得到每层的名字
for i, layer in enumerate(base_model.layers):
   print(i, layer.name)

# 比如这里让顶层两个模块可以被细调,其他的不能调
for layer in model.layers[:249]:
   layer.trainable = False
for layer in model.layers[249:]:
   layer.trainable = True

# 使用很小的学习率开始细调模型
from tensorflow.keras.optimizers import SGD
model.compile(optimizer=SGD(lr=0.0001, momentum=0.9), loss='categorical_crossentropy')

# we train our model again (this time fine-tuning the top 2 inception blocks
# alongside the top Dense layers
model.fit(...)
(5)根据自定义的输入建立InceptionV3
更多的时候是上面和这种情况,输入或者输出不一样。通过自定义输入,使其满足模型的输入,就能直接调用已经训练好的模型到自己的数据上,然后训练并细调。keras提供的模型的输入并不都是一样的,比如resnet的输入尺寸是 (224, 224, 3),自定义的输入宽高不小于32;InceptionV3的输入尺寸是 (299, 299, 3),自定义的输入宽高不小于75;
from tensorflow.keras.applications.inception_v3 import InceptionV3
from tensorflow.keras.layers import Input

# 自定义的输入宽高不小于75都可以
input_tensor = Input(shape=(224, 224, 3))

model = InceptionV3(input_tensor=input_tensor, weights='imagenet', include_top=True)


 1594
1594


 被折叠的 条评论
为什么被折叠?
被折叠的 条评论
为什么被折叠?
 到【灌水乐园】发言


