


为了方便大家,同时也为了加深自己的记忆,这里小落自己搭建一个ssh项目
我把项目搭建步骤都先写出来,使大家在编写代码上更明确 项目源码下载
1.新建一个项目 导入必须的jar包
2.创建db.properties文件并配置
db.properties
jdbc.user=root
jdbc.pwd=root
jdbc.driver=com.mysql.jdbc.Driver
jdbc.jdbcurl=jdbc:mysql://localhost:3306/test?useUnicode=true&characterEncoding=utf-8

jdbc.initPoolSize=5
jdbc.maxPoolSize=10hibernate.cfg.xml
<?xml version="1.0" encoding="UTF-8"?>
<!DOCTYPE hibernate-configuration PUBLIC
	"-//Hibernate/Hibernate Configuration DTD 3.0//EN"
	"http://www.hibernate.org/dtd/hibernate-configuration-3.0.dtd">
<hibernate-configuration>
	<session-factory>
	<property name="hibernate.dialect">org.hibernate.dialect.MySQLDialect</property>
	<property name="hibernate.show_sql">false</property>
	<property name="hibernate.format_sql">false</property>
	<property name="current_session_context_class">org.springframework.orm.hibernate4.SpringSessionContext</property>
	<property name="hibernate.hbm2ddl.auto">update</property>
	</session-factory>
</hibernate-configuration>
4.创建applicationContext.xml引入资源文件并配置c3p0数据源
applicationContext.xml
<?xml version="1.0" encoding="UTF-8"?>
<beans xmlns="http://www.springframework.org/schema/beans"
	xmlns:xsi="http://www.w3.org/2001/XMLSchema-instance"
	xmlns:aop="http://www.springframework.org/schema/aop"
	xmlns:context="http://www.springframework.org/schema/context"
	xmlns:tx="http://www.springframework.org/schema/tx"
	xsi:schemaLocation="http://www.springframework.org/schema/beans http://www.springframework.org/schema/beans/spring-beans.xsd
		http://www.springframework.org/schema/aop http://www.springframework.org/schema/aop/spring-aop-4.0.xsd
		http://www.springframework.org/schema/context http://www.springframework.org/schema/context/spring-context-4.0.xsd
		http://www.springframework.org/schema/tx http://www.springframework.org/schema/tx/spring-tx-4.0.xsd">
<!-- 导入资源文件 -->
	<context:property-placeholder location="classpath:db.properties"/>

</beans>
5.在applicationContext.xml中配置sessionfactory
<!-- 配置 SessionFactory -->
	<bean id="sessionFactory" class="org.springframework.orm.hibernate4.LocalSessionFactoryBean" >
		<property name="dataSource" ref="dataSource"></property>
		<property name="configLocation" value="classpath:hibernate.cfg.xml"></property>
		<property name="mappingLocations" value="classpath:com/jsx/pojo/*.hbm.xml"></property>
		<property name="packagesToScan">
			<list>
				<value>com.jsx.pojo</value>
			</list>
		</property>
	</bean>
6.在applicationContext.xml中配置spring声明事务
1.配置hibernate事务管理器
<!-- 配置 Spring 的声明式事务 -->
<!-- 1. 配置 hibernate 的事务管理器 -->
	<bean id="transactionManager" class="org.springframework.orm.hibernate4.HibernateTransactionManager">
		<property name="sessionFactory" ref="sessionFactory"></property>
	</bean>
2.配置事务属性
<!-- 2. 配置事务属性 -->
	<tx:advice id="txAdvice" transaction-manager="transactionManager">
		<tx:attributes>
			<tx:method name="get*" read-only="true"/>
			<tx:method name="lastNameIsValid" read-only="true"/>
			<tx:method name="*"/>
		</tx:attributes>
	</tx:advice>
3.配置事务切入点, 再把事务属性和事务切入点关联起来
<!-- 3. 配置事务切入点, 再把事务属性和事务切入点关联起来 -->
	<aop:config>
		<aop:pointcut expression="execution(* com.jsx.service.*.*(..))" id="txPointcut"/>
		<aop:advisor advice-ref="txAdvice" pointcut-ref="txPointcut"/>
	</aop:config>
7.配置applicationContext.xml开启自动扫描指定包上类的注解
<!-- 开启自动扫描指定包上类的注解 -->
<context:component-scan base-package="com.jsx" /><?xml version="1.0" encoding="UTF-8"?>
<beans xmlns="http://www.springframework.org/schema/beans"
xmlns:xsi="http://www.w3.org/2001/XMLSchema-instance"
xmlns:aop="http://www.springframework.org/schema/aop"
xmlns:context="http://www.springframework.org/schema/context"
xmlns:tx="http://www.springframework.org/schema/tx"
xsi:schemaLocation="http://www.springframework.org/schema/beans http://www.springframework.org/schema/beans/spring-beans.xsd
http://www.springframework.org/schema/aop http://www.springframework.org/schema/aop/spring-aop-4.0.xsd
http://www.springframework.org/schema/context http://www.springframework.org/schema/context/spring-context-4.0.xsd
http://www.springframework.org/schema/tx http://www.springframework.org/schema/tx/spring-tx-4.0.xsd">
<!-- 导入资源文件 -->
<context:property-placeholder location="classpath:db.properties"/>
<!-- 配置 C3P0 数据源 -->
<bean id="dataSource" class="com.mchange.v2.c3p0.ComboPooledDataSource">
<property name="user" value="${jdbc.user}"></property>
<property name="password" value="${jdbc.pwd}"></property>
<property name="driverClass" value="${jdbc.driver}"></property>
<property name="jdbcUrl" value="${jdbc.jdbcurl}"></property>
<property name="initialPoolSize" value="${jdbc.initPoolSize}"></property>
<property name="maxPoolSize" value="${jdbc.maxPoolSize}"></property>
</bean>
<!-- 配置 SessionFactory -->
<bean id="sessionFactory" class="org.springframework.orm.hibernate4.LocalSessionFactoryBean" >
<property name="dataSource" ref="dataSource"></property>
<property name="configLocation" value="classpath:hibernate.cfg.xml"></property>
<property name="mappingLocations" value="classpath:com/jsx/pojo/*.hbm.xml"></property>
<property name="packagesToScan">
<list>
<value>com.jsx.pojo</value>
</list>
</property>
</bean>
<!-- 配置 Spring 的声明式事务 -->
<!-- 1. 配置 hibernate 的事务管理器 -->
<bean id="transactionManager" class="org.springframework.orm.hibernate4.HibernateTransactionManager">
<property name="sessionFactory" ref="sessionFactory"></property>
</bean>
<!-- 2. 配置事务属性 -->
<tx:advice id="txAdvice" transaction-manager="transactionManager">
<tx:attributes>
<tx:method name="get*" read-only="true"/>
<tx:method name="lastNameIsValid" read-only="true"/>
<tx:method name="*"/>
</tx:attributes>
</tx:advice>
<!-- 3. 配置事务切入点, 再把事务属性和事务切入点关联起来 -->
<aop:config>
<aop:pointcut expression="execution(* com.jsx.service.*.*(..))" id="txPointcut"/>
<aop:advisor advice-ref="txAdvice" pointcut-ref="txPointcut"/>
</aop:config>
<!-- 开启自动扫描指定包上类的注解 -->
<context:component-scan base-package="com.jsx" />
</beans>8.在web.xml 中配置 spring 监听 和 struts核心过滤器
<?xml version="1.0" encoding="UTF-8"?>
<web-app version="3.0"
	xmlns="http://java.sun.com/xml/ns/javaee"
	xmlns:xsi="http://www.w3.org/2001/XMLSchema-instance"
	xsi:schemaLocation="http://java.sun.com/xml/ns/javaee
	http://java.sun.com/xml/ns/javaee/web-app_3_0.xsd">
  <display-name></display-name>

  <context-param>
  	<param-name>contextConfigLocation</param-name>
  	<param-value>classpath:applicationContext*.xml</param-value>
  </context-param>
  <listener>
    <!-- spring 监听  在启动Web容器时,自动装配spring applicationContext.xml的配置信息。 -->
  	<listener-class>org.springframework.web.context.ContextLoaderListener</listener-class>
  </listener>

  <filter>
  	<filter-name>struts</filter-name>
  	<filter-class>org.apache.struts2.dispatcher.ng.filter.StrutsPrepareAndExecuteFilter</filter-class>
  </filter>
  <filter-mapping>
  	<filter-name>struts</filter-name>
  	<url-pattern>/*</url-pattern>
  </filter-mapping>


  <welcome-file-list>
    <welcome-file>index.jsp</welcome-file>
  </welcome-file-list>
</web-app>


<!--
web.xml的配置中<context-param>配置作用
1. 启动一个WEB项目的时候,容器(如:Tomcat)会去读它的配置文件web.xml.读两个节点: <listener></listener> 和 <context-param></context-param>
2.紧接着,容器创建一个ServletContext(上下文),这个WEB项目所有部分都将共享这个上下文.
3.容器将<context-param></context-param>转化为键值对,并交给ServletContext.
4.容器创建<listener></listener>中的类实例,即创建监听.
5.在监听中会有contextInitialized(ServletContextEvent args)初始化方法,在这个方法中获得ServletContext = ServletContextEvent.getServletContext();
context-param的值 = ServletContext.getInitParameter("context-param的键");
6.得到这个context-param的值之后,你就可以做一些操作了.注意,这个时候你的WEB项目还没有完全启动完成.这个动作会比所有的Servlet都要早.
换句话说,这个时候,你对<context-param>中的键值做的操作,将在你的WEB项目完全启动之前被执行.
7.举例.你可能想在项目启动之前就打开数据库.
那么这里就可以在<context-param>中设置数据库的连接方式,在监听类中初始化数据库的连接.
8.这个监听是自己写的一个类,除了初始化方法,它还有销毁方法.用于关闭应用前释放资源.比如说数据库连接的关闭.

 -->
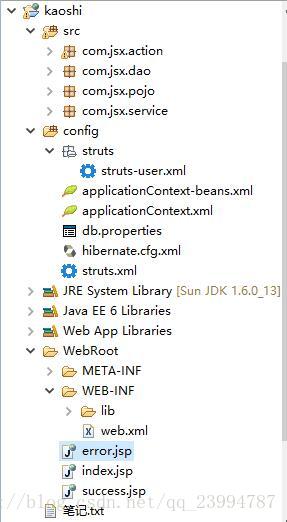
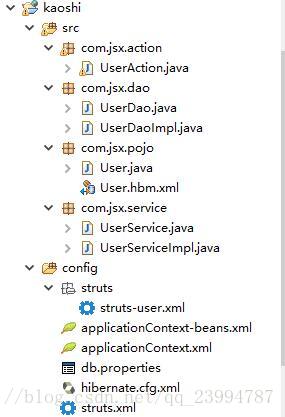
9.创建包层结构
com.jsx.pojo
com.jsx.dao
com.jsx.service
com.jsx.action
10.在pojo层创建User实体 以及对应的User.hbm.xml映射文件
User.java
package com.jsx.pojo;

public class User {
	private int id;
	private String username;
	private String password;
	public int getId() {
		return id;
	}
	public void setId(int id) {
		this.id = id;
	}
	public String getUsername() {
		return username;
	}
	public void setUsername(String username) {
		this.username = username;
	}
	public String getPassword() {
		return password;
	}
	public void setPassword(String password) {
		this.password = password;
	}

}
User.hbm.xml
<?xml version="1.0" encoding="UTF-8"?>
<!DOCTYPE hibernate-mapping PUBLIC
    "-//Hibernate/Hibernate Mapping DTD 3.0//EN"
    "http://www.hibernate.org/dtd/hibernate-mapping-3.0.dtd">

    <hibernate-mapping package="com.jsx.pojo">
    	<class name="User">
    		<id name="id">
    			<generator class="native"></generator>
    		</id>
    		<property name="username"></property>
    		<property name="password"></property>
    	</class>
    </hibernate-mapping>
11.在dao层创建UserDao接口 以及对应的接口实现类 UserDaoImpl 实现类添加关于sessionfactory set注入
UserDao.java
package com.jsx.dao;

import com.jsx.pojo.User;

public interface UserDao {
	public boolean register(User user);
	public User login(User user);
}
package com.jsx.dao;

import org.hibernate.HibernateException;
import org.hibernate.SessionFactory;

import com.jsx.pojo.User;

public class UserDaoImpl implements UserDao{
    private SessionFactory sessionFactory;
	public SessionFactory getSessionFactory() {
		return sessionFactory;
	}
	public void setSessionFactory(SessionFactory sessionFactory) {
		this.sessionFactory = sessionFactory;
	}


	public boolean register(User user) {
		try {
			sessionFactory.getCurrentSession().save(user);
			return true;
		} catch (HibernateException e) {
			return false;
		}
	}
	public User login(User user) {
		User u = null;
		u = (User)sessionFactory.getCurrentSession().createQuery("from User where username=:username and password=:password")
		.setString("username", user.getUsername())
		.setString("password", user.getPassword()).uniqueResult();
		return u;
	}

}
12.在service层创建UserService接口以及对应的接口实现类UserServiceImpl 实现类添加关于UserDao的set注入
UserService.java
package com.jsx.service;

import com.jsx.pojo.User;

public interface UserService {
	public boolean register(User user);
	public User login(User user);
}
UserServiceImpl.java
package com.jsx.service;

import com.jsx.dao.UserDao;
import com.jsx.pojo.User;

public class UserServiceImpl implements UserService{
    private UserDao userDao;
	public UserDao getUserDao() {
		return userDao;
	}
	public void setUserDao(UserDao userDao) {
		this.userDao = userDao;
	}


	public boolean register(User user) {
		return userDao.register(user);
	}
	public User login(User user) {
		return userDao.login(user);
	}

}
13.在action层创建UserAction
1.继承ActionSuport(需要用到里边的常量)
2.实现ModelDriven<User>接口(new 一个User对象接收)
3.添加UserService的set注入
4.实现UserAction的对应方法UserAction.java
package com.jsx.action;

import com.jsx.pojo.User;
import com.jsx.service.UserService;
import com.opensymphony.xwork2.ActionContext;
import com.opensymphony.xwork2.ActionSupport;
import com.opensymphony.xwork2.ModelDriven;

public class UserAction extends ActionSupport implements ModelDriven<User>{
    private User user = new User();
	public User getModel() {
		return user;
	}
	private UserService userService;
	public UserService getUserService() {
		return userService;
	}
	public void setUserService(UserService userService) {
		this.userService = userService;
	}


	public String register(){
		boolean register = userService.register(user);
		if(register){
			return SUCCESS;
		}else{
			return ERROR;
		}
	}
	public String login(){
		User u = null;
		u = userService.login(user);
		if(u!=null){
			ActionContext.getContext().getSession().put("LoginUser", u.getUsername());
			return SUCCESS;
		}else{
			return ERROR;
		}
	}

}
14.在struts.xml中配置UserAction
struts.xml
<?xml version="1.0" encoding="UTF-8"?>
<!DOCTYPE struts PUBLIC
    "-//Apache Software Foundation//DTD Struts Configuration 2.3//EN"
    "http://struts.apache.org/dtds/struts-2.3.dtd">
	<struts>
		<package name="default" extends="struts-default" namespace="/">

		</package>
		<include file="struts/struts-user.xml"></include>
	</struts>
struts-user.xml
<?xml version="1.0" encoding="UTF-8"?>
<!DOCTYPE struts PUBLIC
    "-//Apache Software Foundation//DTD Struts Configuration 2.3//EN"
    "http://struts.apache.org/dtds/struts-2.3.dtd">
	<struts>
		<package name="user" extends="default" namespace="/user">
			<action name="UserAction_*" class="com.jsx.action.UserAction" method="{1}">
				<result name="success">/success.jsp</result>
				<result name="error">/error.jsp</result>
			</action>
		</package>
</struts>applicationContext-beans.xml
<?xml version="1.0" encoding="UTF-8"?>
<beans
	xmlns="http://www.springframework.org/schema/beans"
	xmlns:xsi="http://www.w3.org/2001/XMLSchema-instance"
	xmlns:p="http://www.springframework.org/schema/p"
	xsi:schemaLocation="http://www.springframework.org/schema/beans
	http://www.springframework.org/schema/beans/spring-beans-4.0.xsd">
<!-- User -->
	<bean id="userDao" class="com.jsx.dao.UserDaoImpl">
			<property name="sessionFactory" ref="sessionFactory"></property>
	</bean>
	<bean id="userService" class="com.jsx.service.UserServiceImpl">
			<property name="userDao" ref="userDao"></property>
	</bean>
	<bean id="ua" class="com.jsx.action.UserAction">
			<property name="userService" ref="userService"></property>
	</bean>

</beans>
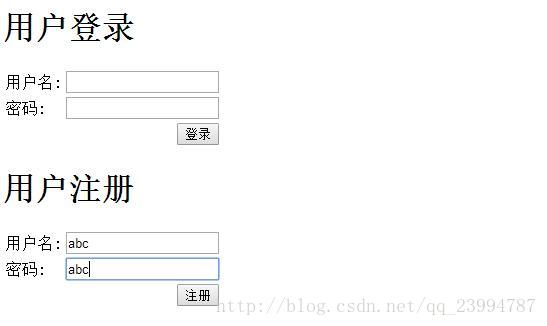
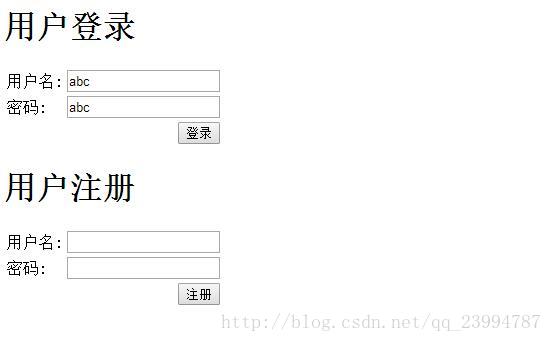
16.编写jsp文件
index.jsp
<%@ page language="java" import="java.util.*" pageEncoding="UTF-8"%>
<%@ taglib prefix="s" uri="/struts-tags"%>
<!DOCTYPE HTML PUBLIC "-//W3C//DTD HTML 4.01 Transitional//EN">
<html>
  <head>
    <title>My JSP 'index.jsp' starting page</title>
  </head>
  <body>
   			<h1>用户登录</h1>
   			<s:form action="UserAction_login" namespace="/user" method="post">
   				<s:textfield name="username" label="用户名"></s:textfield>
   				<s:textfield name="password" label="密码"></s:textfield>
   				<s:submit value="登录"></s:submit>
   			</s:form>
   			<h1>用户注册</h1>
   			<s:form action="UserAction_register" namespace="/user" method="post">
   				<s:textfield name="username" label="用户名"></s:textfield>
   				<s:textfield name="password" label="密码"></s:textfield>
   				<s:submit value="注册"></s:submit>
   			</s:form>
  </body>
</html>
<%@ page language="java" import="java.util.*" pageEncoding="UTF-8"%>
<%@ taglib prefix="s" uri="/struts-tags"%>
<!DOCTYPE HTML PUBLIC "-//W3C//DTD HTML 4.01 Transitional//EN">
<html>
  <head>
    <title>My JSP 'index.jsp' starting page</title>
  </head>
  <body>
   			成功 ---${LoginUser}
  </body>
</html>
error.jsp
<%@ page language="java" import="java.util.*" pageEncoding="UTF-8"%>
<%@ taglib prefix="s" uri="/struts-tags"%>
<!DOCTYPE HTML PUBLIC "-//W3C//DTD HTML 4.01 Transitional//EN">
<html>
  <head>
    <title>My JSP 'index.jsp' starting page</title>
  </head>
  <body>
   			失败
  </body>
</html>
项目结构


 343
343


 被折叠的 条评论
为什么被折叠?
被折叠的 条评论
为什么被折叠?
 到【灌水乐园】发言


