


文章目录
第一块,是做实时性比较高的那块数据,比如说库存,销量之类的这种数据,我们采取的实时的缓存+数据库双写的技术方案,双写一致性保障的方案
第二块,是做实时性要求不高的数据,比如说商品的基本信息,等等,我们采取的是三级缓存架构的技术方案,就是说由一个专门的数据生产的服务,去获取整个商品详情页需要的各种数据,经过处理后,将数据放入各级缓存中,每一级缓存都有自己的作用
1.详情多维设计
我们先来看看一下,所谓的这种实时性要求不高的数据,在商品详情页中,都有哪些

 1、大型电商网站中的商品详情页的数据结构分析

商品的基本信息

标题:【限时直降】Apple/苹果 iPhone 7 128G 全网通4G智能手机正品
短描述:限时优惠 原封国行 正品保障
颜色:
存储容量
图片列表
规格参数

其他信息:店铺信息,分类信息,等等,非商品维度的信息

商品介绍:放缓存,看一点,ajax异步从缓存加载一点,不放我们这里讲解

实时信息:实时广告推荐、实时价格、实时活动推送,等等,ajax加载
2、大型缓存全量更新问题
(1)网络耗费的资源大
(2)每次对redis都存取大数据,对redis的压力也比较大
(3)大家记不记得,之前我给大家提过,redis的性能和吞吐量能够支撑到多大,基本跟数据本身的大小有很大的关系
如果数据越大,那么可能导致redis的吞吐量就会急剧下降
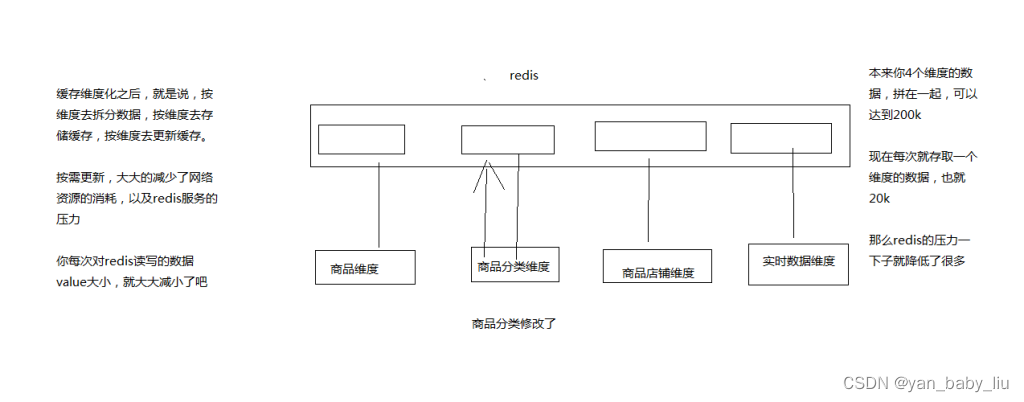
3、缓存维度化解决方案
维度:商品维度,商品分类维度,商品店铺维度
不同的维度,可以看做是不同的角度去观察一个东西,那么每个商品详情页中,都包含了不同的维度数据
我就跟大家举个例子,如果不维度化,就导致多个维度的数据混合在一个缓存value中
但是不同维度的数据,可能更新的频率都大不一样
比如说,现在只是将1000个商品的分类批量调整了一下,但是如果商品分类的数据和商品本身的数据混杂在一起
那么可能导致需要将包括商品在内的大缓存value取出来,进行更新,再写回去,就会很坑爹,耗费大量的资源,redis压力也很大
但是如果我们队对缓存进行围堵维度化
唯独化:将每个维度的数据都存一份,比如说商品维度的数据存一份,商品分类的数据存一份,商品店铺的数据存一份
那么在不同的维度数据更新的时候,只要去更新对应的维度就可以了
包括我们之前讲解的那种实时性较高的数据,也可以理解为一个维度,那么维度拆分后
2.三级缓存实现流程
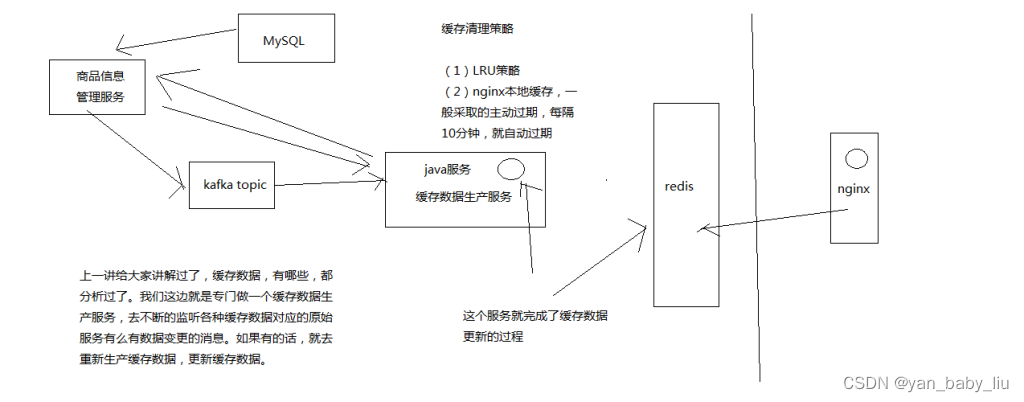
1、商品详情页缓存数据生产服务的工作流程分析
(1)监听多个kafka topic,每个kafka topic对应一个服务(简化一下,监听一个kafka topic)
(2)如果一个服务发生了数据变更,那么就发送一个消息到kafka topic中
(3)缓存数据生产服务监听到了消息以后,就发送请求到对应的服务中调用接口以及拉取数据,此时是从mysql中查询的
(4)缓存数据生产服务拉取到了数据之后,会将数据在本地缓存中写入一份,就是ehcache中
(5)同时会将数据在redis中写入一份
redis和niginx都采用LRU的过期策略,redis属于分布式缓存;而nginx采用主动过期的策略
redis.conf
maxmemory,设置redis用来存放数据的最大的内存大小,一旦超出这个内存大小之后,就会立即使用LRU算法清理掉部分数据
如果用LRU,那么就是将最近最少使用的数据从缓存中清除出去
(1)noeviction: 如果内存使用达到了maxmemory,client还要继续写入数据,那么就直接报错给客户端
(2)allkeys-lru: 就是我们常说的LRU算法,移除掉最近最少使用的那些keys对应的数据
(3)volatile-lru: 也是采取LRU算法,但是仅仅针对那些设置了指定存活时间(TTL)的key才会清理掉
(4)allkeys-random: 随机选择一些key来删除掉
(5)volatile-random: 随机选择一些设置了TTL的key来删除掉
(6)volatile-ttl: 移除掉部分keys,选择那些TTL时间比较短的keys
缓存清理的流程
(1)客户端执行数据写入操作
(2)redis server接收到写入操作之后,检查maxmemory的限制,如果超过了限制,那么就根据对应的policy清理掉部分数据
(3)写入操作完成执行
缓存架构要考虑的点:
1)时效性要求高的缓存–库存 :
采用数据库和缓存双写的方案,注意解决双写一致性问题
2)时效性要求不高的缓存—例如商品详情,采用异步多级缓存,对于大数据缓存,按照维度分别存储
搭建eshop-cache项目
搭建kafka集群(基于zookeeper)
1.zookeeper安装
在node1 node2 node3上安装zookeeper
zookeeper-3.4.5.tar.gz使用WinSCP拷贝到/usr/local目录下。
对zookeeper-3.4.5.tar.gz进行解压缩:tar -zxvf zookeeper-3.4.5.tar.gz。
对zookeeper目录进行重命名:mv zookeeper-3.4.5 zk

配置zookeeper相关的环境变量
vi ~/.bashrc
export ZOOKEEPER_HOME=/usr/local/zk
export PATH=$ZOOKEEPER_HOME/bin
source ~/.bashrc

cd zk/conf
cp zoo_sample.cfg zoo.cfg
# .bashrc

export JAVA_HOME=/usr/java/latest
export ZOOKEEPER_HOME=/usr/local/zk
export PATH=$PATH:$JAVA_HOME/bin:$ZOOKEEPER_HOME/bin

# User specific aliases and functions

alias rm='rm -i'
alias cp='cp -i'
alias mv='mv -i'

# Source global definitions
if [ -f /etc/bashrc ]; then
        . /etc/bashrc
fi
之后修改
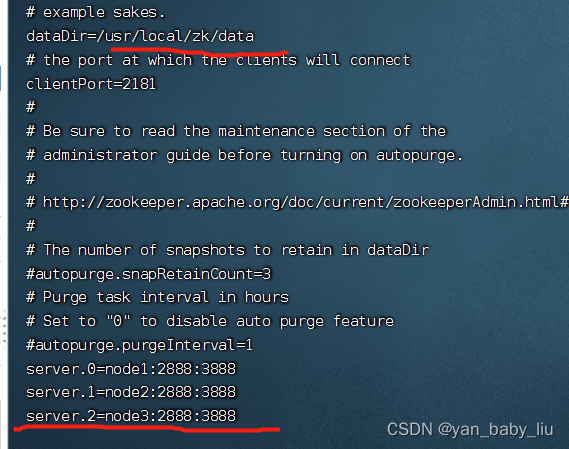
vi zoo.cfg
修改:dataDir=/usr/local/zk/data
新增:
server.0=node1:2888:3888
server.1=node2:2888:3888
server.2=node3:2888:3888
在zk下新建data目录
cd zk
mkdir data
cd data
在data下新建标识号
vi myid
0
在另外两个节点上按照上述步骤配置ZooKeeper,使用scp将zk和.bashrc拷贝到node2和node3上即可。唯一的区别是标识号分别设置为1和2。
[root@node1 conf]# scp ~/.bashrc root@node1:~/
.bashrc                                                                                                                                                   100%  296   251.4KB/s   00:00
[root@node1 conf]# vi ~/.bashrc
[root@node1 conf]# scp ~/.bashrc root@node2:~/
.bashrc                                                                                                                                                   100%  296    26.7KB/s   00:00
[root@node1 conf]# scp ~/.bashrc root@node3:~/
.bashrc                                                                                                                                                   100%  296    26.9KB/s   00:00
[root@node1 conf]#
每台机器都source 下
source ~/.bashrc
拷贝zk
scp -r /usr/local/zk root@node2:/usr/local
修改node2上myid是1
scp -r /usr/local/zk root@node3:/usr/local
修改node2上myid是2
分别在三台机器上执行:zkServer.sh start。
检查ZooKeeper状态:zkServer.sh status,应该是一个leader,两个follower
jps:检查三个节点是否都有QuromPeerMain进程
[root@node2 data]# zkServer.sh status
JMX enabled by default
Using config: /usr/local/zk/bin/…/conf/zoo.cfg
Mode: leader
[root@node2 data]#
[root@node2 data]# jps
26452 Jps
24220 QuorumPeerMain
[root@node3 data]# zkServer.sh status
JMX enabled by default
Using config: /usr/local/zk/bin/…/conf/zoo.cfg
Mode: follower
[root@node3 data]# jps
24246 QuorumPeerMain
26376 Jps
[root@node1 conf]# zkServer.sh status
JMX enabled by default
Using config: /usr/local/zk/bin/…/conf/zoo.cfg
Mode: follower
[root@node1 data]# vi myid
[root@node1 data]# jps
31448 Jps
7834 QuorumPeerMain
2、scala安装
将scala-2.11.4.tgz使用WinSCP拷贝到/usr/local目录下。
对scala-2.11.4.tgz进行解压缩:tar -zxvf scala-2.11.4.tgz。
对scala目录进行重命名:mv scala-2.11.4 scala
配置scala相关的环境变量
vi ~/.bashrc
追加scala配置后
export JAVA_HOME=/usr/java/latest
export ZOOKEEPER_HOME=/usr/local/zk
export SCALA_HOME=/usr/local/scala
export PATH= P A T H : PATH: PATH:JAVA_HOME/bin: Z O O K E E P E R H O M E / b i n : ZOOKEEPER_HOME/bin: ZOOKEEPERHOME/bin:SCALA_HOME/bin
source ~/.bashrc
查看scala是否安装成功:scala -version
按照上述步骤在其他机器上都安装好scala。使用scp将scala和.bashrc拷贝到另外两台机器上即可。
3.安装kafka
将kafka_2.9.2-0.8.1.tgz使用WinSCP拷贝到/usr/local目录下。
对kafka_2.9.2-0.8.1.tgz进行解压缩:tar -zxvf kafka_2.9.2-0.8.1.tgz。
对kafka目录进行改名:mv kafka_2.9.2-0.8.1 kafka
配置kafka
vi /usr/local/kafka/config/server.properties
broker.id:依次增长的整数,0、1、2,集群中Broker的唯一id
zookeeper.connect=10.1.218.22:2181,10.1.218.26:2181,10.1.218.24:2181
安装slf4j—没有操作
将课程提供的slf4j-1.7.6.zip上传到/usr/local目录下
unzip slf4j-1.7.6.zip
把slf4j中的slf4j-nop-1.7.6.jar复制到kafka的libs目录下面
解决kafka Unrecognized VM option 'UseCompressedOops’问题
vi /usr/local/kafka/bin/kafka-run-class.sh
if [ -z “$KAFKA_JVM_PERFORMANCE_OPTS” ]; then
KAFKA_JVM_PERFORMANCE_OPTS=“-server -XX:+UseCompressedOops -XX:+UseParNewGC -XX:+UseConcMarkSweepGC -XX:+CMSClassUnloadingEnabled -XX:+CMSScavengeBeforeRemark -XX:+DisableExplicitGC -Djava.awt.headless=true”
fi
去掉-XX:+UseCompressedOops即可
按照上述步骤在另外两台机器分别安装kafka。用scp把kafka拷贝到其他机器即可。
唯一区别的,就是server.properties中的broker.id,要设置为1和2
[root@node1 local]# scp -r kafka/ root@node2:/usr/local/
[root@node1 local]# scp -r kafka/ root@node3:/usr/local/
在node2和node3上更改broker.id
[root@node3 local]# cd kafka/config/
[root@node3 config]# ll
总用量 32
-rw-r–r–. 1 root root 1202 7月 18 23:28 consumer.properties
-rw-r–r–. 1 root root 3828 7月 18 23:28 log4j.properties
-rw-r–r–. 1 root root 2217 7月 18 23:28 producer.properties
-rw-r–r–. 1 root root 5353 7月 18 23:28 server.properties
-rw-r–r–. 1 root root 3326 7月 18 23:28 test-log4j.properties
-rw-r–r–. 1 root root 995 7月 18 23:28 tools-log4j.properties
-rw-r–r–. 1 root root 1023 7月 18 23:28 zookeeper.properties
[root@node3 config]# vi server.properties
在三台机器上的kafka目录下,分别执行以下命令:nohup bin/kafka-server-start.sh config/server.properties &
[root@node1 kafka]# nohup bin/kafka-server-start.sh config/server.properties &
[1] 17272
[root@node1 kafka]# nohup: 忽略输入并把输出追加到"nohup.out"
使用jps检查启动是否成功
[root@node1 kafka]# jps
21606 Jps
17272 Kafka
7834 QuorumPeerMain
使用基本命令检查kafka是否搭建成功
在node1上创建测试主题,创建生产者,发送消息
[root@node1 kafka]#
bin/kafka-topics.sh --zookeeper 10.1.218.22:2181,10.1.218.26:2181,10.1.218.24:2181 --topic test --replication-factor 1 --partitions 1 --create
Created topic “test”.
[root@node1 kafka]#bin/kafka-console-producer.sh --broker-list 10.1.218.22:9092,10.1.218.26:9092,10.1.218.24:9092 --topic test
SLF4J: Failed to load class “org.slf4j.impl.StaticLoggerBinder”.
SLF4J: Defaulting to no-operation (NOP) logger implementation
SLF4J: See http://www.slf4j.org/codes.html#StaticLoggerBinder for further details.
hello
i love you
在node上,创建消费者
[root@node2 kafka]#
bin/kafka-console-consumer.sh --zookeeper 10.1.218.22:2181,10.1.218.26:2181,10.1.218.24:2181 --topic test --from-beginning
SLF4J: Failed to load class “org.slf4j.impl.StaticLoggerBinder”.
SLF4J: Defaulting to no-operation (NOP) logger implementation
SLF4J: See http://www.slf4j.org/codes.html#StaticLoggerBinder for further details.
收到消息
hello
i love you
以相同的方法创建cache-message 的topic,创建生产者
[root@node1 kafka]#
bin/kafka-topics.sh --zookeeper 10.1.218.22:2181,10.1.218.26:2181,10.1.218.24:2181 --topic cache-message --replication-factor 1 --partitions 1 --create
Created topic “cache-message”.
[root@node1 kafka]#bin/kafka-console-producer.sh --broker-list 10.1.218.22:9092,10.1.218.26:9092,10.1.218.24:9092 --topic cache-message
SLF4J: Failed to load class “org.slf4j.impl.StaticLoggerBinder”.
SLF4J: Defaulting to no-operation (NOP) logger implementation
SLF4J: See http://www.slf4j.org/codes.html#StaticLoggerBinder for further details.
java程序要想获取到kafka发送的消息,需要在java程序部署的服务器上,配置下hosts
10.1.218.22 node1
10.1.218.26 node2
10.1.218.24 node3
在生产者端,发送消息
{“serviceId”:“productService”,“productId”:1}
{“serviceId”:“shopService”,“shopId”:1}

缓存业务代码:https://gitee.com/yanweiling/redis-eshop-struct/tree/master/eshop-cache
nginx 搭建

1、缓存命中率低
缓存数据生产服务那一层已经搞定了,相当于三层缓存架构中的本地堆缓存+redis分布式缓存都搞定了
就要来做三级缓存中的nginx那一层的缓存了
如果一般来说,你默认会部署多个nginx,在里面都会放一些缓存,就默认情况下,此时缓存命中率是比较低的
2、如何提升缓存命中率
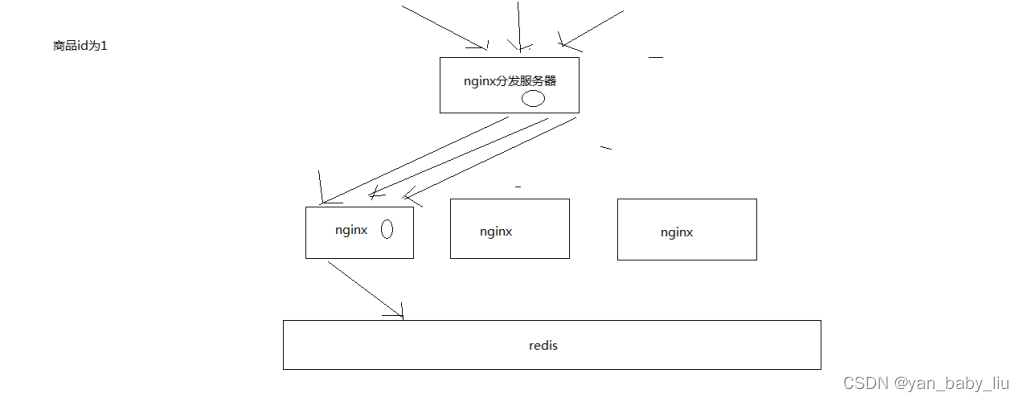
分发层+应用层,双层nginx
分发层nginx,负责流量分发的逻辑和策略,这个里面它可以根据你自己定义的一些规则,比如根据productId去进行hash,然后对后端的nginx数量取模
将某一个商品的访问的请求,就固定路由到一个nginx后端服务器上去,保证说只会从redis中获取一次缓存数据,后面全都是走nginx本地缓存了
后端的nginx服务器,就称之为
应用服务器; 最前端的nginx服务器,被称之为分发服务器
看似很简单,其实很有用,在实际的生产环境中,可以大幅度提升你的nginx本地缓存这一层的命中率,大幅度减少redis后端的压力,提升性能
问题,假设nginx有台机器宕机了呢?nginx应用服务器个数就不确定了,那这样的话,如何hash
nginx应用服务器搭建
在node1上安装第一个nginx
(1)部署openresty
mkdir -p /usr/servers
cd /usr/servers/
安装依赖组件
yum install -y readline-devel pcre-devel openssl-devel gcc
安装nginx_openresty
wget http://openresty.org/download/ngx_openresty-1.7.7.2.tar.gz
tar -xzvf ngx_openresty-1.7.7.2.tar.gz
cd /usr/servers/ngx_openresty-1.7.7.2/
安装luaJIT
cd bundle/LuaJIT-2.1-20150120/
make clean && make && make install
ln -sf luajit-2.1.0-alpha /usr/local/bin/luajit
cd bundle
wget https://github.com/FRiCKLE/ngx_cache_purge/archive/2.3.tar.gz
tar -xvf 2.3.tar.gz
cd bundle
wget https://github.com/yaoweibin/nginx_upstream_check_module/archive/v0.3.0.tar.gz
tar -xvf v0.3.0.tar.gz
cd /usr/servers/ngx_openresty-1.7.7.2
./configure --prefix=/usr/servers --with-http_realip_module --with-pcre --with-luajit --add-module=./bundle/ngx_cache_purge-2.3/ --add-module=./bundle/nginx_upstream_check_module-0.3.0/ -j2
make && make install
检查安装效果
cd /usr/servers/
ll查看下
/usr/servers/luajit
/usr/servers/lualib
/usr/servers/nginx
查看nginx版本号
/usr/servers/nginx/sbin/nginx -V
启动nginx
/usr/servers/nginx/sbin/nginx
(2)nginx+lua开发的hello world
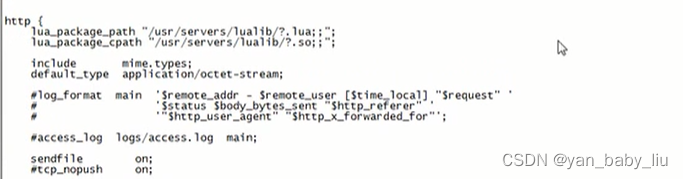
vi /usr/servers/nginx/conf/nginx.conf
在http部分添加:
lua_package_path “/usr/servers/lualib/?.lua;;”;
lua_package_cpath “/usr/servers/lualib/?.so;;”;
/usr/servers/nginx/conf下,创建一个lua.conf
内容为
server {
listen 80;
server_name _;
}
在nginx.conf的http部分添加:
include lua.conf;
验证配置是否正确:
/usr/servers/nginx/sbin/nginx -t
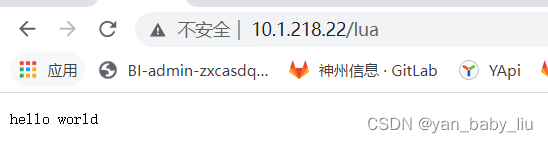
在lua.conf的server部分添加:
location /lua {
default_type ‘text/html’;
content_by_lua ‘ngx.say(“hello world”)’;
}
最后lua.conf为
server {
  listen 80;
  server_name _;
  location /lua {
       default_type   'text/htm';
       content_by_lua  'ngx.say("hello world")';
   }
}
/usr/servers/nginx/sbin/nginx -t
重新nginx加载配置
/usr/servers/nginx/sbin/nginx -s reload
然后访问
vi /usr/servers/nginx/conf/lua/test.lua
ngx.say(“hello world”);
修改lua.conf
location /lua {
default_type ‘text/html’;
content_by_lua_file conf/lua/test.lua;
}
[root@node1 conf]# vi lua.conf
server {
listen 80;
server_name _;
location /lua {
default_type ‘text/htm’;
# content_by_lua ‘ngx.say(“hello world this is node1”)’;
content_by_lua_file conf/lua/test.lua;
}
}
[root@node1 conf]# /usr/servers/nginx/sbin/nginx -t
nginx: the configuration file /usr/servers/nginx/conf/nginx.conf syntax is ok
nginx: configuration file /usr/servers/nginx/conf/nginx.conf test is successful
[root@node1 conf]# /usr/servers/nginx/sbin/nginx -s reload
[root@node1 conf]# curl http://node1/lua
hello world!!
[root@node1 conf]#
查看异常日志
tail -f /usr/servers/nginx/logs/error.log
(3)工程化的nginx+lua项目结构
在usr下有hello文件夹,hello中的项目结构如下:
hello
    hello.conf
    lua
      hello.lua
    lualib
      *.lua
      *.so
项目工程结构
-
在/usr下新建hello文件夹,hello 文件夹下新建lua文件夹
-
将lualib拷贝到hello目录下
[root@node1 nginx]# cd /usr/hello/
[root@node1 hello]# cp -r /usr/servers/lualib/ .
[root@node1 hello]# ll
总用量 4
-rw-r–r–. 1 root root 218 7月 19 05:54 hello.conf
drwxr-xr-x. 2 root root 23 7月 19 05:55 lua
drwxr-xr-x. 5 root root 59 7月 19 06:08 lualib
[root@node1 hello]#
- 新建 vi /usr/hello/hello.conf
server {
    listen       80;
    server_name  _;

    location /hello {
        default_type 'text/html';
        #lua_code_cache off;
        content_by_lua_file /usr/hello/lua/hello.lua;
    }
}
- 新建 vi /usr/hello/lua/hello.lua
ngx.say(“hello world,this is node1”);
- 修改nginx配置文件 vi /usr/servers/nginx/conf/nginx.conf
worker_processes  2;

error_log  logs/error.log;

events {
    worker_connections  1024;
}

http {
    lua_package_path "/usr/hello/lualib/?.lua;;";
    lua_package_cpath "/usr/hello/lualib/?.so;;";
    include /usr/hello/hello.conf;
    include       mime.types;
    default_type  text/html;
}
nginx: the configuration file /usr/servers/nginx/conf/nginx.conf syntax is ok
nginx: configuration file /usr/servers/nginx/conf/nginx.conf test is successful
[root@node1 lua]# /usr/servers/nginx/sbin/nginx -s reload
[root@node1 lua]# curl http://node1/hello
hello world,this is node1
[root@node1 lua]#
如法炮制,在node2和node3上,也用OpenResty部署一个nginx
最终三个节点上都有nginx了
[root@node2 hello]# curl http://node2/hello
helloworld,this is node2
[root@node3 hello]# curl http://node3/hello
hello world,this is nde3
分发Nginx部署
角色node1 node2 做应用层服务器 node3做分发层服务器
在node3,也就是分发层nginx中,编写lua脚本,完成基于商品id的流量分发策略
实际上在你的公司中,你可以随意根据自己的业务逻辑和场景,去制定自己的流量分发策略
1、获取请求参数,比如productId
2、对productId进行hash
3、hash值对应用服务器数量取模,获取到一个应用服务器
4、利用http发送请求到应用层nginx
5、获取响应后返回
这个就是基于商品id的定向流量分发的策略,lua脚本来编写和实现
我们作为一个流量分发的nginx,会发送http请求到后端的应用nginx上面去,所以要先引入lua http lib包
在node3上(分发服务器上)安装http依赖的lua
cd /usr/hello/lualib/resty/
wget https://raw.githubusercontent.com/pintsized/lua-resty-http/master/lib/resty/http_headers.lua
wget https://raw.githubusercontent.com/pintsized/lua-resty-http/master/lib/resty/http.lua
wget https://raw.githubusercontent.com/pintsized/lua-resty-http/master/lib/resty/http_connect.lua
代码:
local uri_args = ngx.req.get_uri_args()
local productId = uri_args["productId"]
local host = {"10.1.218.22","10.1.218.26"};
local hash = ngx.crc32_long(productId);
hash = (hash % 2 ) + 1;
local backend = "http://"..host[hash];

local method = uri_args["method"];
local requestBody = "/"..method.."?productId="..productId
local http = require "resty.http";
local httpc = http:new()
local resp, err = httpc:request_uri(backend, {
    method = "GET",
    path = requestBody,
    keepalive = false
})
if not resp then
   ngx.say("request error:",err)
   return
end

ngx.say(resp.body)
httpc:close()
/usr/servers/nginx/sbin/nginx -s reload
用浏览器访问
http://10.1.218.24/hello?method=hello&productId=14
返回hello world,this is node1
http://10.1.218.24/hello?method=hello&productId=1
返回hello world,this is node2
应用服务Nginx搭建
分发层nginx,lua应用,会将商品id,商品店铺id,都转发到后端的应用nginx
/usr/servers/nginx/sbin/nginx -s reload
1、应用nginx的lua脚本接收到请求
2、获取请求参数中的商品id,以及商品店铺id
3、根据商品id和商品店铺id,在nginx本地缓存中尝试获取数据
4、如果在nginx本地缓存中没有获取到数据,那么就到redis分布式缓存中获取数据,如果获取到了数据,还要设置到nginx本地缓存中
5、如果缓存数据生产服务没有在redis分布式缓存中没有获取到数据,那么就在自己本地ehcache中获取数据,返回数据给nginx,也要设置到nginx本地缓存中
6、如果ehcache本地缓存都没有数据,那么就需要去原始的服务中拉去数据,该服务会从mysql中查询,拉去到数据之后,返回给nginx,并重新设置到ehcache和redis中
7、nginx最终利用获取到的数据,动态渲染网页模板
8、将渲染后的网页模板作为http响应,返回给分发层nginx
但是这里有个问题,建议不要用nginx+lua直接去获取redis数据
因为openresty没有太好的redis cluster的支持包,所以建议是发送http请求到缓存数据生产服务,由该服务提供一个http接口
缓存数生产服务可以基于redis cluster api从redis中直接获取数据,并返回给nginx
在node1 和node2上安装
cd /usr/hello/lualib/resty/
wget https://raw.githubusercontent.com/pintsized/lua-resty-http/master/lib/resty/http_headers.lua
wget https://raw.githubusercontent.com/pintsized/lua-resty-http/master/lib/resty/http.lua
wget https://raw.githubusercontent.com/pintsized/lua-resty-http/master/lib/resty/http_connect.lua
cd /usr/hello/lualib/resty/
wget https://raw.githubusercontent.com/bungle/lua-resty-template/master/lib/resty/template.lua
mkdir /usr/hello/lualib/resty/html
cd /usr/hello/lualib/resty/html
wget https://raw.githubusercontent.com/bungle/lua-resty-template/master/lib/resty/template/html.lua
在hello.conf的server中配置模板位置
新增
set $template_location “/templates”;
set $template_root “/usr/hello/templates”;
lua_shared_dict my_cache 128m;
最后为
server {
listen 80;
server_name _;
set $template_location "/templates";
set $template_root "/usr/hello/templates";
location /hello {
default_type 'text/html';
#lua_code_cache off;
content_by_lua_file /usr/hello/lua/hello.lua;
}
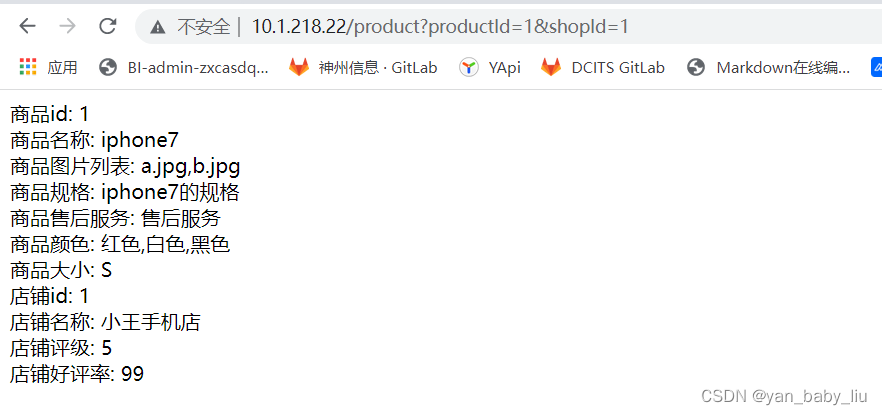
location /product {
default_type 'text/html';
content_by_lua_file /usr/hello/lua/product.lua;
}
}
mkdir /usr/hello/templates
vi product.html
内容为
<html>
	<head>
		<meta http-equiv="Content-Type" content="text/html; charset=UTF-8">
		<title>商品详情页</title>
	</head>
<body>
商品id: {* productId *}<br/>
商品名称: {* productName *}<br/>
商品图片列表: {* productPictureList *}<br/>
商品规格: {* productSpecification *}<br/>
商品售后服务: {* productService *}<br/>
商品颜色: {* productColor *}<br/>
商品大小: {* productSize *}<br/>
店铺id: {* shopId *}<br/>
店铺名称: {* shopName *}<br/>
店铺评级: {* shopLevel *}<br/>
店铺好评率: {* shopGoodCommentRate *}<br/>
</body>
</html>
编辑 vi /usr/servers/nginx/conf/nginx.conf,新增lua_shared_dict配置
http {
lua_package_path “/usr/hello/lualib/?.lua;;”;
lua_package_cpath “/usr/hello/lualib/?.so;;”;
lua_shared_dict my_cache 128m;
include /usr/hello/hello.conf;
lua脚本中:
vi /usr/hello/lua/product.lua
local uri_args = ngx.req.get_uri_args()
local productId = uri_args["productId"]
local shopId = uri_args["shopId"]
-- get nginx share cache
local cache_ngx = ngx.shared.my_cache

local productCacheKey = "product_info_"..productId
local shopCacheKey = "shop_info_"..shopId

local productCache = cache_ngx:get(productCacheKey)
local shopCache = cache_ngx:get(shopCacheKey)

-- if not found value from nginx cache

if productCache == "" or productCache == nil then
     local http = require("resty.http")
     local httpc = http:new()

     local resp,err = httpc:request_uri("http://10.1.218.189:8080",{
           method = "GET",
           path = "/getProductInfo?productId="..productId,
           keepalive = false
      })

      productCache = resp.body
      cache_ngx:set(productCacheKey, productCache, 10 * 60)

end

if shopCache == "" or shopCache == nil then

    local http = require("resty.http")
    local httpc = http.new()

    local resp,err = httpc:request_uri("http://10.1.218.189:8080",{
      method = "GET",
      path = "/getShopInfo?shopId="..shopId,
      keepalive = false
     })

     shopCache = resp.body
     cache_ngx:set(shopCacheKey, shopCache, 10 * 60)
end

local cjson = require("cjson")
local productCacheJSON = cjson.decode(productCache)
local shopCacheJSON = cjson.decode(shopCache)

local context = {
        productId = productCacheJSON.id,
        productName = productCacheJSON.name,
        productPrice = productCacheJSON.price,
        productPictureList = productCacheJSON.pictureList,
        productSpecification = productCacheJSON.specification,
        productService = productCacheJSON.service,
        productColor = productCacheJSON.color,
        productSize = productCacheJSON.size,
        shopId = shopCacheJSON.id,
        shopName = shopCacheJSON.name,
        shopLevel = shopCacheJSON.level,
        shopGoodCommentRate = shopCacheJSON.goodCommentRate
}

local template = require("resty.template")
template.render("product.html",context)
java git 项目地址:https://gitee.com/yanweiling/redis-eshop-struct.git
eshop-cache项目中新增两个接口
    @RequestMapping("/getProductInfo")
    @ResponseBody
    public ProductInfo getProductInfo(Long productId){
        //先从redis中获取数据

        log.info("从redis中获取商品信息");
        ProductInfo productInfo = cacheService.getProductInfoFromRedisCache(productId);
        if(productInfo == null){
            log.info("从local cache中获取商品信息");
            productInfo = cacheService.getProductInfoFromLocalCache(productId);
        }

        if(productInfo==null){
            //从数据库中去拉取
        }
        return productInfo;
    }


    @RequestMapping("/getShopInfo")
    @ResponseBody
    public ShopInfo getShopInfo(Long shopId){
        //先从redis中获取数据
        log.info("从redis中获取店铺信息");
        ShopInfo shopInfo = cacheService.getShopInfoFromRedisCache(shopId);
        if(shopInfo == null){
            log.info("从local cache中获取店铺信息");
            shopInfo = cacheService.getShopInfoFromLocalCache(shopId);
        }

        if(shopInfo==null){
            //从数据库中去拉取
        }
        return shopInfo;
    }
直接访问node1上
在node2上也同样设置nginx应用服务配置
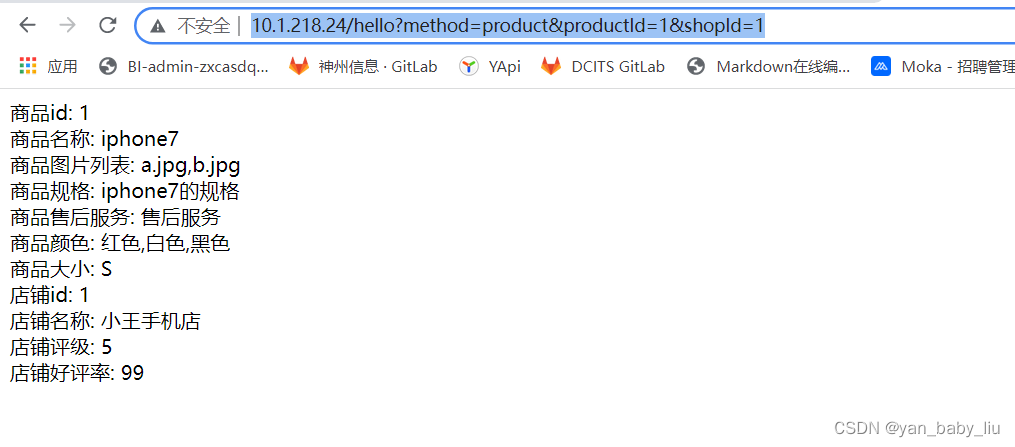
在node3的product.lua中
requestBody变更为
local shopId = uri_args[“shopId”];
local requestBody = “/”…method…“?productId=”…productId…“&shopId=”…shopId
这样,node1,node2应用服务器和node3的分发服务器就都部署好了,我们访问node3的hello,
查看java后台日志会发现,第一次访问走了redis或者localcache缓存,之后访问在10 分钟 的时间内就不会访问后台程序了,直接走nginx的缓存了
第一次访问的时候,其实在nginx本地缓存中是取不到的,所以会发送http请求到后端的缓存服务里去获取,会从redis中获取
拿到数据以后,会放到nginx本地缓存里面去,过期时间是10分钟
然后将所有数据渲染到模板中,返回模板
以后再来访问的时候,就会直接从nginx本地缓存区获取数据了
缓存数据生产 -> 有数据变更 -> 主动更新两级缓存(ehcache+redis)-> 缓存维度化拆分
分发层nginx + 应用层nginx -> 自定义流量分发策略提高缓存命中率
nginx shared dict缓存 -> 缓存服务 -> redis -> ehcache -> 渲染html模板 -> 返回页面
还差最后一个很关键的要点,就是如果你的数据在nginx -> redis -> ehcache三级缓存都不在了,可能就是被LRU清理掉了
如果nginx中的缓存还没有过期,但是数据就已经改了; 如果数据更改后,是否可以主动更改nginx中的数据?
解答:我们就设置nginx缓存有效时间10分钟,10分钟后自动过期,且nginx保存的是一些时效性要求不高的数据,超过10分钟自动过期,且设置内存大小,采用LRU策略自动清除
分布式重建缓存的并发冲突问题
问题:
当nginx转发请求后应用nginx上,发现nginx上没有缓存,然后请求缓存服务器,如果redis和local cache中也没有数据 -------缓存服务器要读取数据库,并将数据返回给nginx,然后异步将数据缓存到redis和local cache中
分布式重建缓存的并发冲突问题
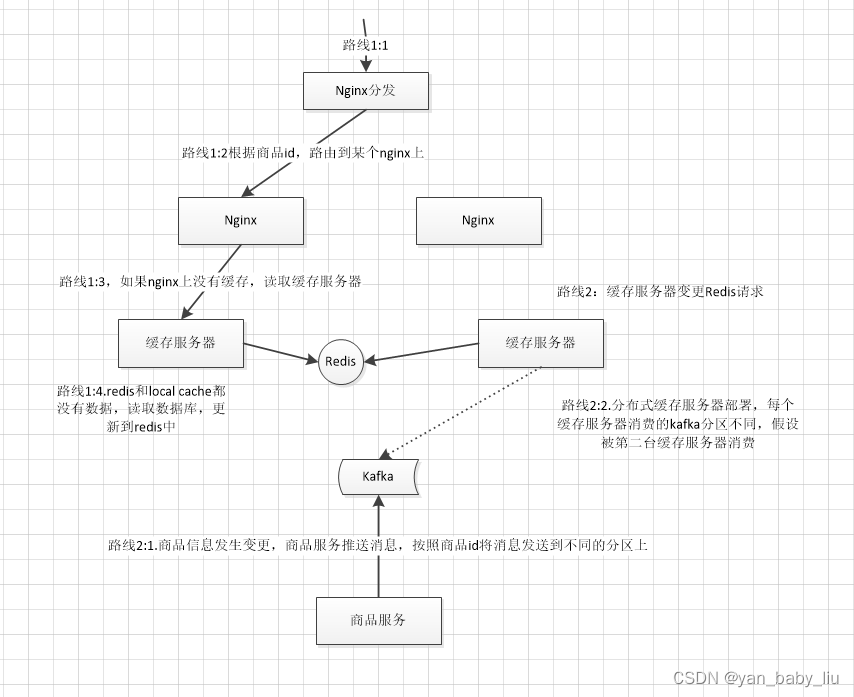
除了通过nginx过来的请求,可能会重建缓存以外; kafka也会推送变更缓存的消息,如以上图所示;
这样就会造成分布式重建缓存的并发冲突问题
造成的原因如下:
1、流量均匀分布到所有缓存服务实例上
应用层nginx,是将请求流量均匀地打到各个缓存服务实例中的,可能咱们的eshop-cache那个服务,可能会部署多实例在不同的机器上
2、应用层nginx的hash,固定商品id,走固定的缓存服务实例
分发层的nginx的lua脚本,按照应用层nginx的地址列表,对每个商品id做一个hash,然后对应用nginx数量取模
将每个商品的请求固定分发到同一个应用层nginx上面去
在应用层nginx里,发现自己本地lua shared dict缓存中没有数据的时候,就采取一样的方式,对product id取模,然后将请求固定分发到同一个缓存服务实例中去
3、源信息服务发送的变更消息,需要按照商品id去分区,固定的商品变更走固定的kafka分区,也就是固定的一个缓存服务实例获取到
缓存服务,是监听kafka topic的,一个缓存服务实例,作为一个kafka consumer,就消费topic中的一个partition
所以你有多个缓存服务实例的话,每个缓存服务实例就消费一个kafka partition
所以这里,一般来说,你的源头信息服务,在发送消息到kafka topic的时候,都需要按照product id去分区
也就时说,同一个product id变更的消息一定是到同一个kafka partition中去的,也就是说同一个product id的变更消息,一定是同一个缓存服务实例消费到的
kafka producer api,里面send message的时候,多加一个参数就可以了,product id传递进去,就可以了
4、问题是,自己写的简易的nginx hash分发,与kafka的分区,可能并不一致!!!
自己写的简易的hash分发策略,是按照crc32去取hash值,然后再取模的
而kafka producer的hash策略是什么,很可能说跟我们的策略是不一样的
这就可能导致,数据变更的消息所到的缓存服务实例,跟我们的应用层nginx分发到的那个缓存服务实例也许就不在一台机器上了
这样的话,在高并发,极端的情况下,可能就会出现冲突
5、分布式的缓存重建并发冲突问题发生了。。。
可以采用分布式锁来解决并发冲突,原理是:缓存服务1,和缓存服务2,并发去修改缓存的时候,首先要先获取分布式锁,成功获取后,且当前版本教高,再去更改缓存信息;如果获取失败,说明其他缓存服务正在更改缓存,然后自己就轮询一会,不断轮询获取分布式锁,如果对方已经更新为最新版本了,则当前缓存服务就放弃更新缓存;如果不是最新缓存版本,则再更新缓存数据
这里采用zookeeper的分布式锁方案
6、基于zookeeper分布式锁的解决方案
分布式锁,如果你有多个机器在访问同一个共享资源,那么这个时候,如果你需要加个锁,让多个分布式的机器在访问共享资源的时候串行起来
那么这个时候,那个锁,多个不同机器上的服务共享的锁,就是分布式锁
zk,做分布式协调这一块,还是很流行的,大数据应用里面,hadoop,storm,都是基于zk去做分布式协调
zk分布式锁的解决并发冲突的方案
(1)变更缓存重建以及空缓存请求重建,更新redis之前,都需要先获取对应商品id的分布式锁
(2)拿到分布式锁之后,需要根据时间版本去比较一下,如果自己的版本新于redis中的版本,那么就更新,否则就不更新
(3)如果拿不到分布式锁,那么就等待,不断轮询等待,直到自己获取到分布式的锁
三台机器同时启动zk ,kafka,redis集群
start-zk.sh
#!/bin/bash
for I in {node1,node2,node3}
do
echo "$I 上的zk 正在启动"
ssh root@$I "source /etc/profile; /usr/local/zk/bin/zkServer.sh start"
echo "$I 上的zk 启动成功"
done
stop_zk.sh
#!/bin/bash
for I in {node1,node2,node3}
do
echo "$I 上的kafka 正在关闭"
ssh root@$I "source /etc/profile;  /usr/local/zk/bin/zkServer.sh stop"
echo "$I 上的kafka 关闭完成"
done
start-kafka.sh
#!/bin/bash
KAFKA_HOME=/usr/local/kafka
for number in {1..3}
do
   host=node${number}
   echo ${host}
    /usr/bin/ssh ${host} "cd ${KAFKA_HOME};source /etc/profile;${KAFKA_HOME}/bin/kafka-server-start.sh ${KAFKA_HOME}/config/server.properties >>/dev/null 2>&1 &"
        echo "${host} started"
done
stop-kafka.sh
#!/bin/bash
KAFKA_HOME=/usr/local/kafka
for number in {1..3}
do
   host=node${number}
   echo ${host}
    /usr/bin/ssh ${host} "cd ${KAFKA_HOME};source /etc/profile;${KAFKA_HOME}/bin/kafka-server-stop.sh"
   echo "${host} stoped"
done
start-redis-cluster.sh
#!/bin/bash
for number in {1..3}
do
echo "关闭 node${number}上的redis port 6379"
 server=node${number}
declare -i num1=$number*2-1
declare -i num2=$number*2
port1="700$num1"
port2="700$num2"
echo "${server}"
echo $port1 $port2
ssh root@$server "redis-cli -p 6379 -a 123456 shutdown"
ssh root@$server "cd /etc/init.d;./redis_$port1 start;./redis_$port2 start "
done


 被折叠的 条评论
为什么被折叠?
被折叠的 条评论
为什么被折叠?
 到【灌水乐园】发言


