


学习笔记|Pytorch使用教程34
本学习笔记主要摘自“深度之眼”,做一个总结,方便查阅。
使用Pytorch版本为1.2
- 图像目标检测是什么?
- 模型是如何完成目标检测的?
- 深度学习目标检测模型简介
- PyTorch中的Faster RCNN训练
四.PyTorch中的Faster RCNN训练
- 1.**torchvision.models.detection.fasterrcnn_resnet50_fpn()**返回FasterRCNN实例
- 2.class FasterRCNN(GeneralizedRCNN)
- 3.class GeneralizedRCNN(nn.Module)
forward():
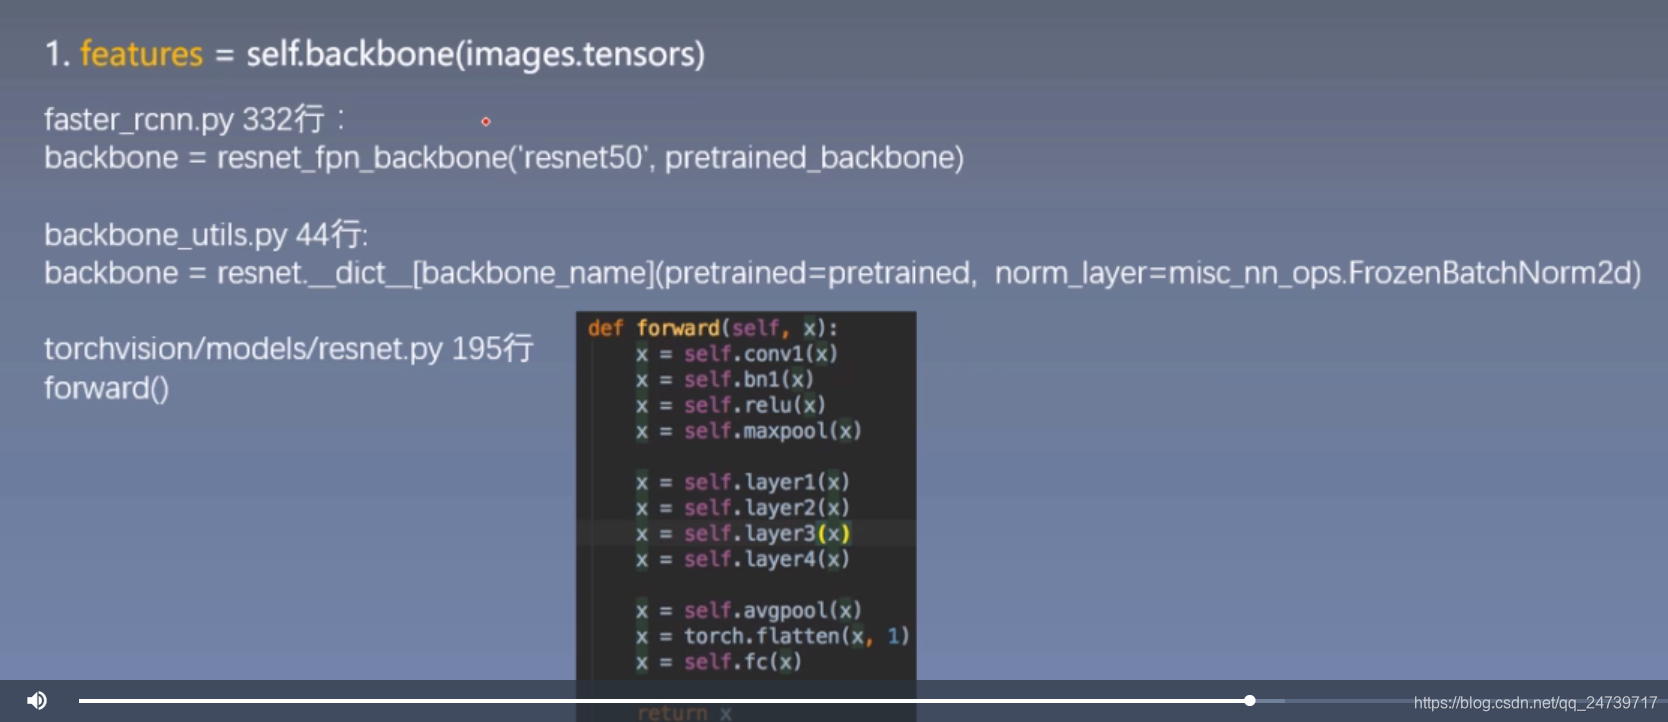
- features = self.backbone(images.tensors)
- proposals, proposal_losses = self.rpn(images, features, targets)
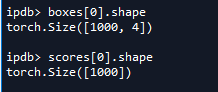
- detections, detector_losses = self.roi_heads(features, proposals, images.image_sizes, targets)
接下来在学习笔记|Pytorch使用教程33(图像目标检测一瞥(上))中的代码设置断点:output_list = model(input_list),并进入(step into)
在该处设置断点,并进入。得到faster rcnn的基类。
class GeneralizedRCNN(nn.Module):
"""
Main class for Generalized R-CNN.
Arguments:
backbone (nn.Module):
rpn (nn.Module):
heads (nn.Module): takes the features + the proposals from the RPN and computes
detections / masks from it.
transform (nn.Module): performs the data transformation from the inputs to feed into
the model
"""
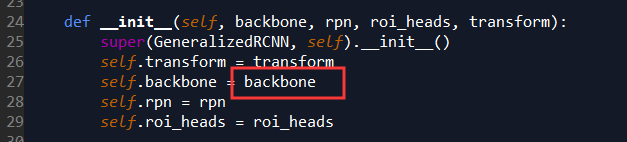
def __init__(self, backbone, rpn, roi_heads, transform):
super(GeneralizedRCNN, self).__init__()
self.transform = transform
self.backbone = backbone
self.rpn = rpn
self.roi_heads = roi_heads
def forward(self, images, targets=None):
"""
Arguments:
images (list[Tensor]): images to be processed
targets (list[Dict[Tensor]]): ground-truth boxes present in the image (optional)
Returns:
result (list[BoxList] or dict[Tensor]): the output from the model.
During training, it returns a dict[Tensor] which contains the losses.
During testing, it returns list[BoxList] contains additional fields
like `scores`, `labels` and `mask` (for Mask R-CNN models).
"""
if self.training and targets is None:
raise ValueError("In training mode, targets should be passed")
original_image_sizes = [img.shape[-2:] for img in images]
images, targets = self.transform(images, targets)
features = self.backbone(images.tensors)
if isinstance(features, torch.Tensor):
features = OrderedDict([(0, features)])
proposals, proposal_losses = self.rpn(images, features, targets)
detections, detector_losses = self.roi_heads(features, proposals, images.image_sizes, targets)
detections = self.transform.postprocess(detections, images.image_sizes, original_image_sizes)
losses = {}
losses.update(detector_losses)
losses.update(proposal_losses)
if self.training:
return losses
return detections
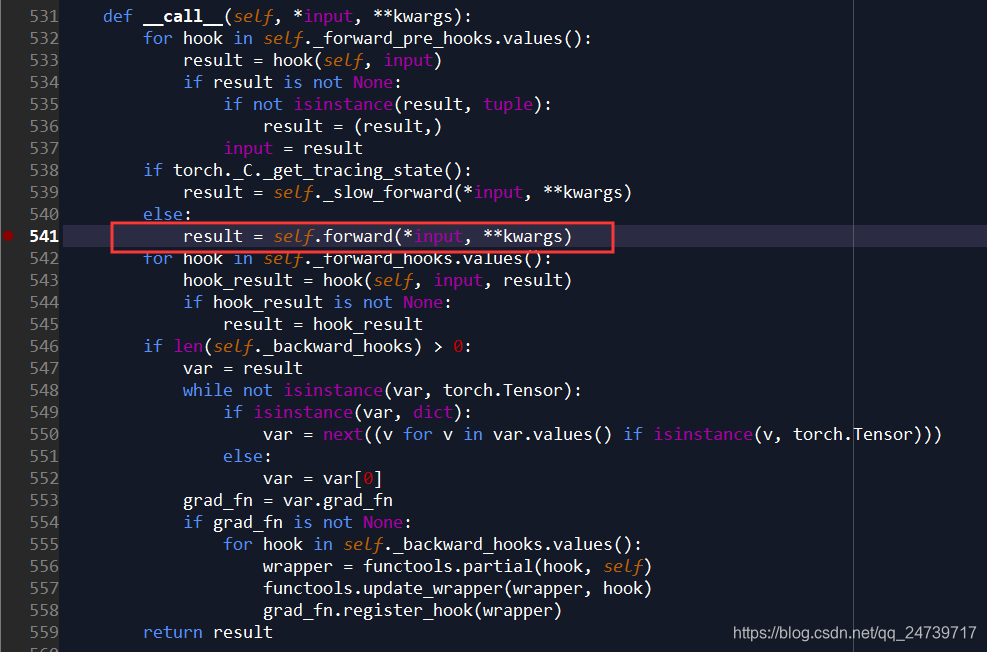
在features = self.backbone(images.tensors)设置断点,了解backbone structure 提取feature 的过程,进入(step into)。类似地,在__call__(self, *input, **kwargs)中设置断点:result = self.forward(*input, **kwargs),再次进入。

发现module已经被封装好了。发现在初始化的时候已经定义好了。
于是来到定义的地方:model = torchvision.models.detection.fasterrcnn_resnet50_fpn(pretrained=True)。然后 Go to definition。
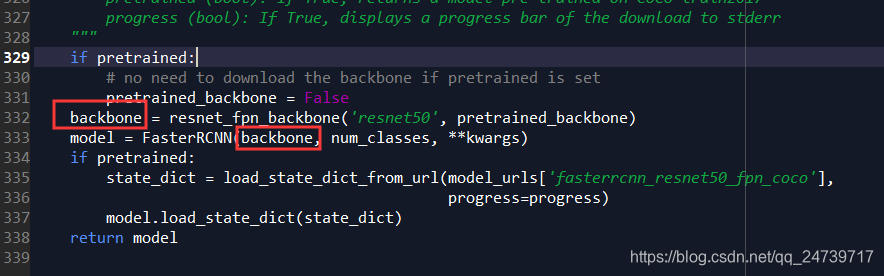
继续然后 Go to definition。
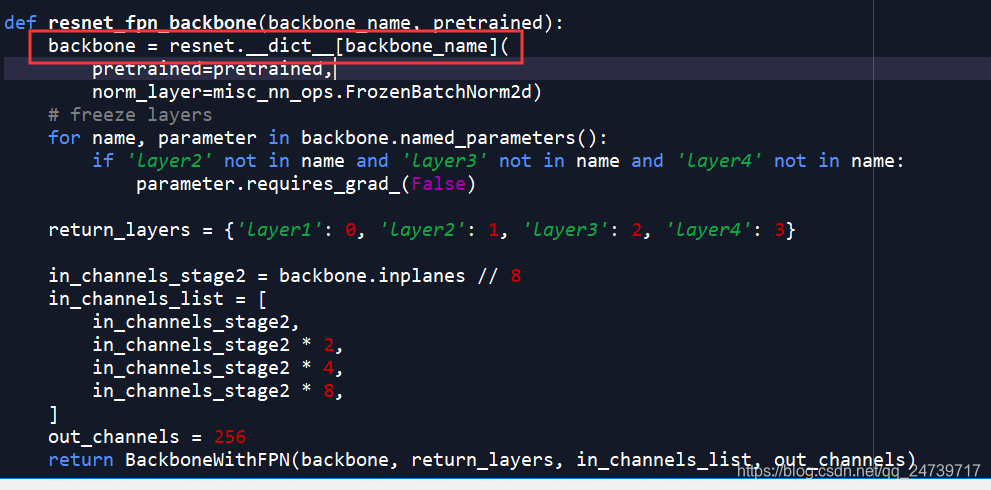
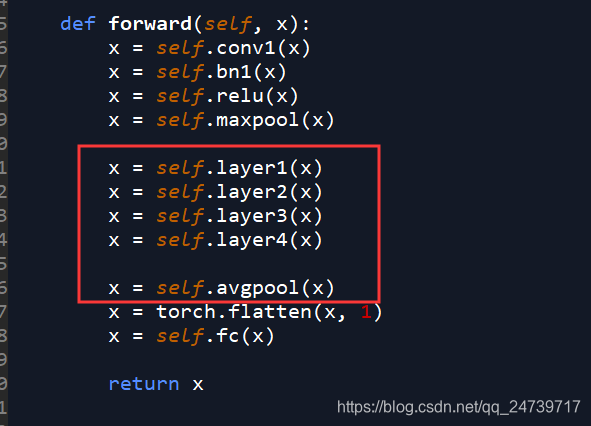
其中backbone_name是’resnet50’。其实就是使用resnet50进行特征提取。
现在直接查看feature。
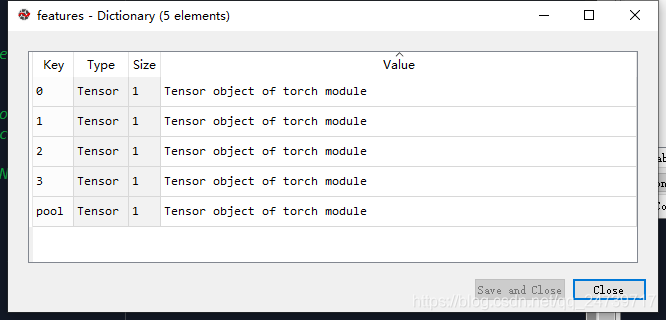
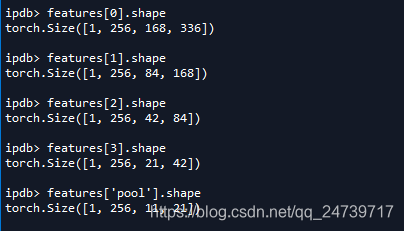
有5个key–value对。其实对应在resnet中的五个输出。
回顾学习笔记|Pytorch使用教程33(图像目标检测一瞥(上))中提到的feature map数据流:[256, h_f, w_f]
接下来查看RPN网络。进入:proposals, proposal_losses = self.rpn(images, features, targets)。
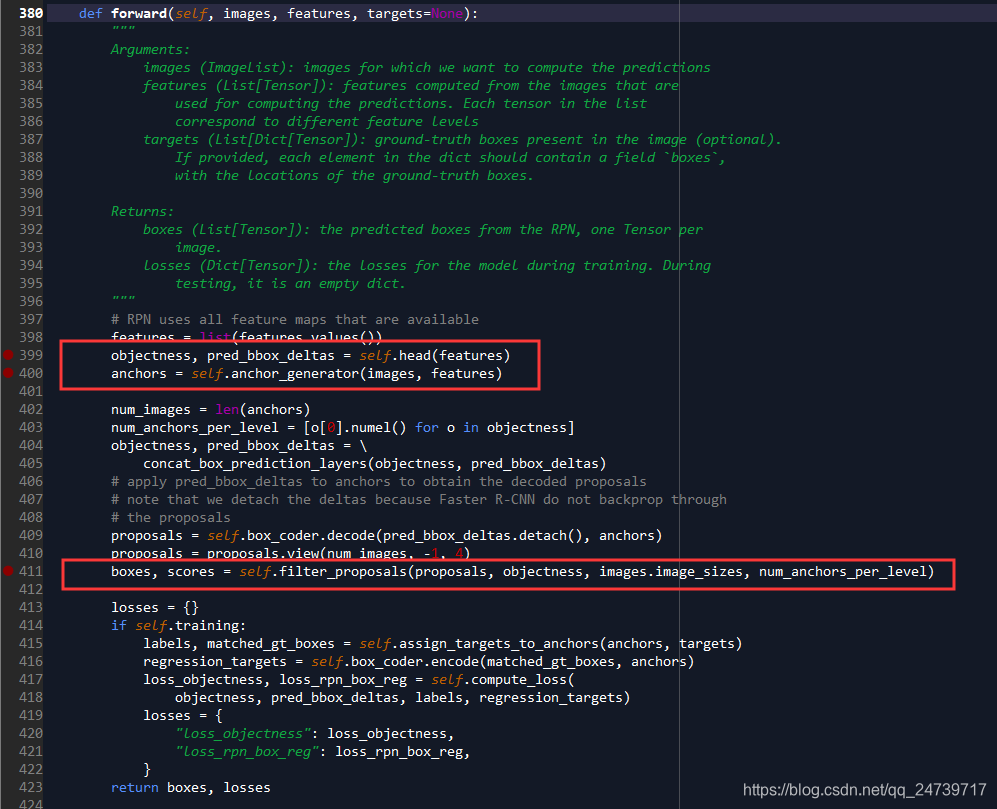
代码:objectness, pred_bbox_deltas = self.head(features)实现RPN网络的核心功能,输出分类向量objectness,实现前背景分类。把候选框的四个偏移量存在pred_bbox_deltas里面。
代码:anchors = self.anchor_generator(images, features)这里是生成边界框。
代码:boxes, scores = self.filter_proposals(proposals, objectness, images.image_sizes, num_anchors_per_level)使用NMS挑选边界框。
A 首先进入objectness, pred_bbox_deltas = self.head(features)
class RPNHead(nn.Module):
    """
    Adds a simple RPN Head with classification and regression heads

    Arguments:
        in_channels (int): number of channels of the input feature
        num_anchors (int): number of anchors to be predicted
    """

    def __init__(self, in_channels, num_anchors):
        super(RPNHead, self).__init__()
        self.conv = nn.Conv2d(
            in_channels, in_channels, kernel_size=3, stride=1, padding=1
        )
        self.cls_logits = nn.Conv2d(in_channels, num_anchors, kernel_size=1, stride=1)
        self.bbox_pred = nn.Conv2d(
            in_channels, num_anchors * 4, kernel_size=1, stride=1
        )

        for l in self.children():
            torch.nn.init.normal_(l.weight, std=0.01)
            torch.nn.init.constant_(l.bias, 0)

    def forward(self, x):
        logits = []
        bbox_reg = []
        for feature in x:
            t = F.relu(self.conv(feature))
            logits.append(self.cls_logits(t))
            bbox_reg.append(self.bbox_pred(t))
        return logits, bbox_reg
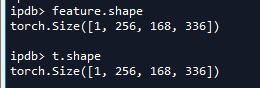
其中的x就是上一步生成的5个特征图。

查看对一个feature map的操作即可。
-
1.
F.relu(self.conv(feature)),进一步使用卷积,在使用relu激活函数。self.conv是self.conv = nn.Conv2d( in_channels, in_channels, kernel_size=3, stride=1, padding=1 )。
-
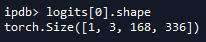
2.根据上面生成的feature map(t)进行逻辑回归:
logits.append(self.cls_logits(t))。查看self.cls_logits,是self.cls_logits = nn.Conv2d(in_channels, num_anchors, kernel_size=1, stride=1)。查看其shape可知num_anchors=3,也就是特征图上每一个像素点都会预测3个anchor。
-
3.根据上面生成的feature map(t)进行逻辑回归进行边界框回归:
bbox_reg.append(self.bbox_pred(t))。查看self.bbox_pred,是self.bbox_pred = nn.Conv2d( in_channels, num_anchors * 4, kernel_size=1, stride=1 ),可知边界框回归是对每anchor预测4个值。这就是12 = 3 * 4 的原因。

-
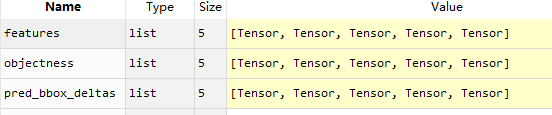
4.当5个特征图全部计算完毕后,会生成列表
objectness和pred_bbox_deltas,里面存储着上述5个特征图计算结果。
-
5.回顾学习笔记|Pytorch使用教程33(图像目标检测一瞥(上))中提到的2 Softmax 数据流:[num_anchors, h_f, w_f] 和 Regressors: [num_anchors * 4, h_f, w_f]。
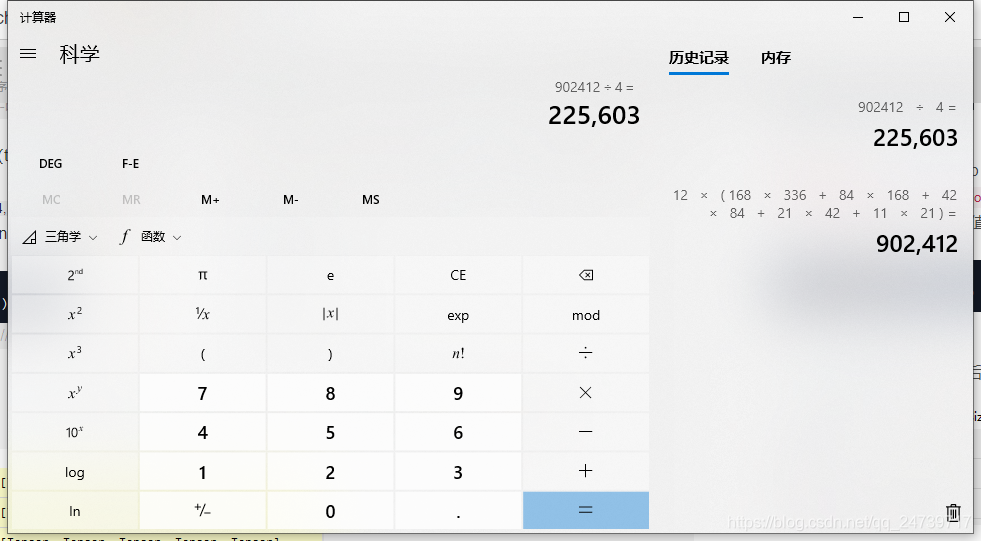
B 接着根据上述计算结果生成一系列anchors:anchors = self.anchor_generator(images, features)。查看生成20+万个anchor

这里225603个anchor,都会使用上述计算出来的偏移量,是和所有偏移量的总量是一致的(一个anchor需要一个偏移量):
C 下面一步则是对生成的anchor进行筛选:boxes, scores = self.filter_proposals(proposals, objectness, images.image_sizes, num_anchors_per_level)。进入(step into)。
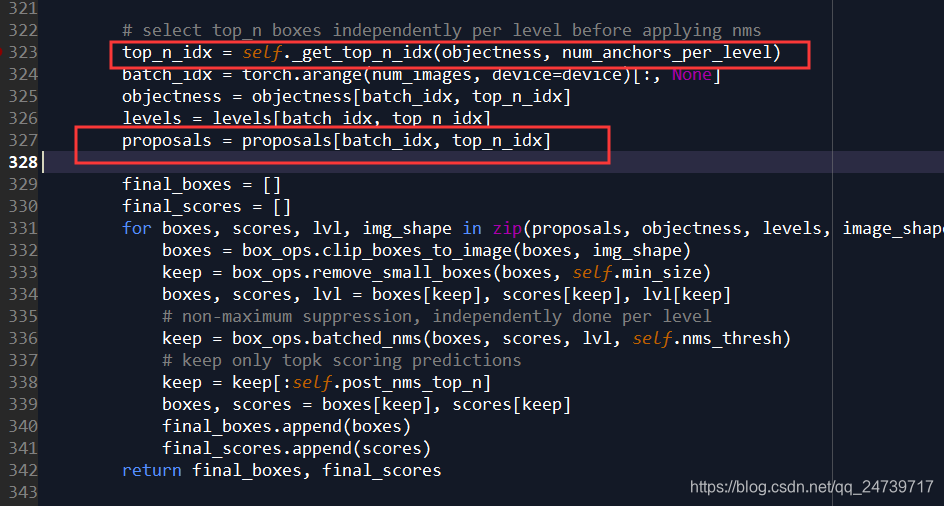
选取top_n 个anchor。如下图所示,1是因为该批次只有1张图片。4693个anchor是从20+W个anchor中筛选出来的。
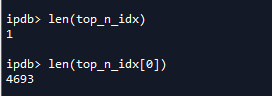
接下来使用NMS进一步筛选:keep = box_ops.batched_nms(boxes, scores, lvl, self.nms_thresh)。使用keep = keep[:self.post_nms_top_n]保留NMS处理过后的值,最终可以得到final_boxes, final_scores。查看输出值的shape,为什么是1000呢?这个是超参数。是在faster_rcnn.py中设置的。

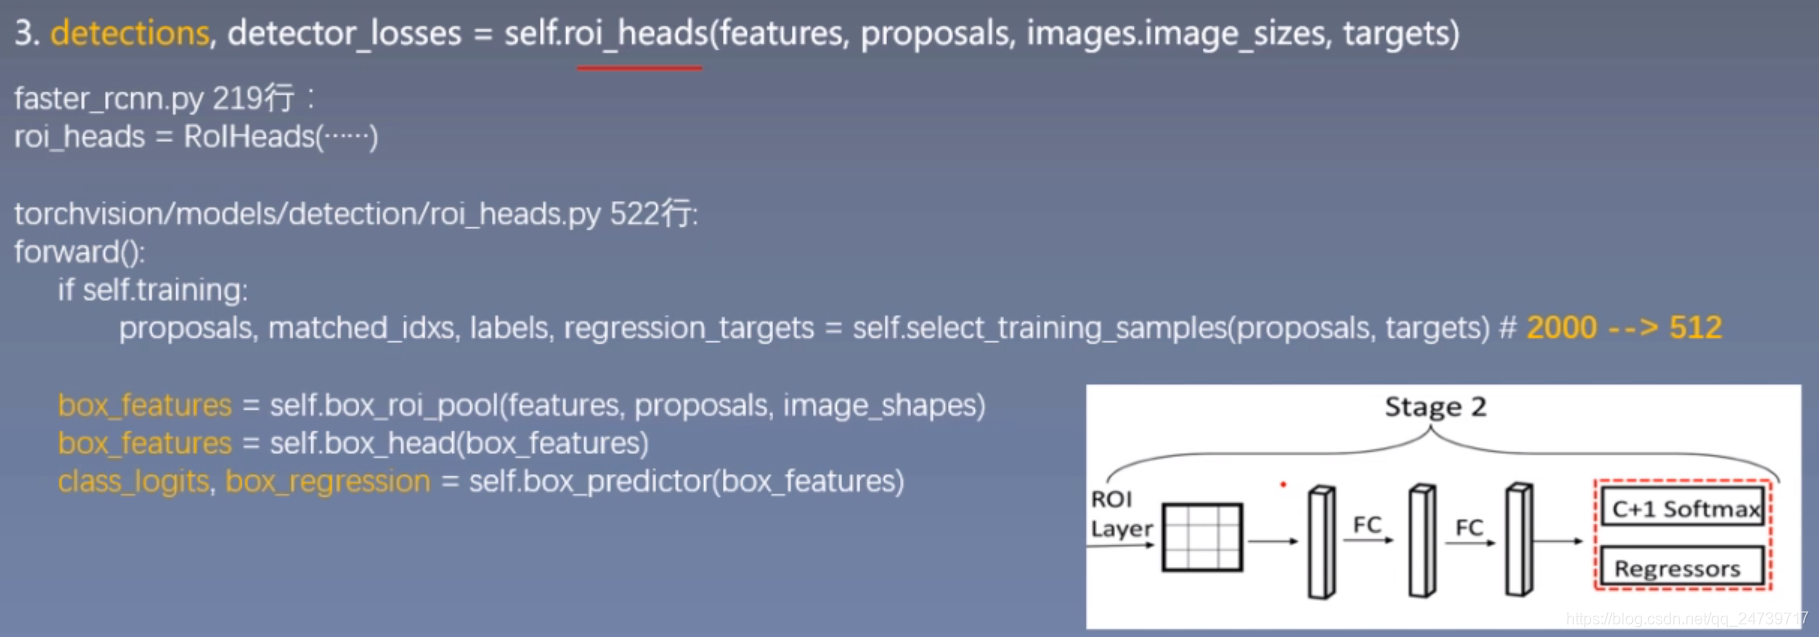
计算完后,返回,开始生成ROI。进入(step into)该代码。
查看相关代码:
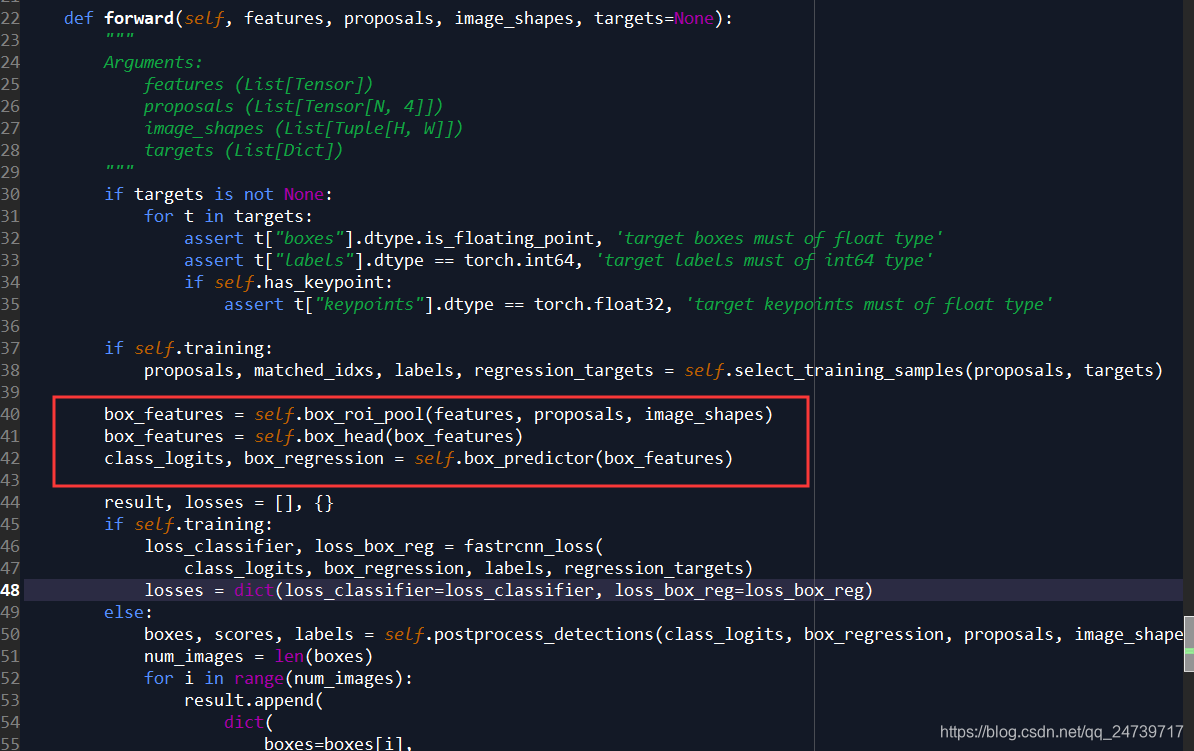
-
1.代码:
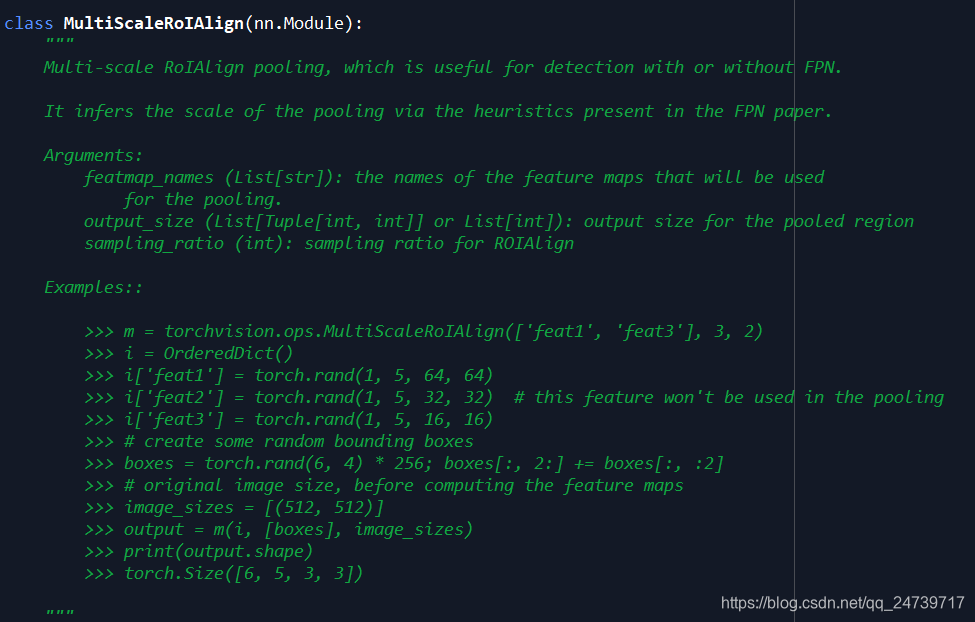
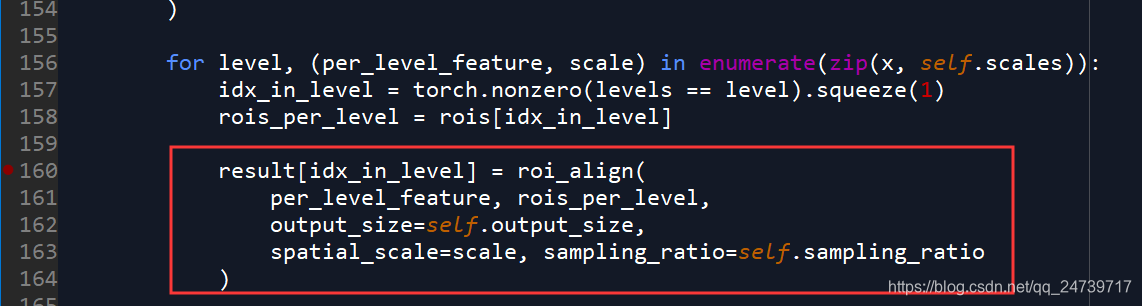
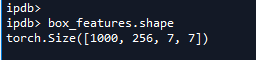
box_features = self.box_roi_pool(features, proposals, image_shapes)。使用proposals在feature map山进行“抠图”,即获取子特征区域,并池化成统一尺度(使得一些列不同尺度的特征图变成同一尺度的特征图)。
现在进入(step into)box_features = self.box_roi_pool(features, proposals, image_shapes)查看。
现关注forward函数。核心代码如下:
执行完之后,生成统一shape为:
-
2.代码:
box_features = self.box_head(box_features)。这个其实就是两个FC层。进图(step into)
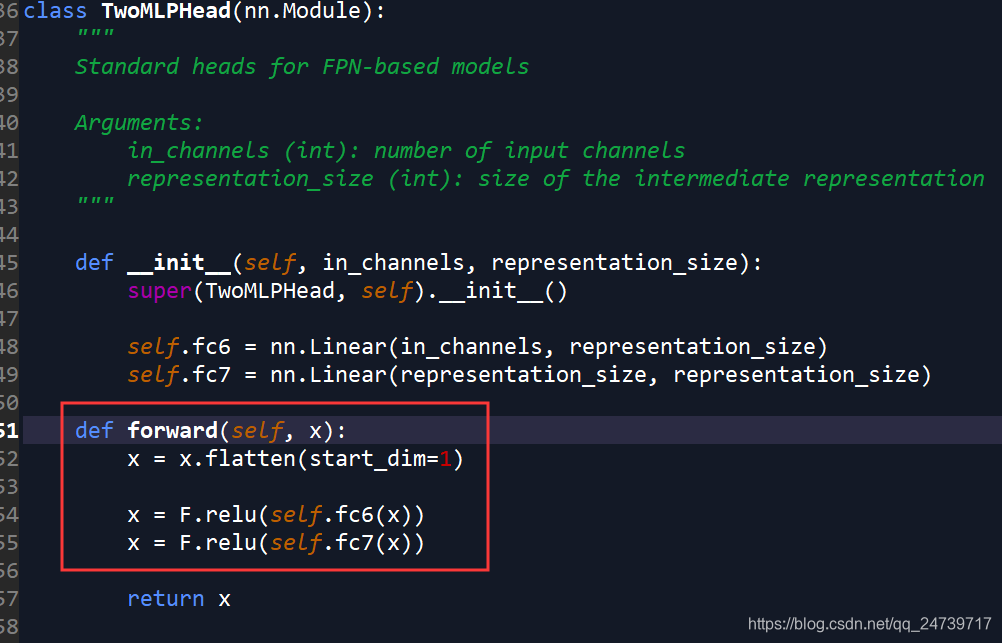
查看输出时的shape为:即把25677 映射成了1024

-
3.代码:
class_logits, box_regression = self.box_predictor(box_features)。进行类别预测和边界框回归。进入(step into)
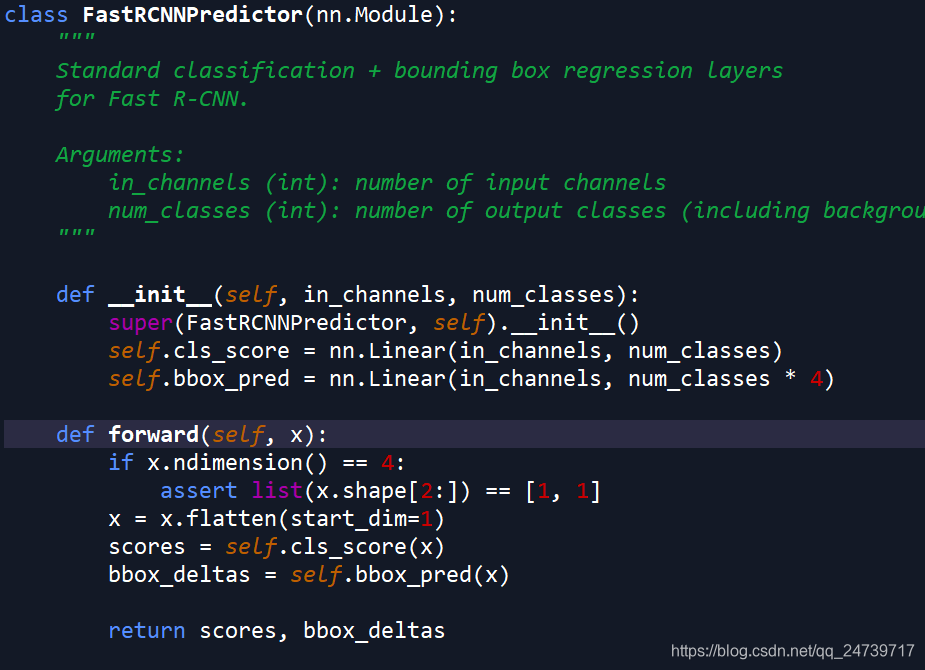
其中self.cls_score和self.bbox_pred均是使用两个全连接层进行预测。查看shape如下。因为使用的是COCO数据集,所有使用的是类别是91个(90个类别+1个背景类)。

-
4.计算完毕后查看
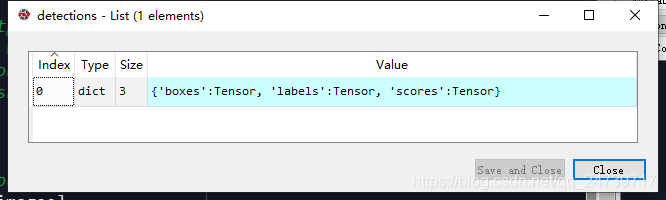
detections, detector_losses = self.roi_heads(features, proposals, images.image_sizes, targets)的输出。
最后使用detections = self.transform.postprocess(detections, images.image_sizes, original_image_sizes),把预测出的坐标映射到原图上。
总结:


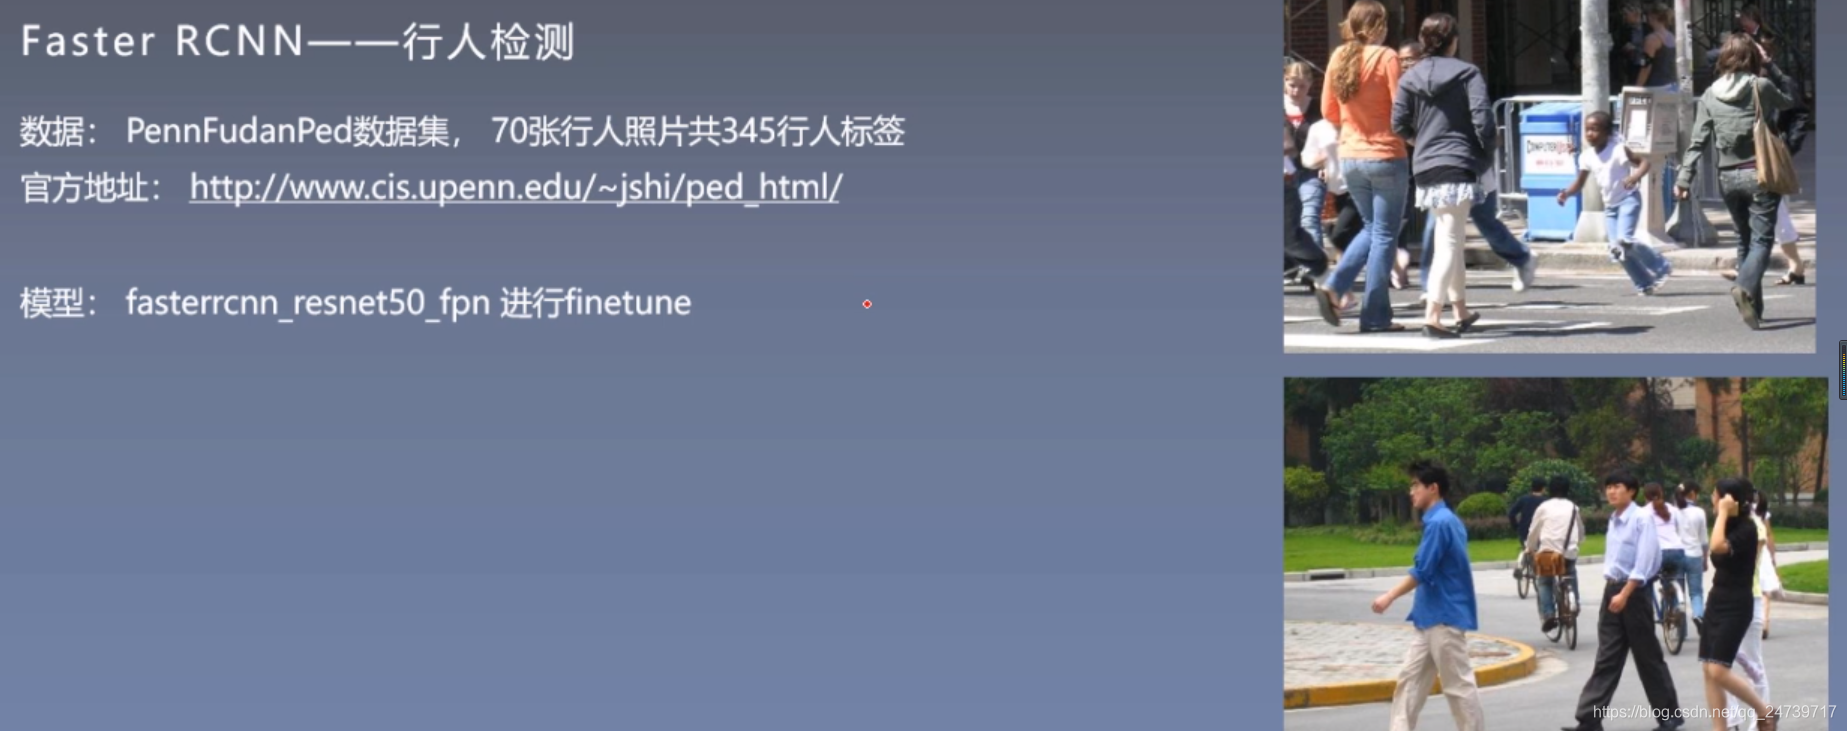
下面使用上述数据集进行训练测试:
测试代码:
import os
import time
import torch.nn as nn
import torch
import random
import numpy as np
import torchvision.transforms as transforms
import torchvision
from PIL import Image
import torch.nn.functional as F
from tools.my_dataset import PennFudanDataset
from tools.common_tools import set_seed
from torch.utils.data import DataLoader
from matplotlib import pyplot as plt
from torchvision.models.detection.faster_rcnn import FastRCNNPredictor
from torchvision.transforms import functional as F
set_seed(1) # 设置随机种子
BASE_DIR = os.path.dirname(os.path.abspath(__file__))
device = torch.device("cuda" if torch.cuda.is_available() else "cpu")
# classes_coco
COCO_INSTANCE_CATEGORY_NAMES = [
'__background__', 'person', 'bicycle', 'car', 'motorcycle', 'airplane', 'bus',
'train', 'truck', 'boat', 'traffic light', 'fire hydrant', 'N/A', 'stop sign',
'parking meter', 'bench', 'bird', 'cat', 'dog', 'horse', 'sheep', 'cow',
'elephant', 'bear', 'zebra', 'giraffe', 'N/A', 'backpack', 'umbrella', 'N/A', 'N/A',
'handbag', 'tie', 'suitcase', 'frisbee', 'skis', 'snowboard', 'sports ball',
'kite', 'baseball bat', 'baseball glove', 'skateboard', 'surfboard', 'tennis racket',
'bottle', 'N/A', 'wine glass', 'cup', 'fork', 'knife', 'spoon', 'bowl',
'banana', 'apple', 'sandwich', 'orange', 'broccoli', 'carrot', 'hot dog', 'pizza',
'donut', 'cake', 'chair', 'couch', 'potted plant', 'bed', 'N/A', 'dining table',
'N/A', 'N/A', 'toilet', 'N/A', 'tv', 'laptop', 'mouse', 'remote', 'keyboard', 'cell phone',
'microwave', 'oven', 'toaster', 'sink', 'refrigerator', 'N/A', 'book',
'clock', 'vase', 'scissors', 'teddy bear', 'hair drier', 'toothbrush'
]
def vis_bbox(img, output, classes, max_vis=40, prob_thres=0.4):
fig, ax = plt.subplots(figsize=(12, 12))
ax.imshow(img, aspect='equal')
out_boxes = output_dict["boxes"].cpu()
out_scores = output_dict["scores"].cpu()
out_labels = output_dict["labels"].cpu()
num_boxes = out_boxes.shape[0]
for idx in range(0, min(num_boxes, max_vis)):
score = out_scores[idx].numpy()
bbox = out_boxes[idx].numpy()
class_name = classes[out_labels[idx]]
if score < prob_thres:
continue
ax.add_patch(plt.Rectangle((bbox[0], bbox[1]), bbox[2] - bbox[0], bbox[3] - bbox[1], fill=False,
edgecolor='red', linewidth=3.5))
ax.text(bbox[0], bbox[1] - 2, '{:s} {:.3f}'.format(class_name, score), bbox=dict(facecolor='blue', alpha=0.5),
fontsize=14, color='white')
plt.show()
plt.close()
class Compose(object):
def __init__(self, transforms):
self.transforms = transforms
def __call__(self, image, target):
for t in self.transforms:
image, target = t(image, target)
return image, target
class RandomHorizontalFlip(object):
def __init__(self, prob):
self.prob = prob
def __call__(self, image, target):
if random.random() < self.prob:
height, width = image.shape[-2:]
image = image.flip(-1)
bbox = target["boxes"]
bbox[:, [0, 2]] = width - bbox[:, [2, 0]]
target["boxes"] = bbox
return image, target
class ToTensor(object):
def __call__(self, image, target):
image = F.to_tensor(image)
return image, target
if __name__ == "__main__":
# config
LR = 0.001
num_classes = 2
batch_size = 1
start_epoch, max_epoch = 0, 30
train_dir = os.path.join(BASE_DIR, "..", "..", "data", "PennFudanPed")
train_transform = Compose([ToTensor(), RandomHorizontalFlip(0.5)])
# step 1: data
train_set = PennFudanDataset(data_dir=train_dir, transforms=train_transform)
# 收集batch data的函数
def collate_fn(batch):
return tuple(zip(*batch))
train_loader = DataLoader(train_set, batch_size=batch_size, collate_fn=collate_fn)
# step 2: model
model = torchvision.models.detection.fasterrcnn_resnet50_fpn(pretrained=True)
in_features = model.roi_heads.box_predictor.cls_score.in_features
model.roi_heads.box_predictor = FastRCNNPredictor(in_features, num_classes) # replace the pre-trained head with a new one
model.to(device)
# step 3: loss
# in lib/python3.6/site-packages/torchvision/models/detection/roi_heads.py
# def fastrcnn_loss(class_logits, box_regression, labels, regression_targets)
# step 4: optimizer scheduler
params = [p for p in model.parameters() if p.requires_grad]
optimizer = torch.optim.SGD(params, lr=LR, momentum=0.9, weight_decay=0.0005)
lr_scheduler = torch.optim.lr_scheduler.StepLR(optimizer, step_size=10, gamma=0.1)
# step 5: Iteration
for epoch in range(start_epoch, max_epoch):
model.train()
for iter, (images, targets) in enumerate(train_loader):
images = list(image.to(device) for image in images)
targets = [{k: v.to(device) for k, v in t.items()} for t in targets]
# if torch.cuda.is_available():
# images, targets = images.to(device), targets.to(device)
loss_dict = model(images, targets) # images is list; targets is [ dict["boxes":**, "labels":**], dict[] ]
losses = sum(loss for loss in loss_dict.values())
print("Training:Epoch[{:0>3}/{:0>3}] Iteration[{:0>3}/{:0>3}] Loss: {:.4f} ".format(
epoch, max_epoch, iter + 1, len(train_loader), losses.item()))
optimizer.zero_grad()
losses.backward()
optimizer.step()
lr_scheduler.step()
# test
model.eval()
# config
vis_num = 5
vis_dir = os.path.join(BASE_DIR, "..", "..", "data", "PennFudanPed", "PNGImages")
img_names = list(filter(lambda x: x.endswith(".png"), os.listdir(vis_dir)))
random.shuffle(img_names)
preprocess = transforms.Compose([transforms.ToTensor(), ])
for i in range(0, vis_num):
path_img = os.path.join(vis_dir, img_names[i])
# preprocess
input_image = Image.open(path_img).convert("RGB")
img_chw = preprocess(input_image)
# to device
if torch.cuda.is_available():
img_chw = img_chw.to('cuda')
model.to('cuda')
# forward
input_list = [img_chw]
with torch.no_grad():
tic = time.time()
print("input img tensor shape:{}".format(input_list[0].shape))
output_list = model(input_list)
output_dict = output_list[0]
print("pass: {:.3f}s".format(time.time() - tic))
# visualization
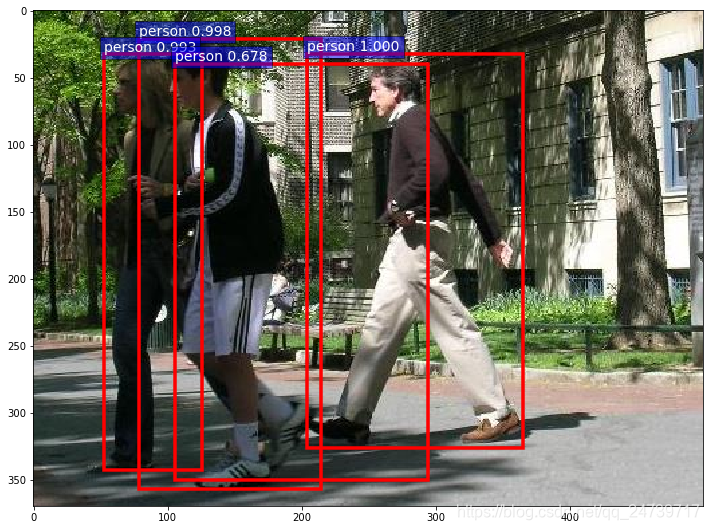
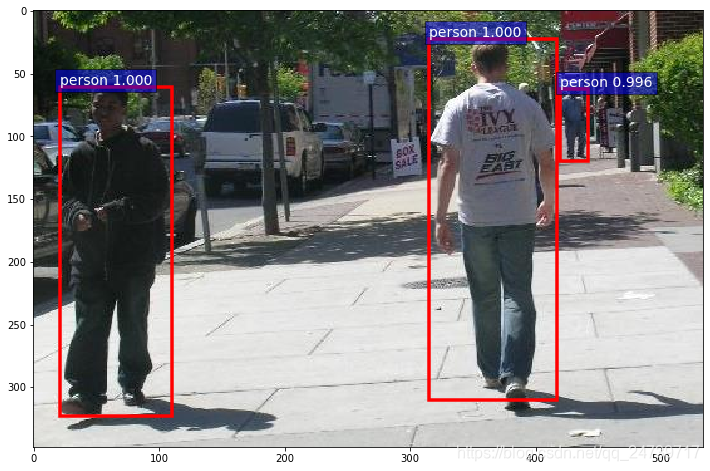
vis_bbox(input_image, output_dict, COCO_INSTANCE_CATEGORY_NAMES, max_vis=20, prob_thres=0.5) # for 2 epoch for nms
输出:
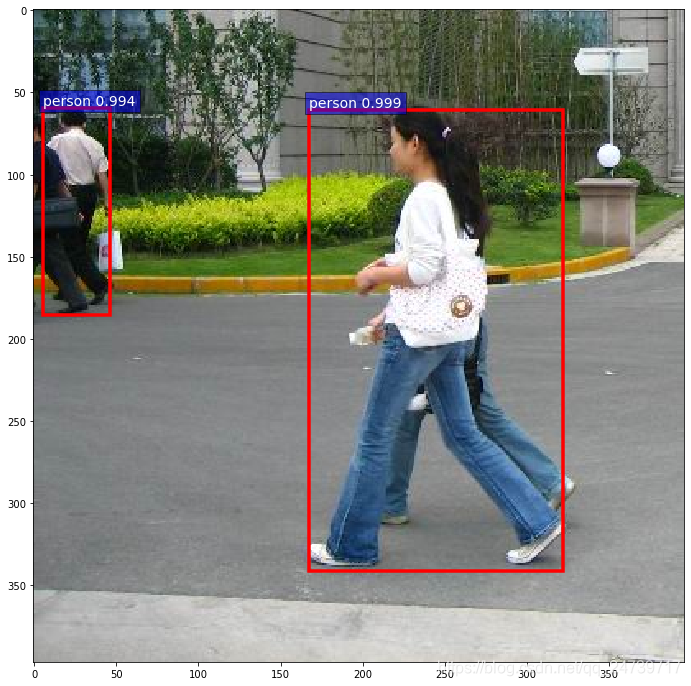
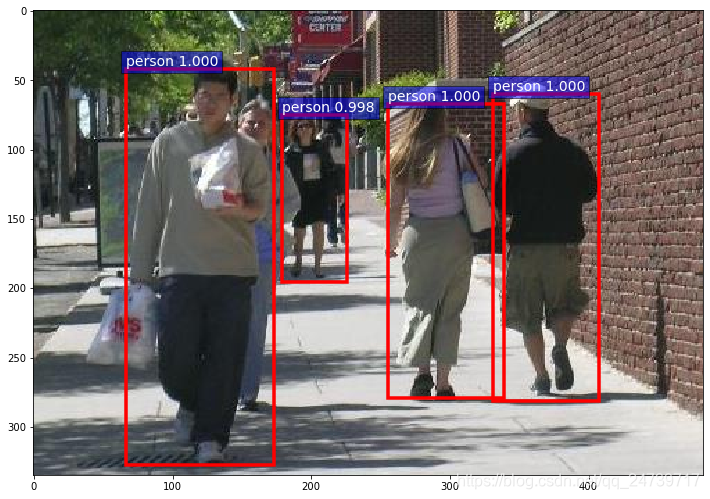
其中微调model成可以使用训练这个行人检测(只需要预测两个类:行人(前景)、背景):
    # step 2: model
    model = torchvision.models.detection.fasterrcnn_resnet50_fpn(pretrained=True)
    in_features = model.roi_heads.box_predictor.cls_score.in_features
    model.roi_heads.box_predictor = FastRCNNPredictor(in_features, num_classes) # replace the pre-trained head with a new one
先查看一下model的构成:
ipdb> model
FasterRCNN(
  (transform): GeneralizedRCNNTransform()
  (backbone): BackboneWithFPN(
    (body): IntermediateLayerGetter(
      (conv1): Conv2d(3, 64, kernel_size=(7, 7), stride=(2, 2), padding=(3, 3), bias=False)
      (bn1): FrozenBatchNorm2d(original_name=FrozenBatchNorm2d)
      (relu): ReLU(inplace=True)
      (maxpool): MaxPool2d(kernel_size=3, stride=2, padding=1, dilation=1, ceil_mode=False)
      (layer1): Sequential(
		......
      )
      (layer2): Sequential(
		......
    )
    (fpn): FeaturePyramidNetwork(
      (inner_blocks): ModuleList(
        (0): Conv2d(256, 256, kernel_size=(1, 1), stride=(1, 1))
        (1): Conv2d(512, 256, kernel_size=(1, 1), stride=(1, 1))
        (2): Conv2d(1024, 256, kernel_size=(1, 1), stride=(1, 1))
        (3): Conv2d(2048, 256, kernel_size=(1, 1), stride=(1, 1))
      )
      (layer_blocks): ModuleList(
        (0): Conv2d(256, 256, kernel_size=(3, 3), stride=(1, 1), padding=(1, 1))
        (1): Conv2d(256, 256, kernel_size=(3, 3), stride=(1, 1), padding=(1, 1))
        (2): Conv2d(256, 256, kernel_size=(3, 3), stride=(1, 1), padding=(1, 1))
        (3): Conv2d(256, 256, kernel_size=(3, 3), stride=(1, 1), padding=(1, 1))
      )
      (extra_blocks): LastLevelMaxPool()
    )
  )
  (rpn): RegionProposalNetwork(
    (anchor_generator): AnchorGenerator()
    (head): RPNHead(
      (conv): Conv2d(256, 256, kernel_size=(3, 3), stride=(1, 1), padding=(1, 1))
      (cls_logits): Conv2d(256, 3, kernel_size=(1, 1), stride=(1, 1))
      (bbox_pred): Conv2d(256, 12, kernel_size=(1, 1), stride=(1, 1))
    )
  )
  (roi_heads): RoIHeads(
    (box_roi_pool): MultiScaleRoIAlign()
    (box_head): TwoMLPHead(
      (fc6): Linear(in_features=12544, out_features=1024, bias=True)
      (fc7): Linear(in_features=1024, out_features=1024, bias=True)
    )
    (box_predictor): FastRCNNPredictor(
      (cls_score): Linear(in_features=1024, out_features=91, bias=True)
      (bbox_pred): Linear(in_features=1024, out_features=364, bias=True)
    )
  )
)
所以可知:

微调之后:

最后:
目标检测推荐github: https://github com/amusi/awesome-object-detection


 720
720


 被折叠的 条评论
为什么被折叠?
被折叠的 条评论
为什么被折叠?
 到【灌水乐园】发言


