原文链接:http://blog.csdn.net/qq_31001665
如有侵权,请联系博主删除博客,谢谢
API文档
文档在开发中的价值与作用:
作为一个开发人员,平时看得最多的恐怕就是各式各样的文档了。并且在开发中我们也避免不了的需要自己去书写文档,比如作为后台开发人员,我们书写最多的应该就是接口文档了。前端人员会按照我们给出的文档来进行前端开发,并且按照文档细节来构建不同的传输协议,对象定义,字段解析等等。
我曾长时间的使用EXCEl来书写接口文档,可是逐渐的也暴露出一些问题:
- 接口过多,每一个接口需要一个入參定义以及出參定义,不同的请求类型。书写过多,浪费时间。
- 输出参数类型定义与文档不符,前端外无法解析,耗费时间。
- 接口修改需要同步修改文档,重复工作。
- 多人开发文档常常造成冲突。
为了解决以上所描述的问题,我们引入了Swagger2,它可以减少我们书写文档的工作量,并且可以保持代码与文档的一致性。同时,可以通过页面测试来直接挑事接口。说了这么多的好处,我们来看看我们我们应该如何在SpringBoot中如何使用Swagger2吧。

这样的文档是不是看起来很简单明了呢。
引入Swagger2依赖:
<dependency>
<groupId>io.springfox</groupId>
<artifactId>springfox-swagger2</artifactId>
<version>2.2.2</version>
</dependency>
<dependency>
<groupId>io.springfox</groupId>
<artifactId>springfox-swagger-ui</artifactId>
<version>2.2.2</version>
</dependency>
在引入Swagger2的依赖后,我们需要创建一个配置类。这个配置类应该是和你的启动类是同级的,这里,我直接在启动类中进行代码书写了(就是这么懒……)
/**
 * 启动类
 */
@RequestMapping(value = "/")
@RestController
@SpringBootApplication
@MapperScan(basePackages = "com.zzp.dao")
@Configuration
@EnableSwagger2
public class Round1Application {

    @RequestMapping(value = "/",method = RequestMethod.GET)
    public String helloWorld(){
        return "Hello World";
    }
    public static void main(String[] args) {
        SpringApplication.run(Round1Application.class, args);
    }


    @Bean
    public Docket createApi(){
        return new Docket(DocumentationType.SWAGGER_2).apiInfo(apiInfo()).select()
                .apis(RequestHandlerSelectors.basePackage("com.zzp.controller"))
                .paths(PathSelectors.any())
                .build();
    }

    private ApiInfo apiInfo(){
        return new ApiInfoBuilder()
                .title("API文档")
                .description("API使用即参数定义")
                .termsOfServiceUrl("http://blog.csdn.net/qq_31001665")
                .contact("ZZP")
                .version("0.1")
                .build();
    }
}
- 1
- 2
- 3
- 4
- 5
- 6
- 7
- 8
- 9
- 10
- 11
- 12
- 13
- 14
- 15
- 16
- 17
- 18
- 19
- 20
- 21
- 22
- 23
- 24
- 25
- 26
- 27
- 28
- 29
- 30
- 31
- 32
- 33
- 34
- 35
- 36
- 37
- 38
我们通过@Configuration注解,让Spring启动时加载配置,通过@EnableSwagger2开启Swagger。话说一般开庆某个功能都是@EnableXXX的。
apiInfo中的内容是文档的一些基本配置信息,而createApi中则是确定扫面哪些包下的接口形成文档,以及文档展示哪些信息。注意这里是一个Docket的bean。
完成配置类的书写后我们已经可以直接访问我们的文档了,启动项目,访问
http://localhost:9090/swagger-ui.html
是不是看见如下内容了呢:
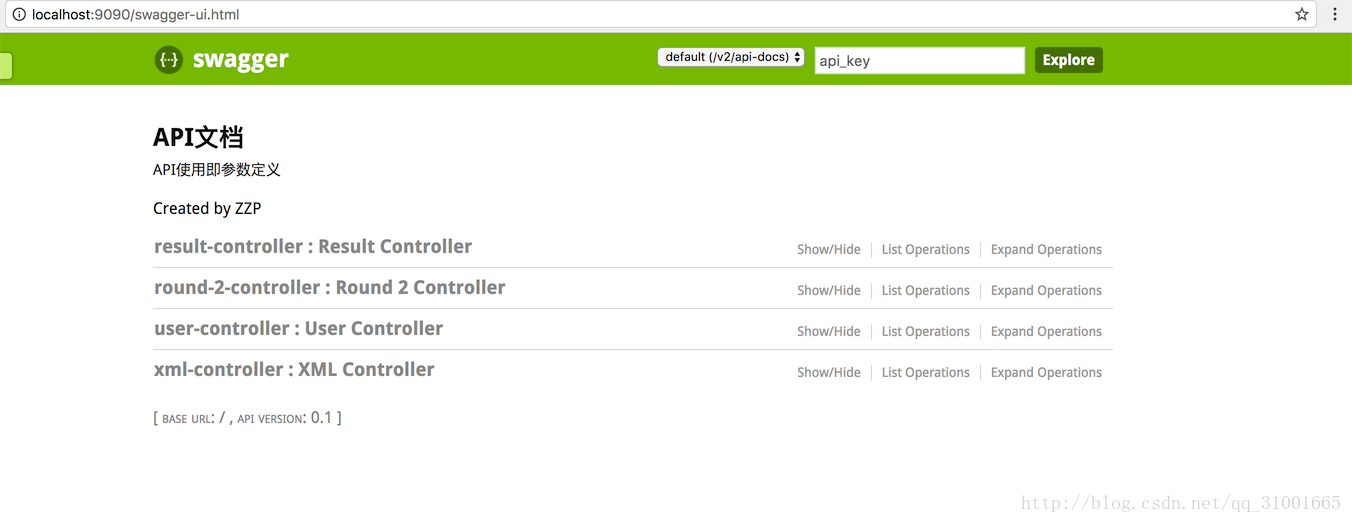
没错这就是我们的四个controller,每个点击开来就可以看到我们的每一个接口了。不过没有中文注释的接口始终对于用户不太友好,我们接下来的工作就是给每一个接口添加注释。这里我们使用@ApiOperation注解来注释我们接口的一些基本信息,使用@ApiImplicitParams,@ApiImplicitParam注解来注释我们的入參信息。
@RequestMapping("/user")
@RestController
public class UserController {

    @Autowired
    private UserService userService;

    /**
     * 添加用户
     * @param tel 注册手机号
     * @param pwd 设置密码
     */
    @ApiOperation(value = "创建用户",notes = "使用手机以及密码初始化用户信息")
    @ApiImplicitParams({
            @ApiImplicitParam(name = "tel",value = "用户手机号",required = true,dataType = "String"),
            @ApiImplicitParam(name = "pwd",value = "用户初始密码",required = true,dataType = "String")
    })
    @PostMapping("/createUser")
    public void createUser(@RequestParam("tel") String tel, @RequestParam("pwd") String pwd){
        userService.createUser(tel,pwd);
    }

    /**
     * 添加用户2
     * @param userInfo
     * @Valid添加表单验证,BindingResult获取验证结果
     */
    @ApiOperation(value = "创建用户V2版本",notes = "使用UserInfo对象初始化用户信息")
    @ApiImplicitParam(name = "userInfo",value = "用户对象",required = true,dataType = "UserInfo")
    @PostMapping("/createUser2")
    public String createUser2(@Valid UserInfo userInfo, BindingResult bindingResult){
        if (bindingResult.hasErrors()){
            return bindingResult.getFieldError().getDefaultMessage();
        }
        userService.createUser(userInfo.getTel(),userInfo.getPassWord());
        return "OK";
    }

    /**
     * 更新用户信息
     * @param user_id 用户ID
     * @param nickName 昵称
     */
    @PutMapping("/updateUser/{id}")
    public void updateUser(@PathVariable("id") String user_id, @RequestParam("nickName") String nickName){
        userService.updateUser(user_id,nickName);
    }

    /**
     * 获取用户信息
     * @param id 用户Id
     * @return
     */
    @GetMapping("/getUser/{id}")
    public UserInfo getUser(@PathVariable("id")  Integer id){
        return userService.getUser(id);
    }

    /**
     * 删除用户
     * @param id
     */
    @DeleteMapping("/deleteUserByUserId/{id}")
    public void deleteUserByUserId(@PathVariable("id")  Integer id){
        userService.deleteUserByUserId(id);
    }

    /**
     * 使用@RequestBody获取参数,用map类型接收,再取出
     * @param reqMap
     */
    @PostMapping("/createUserByMap")
    public void createUserByMap(@RequestBody Map<String,Object> reqMap){
        String tel = reqMap.get("tel").toString();
        String pwd = reqMap.get("pwd").toString();
        userService.createUser(tel,pwd);
    }
}
- 1
- 2
- 3
- 4
- 5
- 6
- 7
- 8
- 9
- 10
- 11
- 12
- 13
- 14
- 15
- 16
- 17
- 18
- 19
- 20
- 21
- 22
- 23
- 24
- 25
- 26
- 27
- 28
- 29
- 30
- 31
- 32
- 33
- 34
- 35
- 36
- 37
- 38
- 39
- 40
- 41
- 42
- 43
- 44
- 45
- 46
- 47
- 48
- 49
- 50
- 51
- 52
- 53
- 54
- 55
- 56
- 57
- 58
- 59
- 60
- 61
- 62
- 63
- 64
- 65
- 66
- 67
- 68
- 69
- 70
- 71
- 72
- 73
- 74
- 75
- 76
- 77
- 78
@RestController
@RequestMapping("/xml")
public class XMLController {
@Autowired
private XMLService service;
@Autowired
private ExceptionHandle handle;
/**
* 更新用户信息
* @param user_id 用户ID
* @param nickName 昵称
*/
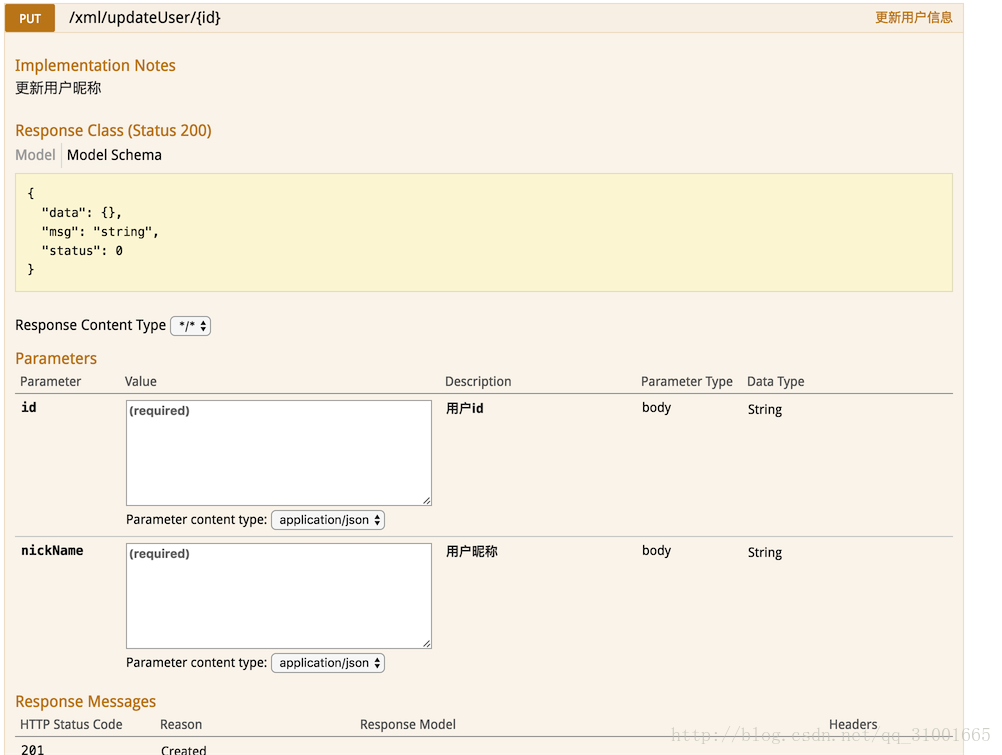
@ApiOperation(value = "更新用户信息",notes = "更新用户昵称")
@ApiImplicitParams({
@ApiImplicitParam(name = "id",value = "用户id",required = true,dataType = "String"),
@ApiImplicitParam(name = "nickName",value = "用户昵称",required = true,dataType = "String")
})
@PutMapping("/updateUser/{id}")
public Result updateUser(@PathVariable("id") String user_id, @RequestParam("nickName") String nickName){
Result result = ResultUtil.success();
try {
service.updateUser(user_id,nickName);
}catch (Exception e){
result = handle.exceptionGet(e);
}
return result;
}
/**
* 获取用户信息
* @param id 用户Id
* @return
*/
@ApiOperation(value = "获取用户信息",notes = "返回用户信息")
@ApiImplicitParam(name = "id",value = "用户id",required = true,dataType = "Integer",paramType = "path")
@GetMapping("/getUser/{id}")
public Result getUser(@PathVariable("id") Integer id){
Result result = ResultUtil.success();
try {
result.setData(service.getUser(id));
}catch (Exception e){
result = handle.exceptionGet(e);
}
return result;
}
/**
* 删除用户
* @param tel
*/
@ApiOperation(value = "删除用户",notes = "根据用户id删除用户")
@ApiImplicitParam(name = "id",value = "用户id",required = true,dataType = "Integer")
@DeleteMapping("/deleteUserByUserId/{tel}")
public Result deleteUserByUserId(@PathVariable("tel") String tel){
Result result = ResultUtil.success();
try {
UserInfo user = new UserInfo();
user.setTel(tel);
service.deleteUserByUserId(user);
}catch (Exception e){
result = handle.exceptionGet(e);
}
return result;
}
/**
* 使用@RequestBody获取参数,用map类型接收,再取出
* @param reqMap
*/
@ApiOperation(value = "创建用户V3版本",notes = "返回用户信息")
@ApiImplicitParam(name = "Map",value = "map集合",required = true,dataType = "Map")
@PostMapping("/createUserByMap")
public Result createUserByMap(@RequestBody Map<String,Object> reqMap){
Result result = ResultUtil.success();
try {
service.createUser(reqMap);
}catch (Exception e){
result = handle.exceptionGet(e);
}
return result;
}
}
- 1
- 2
- 3
- 4
- 5
- 6
- 7
- 8
- 9
- 10
- 11
- 12
- 13
- 14
- 15
- 16
- 17
- 18
- 19
- 20
- 21
- 22
- 23
- 24
- 25
- 26
- 27
- 28
- 29
- 30
- 31
- 32
- 33
- 34
- 35
- 36
- 37
- 38
- 39
- 40
- 41
- 42
- 43
- 44
- 45
- 46
- 47
- 48
- 49
- 50
- 51
- 52
- 53
- 54
- 55
- 56
- 57
- 58
- 59
- 60
- 61
- 62
- 63
- 64
- 65
- 66
- 67
- 68
- 69
- 70
- 71
- 72
- 73
- 74
- 75
- 76
- 77
- 78
- 79
- 80
- 81
- 82
- 83
- 84
- 85
- 86
- 87
- 88
- 89
- 90
- 91
- 92
- 93
这里我给两个controller都加入了直接配置,因为在使用mybatis后,spring会默认使用mybatis配置,jdbc链接数据库会报错:Invalid bound statement (not found): com.zzp.dao.UserInfoMapper.getUser。大家在做项目时,一定要使用一种方法来链接数据库,不然各种错误会一直困扰着你。
我们完成上诉代码的添加后就可以在刚才的地址中看到我们配置的接口信息了
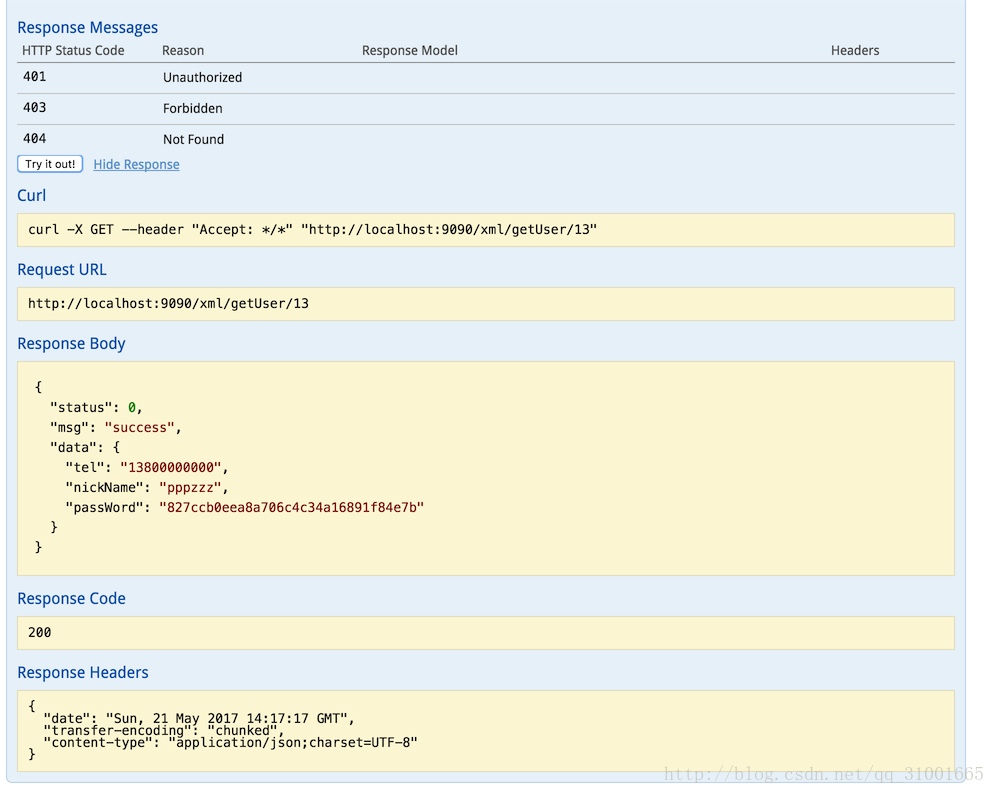
并且我们可以点击 Try it out!来测试我们的接口了。我们这里使用Get方法来获取用户信息的接口测试一下,发现我们已经获取了用户信息,要注意的是如果你也是直接通过URL路径中获取参数,那需要添加paramType = “path”这个参数,不然是无法获取到id值的。
Swagger2写在最后的话:
相比较之前我们使用EXCEl来书写接口文档,Swagger2的确方便了许多,并且书写量也大大减少,看似使用Swagger2来对API文档进行管理是一个不错的选择。其实不然(逃),因为Swagger2对于代码的污染和侵入性我认为太大了。并且你应该也发现了,当你使用Map作为参数时,Swagger2很难对Map内的每一个参数进行说明(你可以写超多文字描述)。所以在实际开发中,Swagger2的使用并不是很多,如果你是个人开发者,那使用简单的Swagger2的确可以满足需求。如果你构建的是庞大的接口系统时。我的建议是使用Swagger2和MarkDown配合完成文档的书写。MarkDown书写方便高效,语法简单,是我们值得学习的。而Swagger2提供接口调试以及字段名匹配来保证入參与出參的一致性。


 1085
1085

 被折叠的 条评论
为什么被折叠?
被折叠的 条评论
为什么被折叠?
 到【灌水乐园】发言


