


本文主要是一下两篇文章的综合,感觉都不错,拿来报讯学习一下
http://blog.csdn.net/qq_33556185/article/details/51579680
http://blog.csdn.net/u013142781/article/details/50629708
详解登录认证及授权--Shiro系列(一)
Apache Shiro 是一个强大而灵活的开源安全框架,它干净利落地处理身份认证,授权,企业会话管理和加密。Apache Shiro 的首要目标是易于使用和理解。安全有时候是很复杂的,甚至是痛苦的,但它没有必要这样。框架应该尽可能掩盖复杂的地方,露出一个干净而直观的 API,来简化开发人员在使他们的应用程序安全上的努力。
以下是你可以用 Apache Shiro 所做的事情:
验证用户来核实他们的身份
对用户执行访问控制,如:
判断用户是否被分配了一个确定的安全角色。
判断用户是否被允许做某事。
在任何环境下使用 Session API,即使没有 Web 或 EJB 容器。
在身份验证,访问控制期间或在会话的生命周期,对事件作出反应。
聚集一个或多个用户安全数据的数据源,并作为一个单一的复合用户“视图”。
启用单点登录(SSO)功能。
并发登录管理(一个账号多人登录作踢人操作)。
…
以及更多——全部集成到紧密结合的易于使用的 API 中。
目前Java领域主流的安全框架有SpringSecurity和Shiro,相比于SpringSecurity,Shiro轻量化,简单容易上手,且不局限于Java和Spring;SpringSecurity太笨重了,难以上手,且只能在Spring里用,所以博主极力推荐Shiro。
spring集成shiro要用到shiro-all-1.2.4.jar
jar包下载地址:http://download.csdn.net/detail/qq_33556185/9540257
第一步:配置shiro.xml文件
shiro.xml配置文件代码:
- <?xml version="1.0" encoding="UTF-8"?>
- <beans xmlns="http://www.springframework.org/schema/beans" xmlns:xsi="http://www.w3.org/2001/XMLSchema-instance" xmlns:tx="http://www.springframework.org/schema/tx" xmlns:context="http://www.springframework.org/schema/context"
- xmlns:mvc="http://www.springframework.org/schema/mvc"
- xsi:schemaLocation="http://www.springframework.org/schema/beans
- http://www.springframework.org/schema/beans/spring-beans-4.2.xsd
- http://www.springframework.org/schema/tx
- http://www.springframework.org/schema/tx/spring-tx-4.2.xsd
- http://www.springframework.org/schema/context
- http://www.springframework.org/schema/context/spring-context-4.2.xsd
- http://www.springframework.org/schema/mvc
- http://www.springframework.org/schema/mvc/spring-mvc-4.2.xsd">
- <!-- Shiro Filter 拦截器相关配置 -->
- <bean id="shiroFilter" class="org.apache.shiro.spring.web.ShiroFilterFactoryBean">
- <!-- securityManager -->
- <property name="securityManager" ref="securityManager" />
- <!-- 登录路径 -->
- <property name="loginUrl" value="/toLogin" />
- <!-- 用户访问无权限的链接时跳转此页面 -->
- <property name="unauthorizedUrl" value="/unauthorizedUrl.jsp" />
- <!-- 过滤链定义 -->
- <property name="filterChainDefinitions">
- <value>
- /loginin=anon
- /toLogin=anon
- /css/**=anon
- /html/**=anon
- /images/**=anon
- /js/**=anon
- /upload/**=anon
- <!-- /userList=roles[admin] -->
- /userList=authc,perms[/userList]
- /toDeleteUser=authc,perms[/toDeleteUser]
- /** = authc
- </value>
- </property>
- </bean>
- <!-- securityManager -->
- <bean id="securityManager" class="org.apache.shiro.web.mgt.DefaultWebSecurityManager">
- <property name="realm" ref="myRealm" />
- </bean>
- <!-- 自定义Realm实现 -->
- <bean id="myRealm" class="com.core.shiro.realm.CustomRealm" />
- <bean id="lifecycleBeanPostProcessor" class="org.apache.shiro.spring.LifecycleBeanPostProcessor" />
- <bean class="org.springframework.web.servlet.view.InternalResourceViewResolver">
- <property name="prefix" value="/"/>
- <property name="suffix" value=".jsp"></property>
- </bean>
- </beans>
anno代表不需要授权即可访问,对于静态资源,访问权限都设置为anno
authc表示需要登录才可访问
/userList=roles[admin]的含义是要访问/userList需要有admin这个角色,如果没有此角色访问此URL会返回无授权页面
/userList=authc,perms[/userList]的含义是要访问/userList需要有/userList的权限,要是没分配此权限访问此URL会返回无授权页面
- <bean id="myRealm" class="com.core.shiro.realm.CustomRealm" />
第二步:在web.xml文件里加载shiro.xml,和加载其他配置文件是一样的,就不多说了
- <context-param>
- <param-name>contextConfigLocation</param-name>
- <param-value>
- classpath*:/spring/spring-common.xml,
- classpath*:/spring/shiro.xml
- </param-value>
- </context-param>
第三步:配置shiroFilter,所有请求都要先进shiro的代理类
- <!--
- DelegatingFilterProxy类是一个代理类,所有的请求都会首先发到这个filter代理
- 然后再按照"filter-name"委派到spring中的这个bean。
- 在Spring中配置的bean的name要和web.xml中的<filter-name>一样.
- targetFilterLifecycle,是否由spring来管理bean的生命周期,设置为true有个好处,可以调用spring后续的bean
- -->
- <filter>
- <filter-name>shiroFilter</filter-name>
- <filter-class>
- org.springframework.web.filter.DelegatingFilterProxy
- </filter-class>
- <init-param>
- <param-name>targetFilterLifecycle</param-name>
- <param-value>true</param-value>
- </init-param>
- </filter>
- <filter-mapping>
- <filter-name>shiroFilter</filter-name>
- <url-pattern>/*</url-pattern>
- </filter-mapping>
- package com.core.shiro.realm;
- import java.util.List;
- import javax.annotation.Resource;
- import org.apache.shiro.authc.AuthenticationException;
- import org.apache.shiro.authc.AuthenticationInfo;
- import org.apache.shiro.authc.AuthenticationToken;
- import org.apache.shiro.authc.SimpleAuthenticationInfo;
- import org.apache.shiro.authc.UsernamePasswordToken;
- import org.apache.shiro.authz.AuthorizationInfo;
- import org.apache.shiro.authz.SimpleAuthorizationInfo;
- import org.apache.shiro.realm.AuthorizingRealm;
- import org.apache.shiro.subject.PrincipalCollection;
- import org.springframework.util.StringUtils;
- import com.core.shiro.dao.IPermissionDao;
- import com.core.shiro.dao.IRoleDao;
- import com.core.shiro.dao.IUserDao;
- import com.core.shiro.entity.Permission;
- import com.core.shiro.entity.Role;
- import com.core.shiro.entity.User;
- public class CustomRealm extends AuthorizingRealm{
- @Resource
- private IUserDao userDao;
- @Resource
- private IPermissionDao permissionDao;
- @Resource
- private IRoleDao roleDao;
- /**
- * 添加角色
- * @param username
- * @param info
- */
- private void addRole(String username, SimpleAuthorizationInfo info) {
- List<Role> roles = roleDao.findByUser(username);
- if(roles!=null&&roles.size()>0){
- for (Role role : roles) {
- info.addRole(role.getRoleName());
- }
- }
- }
- /**
- * 添加权限
- * @param username
- * @param info
- * @return
- */
- private SimpleAuthorizationInfo addPermission(String username,SimpleAuthorizationInfo info) {
- List<Permission> permissions = permissionDao.findPermissionByName(username);
- for (Permission permission : permissions) {
- info.addStringPermission(permission.getUrl());//添加权限
- }
- return info;
- }
- /**
- * 获取授权信息
- */
- protected AuthorizationInfo doGetAuthorizationInfo(PrincipalCollection principals) {
- //用户名
- String username = (String) principals.fromRealm(getName()).iterator().next();
- //根据用户名来添加相应的权限和角色
- if(!StringUtils.isEmpty(username)){
- SimpleAuthorizationInfo info = new SimpleAuthorizationInfo();
- addPermission(username,info);
- addRole(username, info);
- return info;
- }
- return null;
- }
- /**
- * 登录验证
- */
- protected AuthenticationInfo doGetAuthenticationInfo(AuthenticationToken authcToken ) throws AuthenticationException {
- //令牌——基于用户名和密码的令牌
- UsernamePasswordToken token = (UsernamePasswordToken) authcToken;
- //令牌中可以取出用户名
- String accountName = token.getUsername();
- //让shiro框架去验证账号密码
- if(!StringUtils.isEmpty(accountName)){
- User user = userDao.findUser(accountName);
- if(user != null){
- return new SimpleAuthenticationInfo(user.getUserName(), user.getPassword(), getName());
- }
- }
- return null;
- }
- }
- package com.core.shiro.controller;
- import javax.servlet.http.HttpServletRequest;
- import org.apache.shiro.SecurityUtils;
- import org.apache.shiro.authc.AuthenticationException;
- import org.apache.shiro.authc.UsernamePasswordToken;
- import org.apache.shiro.crypto.hash.Md5Hash;
- import org.apache.shiro.subject.Subject;
- import org.springframework.stereotype.Controller;
- import org.springframework.web.bind.annotation.RequestMapping;
- @Controller
- public class ShiroAction {
- @RequestMapping("loginin")
- public String login(HttpServletRequest request){
- //当前Subject
- Subject currentUser = SecurityUtils.getSubject();
- //加密(md5+盐),返回一个32位的字符串小写
- String salt="("+request.getParameter("username")+")";
- String md5Pwd=new Md5Hash(request.getParameter("password"),salt).toString();
- //传递token给shiro的realm
- UsernamePasswordToken token = new UsernamePasswordToken(request.getParameter("username"),md5Pwd);
- try {
- currentUser.login(token);
- return "welcome";
- } catch (AuthenticationException e) {//登录失败
- request.setAttribute("msg", "用户名和密码错误");
- }
- return "login";
- }
- @RequestMapping("toLogin")
- public String toLogin(){
- return "login";
- }
- }
第六步:login页面 略
login请求调用currentUser.login之后,shiro会将token传递给自定义realm,此时realm会先调用doGetAuthenticationInfo(AuthenticationToken authcToken )登录验证的方法,验证通过后会接着调用 doGetAuthorizationInfo(PrincipalCollection principals)获取角色和权限的方法(授权),最后返回视图。
当其他请求进入shiro时,shiro会调用doGetAuthorizationInfo(PrincipalCollection principals)去获取授权信息,若是没有权限或角色,会跳转到未授权页面,若有权限或角色,shiro会放行,ok,此时进入真正的请求方法……
到此shiro的认证及授权便完成了。
Shiro安全框架入门篇(登录验证实例详解与源码)
一、Shiro框架简单介绍
Apache Shiro是Java的一个安全框架,旨在简化身份验证和授权。Shiro在JavaSE和JavaEE项目中都可以使用。它主要用来处理身份认证,授权,企业会话管理和加密等。Shiro的具体功能点如下:
(1)身份认证/登录,验证用户是不是拥有相应的身份;
(2)授权,即权限验证,验证某个已认证的用户是否拥有某个权限;即判断用户是否能做事情,常见的如:验证某个用户是否拥有某个角色。或者细粒度的验证某个用户对某个资源是否具有某个权限;
(3)会话管理,即用户登录后就是一次会话,在没有退出之前,它的所有信息都在会话中;会话可以是普通JavaSE环境的,也可以是如Web环境的;
(4)加密,保护数据的安全性,如密码加密存储到数据库,而不是明文存储;
(5)Web支持,可以非常容易的集成到Web环境;
Caching:缓存,比如用户登录后,其用户信息、拥有的角色/权限不必每次去查,这样可以提高效率;
(6)shiro支持多线程应用的并发验证,即如在一个线程中开启另一个线程,能把权限自动传播过去;
(7)提供测试支持;
(8)允许一个用户假装为另一个用户(如果他们允许)的身份进行访问;
(9)记住我,这个是非常常见的功能,即一次登录后,下次再来的话不用登录了。
文字描述可能并不能让猿友们完全理解具体功能的意思。下面我们以登录验证为例,向猿友们介绍Shiro的使用。至于其他功能点,猿友们用到的时候再去深究其用法也不迟。
二、Shiro实例详细说明
本实例环境:eclipse + maven
本实例采用的主要技术:spring + springmvc + shiro
2.1、依赖的包
假设已经配置好了spring和springmvc的情况下,还需要引入shiro以及shiro集成到spring的包,maven依赖如下:
<!-- Spring 整合Shiro需要的依赖 -->
<dependency>
    <groupId>org.apache.shiro</groupId>
    <artifactId>shiro-core</artifactId>
    <version>1.2.1</version>
</dependency>
<dependency>
    <groupId>org.apache.shiro</groupId>
    <artifactId>shiro-web</artifactId>
    <version>1.2.1</version>
</dependency>
<dependency>
    <groupId>org.apache.shiro</groupId>
    <artifactId>shiro-ehcache</artifactId>
    <version>1.2.1</version>
</dependency>
<dependency>
    <groupId>org.apache.shiro</groupId>
    <artifactId>shiro-spring</artifactId>
    <version>1.2.1</version>
</dependency> - 1
- 2
- 3
- 4
- 5
- 6
- 7
- 8
- 9
- 10
- 11
- 12
- 13
- 14
- 15
- 16
- 17
- 18
- 19
- 20
- 21
2.2、定义shiro拦截器
对url进行拦截,如果没有验证成功的需要验证,然后额外给用户赋予角色和权限。
自定义的拦截器需要继承AuthorizingRealm并实现登录验证和赋予角色权限的两个方法,具体代码如下:
package com.luo.shiro.realm;

import java.util.HashSet;
import java.util.Set;
import org.apache.shiro.authc.AuthenticationException;
import org.apache.shiro.authc.AuthenticationInfo;
import org.apache.shiro.authc.AuthenticationToken;
import org.apache.shiro.authc.SimpleAuthenticationInfo;
import org.apache.shiro.authc.UsernamePasswordToken;
import org.apache.shiro.authz.AuthorizationInfo;
import org.apache.shiro.authz.SimpleAuthorizationInfo;
import org.apache.shiro.realm.AuthorizingRealm;
import org.apache.shiro.subject.PrincipalCollection;
import com.luo.util.DecriptUtil;

public class MyShiroRealm extends AuthorizingRealm {

    //这里因为没有调用后台,直接默认只有一个用户("luoguohui","123456")
    private static final String USER_NAME = "luoguohui";
    private static final String PASSWORD = "123456";

    /*
     * 授权
     */
    @Override
    protected AuthorizationInfo doGetAuthorizationInfo(PrincipalCollection principals) {
        Set<String> roleNames = new HashSet<String>();
        Set<String> permissions = new HashSet<String>();
        roleNames.add("administrator");//添加角色
        permissions.add("newPage.jhtml");  //添加权限
        SimpleAuthorizationInfo info = new SimpleAuthorizationInfo(roleNames);
        info.setStringPermissions(permissions);
        return info;
    }

    /*
     * 登录验证
     */
    @Override
    protected AuthenticationInfo doGetAuthenticationInfo(
            AuthenticationToken authcToken) throws AuthenticationException {
        UsernamePasswordToken token = (UsernamePasswordToken) authcToken;
        if(token.getUsername().equals(USER_NAME)){
            return new SimpleAuthenticationInfo(USER_NAME, DecriptUtil.MD5(PASSWORD), getName());
        }else{
            throw new AuthenticationException();
        }
    }

}
- 1
- 2
- 3
- 4
- 5
- 6
- 7
- 8
- 9
- 10
- 11
- 12
- 13
- 14
- 15
- 16
- 17
- 18
- 19
- 20
- 21
- 22
- 23
- 24
- 25
- 26
- 27
- 28
- 29
- 30
- 31
- 32
- 33
- 34
- 35
- 36
- 37
- 38
- 39
- 40
- 41
- 42
- 43
- 44
- 45
- 46
- 47
- 48
- 49
- 50
- 51
2.3、shiro配置文件
spring-shiro.xml文件内容如下:
<?xml version="1.0" encoding="UTF-8"?>
<beans xmlns="http://www.springframework.org/schema/beans"
    xmlns:xsi="http://www.w3.org/2001/XMLSchema-instance"
    xsi:schemaLocation="http://www.springframework.org/schema/beans
                        http://www.springframework.org/schema/beans/spring-beans-3.0.xsd"
    default-lazy-init="true">

    <description>Shiro Configuration</description>

    <!-- Shiro's main business-tier object for web-enabled applications -->
    <bean id="securityManager" class="org.apache.shiro.web.mgt.DefaultWebSecurityManager">
        <property name="realm" ref="myShiroRealm" />
        <property name="cacheManager" ref="cacheManager" />
    </bean>

    <!-- 項目自定义的Realm -->
    <bean id="myShiroRealm" class="com.luo.shiro.realm.MyShiroRealm">
        <property name="cacheManager" ref="cacheManager" />
    </bean>

    <!-- Shiro Filter -->
    <bean id="shiroFilter" class="org.apache.shiro.spring.web.ShiroFilterFactoryBean">
        <property name="securityManager" ref="securityManager" />
        <property name="loginUrl" value="/login.jhtml" />
        <property name="successUrl" value="/loginsuccess.jhtml" />
        <property name="unauthorizedUrl" value="/error.jhtml" />
        <property name="filterChainDefinitions">
            <value>
                /index.jhtml = authc
                /login.jhtml = anon
                /checkLogin.json = anon
                /loginsuccess.jhtml = anon
                /logout.json = anon
                /** = authc
            </value>
        </property>
    </bean>

    <!-- 用户授权信息Cache -->
    <bean id="cacheManager" class="org.apache.shiro.cache.MemoryConstrainedCacheManager" />

    <!-- 保证实现了Shiro内部lifecycle函数的bean执行 -->
    <bean id="lifecycleBeanPostProcessor" class="org.apache.shiro.spring.LifecycleBeanPostProcessor" />

    <!-- AOP式方法级权限检查 -->
    <bean class="org.springframework.aop.framework.autoproxy.DefaultAdvisorAutoProxyCreator"
        depends-on="lifecycleBeanPostProcessor">
        <property name="proxyTargetClass" value="true" />
    </bean>

    <bean class="org.apache.shiro.spring.security.interceptor.AuthorizationAttributeSourceAdvisor">
        <property name="securityManager" ref="securityManager" />
    </bean>

</beans> - 1
- 2
- 3
- 4
- 5
- 6
- 7
- 8
- 9
- 10
- 11
- 12
- 13
- 14
- 15
- 16
- 17
- 18
- 19
- 20
- 21
- 22
- 23
- 24
- 25
- 26
- 27
- 28
- 29
- 30
- 31
- 32
- 33
- 34
- 35
- 36
- 37
- 38
- 39
- 40
- 41
- 42
- 43
- 44
- 45
- 46
- 47
- 48
- 49
- 50
- 51
- 52
- 53
- 54
- 55
这里有必要说清楚”shiroFilter” 这个bean里面的各个属性property的含义:
(1)securityManager:这个属性是必须的,没什么好说的,就这样配置就好。
(2)loginUrl:没有登录的用户请求需要登录的页面时自动跳转到登录页面,可配置也可不配置。
(3)successUrl:登录成功默认跳转页面,不配置则跳转至”/”,一般可以不配置,直接通过代码进行处理。
(4)unauthorizedUrl:没有权限默认跳转的页面。
(5)filterChainDefinitions,对于过滤器就有必要详细说明一下:
1)Shiro验证URL时,URL匹配成功便不再继续匹配查找(所以要注意配置文件中的URL顺序,尤其在使用通配符时),故filterChainDefinitions的配置顺序为自上而下,以最上面的为准
2)当运行一个Web应用程序时,Shiro将会创建一些有用的默认Filter实例,并自动地在[main]项中将它们置为可用自动地可用的默认的Filter实例是被DefaultFilter枚举类定义的,枚举的名称字段就是可供配置的名称
3)通常可将这些过滤器分为两组:
anon,authc,authcBasic,user是第一组认证过滤器
perms,port,rest,roles,ssl是第二组授权过滤器
注意user和authc不同:当应用开启了rememberMe时,用户下次访问时可以是一个user,但绝不会是authc,因为authc是需要重新认证的
user表示用户不一定已通过认证,只要曾被Shiro记住过登录状态的用户就可以正常发起请求,比如rememberMe
说白了,以前的一个用户登录时开启了rememberMe,然后他关闭浏览器,下次再访问时他就是一个user,而不会authc
4)举几个例子
/admin=authc,roles[admin] 表示用户必需已通过认证,并拥有admin角色才可以正常发起’/admin’请求
/edit=authc,perms[admin:edit] 表示用户必需已通过认证,并拥有admin:edit权限才可以正常发起’/edit’请求
/home=user 表示用户不一定需要已经通过认证,只需要曾经被Shiro记住过登录状态就可以正常发起’/home’请求
5)各默认过滤器常用如下(注意URL Pattern里用到的是两颗星,这样才能实现任意层次的全匹配)
/admins/**=anon 无参,表示可匿名使用,可以理解为匿名用户或游客
/admins/user/**=authc 无参,表示需认证才能使用
/admins/user/**=authcBasic 无参,表示httpBasic认证
/admins/user/**=user 无参,表示必须存在用户,当登入操作时不做检查
/admins/user/**=ssl 无参,表示安全的URL请求,协议为https
/admins/user/*=perms[user:add:]
参数可写多个,多参时必须加上引号,且参数之间用逗号分割,如/admins/user/*=perms[“user:add:,user:modify:*”]
当有多个参数时必须每个参数都通过才算通过,相当于isPermitedAll()方法
/admins/user/**=port[8081]
当请求的URL端口不是8081时,跳转到schemal://serverName:8081?queryString
其中schmal是协议http或https等,serverName是你访问的Host,8081是Port端口,queryString是你访问的URL里的?后面的参数
/admins/user/**=rest[user]
根据请求的方法,相当于/admins/user/**=perms[user:method],其中method为post,get,delete等
/admins/user/**=roles[admin]
参数可写多个,多个时必须加上引号,且参数之间用逗号分割,如/admins/user/**=roles[“admin,guest”]
当有多个参数时必须每个参数都通过才算通过,相当于hasAllRoles()方法
上文参考了http://www.cppblog.com/guojingjia2006/archive/2014/05/14/206956.html,更多详细说明请访问该链接。
2.4、web.xml配置引入对应的配置文件和过滤器
<!-- 读取spring和shiro配置文件 -->
<context-param>
    <param-name>contextConfigLocation</param-name>
    <param-value>classpath:application.xml,classpath:shiro/spring-shiro.xml</param-value>
</context-param>

<!-- shiro过滤器 -->
<filter>
    <filter-name>shiroFilter</filter-name>
    <filter-class>org.springframework.web.filter.DelegatingFilterProxy</filter-class>
    <init-param>
        <param-name>targetFilterLifecycle</param-name>
        <param-value>true</param-value>
    </init-param>
</filter>
<filter-mapping>
    <filter-name>shiroFilter</filter-name>
    <url-pattern>*.jhtml</url-pattern>
    <url-pattern>*.json</url-pattern>
</filter-mapping> - 1
- 2
- 3
- 4
- 5
- 6
- 7
- 8
- 9
- 10
- 11
- 12
- 13
- 14
- 15
- 16
- 17
- 18
- 19
- 20
2.5、controller代码
package com.luo.controller;

import java.util.HashMap;
import java.util.Map;

import javax.servlet.http.HttpServletRequest;

import org.apache.shiro.SecurityUtils;
import org.apache.shiro.authc.UsernamePasswordToken;
import org.apache.shiro.subject.Subject;
import org.springframework.stereotype.Controller;
import org.springframework.web.bind.annotation.RequestMapping;
import org.springframework.web.bind.annotation.RequestMethod;
import org.springframework.web.bind.annotation.ResponseBody;
import org.springframework.web.servlet.ModelAndView;

import com.alibaba.druid.support.json.JSONUtils;
import com.luo.errorcode.LuoErrorCode;
import com.luo.exception.BusinessException;
import com.luo.util.DecriptUtil;

@Controller
public class UserController {

    @RequestMapping("/index.jhtml")
    public ModelAndView getIndex(HttpServletRequest request) throws Exception {
        ModelAndView mav = new ModelAndView("index");
        return mav;
    }

    @RequestMapping("/exceptionForPageJumps.jhtml")
    public ModelAndView exceptionForPageJumps(HttpServletRequest request) throws Exception {
        throw new BusinessException(LuoErrorCode.NULL_OBJ);
    }

    @RequestMapping(value="/businessException.json", method=RequestMethod.POST)
    @ResponseBody
    public String businessException(HttpServletRequest request) {
        throw new BusinessException(LuoErrorCode.NULL_OBJ);
    }

    @RequestMapping(value="/otherException.json", method=RequestMethod.POST)
    @ResponseBody
    public String otherException(HttpServletRequest request) throws Exception {
        throw new Exception();
    }

    //跳转到登录页面
    @RequestMapping("/login.jhtml")
    public ModelAndView login() throws Exception {
        ModelAndView mav = new ModelAndView("login");
        return mav;
    }

    //跳转到登录成功页面
    @RequestMapping("/loginsuccess.jhtml")
    public ModelAndView loginsuccess() throws Exception {
        ModelAndView mav = new ModelAndView("loginsuccess");
        return mav;
    }

    @RequestMapping("/newPage.jhtml")
    public ModelAndView newPage() throws Exception {
        ModelAndView mav = new ModelAndView("newPage");
        return mav;
    }

    @RequestMapping("/newPageNotAdd.jhtml")
    public ModelAndView newPageNotAdd() throws Exception {
        ModelAndView mav = new ModelAndView("newPageNotAdd");
        return mav;
    }

    /**
     * 验证用户名和密码
     * @param String username,String password
     * @return
     */
    @RequestMapping(value="/checkLogin.json",method=RequestMethod.POST)
    @ResponseBody
    public String checkLogin(String username,String password) {
        Map<String, Object> result = new HashMap<String, Object>();
        try{
            UsernamePasswordToken token = new UsernamePasswordToken(username, DecriptUtil.MD5(password));
            Subject currentUser = SecurityUtils.getSubject();
            if (!currentUser.isAuthenticated()){
                //使用shiro来验证
                token.setRememberMe(true);
                currentUser.login(token);//验证角色和权限
            }
        }catch(Exception ex){
            throw new BusinessException(LuoErrorCode.LOGIN_VERIFY_FAILURE);
        }
        result.put("success", true);
        return JSONUtils.toJSONString(result);
    }

    /**
     * 退出登录
     */
    @RequestMapping(value="/logout.json",method=RequestMethod.POST)
    @ResponseBody
    public String logout() {
        Map<String, Object> result = new HashMap<String, Object>();
        result.put("success", true);
        Subject currentUser = SecurityUtils.getSubject();
        currentUser.logout();
        return JSONUtils.toJSONString(result);
    }
}
- 1
- 2
- 3
- 4
- 5
- 6
- 7
- 8
- 9
- 10
- 11
- 12
- 13
- 14
- 15
- 16
- 17
- 18
- 19
- 20
- 21
- 22
- 23
- 24
- 25
- 26
- 27
- 28
- 29
- 30
- 31
- 32
- 33
- 34
- 35
- 36
- 37
- 38
- 39
- 40
- 41
- 42
- 43
- 44
- 45
- 46
- 47
- 48
- 49
- 50
- 51
- 52
- 53
- 54
- 55
- 56
- 57
- 58
- 59
- 60
- 61
- 62
- 63
- 64
- 65
- 66
- 67
- 68
- 69
- 70
- 71
- 72
- 73
- 74
- 75
- 76
- 77
- 78
- 79
- 80
- 81
- 82
- 83
- 84
- 85
- 86
- 87
- 88
- 89
- 90
- 91
- 92
- 93
- 94
- 95
- 96
- 97
- 98
- 99
- 100
- 101
- 102
- 103
- 104
- 105
- 106
- 107
- 108
- 109
- 110
- 111
上面代码,我们只需要更多地关注登录验证和退出登录的代码。
其中DecriptUtil.MD5(password),对密码进行md5加密解密是我自己写的工具类DecriptUtil,对应MyShiroRealm里面的登录验证里面也有对应对应的方法。
另外,BusinessException是我自己封装的异常类。
最后会提供整个工程源码供猿友下载,里面包含了所有的代码。
2.6、login.jsp代码
<%@ page language="java" contentType="text/html; charset=UTF-8" pageEncoding="UTF-8"%>
<html>
<head>
<script src="<%=request.getContextPath()%>/static/bui/js/jquery-1.8.1.min.js"></script>
</head>
<body>
username: <input type="text" id="username"><br><br>
password: <input type="password" id="password"><br><br>
<button id="loginbtn">登录</button>
</body>
<script type="text/javascript">
$('#loginbtn').click(function() {
    var param = {
        username : $("#username").val(),
        password : $("#password").val()
    };
    $.ajax({
        type: "post",
        url: "<%=request.getContextPath()%>" + "/checkLogin.json",
        data: param,
        dataType: "json",
        success: function(data) {
            if(data.success == false){
                alert(data.errorMsg);
            }else{
                //登录成功
                window.location.href = "<%=request.getContextPath()%>" +  "/loginsuccess.jhtml";
            }
        },
        error: function(data) {
            alert("调用失败....");
        }
    });
});
</script>
</html>- 1
- 2
- 3
- 4
- 5
- 6
- 7
- 8
- 9
- 10
- 11
- 12
- 13
- 14
- 15
- 16
- 17
- 18
- 19
- 20
- 21
- 22
- 23
- 24
- 25
- 26
- 27
- 28
- 29
- 30
- 31
- 32
- 33
- 34
- 35
- 36
2.7、效果演示
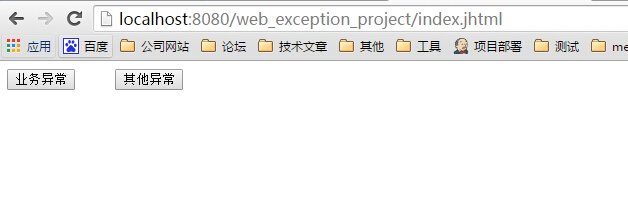
(1)如果未登录前,输入http://localhost:8080/web_exception_project/index.jhtml会自动跳转到http://localhost:8080/web_exception_project/login.jhtml。
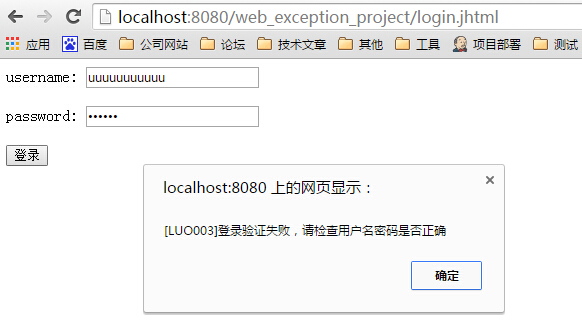
(2)如果登录失败和登录成功:
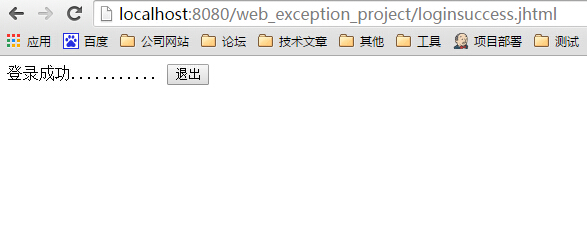
(3)如果登录成功,访问http://localhost:8080/web_exception_project/index.jhtml就可以到其对应的页面了。
2.8、源码下载
http://download.csdn.net/detail/u013142781/9426670
2.9、我遇到的坑
在本实例的调试里面遇到一个问题,虽然跟shiro没有关系,但是也跟猿友们分享一下。
就是ajax请求设置了“contentType : “application/json””,导致controller获取不到username和password这两个参数。
后面去掉contentType : “application/json”,采用默认的就可以了。
具体原因可以浏览博文:http://blog.csdn.net/mhmyqn/article/details/25561535


 416
416

 被折叠的 条评论
为什么被折叠?
被折叠的 条评论
为什么被折叠?
 到【灌水乐园】发言


