


AOSP Version: Oreo 8.0.0_r4
所谓的Native Handler,只是我自己臆想出来的名词(或许也有前人创造了,但我没发现也说不定),用来对Android媒体框架中消息通信部分进行描述。之所以这么命名,主要基于如下几点:
- Android 媒体框架涉及到消息通信部分,主要由ALooper、AHandler、AMessage三个类组成,但并没有一个官方的名称,这对于写作来说,很不方便,总不能提到相关部分内容,就三个名词一起上吧。
- 之所以是Native,是因为这个框架涉及到的类,都位于Native层,实际上ALooper、AHandler、AMessage三个都是C++代码编写,起名Native名副其实。
- 至于Handler,借鉴Android 上层代码中的Handler机制名称,因为它们之间的逻辑,区别真的很小。
该系列文章,会分为三个部分:
- 介绍AHandler、ALooper源码。
- 介绍AMessage源码:AMessage值得一说的地方太多了,就和其它两个类分开了。Android媒体底层通信框架Native Handler(二):AMessage
- 以Nuplayer为例,分析Native Handler在Android底层起到的作用。Android媒体底层通信框架Native Handler(三):NuPlayer
简介
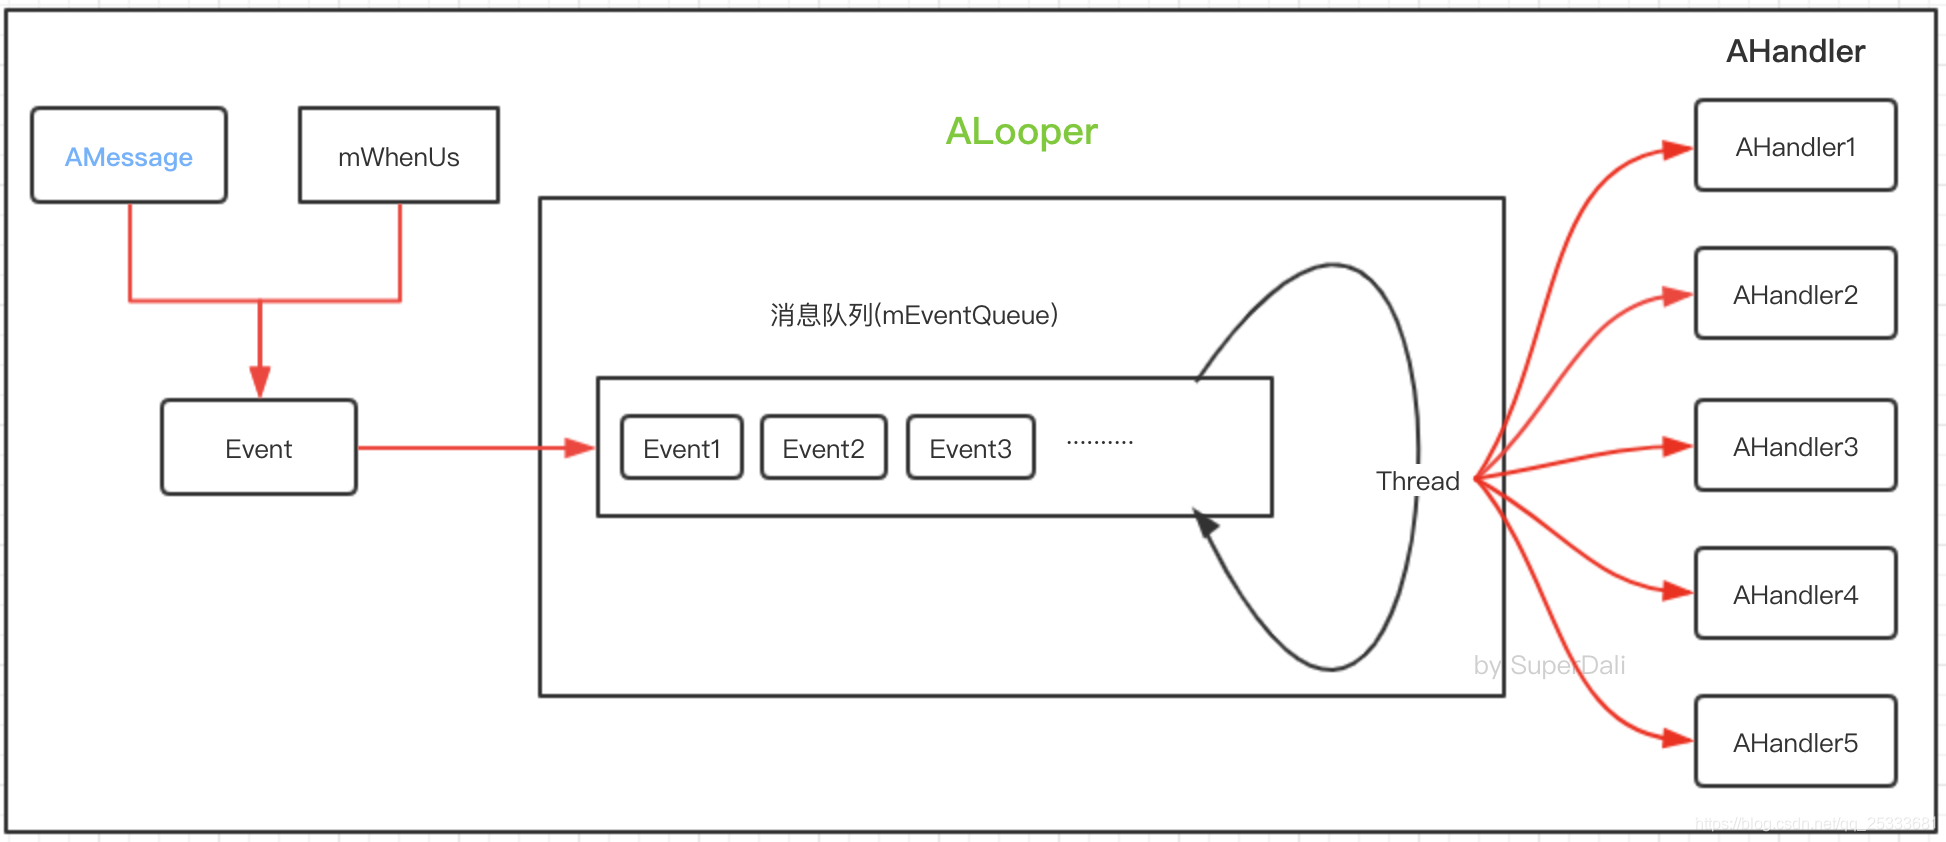
来张图说明一下handler-looper-message之间的关系。
AHandler
源码路径参见文末最后一小节
AHandler,顾名思义,在这个框架中,是消息处理者的角色。
代码片段如下:
namespace android {
struct AMessage;
struct AHandler : public RefBase {
    AHandler()
        : mID(0),
          mVerboseStats(false),
          mMessageCounter(0) {
    }

    sp<ALooper> looper() const {
        return mLooper.promote();
    }
	//......
protected:
    // 纯虚函数,由每个继承了AHandler接口的类实现,是消息处理的关键
    virtual void onMessageReceived(const sp<AMessage> &msg) = 0;

private:
    friend struct AMessage;      // deliverMessage()
    friend struct ALooperRoster; // setID()
	// 每一个handler都有自己的唯一id,可以通过id()函数别获取
    ALooper::handler_id mID;
    // handler需要注册在looper中才会起作用,可以通过get方法获取,通过setID初始化
    wp<ALooper> mLooper;

    inline void setID(ALooper::handler_id id, const wp<ALooper> &looper) {
        mID = id;
        mLooper = looper;
    }

    bool mVerboseStats;
    uint32_t mMessageCounter; // 当前handler处理消息的计数器
    KeyedVector<uint32_t, uint32_t> mMessages; // 和message相关的消息计数器
	// 当需要发送消息时,Looper线程会调用该函数,进而触发子类实现的onMessageReceived函数回调
    void deliverMessage(const sp<AMessage> &msg);

    DISALLOW_EVIL_CONSTRUCTORS(AHandler);
};
}  // namespace android
很简单,来看一下具体实现,也就是AHandler.cpp。
deliverMessage
namespace android {

void AHandler::deliverMessage(const sp<AMessage> &msg) {
    onMessageReceived(msg); // 直接调用纯虚函数(子类实现)onMessageReceived
    mMessageCounter++; // 消息计数器+1
	  // 如果mVerboseStats为true,则会在mMessages中记录通过Handler处理的每一个Message的数量。
    // 这功能对阅读代码来说,基本没什么用。构造函数默认初始化列表直接把mVerboseStats设置成了false
    if (mVerboseStats) {
        uint32_t what = msg->what();
        ssize_t idx = mMessages.indexOfKey(what);
        if (idx < 0) {
            mMessages.add(what, 1); // 添加新的消息
        } else {
            mMessages.editValueAt(idx)++; // 消息计数+1
        }
    }
}

}  // namespace android
可以看到,AHandler的实现非常简单,头文件中,除了一个虚函数外,就只有deliverMessage函数没有实现。所以,在cpp文件中,只需要实现deliverMessage函数即可。
KeyedVector<key, value> 相关函数:
- indexOfKey(key):获取key对应的value值
- add(key, value):添加一个键值对
- editValueAt(value):返回value的地址
小结一下
简单总结一下deliverMessage函数:
- 函数体第一行就直接调用了子类的onMessageReceived函数,处理消息去了。
- 为mMessageCounter消息计数器加1。
- mVerboseStats控制的if代码块,无关紧要,不说也罢。
小结一下AHandler:
-
拥有一个mID,区别其它AHandler。
-
持有一个ALooper的引用,这个引用的主要作用是,在AMmessage构建时,可以通过AHandler获取ALooper的引用,进而调用ALooper的post接口,AMessage对象自己加入到消息队列中去。
-
维护了一个mMessageCounter计数器,记录ahandler已经处理过的Message数。
-
deliverMessage函数直接调用子类的onMessageReceived函数,交给子类处理。
ALooper
源码路径参见文末最后一小节
继续顾名思义,是一个循环器,如果是循环的话,多半有线程了。先看一下它的头文件:
namespace android {

struct AHandler;
struct AMessage;
struct AReplyToken;

struct ALooper : public RefBase {
    typedef int32_t event_id;
    typedef int32_t handler_id;

    ALooper();

	// 注册handler
    handler_id registerHandler(const sp<AHandler> &handler);
    void unregisterHandler(handler_id handlerID); // 根据handlerID注销handler
	// 启动looper的循环线程,开始工作
    status_t start(
            bool runOnCallingThread = false,
            bool canCallJava = false,
            int32_t priority = PRIORITY_DEFAULT
            );
	// 停止线程
    status_t stop();

    static int64_t GetNowUs();

protected:
    virtual ~ALooper(); // 需析构函数,子类可以在复写函数中释放资源

private:
    friend struct AMessage;       // post()消息本身,下一个小结会讲

    struct Event { // 将发送时间和Message封装在一个结构体重
        int64_t mWhenUs;
        sp<AMessage> mMessage;
    };

    Mutex mLock;
    Condition mQueueChangedCondition;
 	// Looper的名字,可以通过对应的set/get函数设置/获取该字段值
    AString mName;

    List<Event> mEventQueue; // 事件列表,所有的消息都会放进来,这就是所谓的消息队列

    struct LooperThread; // 循环线程
    sp<LooperThread> mThread;
    bool mRunningLocally;

    // use a separate lock for reply handling, as it is always on another thread
    // use a central lock, however, to avoid creating a mutex for each reply
    Mutex mRepliesLock;
    Condition mRepliesCondition;

    // START --- 函数只会被AMessage使用

    // 在给定的超时时间内从当前looper上发送一个消息
    void post(const sp<AMessage> &msg, int64_t delayUs);
    // 创建一个和当前looper一起使用的回复令牌
    sp<AReplyToken> createReplyToken();
    // 等待消息发送后的回复令牌。如果状态OK,回复信息会被存储于参数提供的变量中。否则,参数无变化
    status_t awaitResponse(const sp<AReplyToken> &replyToken, sp<AMessage> *response);
    // 发送回复令牌的响应。假如该响应发送成功,返回OK。否则,返回一个错误码
    status_t postReply(const sp<AReplyToken> &replyToken, const sp<AMessage> &msg);

    // END --- 函数只会被AMessage使用
	// 从消息队列中取消息,执行
    bool loop();

    DISALLOW_EVIL_CONSTRUCTORS(ALooper);
};

} // namespace android
简单了解了ALooper的定义,接下来看看一些函数的具体实现。
post()
void ALooper::post(const sp<AMessage> &msg, int64_t delayUs) {
    // 参数接收一个Message,和一个消息发送的时延
    int64_t whenUs; // 消息发送的真实时间:根据时延值,判断是延迟发送还是立即发送。
    if (delayUs > 0) {
        whenUs = GetNowUs() + delayUs;
    } else {
        whenUs = GetNowUs();
    }
	// 遍历消息队列,找到一个队列中Event的时延大于whenUs的位置
    List<Event>::iterator it = mEventQueue.begin();
    while (it != mEventQueue.end() && (*it).mWhenUs <= whenUs) {
        ++it;
    }
	// 根据入参和计算得到的时延,封装消息事件(Event)
    Event event;
    event.mWhenUs = whenUs;
    event.mMessage = msg;

    if (it == mEventQueue.begin()) {
        mQueueChangedCondition.signal();
    }
	// 将封装好的消息事件,插到消息队列中。
    mEventQueue.insert(it, event);
}
一句话总结post函数的功能:post()函数将Message和时延值封装成Event后,插入到消息队列mEventQueue中。
从函数中的消息队列的遍历算法来推断,消息队列是按照时延值的大小,从小到大排列的。
AReplyToken::createReplyToken
// 只有AMessage::postAndAwaitResponse函数会调用
sp<AReplyToken> ALooper::createReplyToken() {
    return new AReplyToken(this);
}
createReplyToken函数直接创建了 一个AReplyToken对象返回,来看看是怎么的定义:
AReplyToken是定义在AMessage.h中的,具体代码路径请查看本文最后一小节
struct AReplyToken : public RefBase {
    explicit AReplyToken(const sp<ALooper> &looper)
        : mLooper(looper), // 将looper保存在mLooper成员中
          mReplied(false) { // 将mReplied初始化为false,刚刚创建回复令牌时状态当然是尚未回复的
    }

private:
    friend struct AMessage;
    friend struct ALooper;
    // 回复令牌中,保存了消息来源于那个looper,一个程序中looper可不止一个。它们彼此应该是靠mName区别
    wp<ALooper> mLooper;
    sp<AMessage> mReply; // 记录回复消息
    bool mReplied; // 本回复令牌的状态

    // 如果未设置回复,则返回false; 否则,它检索回复并返回true
    bool retrieveReply(sp<AMessage> *reply) {
        if (mReplied) {
            *reply = mReply;
            mReply.clear();
        }
        return mReplied;
    }
    // 设置此令牌的回复。 返回OK或错误
    status_t setReply(const sp<AMessage> &reply);
};
只有一个未实现的函数
status_t AReplyToken::setReply(const sp<AMessage> &reply) {
    if (mReplied) { // 已经设置过的回复不可再设置
        ALOGE("trying to post a duplicate reply");
        return -EBUSY;
    }
    CHECK(mReply == NULL);
    mReply = reply;
    mReplied = true;
    return OK;
}
setReply函数将回复的Message设置到回复令牌的mReply字段中,并将回复状态改为true。
小结AReplyToken
- AReplyToken:意味消息的回复令牌
- AReplyToken中包含消息是否已经被处理过的字段mReplied,如果处理过,mReplied字段被置为true。
- AReplyToken中包含了回复消息本身,体现在mReply字段。
awaitResponse
// 只会被AMessage::postAndAwaitResponse函数调用
status_t ALooper::awaitResponse(const sp<AReplyToken> &replyToken, sp<AMessage> response) {
   // return status in case we want to handle an interrupted wait
   Mutex::Autolock autoLock(mRepliesLock);
   CHECK(replyToken != NULL);
   while (!replyToken->retrieveReply(response)) {
       {
           Mutex::Autolock autoLock(mLock);
           if (mThread == NULL) {
               return -ENOENT;
           }
       }
       mRepliesCondition.wait(mRepliesLock); // 等待mRepliesLock,相关知识,请查看Condition小结
   }
   return OK;
}
awaitResponse函数,通过无限循环+同步锁的方式,让当前线程检索出一个可回复的回复令牌后通过入参,将回复消息反馈给调用线程。
在ALooper中,mRepliesCondition.wait等待后,只有当ALooper::stop()和ALooper::postReply函数调用后,才会结束等待,继续下一次循环。
Condition
这是一个用于同步的对象,为Android中特有。它的函数有:
| 函数名 | 功能 |
|---|---|
| wait(Mutex& mutex) | 当前线程等待唤醒 |
| waitRelative(Mutex& mutex, nsecs_t reltime) | 当前线程等待唤醒,如果等待时间超过reltime,退出等待 |
| signal() | 触发唤醒通知,但只能唤醒一个等待的线程 |
| broadcast() | 发送唤醒广播,唤醒所有等待线程 |
postReply
status_t ALooper::postReply(const sp<AReplyToken> &replyToken, const sp<AMessage> &reply) {
    Mutex::Autolock autoLock(mRepliesLock);
    status_t err = replyToken->setReply(reply); // 将回复消息设置到回复令牌中
    if (err == OK) {
        mRepliesCondition.broadcast(); // 通过Condition唤醒awaitResponse函数
    }
    return err;
}
postReply的主要作用,就是将回复令牌和回复消息绑定,并唤醒awaitResponse函数,处理回复消息。
loop
bool ALooper::loop() {
    Event event;
    {
        Mutex::Autolock autoLock(mLock);
        if (mThread == NULL && !mRunningLocally) {
            // 如果没有初始化线程,或者不在本地运行,返回false
            return false;
        }
        if (mEventQueue.empty()) { // 消息队列是空的,当前线程等待,直到被唤醒发回true
            mQueueChangedCondition.wait(mLock);
            return true;
        }
        int64_t whenUs = (*mEventQueue.begin()).mWhenUs; // 获取消息队列第一条消息的发送时间
        int64_t nowUs = GetNowUs();

        if (whenUs > nowUs) {
            // 如果第一条消息还没有到发送时间,则等待whenUs - nowUs后唤醒线程返回true
            int64_t delayUs = whenUs - nowUs;
            mQueueChangedCondition.waitRelative(mLock, delayUs * 1000ll);
            return true;
        }
		// 如果发现消息的发送时间过期,做两件事情:1. 删掉该条消息。2. 发送该条消息
        event = *mEventQueue.begin();
        mEventQueue.erase(mEventQueue.begin()); // 1. 删掉该条消息。
    }
    event.mMessage->deliver(); // 2. 发送该条消息
    return true; // 返回true
}
loop函数,总共做了以下几件事情:
- 条件判断:判断是否初始化线程,并且线程是否在本地运行,如果否则返回false,使可能存在的循环停止。
- 消息队列判断:判断消息队列中是否有消息,没有的话,让线程进入等待,直到有消息入队后被唤醒。
- 消息发送判断:判断队列中,第一条小时发送时间是否满足,满足则发送消息,并将消息移出队列。否则让线程等待,一定时间(当前时间和发送时间的时间差)后,自动唤醒线程。
可以看到,loop函数会根据实际情况,判断是否让线程等待。防止函数不断执行的无意义死循环,造成CPU资源的浪费。
start
status_t ALooper::start(bool runOnCallingThread, bool canCallJava, int32_t priority) {
   if (runOnCallingThread) {
       {
            Mutex::Autolock autoLock(mLock);
            if (mThread != NULL || mRunningLocally) {
                return INVALID_OPERATION;
            }
            mRunningLocally = true; // mRunningLocally 为true意味着当前线程陷入loop的死循环
        }
        do {
        } while (loop());
        return OK;
    }
    Mutex::Autolock autoLock(mLock);
    if (mThread != NULL || mRunningLocally) {
        return INVALID_OPERATION;
    }
    mThread = new LooperThread(this, canCallJava);
    status_t err = mThread->run(
            mName.empty() ? "ALooper" : mName.c_str(), priority);
    if (err != OK) {
        mThread.clear();
    }
    return err;
}
ALooper::start函数算是ALooper中的核心,称得上是NativeHandler机制中的发动机。那么,接下来就详细分析一下吧:
runOnCallingThread
这个入参决定了当调用线程调用Alooper::start函数后,取消息,发送消息的工作在当前线程执行,还是子线程执行。区别在于:
- 如果
runOnCallingThread = true:那么当前线程不会再做其它工作,陷入一个死循环。用于循环执行loop()函数。 - 如果
runOnCallingThread = false:会创建一个子线程,并将loop()逻辑放到这个特定子线程中处理。
在继续往下分析之前,先喝瓶Dali牌西北……额,就,补充点基础知识。
LooperThread&Thread
LopperThread继承于Android的Thread,这个Thread其实是Android对Linux线程API的一个封装。
Android Thread源码路径:/system/core/libutils/Threads.cpp
在这里,我们需要知道的是,Thread中有一个很重要的函数int Thread::_threadLoop(void* user):
int Thread::_threadLoop(void* user) // user 是Thread的子类
{
    Thread* const self = static_cast<Thread*>(user);
    // ......
    bool first = true;
    do {
        bool result;
        if (first) { // 如果是第一次运行,执行readyToRun函数
            first = false;
            self->mStatus = self->readyToRun();
            result = (self->mStatus == NO_ERROR);

            if (result && !self->exitPending()) {
                result = self->threadLoop();
            }
        } else { // 不是第一次运行
            result = self->threadLoop();
        }
	// ......

    } while(strong != 0);

    return 0;
}
Thread::_threadLoop:是Android Thread的主要工作函数,和java层线程类的void run()函数类似。实际上,Thread::_threadLoop的调用函数正是Thread::run()。run函数也是真正调用的Linux线程相关API,创建线程的地方。
接下来看看_threadLoop函数做了什么事情:
- 如果是第一次执行,则执行子类的
readyToRun()函数,最终根据返回值判断是否执行子类的threadLoop(); - 如果不是第一次执行,本身已经在流程中了,就不断地循环调用子类的
threadLoop();函数。
所以,Thread不管如何,都会执行子类的threadLoop();函数,执行具体的业务逻辑。
struct ALooper::LooperThread : public Thread {
    LooperThread(ALooper *looper, bool canCallJava)
        : Thread(canCallJava),
          mLooper(looper),
          mThreadId(NULL) {
    }

    virtual status_t readyToRun() {
        mThreadId = androidGetThreadId();
        return Thread::readyToRun();
    }
    virtual bool threadLoop() {
        return mLooper->loop();
    }
    bool isCurrentThread() const {
        return mThreadId == androidGetThreadId();
    }
    protected:
    virtual ~LooperThread() {}
private:
    ALooper *mLooper;
    android_thread_id_t mThreadId;

    DISALLOW_EVIL_CONSTRUCTORS(LooperThread);
};
再来看LooperThread,主要实现了两个虚函数:
readyToRun(): 该函数是线程第一次进入循环前会执行的函数,子类可以做一些线程循环开启前的准备工作。LooperThread在这里做了一个初始化mThreadId的动作。threadLoop(): 这是处理业务逻辑的函数,整个线程循环中会不断调用。LooperThread在这里调用了mLooper->loop();,开启ALooper的轮询。当消息符合条件时发送消息,当没有符合条件的消息是就等待。
好了,基础知识补充完了,让我们把目光移到start函数中剩下的部分:
mThread = new LooperThread(this, canCallJava);
status_t err = mThread->run(
    mName.empty() ? "ALooper" : mName.c_str(), priority);
if (err != OK) {
    mThread.clear();
}
这段代码中,有哪些重点(或者不重点)呢?
-
canCallJava:这个boolean值是从start函数的入参传进来的,一直也没说。这个之最终会被传递到Android底层的Thread中,如果是true的话,表示线程是否使用JNI函数。默认值为true。
-
new LooperThread:创建一个LooperThread对象。
-
mThread->run:通过上一步创建的LooperThread对象,创建一个Android底层的Thread,并让这个线程运行起来,进入一个do—while循环,通过LooperThread的threadLoop函数,执行
mLooper->loop();,于是循环队列的动作开始跑起来了。 -
priority:这涉及到了Android线程优先级的概念,优先级高的线程,在与优先级低的线程争夺CPU时,占有优势。优先级从011,从低高。
enum {
    PRIORITY_LOWEST         = ANDROID_PRIORITY_LOWEST,
    PRIORITY_BACKGROUND     = ANDROID_PRIORITY_BACKGROUND,
    PRIORITY_NORMAL         = ANDROID_PRIORITY_NORMAL,
    PRIORITY_FOREGROUND     = ANDROID_PRIORITY_FOREGROUND,
    PRIORITY_DISPLAY        = ANDROID_PRIORITY_DISPLAY,
    PRIORITY_URGENT_DISPLAY = ANDROID_PRIORITY_URGENT_DISPLAY,
    PRIORITY_AUDIO          = ANDROID_PRIORITY_AUDIO,
    PRIORITY_URGENT_AUDIO   = ANDROID_PRIORITY_URGENT_AUDIO,
    PRIORITY_HIGHEST        = ANDROID_PRIORITY_HIGHEST,
    PRIORITY_DEFAULT        = ANDROID_PRIORITY_DEFAULT,
    PRIORITY_MORE_FAVORABLE = ANDROID_PRIORITY_MORE_FAVORABLE,
    PRIORITY_LESS_FAVORABLE = ANDROID_PRIORITY_LESS_FAVORABLE,
};
以上是线程优先级的全部定义。比如,我们的UI线程的优先级是:ANDROID_PRIORITY_DISPLAY
小结start函数
- 决定消息轮询工作,是否放在当前线程执行。
- 不管是否放在当前线程执行,都死循环执行loop函数,轮询消息队列,处理到时的消息。
registerHandler&unregisterHandler
ALooper还有两个函数,用来注册AHandler和取消注册AHandler的。有什么用呢?先看看代码吧:
ALooperRoster gLooperRoster;
ALooper::handler_id ALooper::registerHandler(const sp<AHandler> &handler) {
    return gLooperRoster.registerHandler(this, handler);
}
void ALooper::unregisterHandler(handler_id handlerID) {
    gLooperRoster.unregisterHandler(handlerID);
}
不管是注册,还是取消注册,都掉了gLooperRoster的接口,它是个目前为止,不多见的类。结合命名和功能来看的话,作用应该是:专门管理注册的AHandler信息的“花名册”。
ALooperRoster
namespace android {
    struct ALooperRoster {
        ALooperRoster();
        ALooper::handler_id registerHandler(
            const sp<ALooper> &looper, const sp<AHandler> &handler); // 注册handler
        void unregisterHandler(ALooper::handler_id handlerID); // 取消注册handler
        void unregisterStaleHandlers(); // 取消注册陈旧的handler
        void dump(int fd, const Vector<String16>& args);
        private:
        struct HandlerInfo { // handler信息的结构体,包含了ALooper和AHandler的引用
            wp<ALooper> mLooper;
            wp<AHandler> mHandler;
        };
        Mutex mLock;
        KeyedVector<ALooper::handler_id, HandlerInfo> mHandlers; // 保存了HandlerInfo的vector
        ALooper::handler_id mNextHandlerID;
        DISALLOW_EVIL_CONSTRUCTORS(ALooperRoster);
    };
}  // namespace android
通过ALooperRoster的头文件可以看出:
- ALooperRoster中,mHandlers是一个用户保存HandlerInfo的KeyedVector结构。以handler_id为key,HandlerInfo为value。
- 而HandlerInfo中保存了在registerHandler函数中注册的AHandler指针和ALooper指针。
接下来看看几个AHandler注册相关函数。
registerHandler
ALooper::handler_id ALooperRoster::registerHandler(
        const sp<ALooper> &looper, const sp<AHandler> &handler) {
    Mutex::Autolock autoLock(mLock);

    if (handler->id() != 0) { // handler的id初始化值为0。0表示没有注册过,非0表示已注册,不能再注册了
        CHECK(!"A handler must only be registered once.");
        return INVALID_OPERATION;
    }

    HandlerInfo info; // 封装 ALooper和AHandler
    info.mLooper = looper;
    info.mHandler = handler;
    ALooper::handler_id handlerID = mNextHandlerID++; // mNextHandlerID + 1
    mHandlers.add(handlerID, info); // 将封装好的HandlerInfo放到mHandlers中
    handler->setID(handlerID, looper); // 已经注册好的handler的id设置为mNextHandlerID

    return handlerID;
}
函数依旧不复杂,AHandler有一个id,AHandler对象创建之初,id值默认为0。非0表示已经注册过了,不能继续注册。0表示没有被注册,没有被注册过的AHandler对象,和入参looper一起,被封装在一个HandlerInfo的对象中后,添加到了一个mHandlers的KeyedVector中,以handler_id为key,以HandlerInfo为value。最后将AHandler的id值改为加入时的mNextHandlerID值,并将looper设置到AHandler对象的mLooper字段中去,绑定起来。
unregisterHandler
void ALooperRoster::unregisterHandler(ALooper::handler_id handlerID) {
    Mutex::Autolock autoLock(mLock);
    ssize_t index = mHandlers.indexOfKey(handlerID);
	// ......
    const HandlerInfo &info = mHandlers.valueAt(index);
    sp<AHandler> handler = info.mHandler.promote();
    if (handler != NULL) {
        handler->setID(0, NULL);
    }
    mHandlers.removeItemsAt(index);
}
registerHandler是将ALooper和AHandler封装后,以handlerId值为key,存到mHandlers中。
unregisterHandler的操作,基本上与之相反,通过入参传入的handler_id值,从mHandlers取出AHandler,将它的id值设为0后,将注册时绑定的ALooper解绑。
小结registerHandler&unregisterHandler
- registerHandler,直接调用ALooperRoster的registerHandler函数,将AHandler和ALooper对象封装一下,存入到一个名为mHandlers的Vector结构中,并是AHandler对象的id+1,AHandler和ALooper对象相互绑定。
- unregisterHandler,直接调用ALooperRoster的unregisterHandler函数,从mHandlers取出指定id的AHandler,并将id置0,将绑定的ALooper对象解绑。
源码相关路径
Android底层代码,一般*.h文件和.cpp*文件都存放在不同路径下。
头文件
/frameworks/av/include/media/stagefright/foundation/
AMessage.h
AHandler.h
ALooper.h
.cpp文件
/frameworks/av/media/libstagefright/foundation/
AMessage.cpp
AHandler.cpp
ALooper.cpp


 3270
3270


 被折叠的 条评论
为什么被折叠?
被折叠的 条评论
为什么被折叠?
 到【灌水乐园】发言


