


    private class BatteryTracker extends BroadcastReceiver {
        public static final int UNKNOWN_LEVEL = -1;

        // current battery status
        int level = UNKNOWN_LEVEL;
        String percentStr;
        int plugType;
        boolean plugged;
        int health;
        int status;
        String technology;
        int voltage;
        int temperature;
        boolean testmode = false;

		@Override
		public void onReceive(Context context, Intent intent) {
			final String action = intent.getAction();
			if (action.equals(Intent.ACTION_BATTERY_CHANGED)) {
				if (testmode && ! intent.getBooleanExtra("testmode", false)) return;
				//wdh add
				oldStatus = status;

				level = (int)(100f
						* intent.getIntExtra(BatteryManager.EXTRA_LEVEL, 0)
						/ intent.getIntExtra(BatteryManager.EXTRA_SCALE, 100));

				plugType = intent.getIntExtra(BatteryManager.EXTRA_PLUGGED, 0);
				plugged = plugType != 0;
				health = intent.getIntExtra(BatteryManager.EXTRA_HEALTH,
						BatteryManager.BATTERY_HEALTH_UNKNOWN);
				status = intent.getIntExtra(BatteryManager.EXTRA_STATUS,
						BatteryManager.BATTERY_STATUS_UNKNOWN);
				technology = intent.getStringExtra(BatteryManager.EXTRA_TECHNOLOGY);
				voltage = intent.getIntExtra(BatteryManager.EXTRA_VOLTAGE, 0);
				temperature = intent.getIntExtra(BatteryManager.EXTRA_TEMPERATURE, 0);
				if(oldStatus != status){
					setContentDescription(
						context.getString(R.string.accessibility_battery_level, level));
				postInvalidate(UPDATE_MODE_PARTIAL);

				}
				// wdh add
				if (Math.abs(oldLevel-level) > 5 ) {
					//wdh add
				oldLevel = level;
				setContentDescription(
						context.getString(R.string.accessibility_battery_level, level));
				postInvalidate(UPDATE_MODE_PARTIAL);
				}
			} else if (action.equals(ACTION_LEVEL_TEST)) {
				testmode = true;
				post(new Runnable() {
					int curLevel = 0;
					int incr = 1;
					int saveLevel = level;
					int savePlugged = plugType;
					Intent dummy = new Intent(Intent.ACTION_BATTERY_CHANGED);
					@Override
					public void run() {
						if (curLevel < 0) {
							testmode = false;
							dummy.putExtra("level", saveLevel);
							dummy.putExtra("plugged", savePlugged);
							dummy.putExtra("testmode", false);
						} else {
							dummy.putExtra("level", curLevel);
							dummy.putExtra("plugged", incr > 0 ? BatteryManager.BATTERY_PLUGGED_AC : 0);
							dummy.putExtra("testmode", true);
						}
						getContext().sendBroadcast(dummy);

                        if (!testmode) return;

                        curLevel += incr;
                        if (curLevel == 100) {
                            incr *= -1;
                        }
                        postDelayed(this, 200);
                    }
                });
            }
        }
}// wdh add
if (Math.abs(oldLevel-level) > 5 ) {
//wdh add
oldLevel = level;
setContentDescription(
context.getString(R.string.accessibility_battery_level, level));
postInvalidate(UPDATE_MODE_PARTIAL);
}
2,插上usb显示充电图标,拔下还是显示充电图标,不更新问题;这里是我保存了状态,就是充电和不充电的状态,状态不一致就更新
if(oldStatus != status){
setContentDescription(
context.getString(R.string.accessibility_battery_level, level));
postInvalidate(UPDATE_MODE_PARTIAL);
}
<resources>
    <drawable name="notification_number_text_color">#ffffffff</drawable>
    <drawable name="ticker_background_color">#ff1d1d1d</drawable> 下拉状态栏时钟颜色
    <drawable name="system_bar_background">@color/system_bar_background_opaque</drawable><span style="white-space:pre">	</span>背景色引用
    <color name="system_bar_background_opaque">#ffFFFFFF</color><span style="white-space:pre">				</span>修改背景色
    <color name="system_bar_background_semi_transparent">#66000000</color> <!-- 40% black -->
    <color name="notification_panel_solid_background">#ff000000</color>
    <drawable name="status_bar_recents_app_thumbnail_background">#88000000</drawable>
    <color name="status_bar_recents_app_label_color">#ffffffff</color>
    <drawable name="status_bar_notification_row_background_color">#ff090909</drawable>
    <color name="notification_list_shadow_top">#80000000</color>
    <drawable name="recents_callout_line">#99ffffff</drawable>
    <drawable name="notification_item_background_legacy_color">#ffaaaaaa</drawable>
    <drawable name="heads_up_notification_bg_pressed">#ff33B5E5</drawable>
    <drawable name="notification_header_bg">#FFFFFFFF</drawable> 下拉状态栏通知背景
    <color name="notification_panel_scrim_color">#B0000000</color>
    <color name="batterymeter_frame_color">#FFCCCCCC</color><!-- 40% white<span style="font-family: Arial, Helvetica, sans-serif;">电池框架颜色</span><span style="font-family: Arial, Helvetica, sans-serif;"> --></span>
<color name="batterymeter_charge_color">#FF000000</color><!--充电图标,说白就是充电显示的那个闪电的颜色-->
<color name="batterymeter_bolt_color">#FF000000</color><!-- 70% black充电时电池显示的颜色 -->
<color name="status_bar_clock_color">#FF000000</color><span style="white-space:pre"> </span>数字时钟颜色
</resources>
(三),电池电量填充颜色,也就是有多少电量,显示什么颜色,文件位置:Z:\myandroid\frameworks\base\packages\SystemUI\res\values\arrays.xml
  <array name="batterymeter_color_values">
        <item>#FF000000</item>
        <item>#FF000000</item>
        <item>#FF000000</item>这3个就是电量值的多少显示什颜色,我这里都改成黑色,他们是正常状态下电池的颜色,即未充电状态
    </array>
(四),状态栏高度修改:
Z:\myandroid\frameworks\base\core\res\res\values\dimens.xml下改 <dimen name="status_bar_height">25dip</dimen>
(五),systemUI里面添加一个控件,我这里由于状态栏也是白色,添加一个分割线
Z:\myandroid\frameworks\base\packages\SystemUI\res\layout\super_status_bar.xml
<com.android.systemui.statusbar.phone.StatusBarWindowView
    xmlns:android="http://schemas.android.com/apk/res/android"
    xmlns:systemui="http://schemas.android.com/apk/res/com.android.systemui"
    android:focusable="true"
    android:descendantFocusability="afterDescendants"
    android:fitsSystemWindows="true"
    android:background="@android:color/transparent"
    >

    <include layout="@layout/status_bar"
        android:layout_width="match_parent"
        android:layout_height="@*android:dimen/status_bar_height"
        />

    <com.android.systemui.statusbar.phone.PanelHolder
        android:id="@+id/panel_holder"
        android:layout_width="match_parent"
        android:layout_height="match_parent"
        >
        <include layout="@layout/status_bar_expanded"
            android:layout_width="match_parent"
            android:layout_height="match_parent"
            />
        <ViewStub android:id="@+id/quick_settings_stub"
            android:layout="@layout/quick_settings"
            android:layout_width="match_parent"
            android:layout_height="match_parent"
            />
    </com.android.systemui.statusbar.phone.PanelHolder>
<!--add line-->
   <TextView
        android:layout_width="match_parent"
        android:layout_height="1dp"
        android:background="@color/batterymeter_charge_color"
        android:layout_gravity="bottom"/>
</com.android.systemui.statusbar.phone.StatusBarWindowView>
(六),修改wifi图标,由于图标有4套,具体不知道他用的那套,我就全改成一种了
文件位置:Z:\myandroid\frameworks\base\packages\SystemUI\src\com\android\systemui\statusbar\policy\WifiIcons.java
class WifiIcons {
  /*  static final int[][] WIFI_SIGNAL_STRENGTH = {
            { R.drawable.stat_sys_wifi_signal_0,
              R.drawable.stat_sys_wifi_signal_1_fully,
              R.drawable.stat_sys_wifi_signal_2_fully,
              R.drawable.stat_sys_wifi_signal_3_fully,
              R.drawable.stat_sys_wifi_signal_4_fully },
            { R.drawable.stat_sys_wifi_signal_0,
              R.drawable.stat_sys_wifi_signal_1_fully,
              R.drawable.stat_sys_wifi_signal_2_fully,
              R.drawable.stat_sys_wifi_signal_3_fully,
              R.drawable.stat_sys_wifi_signal_4_fully }
        };

    static final int[][] QS_WIFI_SIGNAL_STRENGTH = {
            { R.drawable.ic_qs_wifi_0,
              R.drawable.ic_qs_wifi_1,
              R.drawable.ic_qs_wifi_2,
              R.drawable.ic_qs_wifi_3,
              R.drawable.ic_qs_wifi_4 },
            { R.drawable.ic_qs_wifi_0,
              R.drawable.ic_qs_wifi_full_1,
              R.drawable.ic_qs_wifi_full_2,
              R.drawable.ic_qs_wifi_full_3,
              R.drawable.ic_qs_wifi_full_4 }
        };*/

    static final int[][] WIFI_SIGNAL_STRENGTH = {
          { R.drawable.ic_qs_wifi_0,
              R.drawable.ic_qs_wifi_full_1,
              R.drawable.ic_qs_wifi_full_2,
              R.drawable.ic_qs_wifi_full_3,
              R.drawable.ic_qs_wifi_full_4 },
           { R.drawable.ic_qs_wifi_0,
              R.drawable.ic_qs_wifi_full_1,
              R.drawable.ic_qs_wifi_full_2,
              R.drawable.ic_qs_wifi_full_3,
              R.drawable.ic_qs_wifi_full_4 }
        };

    static final int[][] QS_WIFI_SIGNAL_STRENGTH = {
          { R.drawable.ic_qs_wifi_0,
              R.drawable.ic_qs_wifi_full_1,
              R.drawable.ic_qs_wifi_full_2,
              R.drawable.ic_qs_wifi_full_3,
              R.drawable.ic_qs_wifi_full_4 },
            { R.drawable.ic_qs_wifi_0,
              R.drawable.ic_qs_wifi_full_1,
              R.drawable.ic_qs_wifi_full_2,
              R.drawable.ic_qs_wifi_full_3,
              R.drawable.ic_qs_wifi_full_4 }
        };
然后在res里面修改这5个drawable就好了
修改蓝牙图标:
在Z:\myandroid\frameworks\base\packages\SystemUI\res\drawable-hdpi总之是res里面,
根据不同分辨率具体看用的那套图,找到带bluetooth的图片替换就好啦
(七),修改状态栏通知的字体颜色,文件位置:Z:\myandroid\frameworks\base\packages\SystemUI\res\layout\status_bar.xml

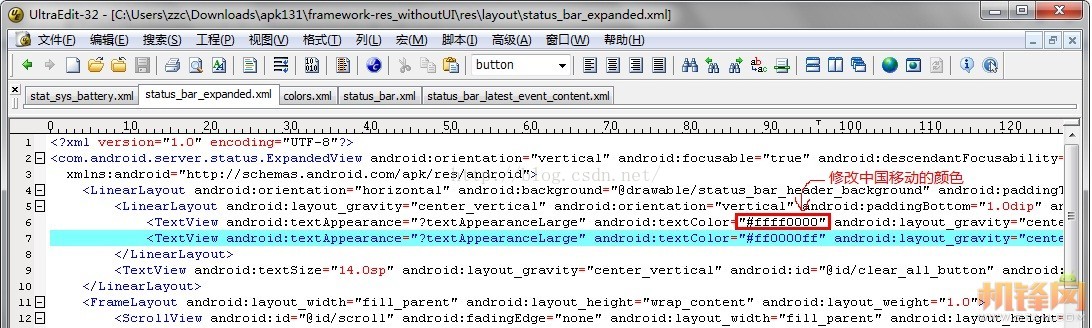
(八),修改下拉通知的文字颜色,文件位置Z:\myandroid\frameworks\base\packages\SystemUI\res\layout\status_bar_expanded.xml
(九),运营商颜色,文件位置Z:\myandroid\frameworks\base\packages\SystemUI\res\layout\status_bar_expanded.xml
(十),屏蔽app在状态栏的的通知
参考了这篇文章:http://light3moon.com/2015/03/04/Android%20SystemUI%20分析——状态栏图标/
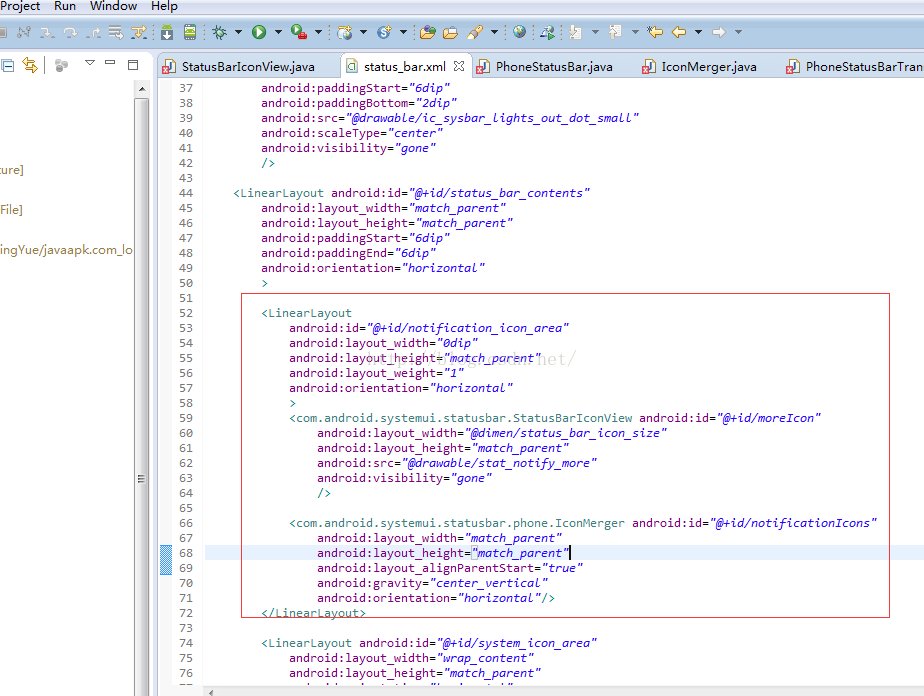
1,首先通知的布局:frameworks\base\packages\SystemUI\res\layout\status_bar.xml,其中红框部分为通知显示的部分
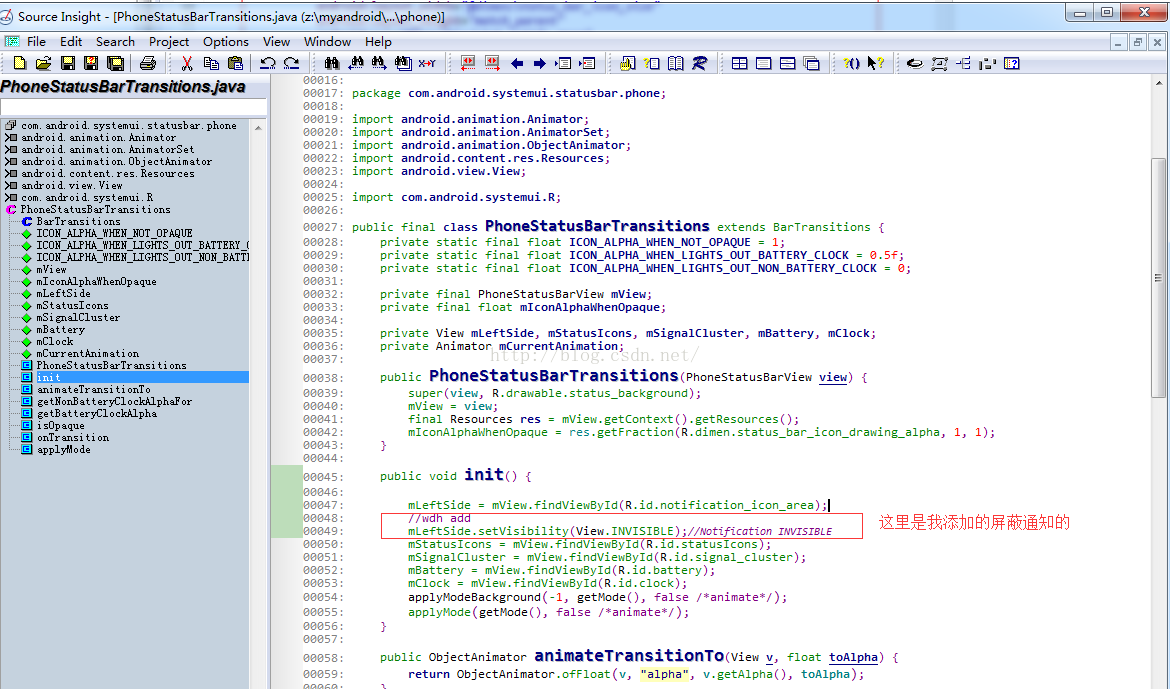
2,知道他显示的布局,接下来找到这个id在那个文件,frameworks\base\packages\SystemUI\src\com\android\systemui\statusbar\phone\PhoneStatusBarTransitions.java
3,做好了你要验证啊,顺便加上自己写个通知测试:
hello_world,修改之前,点击就会在状态栏显示一个图标,修改后则不会显示了,说明屏蔽通知成功了
public class MainActivity extends Activity {

	private TextView hello_world;
	private Context mContext ;

	@Override
	protected void onCreate(Bundle savedInstanceState) {
		super.onCreate(savedInstanceState);
		setContentView(R.layout.activity_main);

		hello_world = (TextView)findViewById(R.id.hello_world);
		mContext = this;
		hello_world.setOnClickListener(new OnClickListener() {

			@Override
			public void onClick(View v) {
				// TODO Auto-generated method stub


				NotificationManager mNotificationManager = (NotificationManager) getSystemService(NOTIFICATION_SERVICE);
				NotificationCompat.Builder mBuilder = new NotificationCompat.Builder(mContext);
				mBuilder.setContentTitle("测试标题")//设置通知栏标题
				.setContentText("测试内容") //设置通知栏显示内容
				.setSmallIcon(R.drawable.ic_launcher);
				mNotificationManager.notify(1, mBuilder.build());
				Log.i("MyNotification", "创建通知");
			}
		});
	}

}
(十一)电池电量低的对话框的样式
1,Z:\myandroid\frameworks\base\packages\SystemUI\res\layout\battery_low.xml里面改字的颜色,因为字是白的,要改成黑色
<LinearLayout xmlns:android="http://schemas.android.com/apk/res/android"
    android:id="@+id/padding"
    android:orientation="vertical"
    android:gravity="center"
    android:padding="16dp"
    >

    <TextView android:id="@+id/subtitle"
        android:layout_width="match_parent"
        android:layout_height="wrap_content"
        android:textSize="18sp"
       <span style="color:#ff0000;"> android:textColor="#ffffffff"</span>
        android:gravity="start"
        android:text="@string/battery_low_subtitle"
        />

    <TextView android:id="@+id/level_percent"
        android:layout_width="match_parent"
        android:layout_height="wrap_content"
        android:textSize="18sp"
       <span style="color:#ff0000;"> android:textColor="#ffffffff"</span>
        android:gravity="start"
        android:paddingBottom="16dp"
        />

    <ImageView android:id="@+id/image"
        android:layout_width="wrap_content"
        android:layout_height="wrap_content"
        android:src="@drawable/battery_low_battery"
        />

</LinearLayout>
2,在mainfest.xml里面改主题没用,不知道怎么回事,于是在alertDialog的构造方法里面设置主题,在systemU里面,Z:\myandroid\frameworks\base\packages\SystemUI\src\com\android\systemui\power\PowerUI.java,
AlertDialog.Builder b = new AlertDialog.Builder(mContext,R.style.lowBatteryWarning);其中的<span style="font-family: Arial, Helvetica, sans-serif;">R.style.lowBatteryWarning是我自定义的,样式如下:</span><span style="font-family: Arial, Helvetica, sans-serif;"></span><pre name="code" class="java"> <style name="lowBatteryWarning"
parent="@*android:style/Theme.Holo.Light.Dialog.Alert">
</style>这样出来就是一个light的对话框了
(十二)app全屏时,systemUI隐藏,点击状态栏systemUI会出现,这时我们可以做点东西,代码位置Z:\myandroid\frameworks\base\packages\SystemUI\src\com\android\systemui\statusbar\phone\PhoneStatusBar.java
    @Override // CommandQueue
    public void setSystemUiVisibility(int vis, int mask) {
        final int oldVal = mSystemUiVisibility;
        final int newVal = (oldVal&~mask) | (vis&mask);
        final int diff = newVal ^ oldVal;
        if (DEBUG) Log.d(TAG, String.format(
                "setSystemUiVisibility vis=%s mask=%s oldVal=%s newVal=%s diff=%s",
                Integer.toHexString(vis), Integer.toHexString(mask),
                Integer.toHexString(oldVal), Integer.toHexString(newVal),
                Integer.toHexString(diff)));
		//wdh add 这里是我添加的,点击一次这里代码会执行3次,我根据值判断只做一次处理
		if(newVal > 67108864)
			Log.d(TAG, "wdh show systemUI");
			   writeFile(update_full,write_content);
		}else{
			Log.d(TAG, "wdh show systemUI2");
		}
        if (diff != 0) {
            mSystemUiVisibility = newVal;

            // update low profile
            if ((diff & View.SYSTEM_UI_FLAG_LOW_PROFILE) != 0) {
                final boolean lightsOut = (vis & View.SYSTEM_UI_FLAG_LOW_PROFILE) != 0;
                if (lightsOut) {
                    animateCollapsePanels();
                    if (mTicking) {
                        haltTicker();
                    }
                }

                setAreThereNotifications();
            }
(十三)修改电池图标,本来是画出来的很丑,现在自己用图片代替
1,Z:\myandroid\frameworks\base\packages\SystemUI\src\com\android\systemui\statusbar\phone\PhoneStatusBarTransitions.java
public void init() {里面添加,让原来的电池的图标消失
mBattery.setVisibility(View.GONE);
在battery下面添加一个TextView布局,其中 TV_Percent 和 TV_battery是我添加的,一个显示电量的图标,一个显示百分比
  <LinearLayout
                android:id="@+id/signal_battery_cluster"
                android:layout_width="wrap_content"
                android:layout_height="match_parent"
                android:paddingStart="2dp"
                android:orientation="horizontal"
                android:gravity="center"
                >
                <include layout="@layout/signal_cluster_view"
                    android:id="@+id/signal_cluster"
                    android:layout_width="wrap_content"
                    android:layout_height="wrap_content"
                    android:paddingLeft="2dp"
                    />

                 <TextView
                android:id="@+id/TV_Percent"
                android:layout_width="wrap_content"
                android:layout_height="wrap_content"
                android:layout_centerVertical="true"
                android:textSize="8sp"
                android:textColor="#000000"
                />
                <!-- battery must be padded below to match assets -->
                <com.android.systemui.BatteryMeterView
                    android:id="@+id/battery"
                    android:layout_height="16dp"
                    android:layout_width="10.5dp"
                    android:layout_marginBottom="0.33dp"
                    android:layout_marginStart="4dip"
                    />


                 <TextView
                android:id="@+id/TV_battery"
                android:layout_width="wrap_content"
                android:layout_height="wrap_content"
                android:layout_marginBottom="6.5dp"
                android:layout_marginTop="6.5dp"
                />
</LinearLayout>添加一个广播接收器,另外别忘了注册
// wdh add
	private class BatteryBroadcastReceiver extends BroadcastReceiver {

		@Override
		public void onReceive(Context context, Intent intent) {
		final String action = intent.getAction();
			if (action.equals(Intent.ACTION_BATTERY_CHANGED)) {

					int level = intent.getIntExtra("level", 0);
					TV_Percent.setText(""+level+"%");
					int status=intent.getIntExtra("status",BatteryManager.BATTERY_STATUS_UNKNOWN);
					if(level <= 5 && status != BatteryManager.BATTERY_STATUS_CHARGING){
					//电量低于5%并且当前不是充电状态就关机
					Intent shoutdownIntent = new Intent(Intent.ACTION_REQUEST_SHUTDOWN);
					intent.putExtra(Intent.EXTRA_KEY_CONFIRM,false);
					intent.setFlags(Intent.FLAG_ACTIVITY_NEW_TASK);
					mContext.startActivity(shoutdownIntent);

					}
					if (status==BatteryManager.BATTERY_STATUS_CHARGING) {
						  TV_battery.setBackgroundResource(R.drawable.charging);
					}else if (100 >= level && level >75) {
						TV_battery.setBackgroundResource(R.drawable.battery4);
					}else if (75 >= level && level > 50) {
						TV_battery.setBackgroundResource(R.drawable.battery3);
					}else if (50 >= level && level > 25) {
						TV_battery.setBackgroundResource(R.drawable.battery2);
					}else if (25 >= level && level > 10) {
						TV_battery.setBackgroundResource(R.drawable.battery1);
					}

				}else if (action.equals(Intent.ACTION_BATTERY_LOW)) {
					TV_battery.setBackgroundResource(R.drawable.battery0);
				}

			}
		}
private TextView TV_battery;
private TextView TV_Percent;
注册:在onstart里面注册,wdh add 是添加的代码
    @Override
    public void start() {
        mDisplay = ((WindowManager)mContext.getSystemService(Context.WINDOW_SERVICE))
                .getDefaultDisplay();
        updateDisplaySize();

        super.start(); // calls createAndAddWindows()

        addNavigationBar();

        // Lastly, call to the icon policy to install/update all the icons.
        mIconPolicy = new PhoneStatusBarPolicy(mContext);

        mHeadsUpObserver.onChange(true); // set up
        if (ENABLE_HEADS_UP) {
            mContext.getContentResolver().registerContentObserver(
                    Settings.Global.getUriFor(SETTING_HEADS_UP), true,
                    mHeadsUpObserver);
        }
		//wdh add
TV_battery = (TextView)mStatusBarView.findViewById(R.id.TV_battery);
TV_Percent = (TextView)mStatusBarView.findViewById(R.id.TV_Percent);
BatteryBroadcastReceiver battery = new BatteryBroadcastReceiver();
IntentFilter mFilter = new IntentFilter();
mFilter.addAction(Intent.ACTION_BATTERY_CHANGED);
mFilter.addAction(Intent.ACTION_BATTERY_LOW);
mContext.registerReceiver(battery, mFilter);
(十四)调整wifi的位置,布局文件
Z:\myandroid\frameworks\base\packages\SystemUI\res\layout\signal_cluster_view.xml
这里面是wifi和手机信号的布局,调整这个-12就可以调整往左往右移动了,本来好像是-6,我改成-12,就往右移动了
 <FrameLayout
        android:id="@+id/wifi_combo"
        android:layout_height="wrap_content"
        android:layout_width="wrap_content"
        android:layout_marginEnd="-12dp"
        >
        <ImageView
            android:id="@+id/wifi_signal"
            android:layout_height="wrap_content"
            android:layout_width="wrap_content"
            android:layout_alignParentEnd="true"
            android:layout_centerVertical="true"
            android:scaleType="center"
            />
    </FrameLayout>
(十五)显示通知或者快捷键的切换按钮
代码位置:Z:/myandroid/frameworks/base/packages/SystemUI/src/com/android/systemui/statusbar/phone/PhoneStatusBar.java里面的mSettingsButton
布局位置:Z:/myandroid/frameworks/base/packages/SystemUI/res/layout/status_bar_expanded_header.xml,控件id为settings_button
图标名:ic_notify_quicksettings_normal.png
他是二个控件切换显示的另一个控件id是settings_button_holder,图标名:ic_notify_open_normal.png


 1113
1113


 被折叠的 条评论
为什么被折叠?
被折叠的 条评论
为什么被折叠?
 到【灌水乐园】发言


