


个人学习笔记分享,当前能力有限,请勿贬低,菜鸟互学,大佬绕道
如有勘误,欢迎指出和讨论,本文后期也会进行修正和补充
前言
原型模式是一种创建型设计模式, 使你能够复制已有对象, 而又无需使代码依赖它们所属的类。
原型(Prototype)模式的定义如下:用一个已经创建的实例作为原型,通过复制该原型对象来创建一个和原型相同或相似的新对象。在这里,原型实例指定了要创建的对象的种类。用这种方式创建对象非常高效,根本无须知道对象创建的细节。
当直接创建对象的代价比较大时,则采用这种模式。
1.介绍
使用目的:已知原型实例的情况下,可以获得相同的实例对象
使用时机:需要动态的生成和删除实例模型
解决问题:动态的创建和删除实例
实现方法:实现Cloneable类的clone()方法
使用场景:
- 通过new一个对象需要极其繁琐的数据准备或者权限,那么推荐使用原型模式
- 对象初始化需要消耗大量资源的时候,从旧的对象进行克隆出新对象,即可不必重复初始化
- 一个对象可能有多个修改者,那么可以克隆出去多份新对象供其使用
应用实例:
- 细胞分裂
- JAVA 中的
Object clone()方法
优点:
- 性能提高,构建新的对象只需要拷贝旧的对象即可
- 逃避构造函数的约束,根本不经过构造函数
缺点:
- 配备克隆方法需要对类的功能进行通盘考虑,这对于全新的类不是很难,但对于已有的类不一定很容易,特别当一个类引用不支持串行化的间接对象,或者引用含有循环结构的时候
- 类必须实现
Cloneable接口。
注意事项:既然是拷贝,那么必须有源对象才能实现,否则还是得构建一个全新的对象
分类:通过拷贝的方法和其内容,分为浅拷贝和深拷贝
- 浅拷贝:只拷贝源对象的基本数据,而不拷贝容器,引用等等,一般实现
Cloneable类并重写clone()方法 - 深拷贝:拷贝源对象的一切,包括数据、容器、引用等等,一般通过实现
Serializable读取二进制流,直接复制出新对象,也可通过其他方式实现
2.实现方案
深拷贝或者浅拷贝是结果,而非简单的由方案决定,比如在
clone方法中拷贝全部内容,也可以达到深拷贝的效果
请注意,示例中修正新对象仅为了测试,实际应用中请视情况处理,理论上应当保持新旧对象尽可能一致
2.1.方案1:实现Cloneable类
实现
Cloneable类并重写clone()方法即可,在该方法中设定好需要拷贝的内容,调用源对象中的该方法即可获得新的对象
步骤
-
定义一个实现了
Cloneable接口的抽象类,并实现clone()方法abstract class Animal implements Cloneable { protected String type; protected List<String> typeSet = new ArrayList<>(); public Animal(String type) { this.type = type; typeSet.add(type); } void say() { System.out.println("myType is " + type); System.out.println("myTypeSet is " + String.join(",", typeSet)); } public Animal clone() { Animal clone = null; try { //克隆对象 clone = (Animal) super.clone(); //克隆对象里的复杂对象,若不拷贝则会使用源对象里的复杂对象 //clone.typeSet = (List<String>) ((ArrayList) this.typeSet).clone(); //修正新对象 clone.type = type + "Cloned"; clone.typeSet.add(clone.type); } catch (CloneNotSupportedException e) { e.printStackTrace(); } return clone; } }这里我们在克隆时,会对新对象进行修正,而其余内容保持与源对象一致
复杂对象后面进行测试
-
定义实体类,实现抽象类,简单易懂
class Dog extends Animal { public Dog() { super("dog"); } @Override void say() { super.say(); System.out.println("汪!"); } } class Cat extends Animal { public Cat() { super("cat"); } @Override void say() { super.say(); System.out.println("喵!"); } } -
定义数据源初始化和调用方法
private Map<String, Animal> animalMap = new HashMap<>();

public void initAnimal() {
    Dog dog = new Dog();
    animalMap.put("dog", dog);
    Cat cat = new Cat();
    animalMap.put("cat", cat);
}

public Animal getAnimal(String type) {
    if (animalMap.containsKey(type)) {
        return animalMap.get(type).clone();
    } else {
        return null;
    }
}
在
initAnimal()方法中初始化出两个对象,并将其存储入map在
getAnimal()方法中取出对象的克隆 -
测试调用
    public static void main(String[] args) {
        //初始化
        initAnimal();

        //第一轮测试
        System.out.println("test turn 1:");
        Animal dog1 = getAnimal("dog");
        Animal cat1 = getAnimal("cat");
        dog1.say();
        cat1.say();

        //第二轮测试
        System.out.println("test turn 2:");
        Animal dog2 = dog1.clone();
        dog2.say();

        //第三轮测试
        System.out.println("test turn 3:");
        dog1.say();
        System.out.println("clone equals:" + Objects.equals(dog1.typeSet, dog2.typeSet));
    }
完整代码
package com.company.clone;

import java.util.*;

class Animal implements Cloneable {
    protected String type;
    protected List<String> typeSet = new ArrayList<>();

    public Animal(String type) {
        this.type = type;
        typeSet.add(type);
    }

    void say() {
        System.out.println("myType is " + type);
        System.out.println("myTypeSet is " + String.join(",", typeSet));
    }

    public Animal clone() {
        Animal clone = null;
        try {
            //克隆对象
            clone = (Animal) super.clone();
            //克隆对象里的复杂对象,若不拷贝则会使用源对象里的复杂对象
            //clone.typeSet = (List<String>) ((ArrayList) this.typeSet).clone();

            //修正新对象
            clone.type = type + "Cloned";
            clone.typeSet.add(clone.type);

        } catch (CloneNotSupportedException e) {
            e.printStackTrace();
        }
        return clone;
    }
}

class Dog extends Animal {

    public Dog() {
        super("dog");
    }

    @Override
    void say() {
        super.say();
        System.out.println("汪!");
    }
}

class Cat extends Animal {

    public Cat() {
        super("cat");
    }

    @Override
    void say() {
        super.say();
        System.out.println("喵!");
    }
}

public class CloneTest {
    public static void main(String[] args) {
        //初始化
        initAnimal();

        //第一轮测试
        System.out.println("test turn 1:");
        Animal dog1 = getAnimal("dog");
        Animal cat1 = getAnimal("cat");
        dog1.say();
        cat1.say();

        //第二轮测试
        System.out.println("test turn 2:");
        Animal dog2 = dog1.clone();
        dog2.say();

        //第三轮测试
        System.out.println("test turn 3:");
        dog1.say();
        System.out.println("clone equals:" + Objects.equals(dog1.typeSet, dog2.typeSet));
    }

    private static Map<String, Animal> animalMap = new HashMap<>();

    public static void initAnimal() {
        Dog dog = new Dog();
        animalMap.put("dog", dog);
        Cat cat = new Cat();
        animalMap.put("cat", cat);
    }

    public static Animal getAnimal(String type) {
        if (animalMap.containsKey(type)) {
            return animalMap.get(type).clone();
        } else {
            return null;
        }
    }
}
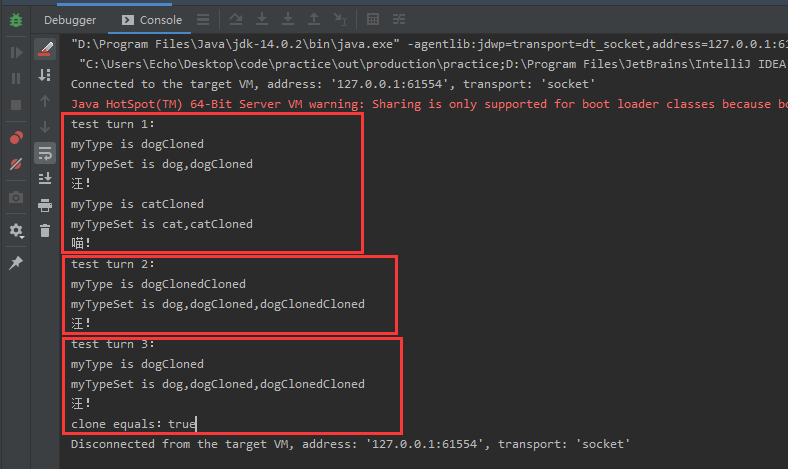
运行结果
分析
- 第一轮测试为一次克隆的结果,
type后追加Cloned,typeSet包括2个数据,分别是旧type和新type - 第二轮测试为二次克隆的结果,
type后追加两个Cloned,typeSet包括3个数据 - 第三轮仍为一次克隆的结果,
type后只追加了一个Cloned,但typeSet却有3个数据,与二次克隆是同一个typeSet
也就是说克隆后,使用的typeSet是同一个
这也就是所说的浅拷贝:只拷贝数据,而容器、引用等则直接使用源对象的,并不进行拷贝
如果需要深拷贝,则需要在clone()方法中对复杂对象进行复制
如果启用clone()方法中注释掉的代码,运行结果会变成下面这样
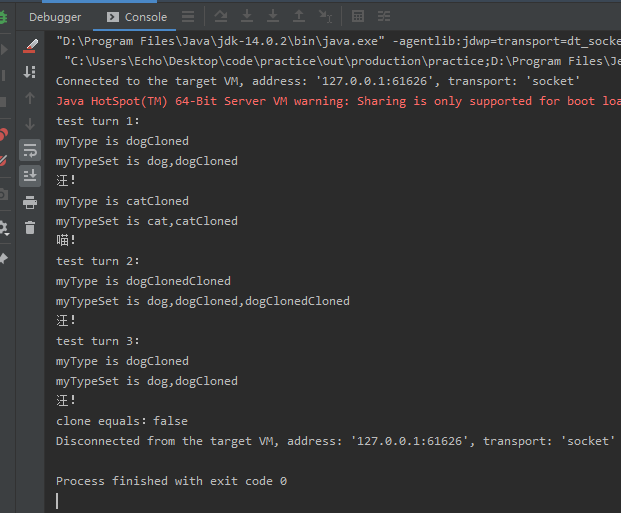
可以看到现在的typeSet不是同一个了,只是拷贝的时候复制了里面的内容
2.2.方案2:序列化后进行复制
即将对象以二进制完全复制一份新的,再转换为对象,通常使用
Serializable和数据流一起实现
步骤
这里仅修改
clone()方法,其余步骤与方案1一致
class Animal implements Serializable {
    protected String type;
    protected List<String> typeSet = new ArrayList<>();

    public Animal(String type) {
        this.type = type;
        typeSet.add(type);
    }

    void say() {
        System.out.println("myType is " + type);
        System.out.println("myTypeSet is " + String.join(",", typeSet));
    }

    public Animal clone() {
        Animal clone = null;
        try {
            //将对象写到流里
            ByteArrayOutputStream bos = new ByteArrayOutputStream();
            ObjectOutputStream oos = new ObjectOutputStream(bos);
            oos.writeObject(this);
            //从流里读回来
            ByteArrayInputStream bis = new ByteArrayInputStream(bos.toByteArray());
            ObjectInputStream ois = new ObjectInputStream(bis);
            clone = (Animal) ois.readObject();
            //修正新对象
            clone.type = type + "Cloned";
            clone.typeSet.add(clone.type);
        } catch (IOException | ClassNotFoundException e) {
            e.printStackTrace();
        }
        return clone;
    }
}
将对象写入流里,再读出来,并强制转换为对应类的对象即可
运行结果
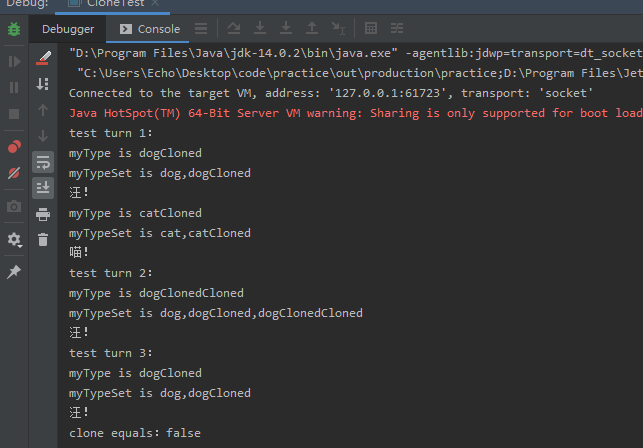
分析
可以看到结果是深拷贝,因为新对象时由数据流转换来的,复杂对象保留的是数据,而非引用地址,那么自然会构造新的
3.后记
实例中我们预先初始化所有源对象,使用map存储,使用的时候取出对应对象的克隆体
其实这就是最常见的应用场景,我们可以快速获得对应的对象,不需要每次都初始化和进行构造,而对深拷贝对象的修改都不会影响源对象,也就可以保证每次的源对象是相同且纯净的
一次初始化,之后便可快速得到新的对象,我们也可以在初始化的时候进行数据预设等等,视业务情况处理
总之,还是很实用的对吧~
作者:Echo_Ye
WX:Echo_YeZ
EMAIL :echo_yezi@qq.com
个人站点:在搭了在搭了。。。(右键 - 新建文件夹)


 9366
9366


 被折叠的 条评论
为什么被折叠?
被折叠的 条评论
为什么被折叠?
 到【灌水乐园】发言


