


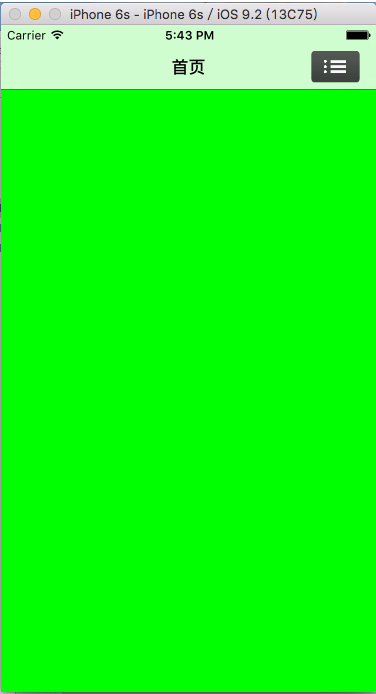
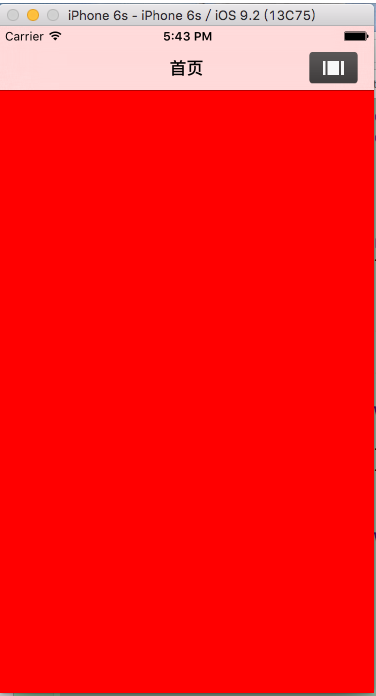
实现原理:
1.定义两个UIView:view1,view2(大小跟self.view一样),添加到self.view,并设置它们的tag值标识和隐藏的属性.
2.自定义右侧导航栏按钮.定义一个视图customView,在创建两个按钮添加在customView,然后在添加在自带右侧导航栏.
3, 两个按钮的响应方法是同一个,在响应方法中通过获取tag值得到相应的控件,再根据按钮的隐藏值来判断左翻还是又翻的动画效果,最后在配置动画,在动画的动作中将两个按钮和视图的隐藏值相互取反,来达到点击按钮视图和按钮也翻转效果.
//
//  ViewController.m
//  ViewFipDemo
//
//  Created by mac on 16/7/28.
//  Copyright © 2016年 huang. All rights reserved.
//

#import "ViewController.h"

@interface ViewController ()

@end

@implementation ViewController

- (void)viewDidLoad {
    [super viewDidLoad];

    [self _createNavRightItem];
    [self _createView];
}

- (void) _createView{
    UIView *view1 = [[UIView alloc] initWithFrame:self.view.frame];
    view1.backgroundColor = [UIColor redColor];
    view1.tag = 2000;
    view1.hidden = YES;
    [self.view addSubview:view1];

    UIView *view2 = [[UIView alloc] initWithFrame:self.view.frame];
    view2.backgroundColor = [UIColor greenColor];
    view2.tag = 2001;
    view2.hidden = NO;
    [self.view addSubview:view2];
}

- (void) _createNavRightItem {

    UIView *customView = [[UIView alloc] initWithFrame:CGRectMake(0, 0, 49, 32)];
    customView.backgroundColor = [UIColor clearColor];
    customView.tag = 1000;
    //创建button
    UIButton *postButton = [UIButton buttonWithType:UIButtonTypeCustom];
    //设置button的frame
    postButton.frame = customView.bounds;
    //设置图片
    [postButton setImage:[UIImage imageNamed:@"poster_home"]forState:UIControlStateNormal];
     [postButton setBackgroundImage:[UIImage imageNamed:@"exchange_bg_home"] forState:UIControlStateNormal];
    postButton.tag = 1001;
    postButton.hidden = YES;
    //设置响应事件
    [postButton addTarget:self
            action:@selector(button1Action:)
  forControlEvents:UIControlEventTouchUpInside];
    //添加到视图上
    [customView addSubview:postButton];

    //创建button
    UIButton *listButton = [UIButton buttonWithType:UIButtonTypeCustom];
    //设置button的frame
    listButton.frame = customView.bounds;
    //设置图片
    [listButton setImage:[UIImage imageNamed:@"list_home"]forState:UIControlStateNormal];
    [listButton setBackgroundImage:[UIImage imageNamed:@"exchange_bg_home"] forState:UIControlStateNormal];
    listButton.tag = 1002;
    listButton.hidden = NO;
    //设置响应事件
    [listButton addTarget:self
                   action:@selector(button1Action:)
         forControlEvents:UIControlEventTouchUpInside];
    //添加到视图上
    [customView addSubview:listButton];

    self.navigationItem.rightBarButtonItem = [[UIBarButtonItem alloc] initWithCustomView:customView];

}

- (void) button1Action:(UIButton *)button {
    UIView *customView = [self.navigationController.navigationBar viewWithTag:1000];
     UIView *view1 = [self.view viewWithTag:2000];
     UIView *view2 = [self.view viewWithTag:2001];
    UIButton *postBtn = [self.navigationController.navigationBar  viewWithTag:1001];
    UIButton *listBtn = [self.navigationController.navigationBar  viewWithTag:1002];
    BOOL flip = postBtn.hidden;
    UIViewAnimationOptions option;

    if (flip) {
        option = UIViewAnimationOptionTransitionFlipFromLeft;
    }else{
        option = UIViewAnimationOptionTransitionFlipFromRight;
    }
    [UIView transitionWithView:customView duration:0.35 options:option animations:^{
        postBtn.hidden = !postBtn.hidden;
        listBtn.hidden = !listBtn.hidden;
    } completion:nil];

    [UIView transitionWithView:self.view duration:0.3 options:option animations:^{
        view1.hidden = !view1.hidden;
        view2.hidden = !view2.hidden;
    } completion:nil];
    }
@end
运行效果:


 1084
1084

 被折叠的 条评论
为什么被折叠?
被折叠的 条评论
为什么被折叠?
 到【灌水乐园】发言


