


//下面的方式就是自定义组件或方法的方式
Vue.use(Object.defineProperty(Vue.prototype, '$eventHub', {
get() {
return new Vue({
data () {
return {
// 定义数据
val: ''
}
},
created () {
// 绑定监听
this.$on('eventHub', (val)=>{
this.val = val
})
}
});
}
}))
发送数据到eventHub
this.$eventHub.$emit('eventHub', {
data:"data"
});
需要使用数据的地方接收eventHub
computed:{
val () {
return eventHub.val
}
}
从这里开始是转载::::::::::::::::::::::::::::::::::
项目中会遇到一个组件/方法, 在多个地方被调用,比较方便的的方式之一,this.$custom(agruments) 这样就比较方便
,不然用组件引入的办法调用就就比较麻烦,每可能都需要这样调用
[javascript] view plain copy
- import coustom from './coustom'
- export default {
- components: {
- coustom
- }
- }
- <coustom :data="data" v-if="show"></coustom>
换个办法以自定义alert 为例

就这么一句就调用出来
this.$alert('哈哈哈');
alert.vue 如下
[javascript] view plain copy
- <template>
- <transition name="dialog-fade">
- <div v-if="show" class="modal fade dialog-modal" id="alert" role="dialog" data-backdrop="false" aria-hidden="true">
- <div class="modal-dialog" role="document">
- <div class="modal-content">
- <div class="modal-header row">
- <h5 class="modal-title col-md-4">提示</h5>
- <button type="button" class="close" aria-label="Close" @click="close">
- <span aria-hidden="true">×</span>
- </button>
- </div>
- <div class="modal-body">
- <div class="col-xs-offset-1">{{message}}</div>
- </div>
- <div class="modal-footer">
- <button type="button" class="btn btn-primary" @click="close">确定</button>
- </div>
- </div>
- </div>
- </div>
- </transition>
- </template>
- <script>
- export default {
- name: 'Alert',
- methods: {
- close: function() {
- this.show = false
- }
- }
- }
- </script>
对然后将Alert 挂载到vue全局 index.js
[javascript] view plain copy
- function install(Vue) {
- Object.defineProperty(Vue.prototype, '$alert', {
- get() {
- let div = document.createElement('div')
- document.body.appendChild(div);
- return (message) => {
- const Constructor = Vue.extend(Alert)
- let Instance = new Constructor({
- data() {
- return {
- message: message,
- show: true
- }
- }
- }).$mount(div);
- };
- }
- });
- }
- export default install
最后vue.use 一下
[javascript] view plain copy
- import alert from 'index'
- Vue.use(alert)
就能直接调用了
当然前面有个坑 transition 的 vue 的过渡 alert的div不是一开始就加载到文档上的,通过后面的
[javascript] view plain copy
- document.body.appendChild(div);
动态写入,就造成 alert 显示时看不到transition效果,抛开vue来说也会遇到这样的情况 可以settimeout 下 给append的元素 addClass
同理在vue 中也可以,当然还有更好的办法暂时没想到。。。。
alert 只是纯的 传递一个param 但是需要 传递一个function 时,比如confirem
this.$confirm('请确定你是傻逼', () => console.log('yes')})
还是相同的味道,相同的道理
Confirm.vue
[javascript] view plain copy
- <template>
- <transition name="dialog-fade">
- <div v-if="show" class="modal fade" id="confirm" tabindex="-1" role="dialog"
- data-backdrop="false" aria-hidden="true">
- <div class="modal-dialog" role="document">
- <div class="modal-content">
- <div class="modal-header row">
- <h5 class="modal-title col-md-4">提示</h5>
- <button type="button" class="close" @click="close">
- <span aria-hidden="true">×</span>
- </button>
- </div>
- <div class="modal-body">
- <div class="col-xs-offset-1">{{message}}</div>
- </div>
- <div class="modal-footer">
- <button type="button" class="btn btn-info" @click="close">取消</button>
- <button type="button" class="btn btn-primary" @click="ConfirmSure">确定</button>
- </div>
- </div>
- </div>
- </div>
- </transition>
- </template>
- <script>
- export default {
- name: 'Confirm',
- methods: {
- close: function() {
- this.show = false
- },
- ConfirmSure() {
- this.confirmSure()//确定关闭 由install 传入
- this.close()
- }
- }
- }
- </script>
[javascript] view plain copy
- import Confirm from './Confirm.vue'
- function install(Vue) {
- Object.defineProperty(Vue.prototype, '$confirm', {
- get() {
- let div = document.createElement('div')
- document.body.appendChild(div);
- return (message, confirmSure) => {
- const Constructor = Vue.extend(Confirm)
- const Instance = new Constructor({
- data() {
- return {
- message: message,
- show: true
- }
- },
- methods: {
- confirmSure: confirmSure //确定方法
- }
- }).$mount(div);
- };
- }
- });
- }
- export default install
同样use 一下
import alert from 'index' Vue.use(alert)
[javascript] view plain copy
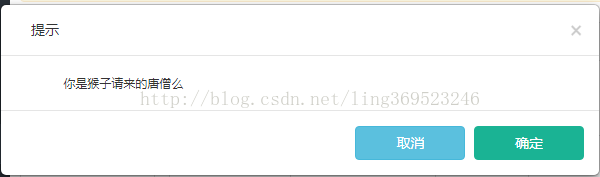
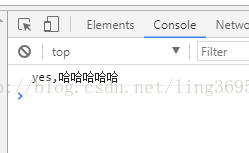
- this.$confirm('你是猴子请来的唐僧么', () => console.log('yes,哈哈哈哈哈'))
传了两个arguments,累了吧,轻松点,
片分三级,嗯········参数也得 至少能传 三个。。。。

嗯,往哪里看呐···!
这里传递的params 才传递到第二个,才实现第二个功能,要么要实现第三个功能呢,dialog对话框内容,根据环境应用环境传递进去显示
如此中间的form 表单是动态传递进入的
[javascript] view plain copy
- <div class="midpass">
- <div class="form-group form-group-inline flex" :class="errors.has('ans') ? 'has-error has-danger' : '' ">
- <label class="form-control-label">1+1=?</label>
- <div class="form-input-longer">
- <input type="password" class="form-control form-control-title" name="ans" v-model="input.value"
- v-validate="'required|min:1'" placeholder="请输入答案">
- <div class="help-block">请输入答案</div>
- </div>
- </div>
- </div>
[javascript] view plain copy
- export default {
- name: 'oneaddone',
- data() {
- return {
- input: {
- value: null
- }
- }
- }
- }
用到了前端验证 vue veevalidate 这样传递进去 要调教数据时,触发验证,就是父组件调用子组件的方法
this.$children 即可
dialog.vue
[javascript] view plain copy
- <template>
- <transition name="dialog-fade">
- <div v-if="show" class="modal fade" id="popform" tabindex="-1"
- role="dialog" data-backdrop="false" aria-hidden="true">
- <div class="hide" id="formpop-btn" data-toggle="modal" data-target="#popform"></div>
- <div class="modal-dialog" role="document">
- <div class="modal-content">
- <div class="modal-header row">
- <h4 class="modal-title col-md-6 col-xs-4">{{message}}</h4>
- <button type="button" class="close col-md-1" aria-label="Close" @click="close">
- <span aria-hidden="true">×</span>
- </button>
- </div>
- <form @submit.prevent="submit">
- <div class="modal-body">
- <keep-alive>
- <component :is="modalBody" ref="forms"></component>
- </keep-alive>
- </div>
- <div class="modal-footer">
- <div class="center-block" style="width: 230px;">
- <button type="button" class="btn btn-secondary" @click="close">取消</button>
- <button type="submit" class="btn btn-primary">保存</button>
- </div>
- </div>
- </form>
- </div>
- </div>
- </div>
- </transition>
- </template>
- <script>
- export default {
- name: 'dialog',
- data() {
- return {
- Submit: () => {}
- }
- },
- methods: {
- close() {
- this.show = false
- },
- setSubmit(dataKey, Submit) {
- this.submit = () => { //给submit btn 设置提交方法
- this.$children.map(function (child) {
- let data = child.$data[dataKey] //data 的key 调用时传递的 data key 可以根据情景定义
- child.$validator.validateAll().then((result) => {
- if (result) {
- Submit(data).then(res => {
- if (res) this.close()
- })
- }
- });
- })
- }
- },
- }
- }
- </script>
再来一遍

[javascript] view plain copy
- import dialog from './dialog.vue'
- function install(Vue) {
- Object.defineProperty(Vue.prototype, '$dialog', {
- get() {
- let div = document.createElement('div');
- document.body.appendChild(div);
- return (message, modalBody) => {
- const Constructor = Vue.extend(dialog)
- const Instance = new Constructor({
- data() {
- return {
- message: message,
- show: true,
- modalBody: modalBody
- }
- }
- }).$mount(div)
- return Instance.setSubmit //放回 一个方法用于 传递 自定义的数据和 submit 时方法
- };
- }
- });
- }
- export default install
Vue.use 同上
[javascript] view plain copy
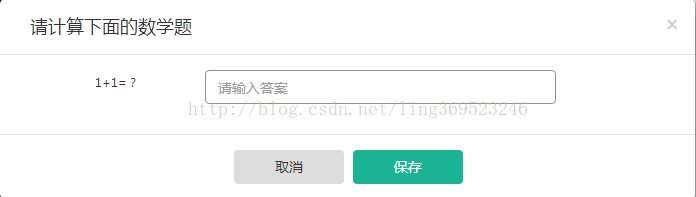
- this.$dialog('请计算下面的数学题', resolve =>
- require(['./oneaddone.vue'], resolve))('input', (data) => {
- this.$alert('哈哈哈,正确')
- console.log(data)
- return data
- }
- )
PS:这里需要注意的是 this.$dialog()(); 是这样的 因为里面返回的是一个方法,同时$mount 不能直接挂载在body 或者html下 必须在body的 子元素中 所以,createElement('div')
1+1 = 2 答案正确········
欢迎加群交流:897724635 更多视频教程资源分享给大家


 1247
1247

 被折叠的 条评论
为什么被折叠?
被折叠的 条评论
为什么被折叠?
 到【灌水乐园】发言


