


一. Haar
import cv2

cam = cv2.VideoCapture(0)
face_detector = cv2.CascadeClassifier('haarcascade_frontalface_default.xml')
# face_detector = cv2.CascadeClassifier('haarcascade_frontalface_alt2.xml')
while(True):
    ret, img = cam.read() #读取摄像头
    if not ret:break
    gray = cv2.cvtColor(img, cv2.COLOR_BGR2GRAY) #图片灰度
    faces = face_detector.detectMultiScale(gray, 1.3, 5)
    for (x,y,w,h) in faces:
        cv2.rectangle(img, (x,y), (x+w,y+h), (255,0,0), 2)
    cv2.imshow('image', img)

    k = cv2.waitKey(10) & 0xff # Press 'ESC' for exiting video
    if k == 27:
        break
cam.release()
cv2.destroyAllWindows()
二. dlib
import cv2
import dlib
cam = cv2.VideoCapture(0)
detector = dlib.get_frontal_face_detector()#加载识别器
while(True):
    ret, img = cam.read() #读取摄像头
    if not ret:break
    gray = cv2.cvtColor(img, cv2.COLOR_BGR2GRAY) #图片灰度
    rects = detector(gray, 0)#获取识别结果
    for i in range(len(rects)): #框选人脸
        x = rects[i].left()
        y= rects[i].top()
        w = rects[i].width()
        h = rects[i].height()
        cv2.rectangle(img, (x,y), (x+w,y+h), (255,0,0), 2)
    cv2.imshow('image', img)

    k = cv2.waitKey(10) & 0xff # Press 'ESC' for exiting video
    if k == 27:
        break

cam.release()
cv2.destroyAllWindows()
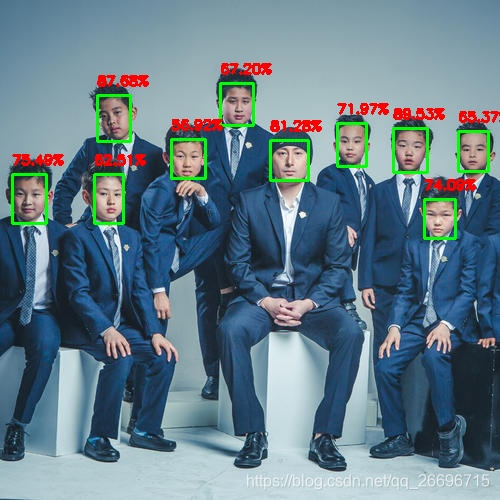
三. dnn模块
模型下载https://download.csdn.net/download/qq_26696715/12635947
import cv2
import numpy as np
# 定义相关的路径参数
modelPath = "opencv_face_detector_uint8.pb"
weightPath = "opencv_face_detector.pbtxt"
# 置信度参数,高于此数才认为是人脸,可调
confidence = 0.3
font = cv2.FONT_HERSHEY_SIMPLEX
cam = cv2.VideoCapture(0)
net = cv2.dnn.readNetFromTensorflow(modelPath, weightPath)
while True:
    ret, img =cam.read()
    (h, w) = img.shape[:2]  # 获取图像的高和宽,用于画图
    blob = cv2.dnn.blobFromImage(cv2.resize(img, (300, 300)), 1.0,(300, 300), (104.0, 177.0, 123.0))
    # blobFromImage待研究
    net.setInput(blob)
    # 预测结果
    detections = net.forward()
    # 在原图加上标签和框
    for i in range(0, detections.shape[2]):
        # 获得置信度
        res_confidence = detections[0, 0, i, 2]
        # 过滤掉低置信度的像素
        if res_confidence > confidence:
            # 获得框的位置
            box = detections[0, 0, i, 3:7] * np.array([w, h, w, h])
            (startX, startY, endX, endY) = box.astype("int")
            # 在图片上写上标签
            text = "{:.2f}%".format(res_confidence * 100)
            # 如果检测脸部在左上角,则把标签放在图片内,否则放在图片上面
            y = startY - 10 if startY - 10 > 10 else startY + 10
            cv2.rectangle(img, (startX, startY), (endX, endY),(0, 255, 0), 2)
            cv2.putText(img, text, (startX, y),cv2.FONT_HERSHEY_SIMPLEX, 0.45, (0, 0, 255), 2)

    cv2.imshow('camera',img)
    k = cv2.waitKey(10) & 0xff # Press 'ESC' for exiting video
    if k == 27:
        break
cv2.destroyAllWindows()
有问题添加QQ群:686070107


 2135
2135


 被折叠的 条评论
为什么被折叠?
被折叠的 条评论
为什么被折叠?
 到【灌水乐园】发言


