


你已经不是小宝宝了,要学会自己找资料了,本文就不过多介绍一些基础细节了,我来说下这个应用的结构
首先这个应用包含了Client和Service,也就是客户端和服务端,因为我懒,不想写两个App,所以做了一些标识的区分,我准备了两台手机进行测试,一台是三星,一台是小米,小米开启Ap热点,好的,那么开始吧。
Service
首先,我们在小米手机上打开Service
    private void initTopService() {
        try {
            serverSocket = new ServerSocket(PORT);
            Socket clientSocket = serverSocket.accept();
            String remoteIP = clientSocket.getInetAddress().getHostAddress();
            int remotePort = clientSocket.getLocalPort();
            Log.e(MainActivity.TAG, "A client connected. IP:" + remoteIP + ", Port: " + remotePort);
            in = new BufferedReader(new InputStreamReader(clientSocket.getInputStream()));
            out = new PrintStream(clientSocket.getOutputStream(), true, "utf-8");

            while (true) {
                String tmp = in.readLine();
                if (!TextUtils.isEmpty(tmp)) {
                    Message message = mHandler.obtainMessage();
                    message.obj = tmp;
                    message.what = H_DATA;
                    mHandler.sendMessage(message);
                }
                try {
                    Thread.sleep(100);
                } catch (InterruptedException e) {
                    e.printStackTrace();
                }
            }
        } catch (IOException e) {
            Log.e(MainActivity.TAG, "serverSocket" + e.toString());
        }
    }
我们来分析一下这段代码,这段代码通过ServerSocket连接一个端口,这个端口是我写固定的:5000,实际上你只要对的上,写多少都行,然后就是一些常规操作了,我获取了输出流和输入流in和out,通过他们我就可以进行读写操作了,读的话这个里进行了死循环,只要读取到内容,我就通过Hander发送出去更新UI即可,那么输入流,实际上只需要
out.println(text);
只需要通过println就可以写入,也就是发送给Client了,服务端比较简单,到这里就没有东西了,我们再来看下客户端
Client
首先我要确保WIFI是否连接,如果连接了我就直接连接Service即可,但是如果没有连接的话,我应该做什么处理呢?所以我就有了如下的这段代码
        if (WifiManager.getInstance().isWifiConnect(this)) {
            Intent intent = new Intent(this, ChatActivity.class);
            intent.putExtra("type","client");
            startActivity(intent);
            return;
        }
        if (!WifiManager.getInstance().isWifiEnabled()) {
            WifiManager.getInstance().setWifiEnabled(true);
        }

        WifiManager.getInstance().startScan();
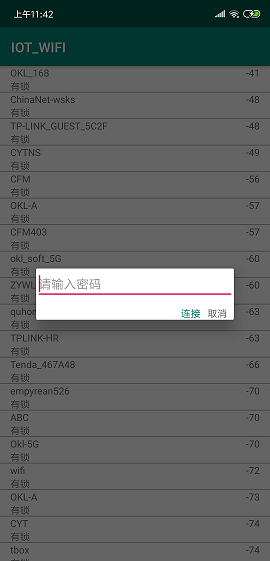
我先判断了WIFI是否连接,如果连接了我就跳转到聊天的界面,如果没有连接,我就判断WIFI有没有打开并且没有打开的话我就去打开,接着我就开始搜索设备了,如下界面:
接着我会通过WIFIConfig去连接WIFI
    /**
     * 创建WIFI信息
     *
     * @param SSID
     * @param Password
     * @param Type
     * @return
     */
    public WifiConfiguration createWifiInfo(String SSID, String Password, String Type) {
        WifiConfiguration config = new WifiConfiguration();
        config.allowedAuthAlgorithms.clear();
        config.allowedGroupCiphers.clear();
        config.allowedKeyManagement.clear();
        config.allowedPairwiseCiphers.clear();
        config.allowedProtocols.clear();
        config.SSID = "\"" + SSID + "\"";
        if (Type.contains("WEP") || Type.contains("wep")) {
            if (!TextUtils.isEmpty(Password)) {
                if (isHexWepKey(Password)) {
                    config.wepKeys[0] = Password;
                } else {
                    config.wepKeys[0] = "\"" + Password + "\"";
                }
            }
            config.allowedAuthAlgorithms.set(WifiConfiguration.AuthAlgorithm.OPEN);
            config.allowedAuthAlgorithms.set(WifiConfiguration.AuthAlgorithm.SHARED);
            config.allowedKeyManagement.set(WifiConfiguration.KeyMgmt.NONE);
            config.wepTxKeyIndex = 0;
        } else if (Type.contains("WPA") || Type.contains("wpa")) {
            config.preSharedKey = "\"" + Password + "\"";
            config.allowedAuthAlgorithms.set(WifiConfiguration.AuthAlgorithm.OPEN);
            config.allowedGroupCiphers.set(WifiConfiguration.GroupCipher.TKIP);
            config.allowedGroupCiphers.set(WifiConfiguration.GroupCipher.CCMP);
            config.allowedKeyManagement.set(WifiConfiguration.KeyMgmt.WPA_PSK);
            config.allowedPairwiseCiphers.set(WifiConfiguration.PairwiseCipher.TKIP);
            config.allowedPairwiseCiphers.set(WifiConfiguration.PairwiseCipher.CCMP);
            config.allowedProtocols.set(WifiConfiguration.Protocol.RSN);
            config.allowedProtocols.set(WifiConfiguration.Protocol.WPA);
            config.status = WifiConfiguration.Status.ENABLED;
        } else {
            config.allowedKeyManagement.set(WifiConfiguration.KeyMgmt.NONE);
        }
        return config;
    }

    /**
     * 是否十六进制的密码
     *
     * @param wepKey
     * @return
     */
    private boolean isHexWepKey(String wepKey) {
        final int len = wepKey.length();
        // WEP-40, WEP-104, and some vendors using 256-bit WEP (WEP-232?)
        if (len != 10 && len != 26 && len != 58) {
            return false;
        }
        return isHex(wepKey);
    }

    /**
     * 是否十六进制
     *
     * @param key
     * @return
     */
    private boolean isHex(String key) {
        for (int i = key.length() - 1; i >= 0; i--) {
            final char c = key.charAt(i);
            if (!(c >= '0' && c <= '9' || c >= 'A' && c <= 'F' || c >= 'a' && c <= 'f')) {
                return false;
            }
        }
        return true;
    }

    /**
     * 连接WIFI
     *
     * @param mWifiConfiguration
     * @return
     */
    public boolean connetWifi(WifiConfiguration mWifiConfiguration) {
        int netID = mWifiManager.addNetwork(mWifiConfiguration);
        boolean enabled = mWifiManager.enableNetwork(netID, true);
        return enabled;
    }
这段代码也比较好理解,就是创建一个WIFI的信息类,然后通过connetWifi这个方法进行连接,连接成功后,因为我监听了WIFI状态
        mWifiListReceiver = new WifiListReceiver();
        IntentFilter filter = new IntentFilter();
        //搜索结果
        filter.addAction(android.net.wifi.WifiManager.SCAN_RESULTS_AVAILABLE_ACTION);
        //WIFI改变
        filter.addAction(android.net.wifi.WifiManager.WIFI_STATE_CHANGED_ACTION);
        //网络改变
        filter.addAction(android.net.wifi.WifiManager.NETWORK_STATE_CHANGED_ACTION);
        //WIFI状态
        filter.addAction(android.net.wifi.WifiManager.SUPPLICANT_STATE_CHANGED_ACTION);
        registerReceiver(mWifiListReceiver, filter);
所以我可以通过广播来得到他已经连接上了,这个时候我就可以去获取Server的IP了
    /**
     * 获取热点IP
     *
     * @return
     */
    public String getHotIp() {
        DhcpInfo ipinfo = mWifiManager.getDhcpInfo();
        String ip = fixIp(ipinfo.serverAddress);
        return ip;
    }
实测证明,正常的情况下都是192.168.43.1
这样我们就可以去搭建Client的通信了
    private void initClient() {
        Log.e(MainActivity.TAG, "initClient" + MainActivity.hot_ip);
        try {
            socket = new Socket(MainActivity.hot_ip, PORT);
            output = new PrintStream(socket.getOutputStream(), true, "utf-8");
            initService();
        } catch (IOException e) {
            Log.e(MainActivity.TAG, "initClient" + e.toString());
            mHandler.postDelayed(new Runnable() {
                @Override
                public void run() {
                    new Thread(new Runnable() {
                        @Override
                        public void run() {
                            //无限重连
                            initClient();
                        }
                    }).start();
                }
            },1000);
        }
    }
这里我创建了Socket,如果出现异常,比如Time Out ,我就会去延时重连,只到创建成果,这里用了一个ip就是刚才获取的服务端的IP以及端口,就是两端协定好的,在这里我就已经拿到了output,同样可以通过他去println就可以向服务端发送消息了,接着我们来看下他的接收
    private void initService() {
        Log.e(MainActivity.TAG, "initService");
        readThread = new ReadThread();
        readThread.start();
    }
这里我创建了一个线程
    private class ReadThread extends Thread {

        @Override
        public void run() {
            //不断读取
            while (true) {
                byte[] data = receiveData();
                if (data != null) {
                    if (data.length > 1) {
                        String text = new String(data);
                        Log.e(MainActivity.TAG, text);
                        Message message = new Message();
                        message.what = H_DATA;
                        message.obj = text;
                        mHandler.sendMessage(message);
                    }
                }
            }
        }
    }
线程里做的事情很简单也是死循环的去读取数据,有数据的话就通过Handler发送出去更新UI,所以我们重点看下receiveData
    /**
     * 接收数据
     *
     * @return
     */
    public byte[] receiveData() {
        byte[] data = null;
        if (socket == null || socket.isClosed()) {
            try {
                Log.e(MainActivity.TAG,"receiveData:" + MainActivity.hot_ip);
                socket = new Socket(MainActivity.hot_ip, PORT);
            } catch (Exception e) {
                Log.e(MainActivity.TAG, "receiveData 1 " + e.toString());
            }
        }
        if (socket.isConnected()) {
            try {
                bufferedInputStream = new BufferedInputStream(socket.getInputStream());
                data = new byte[bufferedInputStream.available()];
                bufferedInputStream.read(data);
            } catch (IOException e) {
                Log.e(MainActivity.TAG, "receiveData 2" + e.toString());
            }
        } else {
            data = new byte[1];
        }
        return data;
    }
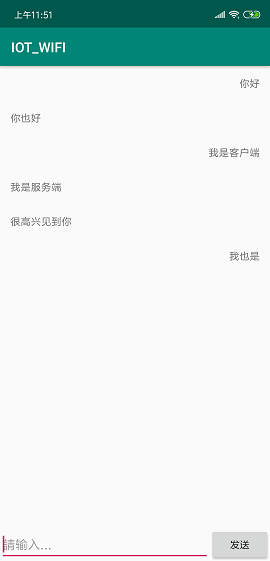
这里我们就是不断的从缓冲区获取消息,也就是data返回出去,到这里他们就已经建立通信了
好的,这个到这里就结束了,有兴趣的可以继续深入了解下,我们一起学习物联网


 2119
2119


 被折叠的 条评论
为什么被折叠?
被折叠的 条评论
为什么被折叠?
 到【灌水乐园】发言


