


Android之自定义TextView
对于自定义,我也是最近才开始学习,所以有些自定义的控件也都是在学习中,今天先来写一个简单的自定义控件TextView,这个模仿已经简单的不能再简单了。
对于自定义控件,一般来说,我们首先有以下几个步奏
- 自定义的属性
- 获取自定义属性
- 重写常用的方法onDraw() onMeasure() onTouchEvent()等,这些是我们一些基本的方法,具体重写哪些方法根据具体需求重写即可
- 开始自定义实现
首先在res ——values下自定义一个自己的myStyles属性,或者直接在styles下定义即可。
myStyles.xml
<?xml version="1.0" encoding="utf-8"?>
<resources>
    <!--定义一个styleable,name中是自定义的类名-->
    <declare-styleable name="CustomViewNet1">
        <!--声明自己需要的属性,指定好对应类型-->
        <attr name="titleName" format="string"/>
        <attr name="titleColor" format="color"/>
        <attr name="titleSize" format="dimension"/>
    </declare-styleable>
</resources>
activity_main.xml
<?xml version="1.0" encoding="utf-8"?>
<RelativeLayout xmlns:android="http://schemas.android.com/apk/res/android"
xmlns:app="http://schemas.android.com/apk/res-auto"
xmlns:tools="http://schemas.android.com/tools"
android:layout_width="match_parent"
android:layout_height="match_parent"
tools:context="cn.itrealman.customview.MainActivity">
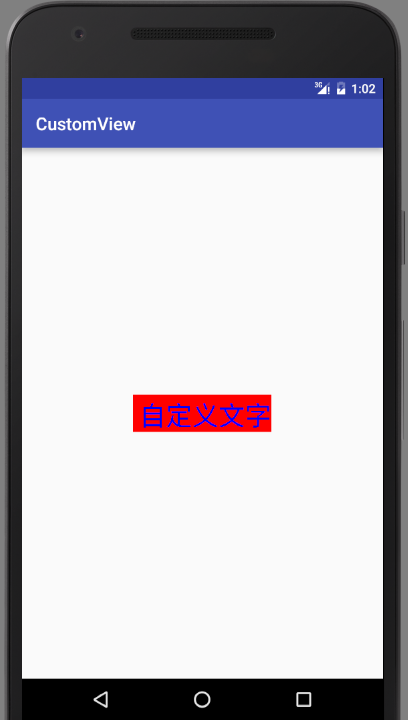
<cn.itrealman.customview.net.CustomViewNet1
android:layout_width="wrap_content"
android:layout_height="wrap_content"
app:titleColor="#00f"
android:layout_centerInParent="true"
app:titleName="自定义文字"
app:titleSize="30sp"
/>
</RelativeLayout>
上面不要忘记添加xmlns:app="http://schemas.android.com/apk/res-auto"代码,这句代码表示的意思类似于我们Java中import java.lang.*,表示将某个包中的所有类导入进来。所以这里就是自动将所有自定义的控件导进来。
CustomViewNet1.java
public class CustomViewNet1 extends View {
    //文字标题
    private String mTitleName;
    //文字颜色
    private int mTitleColor;
    //文字大小
    private int mTitleSize;

    //控制绘制文字时的范围
    private Rect mBound;
    //画笔
    private Paint mPaint;

    public CustomViewNet1(Context context) {
        this(context, null);
    }

    /**
     * 一般会默认先执行带两个参数的构造方法
     * @param context 上下文
     * @param attrs 属性值
     */
    public CustomViewNet1(Context context, AttributeSet attrs) {
        this(context, attrs, 0);
    }

    /**
     * 这个方法也需要调用
     * @param context 上下文
     * @param attrs 属性值
     * @param defStyleAttr 默认的属性风格
     */
    public CustomViewNet1(Context context, AttributeSet attrs, int defStyleAttr) {
        super(context, attrs, defStyleAttr);
        //获取所有自定义的属性值
        TypedArray typedArray = context.getTheme().obtainStyledAttributes(attrs, R.styleable.CustomViewNet1, defStyleAttr, 0);
        //获取属性值的个数
        int count = typedArray.getIndexCount();
        Log.d("IT_Real", "CustomViewNet1: count = " + count);
        //遍历获取的属性值个数
        for (int i = 0; i < count; i++) {
            //根据下标获取对应的属性类型
            int attr = typedArray.getIndex(i);
            Log.d("IT_Real", "CustomViewNet1: attr = " + attr);
            //设置将布局中的值设置该方法中的变量中
            switch (attr) {
                case R.styleable.CustomViewNet1_titleColor:
                    //文字默认值为黑色
                    mTitleColor = typedArray.getColor(attr, Color.BLACK);
                    break;
                case R.styleable.CustomViewNet1_titleName:
                    mTitleName = typedArray.getString(attr);
                    break;
                case R.styleable.CustomViewNet1_titleSize:
                    //默认设置为16sp,关于TypeValue.applyDimension方法的使用可以参考我博客中的介绍
                    mTitleSize = typedArray.getDimensionPixelSize(attr, (int) TypedValue.applyDimension(TypedValue.COMPLEX_UNIT_SP, 16, getResources().getDisplayMetrics()));
                    break;
            }
        }
        //释放资源
        typedArray.recycle();
        //创建一个画笔
        mPaint = new Paint();
        //设置字体大小
        mPaint.setTextSize(mTitleSize);
        //创建一个保存文字大小的容器
        mBound = new Rect();
        //获取文字的大小
        mPaint.getTextBounds(mTitleName, 0, mTitleName.length(), mBound);

    }

    @Override
    protected void onDraw(Canvas canvas) {
        //设置画笔的颜色为红色
        mPaint.setColor(Color.RED);
        //先画一个布局
        canvas.drawRect(0, 0, getMeasuredWidth(), getMeasuredHeight(), mPaint);
        //设置画文字的颜色
        mPaint.setColor(mTitleColor);
        //绘制文字,这里是先获取布局的宽和高,然后进行一些简单运算,将文字居中
        canvas.drawText(mTitleName, getWidth() / 2 - mBound.width() / 2, getHeight() / 2 + mBound.height() / 2, mPaint);
    }

    /**
     * 测量用户定义控件的宽高度
     * @param widthMeasureSpec
     * @param heightMeasureSpec
     */
    @Override
    protected void onMeasure(int widthMeasureSpec, int heightMeasureSpec) {
        //获取宽度定义的模式
        int widthMode = MeasureSpec.getMode(widthMeasureSpec);
        //获取宽度定义的具体大小
        int widthSize = MeasureSpec.getSize(widthMeasureSpec);
        //获取高度定义的模式
        int heightMode = MeasureSpec.getMode(heightMeasureSpec);
        //获取高度定义的具体大小
        int heightSize = MeasureSpec.getSize(heightMeasureSpec);
        int width;
        int height;
        /**
         * 首先要了解以下的几个模式
         * EXACTLY:一般是设置了明确的值或者是MATCH_PARENT
         * AT_MOST:表示子布局限制在一个最大值内,一般为WARP_CONTENT
         * UNSPECIFIED:表示子布局想要多大就多大,很少使用
         */
        if (widthMode == MeasureSpec.EXACTLY) {
            width = widthSize;
        } else {
            mPaint.setTextSize(mTitleSize);
            mPaint.getTextBounds(mTitleName, 0, mTitleName.length(), mBound);
            //文字的宽度
            float textWidth = mBound.width();
            //获取设置了边距的值
            int desired = (int) (getPaddingLeft() + textWidth + getPaddingRight());
            //设置宽的布局大小
            width = desired + desired / 10;
        }
        if (heightMode == MeasureSpec.EXACTLY) {
            height = heightSize;
        } else {
            mPaint.setTextSize(mTitleSize);
            mPaint.getTextBounds(mTitleName, 0, mTitleName.length(), mBound);
            float textHeight = mBound.height();
            int desired = (int) (getPaddingTop() + textHeight + getPaddingBottom());
            //设置高的布局大小
            height = desired + desired / 2;
        }
        setMeasuredDimension(width, height);
    }

}
效果图如下:
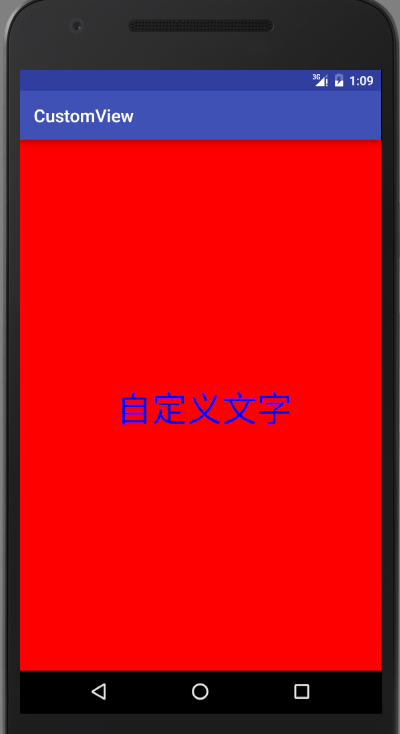
修改一下布局:
<cn.itrealman.customview.net.CustomViewNet1
        android:layout_width="match_parent"
        android:layout_height="match_parent"
        app:titleColor="#00f"
        app:titleName="自定义文字    "
        android:layout_centerInParent="true"
        app:titleSize="30sp"
        />
效果图如下:
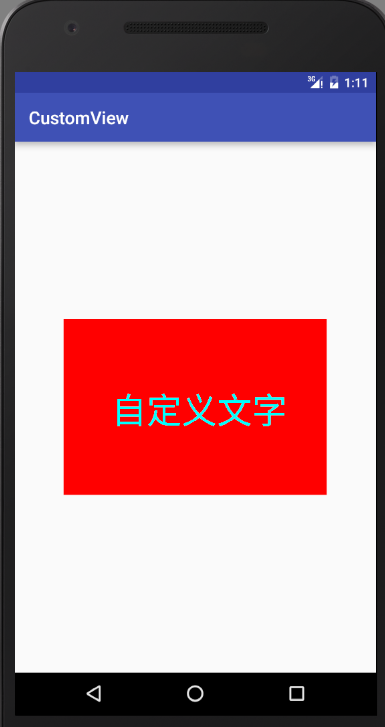
在设置一下布局具体的值:
 <cn.itrealman.customview.net.CustomViewNet1
        android:layout_width="300dp"
        android:layout_height="200dp"
        app:titleColor="#0ff"
        app:titleName="自定义文字    "
        android:layout_centerInParent="true"
        app:titleSize="40sp"
        />
效果图如下:
简单的布局就完成了,当然,这个布局只是简单的模仿TextView而已,具体的其他属性,可以尝试这去学习自定义一下。


 541
541

 被折叠的 条评论
为什么被折叠?
被折叠的 条评论
为什么被折叠?
 到【灌水乐园】发言


