


1.OAuth2 相关名词解释
- Resource owner(资源拥有者):拥有该资源的最终用户,他有访问资源的账号密码;
- Resource server(资源服务器):拥有受保护资源的服务器,如果请求包含正确的访问令牌,可以访问资源;
- Client(客户端):访问资源的客户端,会使用访问令牌去获取资源服务器的资源,可以是浏览器、移动设备或者服务器;
- Authorization server(认证服务器):用于认证用户的服务器,如果客户端认证通过,发放访问资源服务器的令牌。
2.四种授权模式
- Authorization Code(授权码模式):正宗的OAuth2的授权模式,客户端先将用户导向认证服务器,登录后获取授权码,然后进行授权,最后根据授权码获取访问令牌;
- Implicit(简化模式):和授权码模式相比,取消了获取授权码的过程,直接获取访问令牌;
- Resource Owner Password Credentials(密码模式):客户端直接向用户获取用户名和密码,之后向认证服务器获取访问令牌;
- Client Credentials(客户端模式):客户端直接通过客户端认证(比如client_id和client_secret)从认证服务器获取访问令牌。
3.两种常用的授权模式
3.1 授权码模式
- (A)客户端将用户导向认证服务器;
- (B)用户在认证服务器进行登录并授权;
- ©认证服务器返回授权码给客户端;
- (D)客户端通过授权码和跳转地址向认证服务器获取访问令牌;
- (E)认证服务器发放访问令牌(有需要带上刷新令牌)。
3.2 密码模式
- (A)客户端从用户获取用户名和密码;
- (B)客户端通过用户的用户名和密码访问认证服务器;
- ©认证服务器返回访问令牌(有需要带上刷新令牌)。
4.Oauth2的使用

4.1 pom
在pom.xml中添加相关依赖:
<dependency>
    <groupId>org.springframework.cloud</groupId>
    <artifactId>spring-cloud-starter-oauth2</artifactId>
</dependency>
<dependency>
    <groupId>org.springframework.cloud</groupId>
    <artifactId>spring-cloud-starter-security</artifactId>
</dependency>
<dependency>
    <groupId>org.springframework.boot</groupId>
    <artifactId>spring-boot-starter-web</artifactId>
</dependency>
4.2 application
spring.application.name=security-demo
# 应用服务web访问端口
server.port=8666
# ActuatorWeb访问端口
management.server.port=8667
management.endpoints.jmx.exposure.include=*
management.endpoints.web.exposure.include=*
management.endpoint.health.show-details=always
4.3 添加UserService实现UserDetailsService接口
- 用于加载用户信息
import org.apache.commons.collections4.CollectionUtils;
import org.springframework.beans.factory.annotation.Autowired;
import org.springframework.security.core.authority.AuthorityUtils;
import org.springframework.security.core.userdetails.User;
import org.springframework.security.core.userdetails.UserDetails;
import org.springframework.security.core.userdetails.UserDetailsService;
import org.springframework.security.core.userdetails.UsernameNotFoundException;
import org.springframework.security.crypto.password.PasswordEncoder;
import org.springframework.stereotype.Service;

import javax.annotation.PostConstruct;
import java.util.ArrayList;
import java.util.List;
import java.util.stream.Collectors;

/**
 * @ClassName: UserService
 * @Description: 用户账号信息
 **/
@Service
public class UserService implements UserDetailsService {
    // 存放一些用户信息
    List<User> userList;

    @Autowired
    private PasswordEncoder passwordEncoder;

    // 根据用户名查找对应的用户,后面会UsernamePasswordAuthenticationFilter
    @Override
    public UserDetails loadUserByUsername(String name) throws UsernameNotFoundException {
        String password = passwordEncoder.encode("123456");
        userList = new ArrayList<>();
        // AuthorityUtils.commaSeparatedStringToAuthorityList(“admin”) 是用来为用户分配权限,上面的配置类会根据权限来限制访问,产生不同结果。
        userList.add(new User("admin",password,AuthorityUtils.commaSeparatedStringToAuthorityList("admin")));
        userList.add(new User("user1",password,AuthorityUtils.commaSeparatedStringToAuthorityList("user")));
        userList.add(new User("user2",password,AuthorityUtils.commaSeparatedStringToAuthorityList("user")));
        List<User> collect =
            userList.stream().filter(user -> user.getUsername().equals(name)).collect(Collectors.toList());
        if (CollectionUtils.isNotEmpty(collect)){
            return collect.get(0);
        }else {
            throw new UsernameNotFoundException("用户名或密码错误");
        }
    }
}
- 使用从数据库取得方式
@Service
public class UmsAdminServiceImpl implements UmsAdminService {
    @Override
    public UserDetails loadUserByUsername(String username){
        //获取用户信息
        UmsAdmin admin = getAdminByUsername(username);
        if (admin != null) {
            List<UmsPermission> permissionList = getPermissionList(admin.getId());
            return new AdminUserDetails(admin,permissionList);
        }
        throw new UsernameNotFoundException("用户名或密码错误");
    }
}
这里介绍一下AuthorityUtils.commaSeparatedStringToAuthorityList()
@EnableGlobalMethodSecurity(prePostEnabled = true) 开启后,Spring Security 的 @PreAuthorize,@PostAuthorize 注解才可以使用。
在UserDetailsService的loadUserByUsername方法里去构建当前登陆的用户时,你可以选择两种授权方法,即角色授权和权限授权,
对应使用的代码是hasRole和hasAuthority,而这两种方式在设置时也有不同,下面介绍一下:

角色授权:授权代码需要加ROLE_前缀,controller上使用时不要加前缀
权限授权:设置和使用时,名称保持一至即可
AuthorityUtils.commaSeparatedStringToAuthorityList("read,ROLE_USER"));//设置权限和角色

1. commaSeparatedStringToAuthorityList放入角色时需要加前缀ROLE_,而在controller使用时不需要加ROLE_前缀
2. 放入的是权限时,不能加ROLE_前缀,hasAuthority与放入的权限名称对应即可

    @GetMapping("/read-or-write")
  @PreAuthorize("hasAnyAuthority('read','write')")
  public String readWriteDate() {
    return "have a read or write authority";
  }

  @GetMapping("/admin-role")
  @PreAuthorize("hasRole('admin')")
  public String readAdmin() {
    return "have a admin role";
  }

  @GetMapping("/user-role")
  @PreAuthorize("hasRole('USER')")
  public String readUser() {
    return "have a user role";
  }
4.4 SpringSecurity配置路径权限
- 允许认证相关路径的访问及表单登录
import org.springframework.context.annotation.Bean;
import org.springframework.context.annotation.Configuration;
import org.springframework.security.authentication.AuthenticationManager;
import org.springframework.security.config.annotation.web.builders.HttpSecurity;
import org.springframework.security.config.annotation.web.configuration.EnableWebSecurity;
import org.springframework.security.config.annotation.web.configuration.WebSecurityConfigurerAdapter;
import org.springframework.security.crypto.bcrypt.BCryptPasswordEncoder;
import org.springframework.security.crypto.password.PasswordEncoder;

/**
 * @ClassName: SecurityConfig
 * @Description: 路径校验控制类
 **/
@Configuration
@EnableWebSecurity
public class SecurityConfig extends WebSecurityConfigurerAdapter {
    @Bean
    public PasswordEncoder passwordEncoder() {
        return new BCryptPasswordEncoder();
    }
    // 密码模式要用到
    @Bean
    @Override
    public AuthenticationManager authenticationManagerBean() throws Exception {
        return super.authenticationManagerBean();
    }
    @Bean
    @Override
    protected UserDetailsService userDetailsService() {
        return new UserService();
    }

    @Override
    protected void configure(HttpSecurity http) throws Exception {
        http.csrf().disable()
            .authorizeRequests()
            .antMatchers("/oauth/**", "/login/**", "/logout/**","/actuator/**").permitAll()
            .anyRequest().authenticated()
            .and()
            .formLogin()
            .permitAll();
    }
    @Override
    protected void configure(AuthenticationManagerBuilder auth) throws Exception {
        /*String password = new BCryptPasswordEncoder().encode("123456");
        auth.inMemoryAuthentication()
            .withUser("admin").password(password).authorities("admin")
            .and()
            .withUser("user2").password(password).authorities("USER");*/
        auth.userDetailsService(userDetailsService());
    }
}
4.5 认证服务器配置 @EnableAuthorizationServer
import com.zsjk.security.service.UserService;
import org.springframework.beans.factory.annotation.Autowired;
import org.springframework.context.annotation.Configuration;
import org.springframework.security.authentication.AuthenticationManager;
import org.springframework.security.crypto.password.PasswordEncoder;
import org.springframework.security.oauth2.config.annotation.configurers.ClientDetailsServiceConfigurer;
import org.springframework.security.oauth2.config.annotation.web.configuration.AuthorizationServerConfigurerAdapter;
import org.springframework.security.oauth2.config.annotation.web.configuration.EnableAuthorizationServer;
import org.springframework.security.oauth2.config.annotation.web.configurers.AuthorizationServerEndpointsConfigurer;

/**
 * @ClassName: AuthorizationServerConfig
 * @Description: 认证服务器配置
 **/

@Configuration
@EnableAuthorizationServer
public class AuthorizationServerConfig extends AuthorizationServerConfigurerAdapter {

    @Autowired
    private PasswordEncoder passwordEncoder;

    @Autowired
    private AuthenticationManager authenticationManager;

    @Autowired
    private UserService userService;

    // 使用密码模式需要配置
    @Override
    public void configure(AuthorizationServerEndpointsConfigurer endpoints) throws Exception {
        endpoints.authenticationManager(authenticationManager);
            // .userDetailsService(userService);
    }

    @Override
    public void configure(ClientDetailsServiceConfigurer clients) throws Exception {
        clients.inMemory()
            .withClient("admin")//配置client_id
            .secret(passwordEncoder.encode("admin123456"))//配置client_secret
            .accessTokenValiditySeconds(3600)//配置访问token的有效期
            .refreshTokenValiditySeconds(864000)//配置刷新token的有效期
            .redirectUris("http://www.baidu.com")//配置redirect_uri,用于授权成功后跳转
            .scopes("all") // 配置申请的权限范围,授权页面会显示
            .authorizedGrantTypes("authorization_code","password");//配置grant_type,表示授权类型
            // .add().withClient("user") 可以配置多个
    }
}
4.6 资源服务器配置@EnableResourceServer
import org.springframework.context.annotation.Configuration;
import org.springframework.security.config.annotation.web.builders.HttpSecurity;
import org.springframework.security.oauth2.config.annotation.web.configuration.EnableResourceServer;
import org.springframework.security.oauth2.config.annotation.web.configuration.ResourceServerConfigurerAdapter;

/**
 * @ClassName: ResourceServerConfig
 * @Description: 资源服务配置
 **/
@Configuration
@EnableResourceServer
public class ResourceServerConfig extends ResourceServerConfigurerAdapter {
    @Override
    public void configure(HttpSecurity http) throws Exception {
        http.authorizeRequests()
            .anyRequest()
            .authenticated()
            .and()
            .requestMatchers()
            .antMatchers("/user/**");//配置需要保护的资源路径
    }
}
4.7 需要登录的接口用于测试
@RequestMapping("/user")
@RestController
public class UserController {
    @GetMapping("/getCurrentUser")
    public Object getCurrentUser(Authentication authentication) {
        return authentication.getPrincipal();
    }
}
5.两种模式测试
5.1 授权码模式
- 在浏览器访问该地址进行登录授权:
- 输入账号密码进行登录操作:

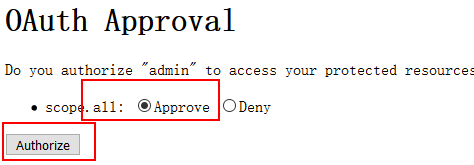
- 登录后进行授权操作:
- 之后会浏览器会带着授权码跳转到我们指定的路径:

使用授权码请求该地址获取访问令牌:http://localhost:8666/oauth/token
- 使用Basic认证通过client_id和client_secret构造一个Authorization头信息;

- 在body中添加以下参数信息,通过POST请求获取访问令牌;

- 在请求头中添加访问令牌,访问需要登录认证的接口进行测试,发现已经可以成功访问:http://localhost:8666/user/getCurrentUser

- 不添加令牌是无法访问的

5.2 密码模式使用
- 使用密码请求该地址获取访问令牌:http://localhost:8666/oauth/token
- 使用Basic认证通过client_id和client_secret构造一个Authorization头信息;


 被折叠的 条评论
为什么被折叠?
被折叠的 条评论
为什么被折叠?
 到【灌水乐园】发言


