


-
- Android 5.0给TabLayout加入了新的特性,所以TabLayout又开始被使用了/
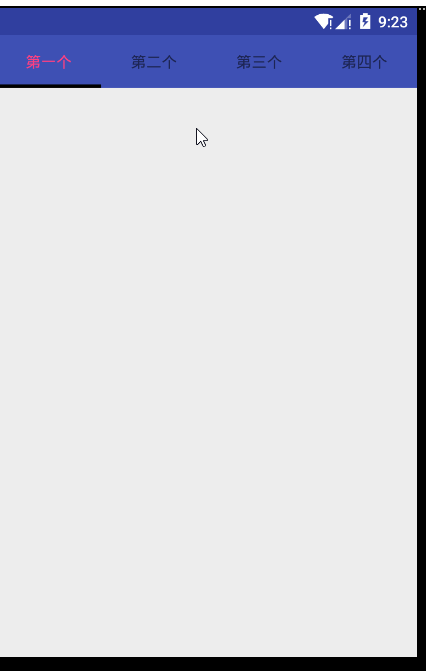
简单的TabLayout
- 使用这个控件,首先我们要点击File–>Project Sturucture–>app来进行导包
然后在布局文件中使用之前,需要在父布局中添加这句话

xmlns:tab="http://schemas.android.com/apk/res-auto"- 布局文件的代码如下:
<?xml version="1.0" encoding="utf-8"?>
<LinearLayout xmlns:android="http://schemas.android.com/apk/res/android"
    xmlns:tools="http://schemas.android.com/tools"
    xmlns:tab="http://schemas.android.com/apk/res-auto"
    android:layout_width="match_parent"
    android:layout_height="match_parent"
    android:orientation="vertical"
    tools:context="com.lingzhuo.testtablelayout01.FirstActivity">

    <android.support.design.widget.TabLayout
        android:id="@+id/tablelayout"
        android:layout_width="match_parent"
        android:layout_height="wrap_content"
        tab:tabBackground="@color/colorPrimary"
        tab:tabSelectedTextColor="@color/colorAccent"
        tab:tabIndicatorColor="#000000"
        tab:tabIndicatorHeight="3dp" />

</LinearLayout>- tab:tabIndicatorColor
- 选中的条目的下面的滑条的颜色
- tab:tabIndicatorHeight
- 滑条的宽度
- tab:tabMode=”scrollable”
可滑动的tab栏
活动中的逻辑代码
public class FirstActivity extends AppCompatActivity {

    private TabLayout tabLayout;
    protected void onCreate(Bundle savedInstanceState) {
        super.onCreate(savedInstanceState);
        setContentView(R.layout.activity_first);
        init();
    }

    private void init() {
        tabLayout= (TabLayout) findViewById(R.id.tablelayout);
        tabLayout.addTab(tabLayout.newTab().setText("第一个"));
        tabLayout.addTab(tabLayout.newTab().setText("第二个"));
        tabLayout.addTab(tabLayout.newTab().setText("第三个"));
        tabLayout.addTab(tabLayout.newTab().setText("第四个"));
    }
}- 代码解释
tabLayout.addTab(tabLayout.newTab().setText("第一个"));- 添加一个标签项,顺便设置上面的内容
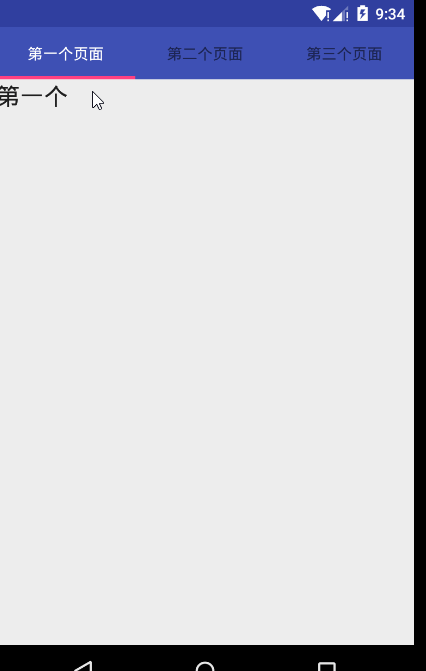
复杂的TabLayout
使用TableLayout和ViewPager联动,以完成多个页面的切换
界面布局
<?xml version="1.0" encoding="utf-8"?>
<LinearLayout xmlns:android="http://schemas.android.com/apk/res/android"
    xmlns:tools="http://schemas.android.com/tools"
    xmlns:tab="http://schemas.android.com/apk/res-auto"
    android:layout_width="match_parent"
    android:layout_height="match_parent"
    android:orientation="vertical"
    tools:context="com.lingzhuo.testtablelayout01.SecActivity">
    <android.support.design.widget.TabLayout
        android:id="@+id/tablelayout2"
        android:layout_width="match_parent"
        android:layout_height="wrap_content"
        tab:tabBackground="@color/colorPrimary"
        tab:tabSelectedTextColor="#ffffff"
        tab:tabIndicatorColor="@color/colorAccent"
        tab:tabIndicatorHeight="3dp"></android.support.design.widget.TabLayout>

    <android.support.v4.view.ViewPager
        android:id="@+id/viewpager"
        android:layout_width="match_parent"
        android:layout_height="wrap_content"></android.support.v4.view.ViewPager>
</LinearLayout>
就是在TableLayout控件下又添加了一个ViewPager控件
三个自定义的Fragment页面大同小异,这里只贴出其中一个的代码
- Fragment布局
<?xml version="1.0" encoding="utf-8"?>
<LinearLayout xmlns:android="http://schemas.android.com/apk/res/android"
    android:orientation="vertical" android:layout_width="match_parent"
    android:layout_height="match_parent">

    <TextView
        android:layout_width="wrap_content"
        android:layout_height="wrap_content"
        android:textAppearance="?android:attr/textAppearanceLarge"
        android:text="第一个"
        android:id="@+id/textView" />
</LinearLayout>- Fragment代码
public class MyFragment01 extends Fragment {
    @Override
    public View onCreateView(LayoutInflater inflater, ViewGroup container, Bundle savedInstanceState) {
        View view=inflater.inflate(R.layout.layout_fragment01,null);
        return view;
    }
}- 定义一个bean类,用于存储ViewPager对应的Fragment和title
public class TabFragment {
    private Fragment fragment;
    private String title;

    public TabFragment(Fragment fragment, String title) {
        this.fragment = fragment;
        this.title = title;
    }

    public Fragment getFragment() {
        return fragment;
    }

    public void setFragment(Fragment fragment) {
        this.fragment = fragment;
    }

    public String getTitle() {
        return title;
    }

    public void setTitle(String title) {
        this.title = title;
    }
}- ViewPager的Adapter代码
public class MyAdapter extends FragmentPagerAdapter{

    private List<TabFragment> list;

    public MyAdapter(FragmentManager fm) {
        super(fm);
    }

    public MyAdapter(FragmentManager fm, List<TabFragment> list) {
        super(fm);
        this.list = list;
    }

    @Override
    public Fragment getItem(int position) {
        return list.get(position).getFragment();
    }

    @Override
    public int getCount() {
        return list.size();
    }

    @Override
    public CharSequence getPageTitle(int position) {
        return list.get(position).getTitle();
    }
}- 活动中的逻辑代码:
public class SecActivity extends AppCompatActivity{

    private TabLayout tabLayout2;
    private ViewPager viewPager;
    private List<TabFragment> list;
    protected void onCreate(Bundle savedInstanceState) {
        super.onCreate(savedInstanceState);
        setContentView(R.layout.activity_sec);
        init();
        MyAdapter adapter=new MyAdapter(getSupportFragmentManager(),list);
        viewPager.setAdapter(adapter);
        tabLayout2.setupWithViewPager(viewPager);
    }

    private void init() {
        viewPager= (ViewPager) findViewById(R.id.viewpager);
        list=new ArrayList<>();
        list.add(new TabFragment(new MyFragment01(),"第一个页面"));
        list.add(new TabFragment(new MyFragment02(),"第二个页面"));
        list.add(new TabFragment(new MyFragment03(),"第三个页面"));
        tabLayout2= (TabLayout) findViewById(R.id.tablelayout2);
    }
}- 代码逻辑很清晰,这里就不再一一解释了。


 1000
1000

 被折叠的 条评论
为什么被折叠?
被折叠的 条评论
为什么被折叠?
 到【灌水乐园】发言


