一、什么是Intent
1、概念
Intent翻译过来是”意图、目的”的意思,是连接四大组件的桥梁,作为中介传输信息.
2、类型
Intent分为两种,显示和隐示.显示需要指定目标组件信息,隐示则只需要指定被目标组件响应的信息(action和category等信息).
3、属性
component(组件):目的组件
action(动作):用来表现意图的行动
category(类别):用来表现动作的类别
data(数据):表示与动作要操纵的数据
type(数据类型):对于data范例的描写
extras(扩展信息):扩展信息
Flags(标志位):期望这个意图的运行模式
.
二、连接不同组件的原理
这里以Activity里启动Service为例,来分析原理.
Intent intent = new Intent(MainActivity.this, MainService.class); startService(intent);
1、点击跳转到Intent带有这两个参数的构造方法
    public class Intent implements Parcelable, Cloneable {
            ......
    public Intent(Context packageContext, Class<?> cls) {
        mComponent = new ComponentName(packageContext, cls);
    }
            ......
            }
在这里只是新建了ComponentName实例.
2、好,回到startService(intent),点击会跳转到ContextWrapper类
public class ContextWrapper extends Context {
     Context mBase;
     ......
     @Override public ComponentName startService(Intent service) {
     return mBase.startService(service);
     }
     ......
     }
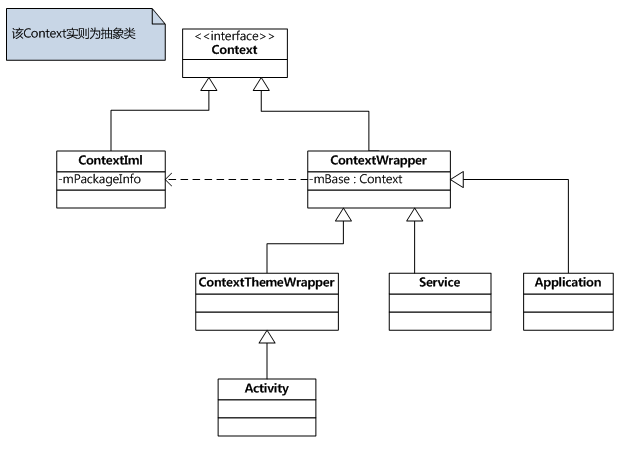
3、在这个方法里调用mBase的startService方法,这个mBase其实是ContextIml的实例,ContextIml也继承自Context,代码位于/frameworks/base/core/java/android/app/ContextImpl.java。
这里顺便介绍下Context、ContextWrapper 、ContextImpl的关系.直接
放图吧。


4、好,继续看ContextImpl类中的startService实现.
PS:给大家推荐一个在线看源码的网站 点击打开
class ContextImpl extends Context {
            ......
            @Override
            public ComponentName startService(Intent service) {
                try {
                    service.setAllowFds(false);
                    ComponentName cn=ActivityManagerNative.getDefault().startService( mMainThread.getApplicationThread(), service, service.resolveTypeIfNeeded(getContentResolver()));
                    if (cn != null && cn.getPackageName().equals()) {
                        throw new SecurityException( + service + + cn.getClassName());
                        }
                    return cn;
                    } catch (RemoteException e) {
                        return null;
                        }
                }
            ......
            }
- 1
- 2
- 3
- 4
- 5
- 6
- 7
- 8
- 9
- 10
- 11
- 12
- 13
- 14
- 15
- 16
- 17
5、在这里调用了ActivityManagerNative的getDefault方法返回的是gDefault.get()方法.
public abstract class ActivityManagerNative extends Binder implements IActivityManager {
            ......
            static public IActivityManager getDefault() {
                return gDefault.get();
                }
            ......
        }
6、gDefault.get()方法返回的是IActivityManager对象.IActivityManager是一个Binder对象.
{
            ......
            private static final Singleton<IActivityManager> gDefault = new Singleton<IActivityManager>() {
                protected IActivityManager create() {
                    IBinder b = ServiceManager.getService();
                    if (false) {
                        Log.v(, + b);
                        }
                    IActivityManager am = asInterface(b);
                    if (false) {
                        Log.v(, + am);
                        }
                    return am;
                    }
                };
            ......
                }
- 1
- 2
- 3
- 4
- 5
- 6
- 7
- 8
- 9
- 10
- 11
- 12
- 13
- 14
- 15
- 16
- 17
7、回到第4步.
ActivityManagerNative.getDefault().startService( mMainThread.getApplicationThread(), service, service.resolveTypeIfNeeded(getContentResolver()))
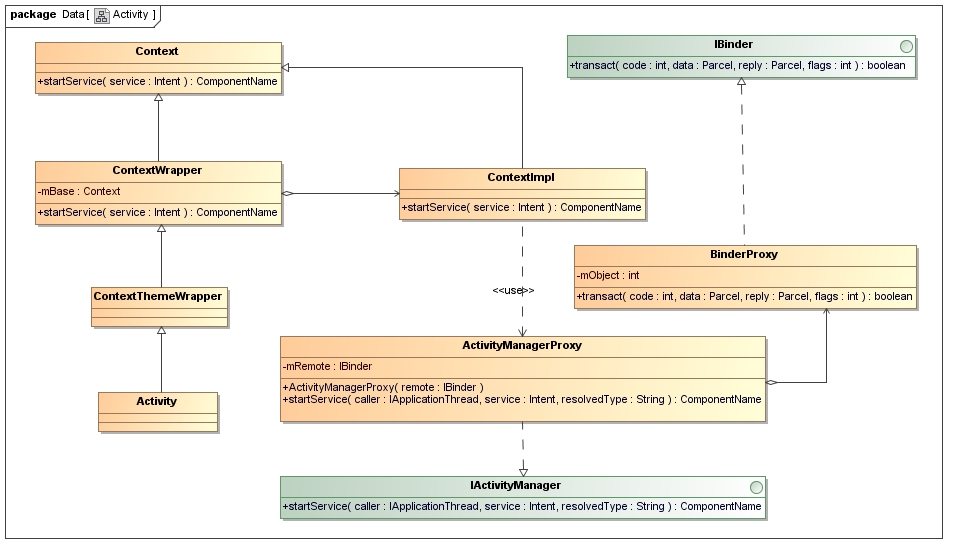
调用了IActivityManager的startService方法,IActivityManager是一个抽象类,由它的实现类ActivityManagerProxy来实现.
8、看下它的实现
class ActivityManagerProxy implements IActivityManager {
            ......
            public ComponentName startService(IApplicationThread caller, Intent service, String resolvedType) throws RemoteException {
                Parcel data = Parcel.obtain();
                Parcel reply = Parcel.obtain();
                data.writeInterfaceToken(IActivityManager.descriptor);
                data.writeStrongBinder(caller != null ? caller.asBinder() : null);
                service.writeToParcel(data, 0);
                data.writeString(resolvedType);
                mRemote.transact(START_SERVICE_TRANSACTION, data, reply, 0);
                reply.readException();
                ComponentName res = ComponentName.readFromParcel(reply);
                data.recycle();
                reply.recycle();
                return res;
                }
            ......
            }
- 1
- 2
- 3
- 4
- 5
- 6
- 7
- 8
- 9
- 10
- 11
- 12
- 13
- 14
- 15
- 16
- 17
- 18
startService传入是三个参数:IApplicationThread 、Intent 、resolvedType.
第一个参数IApplicationThread是一个接口, 由主进程ActivityThread创建的一个Binder对象.第二个参数Intent 不用说了第三个参数是Intent 的MIME类型
9、接下来关键的一行代码
mRemote.transact(START_SERVICE_TRANSACTION, data, reply, 0);
这个transact方法会进入Binder驱动程序.Binder驱动程序唤醒正在等待的ActivityManagerService进程,最后进入到ActivityManagerService的startService函数中。
public final class ActivityManagerService extends ActivityManagerNative implements Watchdog.Monitor, BatteryStatsImpl.BatteryCallback {
{
......
public ComponentName startService(IApplicationThread caller, Intent service, String resolvedType) {
if (service != null && service.hasFileDescriptors() == true) {
throw new IllegalArgumentException();
}
synchronized(this) {
final int callingPid = Binder.getCallingPid();
final int callingUid = Binder.getCallingUid();
final long origId = Binder.clearCallingIdentity();
ComponentName res = startServiceLocked(caller, service, resolvedType, callingPid, callingUid); Binder.restoreCallingIdentity(origId); return res;
}
}
......
}
}
}
}
- 1
- 2
- 3
- 4
- 5
- 6
- 7
- 8
- 9
- 10
- 11
- 12
- 13
- 14
- 15
- 16
- 17
- 18
- 19
- 20
10、从Binder里获取到pid和uid,添加这两个参数到startServiceLocked方法.
public final class ActivityManagerService extends ActivityManagerNative implements Watchdog.Monitor, BatteryStatsImpl.BatteryCallback {
            {
                ......
                ComponentName startServiceLocked(IApplicationThread caller,Intent service, String resolvedType,int callingPid, int callingUid) {
                    ......
                    ServiceLookupResult res =retrieveServiceLocked(service, resolvedType,callingPid, callingUid);
                    ServiceRecord r = res.record;
                    ......
                    return r.name;
                    }
                ......
                }
        }
11、在这个方法里,调用retrieveServiceLocked方法解析service这个Intent.至此,Intent的使命基本结束了,我就不继续追踪服务的启动了.大家感兴趣可以自己往下跟踪.
三、总结
Intent是作为一个参数,携带相关的信息.
1、由主进程通过Binder进入AMS进程
2、 在AMS进程获取和管理要启动的服务的相关信息
3、 由AMS进程回到该主进程启动服务
而Intent一直是贯穿始终的.
最后附上从网上找到的整个流程图,,帮大家理


 3247
3247


 被折叠的 条评论
为什么被折叠?


