转载于 http://www.cnblogs.com/xing901022
SWT知识介绍
之前学过Java的朋友,多少页会一些关于Swing的东西。那么这里的SWT就是Eclipse插件所应用到的小部件开发框架。
里面包含了大量的桌面控件,并且进行了一系列的优化整合,相对于Swing,极大的减少了内存的消耗。而且关于资源的释放也需要开发者注意,需要特定的手动删除,但是比如一个部件的子部件会随着该部件的销毁而销毁。
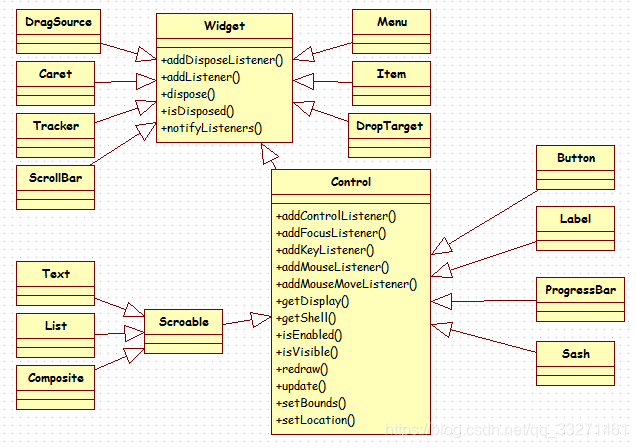
下面看一下开发中常用的一些部件模型,这里介绍的并不全,小控件其实有很多很多,这里就简单的介绍几种:

这里Widget是一个超类,所有的部件都继承与这个类。它也提供了一些常用的方法,比如添加一些监听,获取常用的信息等等。
最常用的还要数Control了,因为很多Button Label控件都是继承这个类,在开发中经常使用的方法就是
addMouseListener()进行鼠标点击的监听
setBounds 进行控件的重新绘制
等等。具体的函数,大家可以通过开发多留意一下,就行了。
关于SWT里面Display与Shell之间的关系
Eclipse插件开发的程序大多有个不成文的规定,一个程序活动期间,只能有一个Dispaly对象,但是可以有多个Shell对象。那么,什么是Dispaly,什么又是Shell呢。

这里红色箭头显示的就是一个Display,也就是一个底层的应用实例。如果这个实例没有被销毁,而程序意外停止了,那么是不能重新运行的。也就是说,运行期间,一个应用程序,只能有一个Display。就像显示器与窗口内的内容,只有一个显示器,但是显示器内部可以显示多个文件内容。
绿色箭头对应的就是Shell,一个Shell相当于一个活动的窗口,可以在里面添加各种小部件,组成一个丰富的应用界面。
综上,一个Display可以有多个Shell,但是只有一个Display(适用于普通情况).!
在Main中启动开发界面
接下来介绍一下如何不启动一个Eclipse 插件工程,来开发SWT。这个过程很多教材上都有描述,因此这里只提供了上面例子所对应的代码。
要注意的是,最后要释放资源,Shell是挂载到Dispaly上面(原谅我用挂载这个词,Linux里面挂载比较生动),因此销毁Display的时候,可以自动的销毁Shell对象。但是Color并不是通过挂载方式创建的,因此要独立的释放。
package com.xingoo.plugin.swttest;

import javax.swing.Scrollable;
import javax.swing.text.StyleConstants.ColorConstants;

import org.eclipse.swt.SWT;
import org.eclipse.swt.graphics.Color;
import org.eclipse.swt.layout.FillLayout;
import org.eclipse.swt.widgets.Display;
import org.eclipse.swt.widgets.Label;
import org.eclipse.swt.widgets.Shell;
import org.eclipse.swt.widgets.Text;

public class mainTestExample {
    public static void main(String[] args) {
        Display display = new Display();
        Color color =  new Color(display,255,0,0);

        //create a shell
        Shell shell_1 = new Shell(display);
        shell_1.setText("This is a shell in main function()");
        shell_1.setBounds(100,100,400,200);
        shell_1.setLayout(new FillLayout());

        Label label_1 = new Label(shell_1,SWT.CENTER);
        label_1.setText("this is the text of a label");
        label_1.setForeground(color);

        shell_1.open();
        Text test;
        //create another shell
        Shell shell_2 = new Shell(display);
        shell_2.setText("This is a shell1 in main function()");
        shell_2.setBounds(250,250,400,200);
        shell_2.setLayout(new FillLayout());

        Label label_2 = new Label(shell_2,SWT.CENTER);
        label_2.setText("this is the text of a label1");
        label_2.setForeground(color);

        shell_2.open();

        while(!shell_1.isDisposed() || !shell_2.isDisposed()){
            if(!display.readAndDispatch())
                display.sleep();
        }

        //dispose the resource
        display.beep();
        color.dispose();
        display.dispose();
    }
}
这个函数代码在一般 工程 里面就可以运行,但是缺少一个Jar包,swt的jar包,这个jar包在Eclipse的plugins文件夹下就可以找到。可以通过引入的方式,引入到工程中。
其实只需要swtx86这个jar包就可以了,source是源代码,可以让我跟踪调试swt的源码。

便于继承的窗口抽象类
为了后面的测试使用,这里可以把这段代码进行提取。这样之后的main函数的类只要继承这个AbstractExample就可以进行窗口的编辑了。
package com.xingoo.plugin.swttest;

import org.eclipse.swt.SWT;
import org.eclipse.swt.layout.FillLayout;
import org.eclipse.swt.widgets.Display;
import org.eclipse.swt.widgets.Label;
import org.eclipse.swt.widgets.Shell;

abstract class AbstractExample{
    public void run(){
        Display display = new Display();
        Shell shell = new Shell(display);
        shell.setText("shell example");
        shell.setBounds(100,100,400,200);
        shell.setLayout(new FillLayout());
        todo(shell);
        shell.open();

        while(!shell.isDisposed()){
            if(!display.readAndDispatch())
                display.sleep();
        }
        //dispose the resource
        display.beep();
        display.dispose();
    }
    public abstract void todo(Shell shell);//extension something here
}

public class mainTestExample extends AbstractExample{
    public static void main(String[] args) {
        new mainTestExample().run();
    }

    public void todo(Shell shell) {
        //...add something you like
        Label label_1 = new Label(shell,SWT.CENTER);
        label_1.setText("this is the text of a label");
    }
}
Eclipse的布局机制,提供了两个对象概念,Layout(描述内部布局方式)以及GridData(描述本身布局方式)。
什么是Layout?
首先说一下Layout,layout定义了一个空间内部的布局格式。比如我们把箱子作为一个整体,那么箱子内部该怎么去设计,怎么放置东西进去,就需要用layout来指定。

而常用的布局方式,就包括FillLayout,gridLayout,RowLayout,以及FormLayout。
下面就针对这几种布局进行一下介绍:
Filllayout
也叫做填充布局,它会让里面的子空间以填充的方式进行布局。
比如我们采用如下的设计方式:
FillLayout layout = new FillLayout();
shell.setLayout(layout);
for(int i=0;i<10;i++){
    Button button = new Button(shell,SWT.PUSH);
    button.setText("Button"+i);
}
正常的布局是这样的:

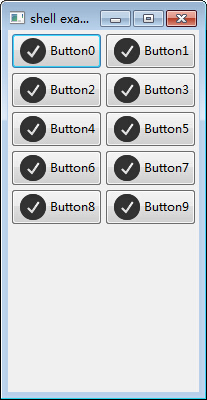
RowLayout
也叫行布局,它会让内部的子空间以行为单位进行排列,遇到边界时,自动换成下一行。
RowLayout layout = new RowLayout();
        shell.setLayout(layout);
        for(int i=0;i<10;i++){
            Button button = new Button(shell,SWT.PUSH);
            Image img = new Image(null,"icons\\ok.png");
            button.setImage(img);
            button.setText("Button"+i);
        }
得到的结果是这样的:

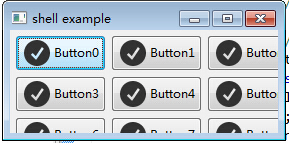
当压缩边界的时候,会自动换行

GridLayout
也叫做网格布局,它以规定网格的形式,指定每一行有多少列,元素会以每列几个的方式进行排列,超出的部分挤到下一行
GridLayout layout = new GridLayout();
        layout.numColumns = 3;
        shell.setLayout(layout);
        for(int i=0;i<10;i++){
            Button button = new Button(shell,SWT.PUSH);
            Image img = new Image(null,"icons\\ok.png");
            button.setImage(img);
            button.setText("Button"+i);
        }
当指定每行有3个子控件时,无论怎么改变窗口的大小,都不会改变排列的方式

当改变窗口大小时,不会发生变化

FormLayout
感觉这个是最难使用的了,它会以一个Form表单的形式提供布局。先看一下使用方式吧:
FormLayout layout = new FormLayout();
        shell.setLayout(layout);

        Button cancelButton = new Button(shell,SWT.PUSH);
        cancelButton.setText("Cancel");
        FormData formData1 = new FormData();
        formData1.right = new FormAttachment(100,-5); //第一个数字式百分比,也就是说  【宽度-5】
        formData1.bottom = new FormAttachment(100,-5); //第一个数字式百分比,也就是说  【高度-5】
        cancelButton.setLayoutData(formData1);

        Button okButton = new Button(shell,SWT.PUSH);
        okButton.setText("OK");
        FormData formData2 = new FormData();
        formData2.right = new FormAttachment(100,-60);
        formData2.bottom = new FormAttachment(100,-5);
        okButton.setLayoutData(formData2);

        Text text = new Text(shell,SWT.MULTI | SWT.BORDER | SWT.V_SCROLL | SWT.H_SCROLL);
        FormData formData3 = new FormData();
        formData3.top = new FormAttachment(0,5);
        formData3.bottom = new FormAttachment(cancelButton,-5);//底部距离 【底部控件-5个像素】
        formData3.left = new FormAttachment(0,5);
        formData3.right = new FormAttachment(100,-5);
        text.setLayoutData(formData3);
        Color color = new Color(null,255,0,0);
        text.setForeground(color);
可以看到他提供了一个FormData的布局方式,通过FormAttachment实现,这个类需要两个参数,第一个是宽度(left或者right)或者高度(top或者bottom)的百分比,第二个参数是它相对加上的值。如果是负数,就是减去的像素值。而且提供Control类型的参数,也就是控件类型的参数。如果第一个参数指定一个控件,比如上面指定的那个bottom,那么他会自动获取这个控件对应的高度,在进行加减。
这样就保证了,某些控件的相对位置保持不变。
下面看一下效果:

拉伸后编程

什么是GridData呢?又该如何使用呢?
下面介绍一下GridData,这个也是一个重量级的参数:
这个参数用于指定目标如何摆放,它描述了以表格为单位的布局。
它描述了空间本身的一个布局摆放的方式:

并且搭配之前的GridLayout布局,通过每行有几列的方式,控制布局。先看一下都有什么参数,以及参数描述的意义:
GridData griddata = new GridData(SWT.FILL,SWT.FILL,false,false,1,1);

  一般都是上面这样的参数格式:

  第一个参数:水平方向如何对齐

  第二个参数:竖直方向如何对齐

  第三个参数:是否占用水平的剩余空间

  第四个参数:是否占用竖直的剩余空间

  第五个参数:水平的列数

  第六个参数:竖直的行数
这样一来,举个例子就简单了。
比如我们指定了一个表格是三行三列的,那么通过设定
第一个控件参数是(SWT.FILL,SWT.FILL,false,false,1,1);

  第二个参数是(SWT,SWT,false,false,1,2);

  第三个参数是(SWT.FILL_BOTH);

  第四个得到如下的布局:(SWT.FILL,SWT.FILL,false,false,1,1);
这样我们得到如下的布局:

感觉上面的图顿时拉低了文章的档次,凑合看吧。可以看到第二个控件,通过指定真的占用了两列。
但是第三个的FILL_BOTH并没有按照预期占用了剩余的所有控件,这就说明,填充布局还是不会垮行到下一列的布局的。
另外添加两个小知识,就是使用颜色以及图片。
颜色通常使用RGB来指定:
Color color = new Color(null,255,0,0);
text.setForeground(color);
颜色的第一参数是Device,可以填写为null;
而图片也图普通的控件一样,需要指定一个ImgData来指定图片的URL即可:
Image img = new Image(null,"icons\\ok.png");
button.setImage(img);
下面是这个例子所用到的代码:
package com.xingoo.plugin.swttest.test;

import org.eclipse.swt.SWT;
import org.eclipse.swt.graphics.Color;
import org.eclipse.swt.graphics.Image;
import org.eclipse.swt.layout.FillLayout;
import org.eclipse.swt.layout.FormAttachment;
import org.eclipse.swt.layout.FormData;
import org.eclipse.swt.layout.FormLayout;
import org.eclipse.swt.layout.GridData;
import org.eclipse.swt.layout.GridLayout;
import org.eclipse.swt.layout.RowLayout;
import org.eclipse.swt.widgets.Button;
import org.eclipse.swt.widgets.Shell;
import org.eclipse.swt.widgets.Text;

import com.xingoo.plugin.swttest.Abstract.AbstractExample;

public class LayoutTest extends AbstractExample{
    public static void main(String[] args) {
        new LayoutTest().run();
    }

    public void todo(Shell shell) {
        //
        //FillLayout
        //
//        FillLayout layout = new FillLayout();
//        shell.setLayout(layout);
//        for(int i=0;i<10;i++){
//            Button button = new Button(shell,SWT.PUSH);
//            button.setText("Button"+i);
//
            Image img = new Image(null,"icons\\ok.png");
            button.setImage(img);
//        }
        //
        //RowLayout
        //
//        RowLayout layout = new RowLayout();
//        shell.setLayout(layout);
//        for(int i=0;i<10;i++){
//            Button button = new Button(shell,SWT.PUSH);
//            Image img = new Image(null,"icons\\ok.png");
//            button.setImage(img);
//            button.setText("Button"+i);
//        }
        //
        //GridLayout
        //
//        GridLayout layout = new GridLayout();
//        layout.numColumns = 3;
//        shell.setLayout(layout);
//        for(int i=0;i<10;i++){
//            Button button = new Button(shell,SWT.PUSH);
//            Image img = new Image(null,"icons\\ok.png");
//            button.setImage(img);
//            button.setText("Button"+i);
//        }
        GridLayout layout = new GridLayout();
        layout.numColumns = 3;
        shell.setLayout(layout);
        Button btn1 = new Button(shell,SWT.PUSH);
        GridData gd1 = new GridData(SWT.FILL,SWT.FILL,false,false,1,1);
        gd1.widthHint = 100;
        gd1.heightHint = 100;
        btn1.setLayoutData(gd1);
        Button btn2 = new Button(shell,SWT.PUSH);
        GridData gd2 = new GridData(SWT.FILL,SWT.FILL,false,false,1,2);
        gd2.widthHint = 100;
        gd2.heightHint = 100;
        btn2.setLayoutData(gd2);
        Button btn3 = new Button(shell,SWT.PUSH);
        GridData gd3 = new GridData(GridData.FILL_BOTH);
//        gd3.widthHint = 100;
//        gd3.heightHint = 100;
        btn3.setLayoutData(gd3);
        Button btn4 = new Button(shell,SWT.PUSH);
        GridData gd4 = new GridData(SWT.FILL,SWT.FILL,false,false,1,1);
        gd4.widthHint = 100;
        gd4.heightHint = 100;
        btn4.setLayoutData(gd4);
        //
        //FormLayout
        //
//        FormLayout layout = new FormLayout();
//        shell.setLayout(layout);
//
//        Button cancelButton = new Button(shell,SWT.PUSH);
//        cancelButton.setText("Cancel");
//        FormData formData1 = new FormData();
//        formData1.right = new FormAttachment(100,-5); //第一个数字式百分比,也就是说  【宽度-5】
//        formData1.bottom = new FormAttachment(100,-5); //第一个数字式百分比,也就是说  【高度-5】
//        cancelButton.setLayoutData(formData1);
//
//        Button okButton = new Button(shell,SWT.PUSH);
//        okButton.setText("OK");
//        FormData formData2 = new FormData();
//        formData2.right = new FormAttachment(100,-60);
//        formData2.bottom = new FormAttachment(100,-5);
//        okButton.setLayoutData(formData2);
//
//        Text text = new Text(shell,SWT.MULTI | SWT.BORDER | SWT.V_SCROLL | SWT.H_SCROLL);
//        FormData formData3 = new FormData();
//        formData3.top = new FormAttachment(0,5);
//        formData3.bottom = new FormAttachment(cancelButton,-5);//底部距离 【底部控件-5个像素】
//        formData3.left = new FormAttachment(0,5);
//        formData3.right = new FormAttachment(100,-5);
//        text.setLayoutData(formData3);
//        Color color = new Color(null,255,0,0);
//        text.setForeground(color);
    }
}
前面讲到了简单控件的使用,复杂控件使用原则上与简单控件差不多,不过数据的使用还有一些布局还有些额外的技巧。
成果展示:


这里介绍下Tab页,列表,以及树的使用。
Tab页
这个tab页仍然采用SWT控件的一贯作风,子页都以挂载的方式连接到Tab容器上,但是需要使用一个组个对象才能在里面放置内容,并不支持直接进行布局。
TabFolder tabFolder = new TabFolder(shell,SWT.BORDER);

        TabItem tabItem1 = new TabItem(tabFolder,SWT.NONE);
        tabItem1.setText("第一页");

        Composite compsoite1 = new Composite(tabFolder,SWT.NONE);
        tabItem1.setControl(compsoite1);
这样再在Composite容器内放置其他的控件。
树形结构
而列表以及树的使用基本上差不多,树稍微复杂一点,有一个父亲孩子的概念,多使用几次就了解其中的关系技巧了。
tree = new Tree(treeGroup,SWT.SINGLE);
            tree.setLayoutData(new GridData(GridData.FILL_BOTH));

            TreeItem stu1 = new TreeItem(tree,SWT.NONE);
            stu1.setText("xingoo");
            {
                TreeItem info1 = new TreeItem(stu1,SWT.NONE);
                info1.setText("age:25");

                TreeItem info2 = new TreeItem(stu1,SWT.NONE);
                info2.setText("tel:12345");
            }
            TreeItem stu2 = new TreeItem(tree,SWT.NONE);
            stu2.setText("halo");
            {
                TreeItem info3 = new TreeItem(stu2,SWT.NONE);
                info3.setText("age:25");

                TreeItem info4 = new TreeItem(stu2,SWT.NONE);
                info4.setText("tel:67890");
            }
表格
比较常用的一般就是列表,一般导向页,对话框也都是使用Table来制作。
table = new Table(tableGroup,SWT.SINGLE | SWT.BORDER | SWT.FULL_SELECTION);
            table.setHeaderVisible(true);//设置表头可见
            table.setLinesVisible(true);//设置线条可见
            table.setLayoutData(new GridData(GridData.FILL_BOTH));

            TableColumn column1 = new TableColumn(table,SWT.NULL);
            column1.setText("Tree Item");
            column1.pack();
            column1.setWidth(150);

            TableColumn column2 = new TableColumn(table,SWT.NULL);
            column2.setText("Parent");
            column2.pack();
            column2.setWidth(150);
            TableItem item = new TableItem(table,SWT.NONE);
            item.setText(new String[]{“123”,“445”});
那么下面还是看一个搭配使用的例子

首先应用的是一个Tab容器,在第一页放置了一个树形控件,和一个列表控件。点击树形控件的节点,会在列表中添加相关的内容。
源码参考如下:
public void todo(Shell shell) {
        TabFolder tabFolder = new TabFolder(shell,SWT.BORDER);

        TabItem tabItem1 = new TabItem(tabFolder,SWT.NONE);
        tabItem1.setText("第一页");

        Composite compsoite1 = new Composite(tabFolder,SWT.NONE);
        tabItem1.setControl(compsoite1);

        GridLayout layout = new GridLayout();
        layout.numColumns = 1;
        compsoite1.setLayout(layout);
        Group treeGroup = new Group(compsoite1,SWT.NONE);
        treeGroup.setText("Tree");
        GridData griddata = new GridData(GridData.FILL_BOTH);
        griddata.heightHint = 50;
        treeGroup.setLayoutData(griddata);
        treeGroup.setLayout(new GridLayout(1,false));
        {
            tree = new Tree(treeGroup,SWT.SINGLE);
            tree.setLayoutData(new GridData(GridData.FILL_BOTH));

            TreeItem stu1 = new TreeItem(tree,SWT.NONE);
            stu1.setText("xingoo");
            {
                TreeItem info1 = new TreeItem(stu1,SWT.NONE);
                info1.setText("age:25");

                TreeItem info2 = new TreeItem(stu1,SWT.NONE);
                info2.setText("tel:12345");
            }
            TreeItem stu2 = new TreeItem(tree,SWT.NONE);
            stu2.setText("halo");
            {
                TreeItem info3 = new TreeItem(stu2,SWT.NONE);
                info3.setText("age:25");

                TreeItem info4 = new TreeItem(stu2,SWT.NONE);
                info4.setText("tel:67890");
            }

            tree.addSelectionListener(new SelectionAdapter() {
                public void widgetSelected(SelectionEvent evt){
                    TableItem item = new TableItem(table,SWT.NONE);
                    item.setText(new String[]{tree.getSelection()[0].toString(),tree.getSelection()[0].getText()});
                }
            });
        }
        Group tableGroup = new Group(compsoite1,SWT.NONE);
        tableGroup.setText("Table");
        GridData gd = new GridData(GridData.FILL_BOTH);
        gd.heightHint = 20;
        tableGroup.setLayoutData(gd);
        tableGroup.setLayout(new GridLayout(1,false));
        {    //创建一个单选的,有边界的,一行全选的表格
            table = new Table(tableGroup,SWT.SINGLE | SWT.BORDER | SWT.FULL_SELECTION);
            table.setHeaderVisible(true);//设置表头可见
            table.setLinesVisible(true);//设置线条可见
            table.setLayoutData(new GridData(GridData.FILL_BOTH));

            TableColumn column1 = new TableColumn(table,SWT.NULL);
            column1.setText("Tree Item");
            column1.pack();
            column1.setWidth(150);

            TableColumn column2 = new TableColumn(table,SWT.NULL);
            column2.setText("Parent");
            column2.pack();
            column2.setWidth(150);
        }


        TabItem tabItem2 = new TabItem(tabFolder,SWT.NONE);
        tabItem2.setText("第二页");
    }
全部源码
package com.xingoo.plugin.swttest.test;

import javax.swing.text.StyleConstants.ColorConstants;

import org.eclipse.swt.SWT;
import org.eclipse.swt.events.SelectionAdapter;
import org.eclipse.swt.events.SelectionEvent;
import org.eclipse.swt.layout.FillLayout;
import org.eclipse.swt.layout.GridData;
import org.eclipse.swt.layout.GridLayout;
import org.eclipse.swt.widgets.Composite;
import org.eclipse.swt.widgets.Group;
import org.eclipse.swt.widgets.Shell;
import org.eclipse.swt.widgets.TabFolder;
import org.eclipse.swt.widgets.TabItem;
import org.eclipse.swt.widgets.Table;
import org.eclipse.swt.widgets.TableColumn;
import org.eclipse.swt.widgets.TableItem;
import org.eclipse.swt.widgets.Tree;
import org.eclipse.swt.widgets.TreeItem;

import com.xingoo.plugin.swttest.Abstract.AbstractExample;

public class Test1 extends AbstractExample{
    private Table table;
    private Tree tree;
    public static void main(String[] args) {
        new Test1().run();
    }

    public void todo(Shell shell) {
        TabFolder tabFolder = new TabFolder(shell,SWT.BORDER);

        TabItem tabItem1 = new TabItem(tabFolder,SWT.NONE);
        tabItem1.setText("第一页");

        Composite compsoite1 = new Composite(tabFolder,SWT.NONE);
        tabItem1.setControl(compsoite1);

        GridLayout layout = new GridLayout();
        layout.numColumns = 1;
        compsoite1.setLayout(layout);
        Group treeGroup = new Group(compsoite1,SWT.NONE);
        treeGroup.setText("Tree");
        GridData griddata = new GridData(GridData.FILL_BOTH);
        griddata.heightHint = 50;
        treeGroup.setLayoutData(griddata);
        treeGroup.setLayout(new GridLayout(1,false));
        {
            tree = new Tree(treeGroup,SWT.SINGLE);
            tree.setLayoutData(new GridData(GridData.FILL_BOTH));

            TreeItem stu1 = new TreeItem(tree,SWT.NONE);
            stu1.setText("xingoo");
            {
                TreeItem info1 = new TreeItem(stu1,SWT.NONE);
                info1.setText("age:25");

                TreeItem info2 = new TreeItem(stu1,SWT.NONE);
                info2.setText("tel:12345");
            }
            TreeItem stu2 = new TreeItem(tree,SWT.NONE);
            stu2.setText("halo");
            {
                TreeItem info3 = new TreeItem(stu2,SWT.NONE);
                info3.setText("age:25");

                TreeItem info4 = new TreeItem(stu2,SWT.NONE);
                info4.setText("tel:67890");
            }

            tree.addSelectionListener(new SelectionAdapter() {
                public void widgetSelected(SelectionEvent evt){
                    TableItem item = new TableItem(table,SWT.NONE);
                    item.setText(new String[]{tree.getSelection()[0].toString(),tree.getSelection()[0].getText()});
                }
            });
        }
        Group tableGroup = new Group(compsoite1,SWT.NONE);
        tableGroup.setText("Table");
        GridData gd = new GridData(GridData.FILL_BOTH);
        gd.heightHint = 20;
        tableGroup.setLayoutData(gd);
        tableGroup.setLayout(new GridLayout(1,false));
        {    //创建一个单选的,有边界的,一行全选的表格
            table = new Table(tableGroup,SWT.SINGLE | SWT.BORDER | SWT.FULL_SELECTION);
            table.setHeaderVisible(true);//设置表头可见
            table.setLinesVisible(true);//设置线条可见
            table.setLayoutData(new GridData(GridData.FILL_BOTH));

            TableColumn column1 = new TableColumn(table,SWT.NULL);
            column1.setText("Tree Item");
            column1.pack();
            column1.setWidth(150);

            TableColumn column2 = new TableColumn(table,SWT.NULL);
            column2.setText("Parent");
            column2.pack();
            column2.setWidth(150);
        }


        TabItem tabItem2 = new TabItem(tabFolder,SWT.NONE);
        tabItem2.setText("第二页");
    }
}
引用的抽象类
package com.xingoo.plugin.swttest.Abstract;

import org.eclipse.swt.layout.FillLayout;
import org.eclipse.swt.widgets.Display;
import org.eclipse.swt.widgets.Shell;

public abstract class AbstractExample{
    public void run(){
        Display display = new Display();
        Shell shell = new Shell(display);
        shell.setText("shell example");
        shell.setBounds(200,200,400,400);
        shell.setLayout(new FillLayout());
        todo(shell);
        shell.open();

        while(!shell.isDisposed()){
            if(!display.readAndDispatch())
                display.sleep();
        }
        //dispose the resource
        display.beep();
        display.dispose();
    }
    public abstract void todo(Shell shell);//extension something here
}


 1万+
1万+


 被折叠的 条评论
为什么被折叠?


