


文章目录
一、SpringIOC的概念及作用
· 百度百科的定义:控制反转(Inversion of Control,缩写为IoC),是面向对象编程中的一种设计原则,可以用来减低计算机代码之间的耦合度。其中最常见的方式叫做依赖注入(Dependency Injection,简称DI),还有一种方式叫“依赖查找”(Dependency Lookup)。通过控制反转,对象在被创建的时候,由一个调控系统内所有对象的外界实体将其所依赖的对象的引用传递给它。也可以说,依赖被注入到对象中。
· 在我的上一篇博客工厂模式实战中讲到,工厂可以用来降低程序之间的耦合程度,而利用工厂来创建单例对象就是在工厂中构建了一了Map集合。SpringIOC就是这样的一个工厂,叫做IOC容器,本质上就是一个存放Bean对象的Map集合。与工厂模式实战博客中不同的是,SpringIOC是通过构造函数来读取配置文件的,这样的设定更加灵活。
· 而SpringIOC的工厂接口就是ApplicationContext(在BeanFactory的基础上做了升级),其具体的实现类用来执行不同配置选项的加载。很显然,IOC容器是工厂模式附属品,作用自然就是给我们的程序解耦。其叫做控制翻转的真正含义就是:在书写程序时,我们放弃了创建对象的控制权(即:new一个新对象),把这个控制权转交给了Spring工厂去创建。注:在web项目中,我们创建的对象一般被叫做JavaBean,Bean不仅仅指一些实体对象,而是指所有可重复使用的的对象。
· 注:本篇博客不涉及源码的解读,仅仅只是将IOC的配置和作用做了个总结。
二、IOC的环境依赖
2.1需要导入的jar包
· spring-context包,版本用最新的5.0以上。
· 当引入这个依赖后之后,Maven会自动把所有的关键包都导入,如果要手动添加,需要添加的包如下图所示:
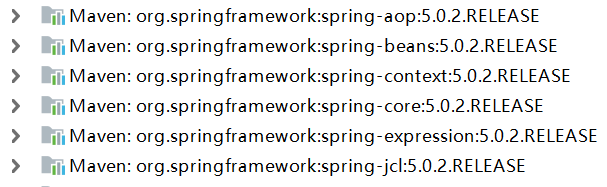
· 这些包看名字就大致能知道是有什么作用,ioc需要用到的包是:beans(IOC管理),context(扩展),core(核心),expression(SpEL表达式)。而AOP是SpringAOP的必备包,而JCL是Spring整合JVM日志的一个包(一般不用)。
2.2 本次案例的需求
· 大家都知道Spring是用作web开发的框架,因此本次案例就针对业务层和持久层,利用Spring进行Bean的管理,来实现对数据库的增删改查。以下是要创建的类和数据库对象(为了方便,使用dbUtils包操作数据库):
- 数据库:springioc(包含t_stu表,字段为:sid(主键),sname,grade)
- 持久层接口:StudentDao
package com.memoforward.dao;

public interface StudentDao {
	void save();
}
- 持久层实现:StudentDaoImpl
package com.memoforward.dao.impl;
public class StudentDaoImpl implements StudentDao{
	public StudentDaoImpl(){
        System.out.println("StudnetDaoImpl被创建了...");
    }
    @Override
    public void save() {
        System.out.println("学生被保存了....");
    }
}
- 业务层接口:StudentService(调用持久层方法来实现业务逻辑,在数据CRUD中,两部分的功能是一模一样的)
package com.memoforward.service;
import com.memoforward.dao.StudentDao;

public interface StudentService {
	void save();
}
- 业务层实现:StudentServiceImpl
package com.memoforward.service.impl;
import com.memoforward.dao.StudentDao;

public interface StudentServiceImpl implements StudentService {
	StudentDao stuDao;

    public StudentServiceImpl(){
        System.out.println("StudentServiceImpl被创建了...");
    }

    @Override
    public void save() {
        stuDao.save();
}
三、使用XML进行SpringIOC的配置
· 既然IOC容器是用工厂进行了Bean的管理,那么我们自然就会想到用配置文件来告知Spring创建何种类的对象。
· Spring配置文件的基本约束和格式如下(理论上文件名可以任取,但一般是applicationContext.xml):
<?xml version="1.0" encoding="UTF-8"?>
<beans xmlns="http://www.springframework.org/schema/beans"
       xmlns:xsi="http://www.w3.org/2001/XMLSchema-instance"
       xsi:schemaLocation="http://www.springframework.org/schema/beans http://www.springframework.org/schema/beans/spring-beans.xsd">
    <!--创建Bean-->

</beans>
· 在用加载配置文件,生成ApplicationContext工厂接口后就可以使用IOC来获取bean对象了。
注意:使用ApplicationContext加载配置文件的同时,所有在配置文件中的单例bean就被创建了。
3.1 bean的三种创建方式
- 1.利用无参构造方法创建,给定全限定类名就行了。
	<!--1. 通过调用构造函数加载-->
    <bean id="studentDao01" class="com.memoforward.dao.impl.StudentDaoImpl"/>
- 2.如果另有一个类的方法可以生成这个bean,比如如下的:DaoFactory中的createStudentDao
package com.memoforward.factory;

import com.memoforward.dao.StudentDao;
import com.memoforward.dao.impl.StudentDaoImpl;

public class DaoFactory {
    public StudentDao createStudentDao(){
        return new StudentDaoImpl();
    }
    public static StudentDao createStudentDaoByStaticMethod(){
        return new StudentDaoImpl();
    }
}
则可以有如下配置创建bean:
    <!--2. 通过其他类的方法创建-->
    <bean id="daoFactory" class="com.memoforward.factory.DaoFactory"/>
    <bean id="studentDao02" factory-bean="daoFactory" factory-method="createStudentDao"/>
- 3.第三种方法是通过其他类的静态方法来创建,如DaoFactory的createStudentDaoByStaticMethod
则配置如下:
    <!--3. 通过其他类的静态方法创建-->
    <bean id="studentDao03" class="com.memoforward.factory.DaoFactory" factory-method="createStudentDaoByStaticMethod"/>
- 测试如下:加载配置后,三个bean都被创建成功了
    @Test
    public void createBeanTest01(){
        ApplicationContext ac = new ClassPathXmlApplicationContext("classpath:applicationContext.xml");
    }

	//测试结果
	StudnetDaoImpl被创建了...
	StudnetDaoImpl被创建了...
	StudnetDaoImpl被创建了...
3.2 Bean的作用范围与生命周期
· 这里的Bean的作用范围和生命周期与我的上一篇博客工厂模式实战里的对象一模一样,这里就不细讲了。
· 在bean标签里表示作用范围的属性是:scope。值只需要记住两个:singleton(单例),prototype(多例)。
· 能体现生命周期的属性是:init-method和destroy-method,分别表示该bean在创建和销毁时会调用的方法,一般不用。
3.3 依赖注入(DI)
· 我们在StudentServiceImpl中需要有一个StudentDao来带给业务层以持久层的逻辑,这时就需要我们把StudentDao的Bean注入到StudnetServiceImpl的对象中。
· 利用XML配置文件的方式实现注入有两种方式:
- 1.利用构造函数进行注入
· 在StudentServiceImpl中添加有参构造:
    public StudentServiceImpl(StudentDao stuDao) {
        this.stuDao = stuDao;
    }
· 添加如下的配置,注入上面id为studentDao01的bean(设置成多例,测试方便):
    <!--1. 通过构造函数注入-->
    <bean id="studentService01" class="com.memoforward.service.impl.StudentServiceImpl" scope="prototype">
        <constructor-arg name="stuDao" ref="studentDao01"/>
    </bean>
注意:< constructor-arg >标签有两种属性:
· 1)(表示要注入什么数据)name,index,type:分别表示要注入的数据的名称,在构造函数中的位置,数据的类型。我们一般用name属性。
· 2)(表示数据具体的内容)value:注入String和基本数据类型;ref:注入其他的bean。
- 2. 利用set方法来进行注入
· 在StudentServiceImpl方法中添加set方法:
    public void setStuDao(StudentDao stuDao) {
    	System.out.println("StudentServiceImpl有参构造被调用了....");
        this.stuDao = stuDao;
    }
· 添加如下的配置,注入上面id为studentDao02的bean:
    <!--2.通过set方法来注入-->
    <bean id="studentService02" class="com.memoforward.service.impl.StudentServiceImpl" scope="prototype">
        <property name="stuDao" ref="studentDao02"/>
    </bean>
注意:< property >标签只有两种属性,其一是name,表示set的数据名称;其二是value/ref,和上述一样。
- 测试如下:
    @Test
    public void testDI(){
        ApplicationContext ac = new ClassPathXmlApplicationContext("classpath:applicationContext.xml");
        System.out.println("******************");
        StudentService studentService01 = ac.getBean("studentService01", StudentService.class);
        studentService01.save();
        System.out.println("-----------------");
        StudentService studentService02 = (StudentService) ac.getBean("studentService02");
        studentService02.save();
    }

	//测试结果如下
	StudnetDaoImpl被创建了...
	StudnetDaoImpl被创建了...
	StudnetDaoImpl被创建了...
	******************
	StudentServiceImpl有参构造被调用了....
	学生被保存了....
	-----------------
	StudentServiceImpl被创建了...
	学生被保存了....
-
测试结果分析:
· 单例的Bean会在配置文件被加载的同时被创建,多例bean会在被调用的时候被创建。同时,两种依赖也被成功注入了。 -
3.复杂类型的注入(不做测试了)
· 配置框架如下:
    <!--3.复杂类型的注入-->
    <bean id="xxx" class="xxx.xx.xxx">
        <property name="yyy">
            <list>
                <value>zzz</value>
            </list>
            <set>
                <value>zzz</value>
            </set>
            <array>
                <value>zzz</value>
            </array>
            <map>
                <entry key="xx" value-type="?" value="yy" />
                <entry key-ref="xxx" value-ref="xxx"/>
            </map>
        </property>
    </bean>
· 其中list,set,array实现基本一样,因此标签互换也是没有关系的;复杂数据类型的注入就是套路,记住就好了。
3.4 XML配置总结
· XML配置优点就是直观;但是缺点也比较明显:写起来比较复杂。
· 为了能够简化配置文件,加快开发速度,IOC的注解开发也是不错的选择。
3.5 注意
· 当一个类中有被Spring注入的属性,那就不要自己再去new这个类的实例了,因为自己new出来的实例,里面的属性Spring并不会自动帮你注入,Spring只在它自己管理的Bean中注入属性。
四、使用注解进行SpringIOC的配置
· 使用注解和使用XML本质上一模一样,都是为了降低程序间的耦合。
· 使用注解之后,一般就不必在配置文件中配置Bean了,但是需要在配置文件开启组件扫描,让Spirng在程序主方法运行前去扫描可能带有注解的包,并创建实例对象或者进行依赖的注入。
4.1 配置文件
· 扫描包需要加入context约束,配置如下(扫描com.memoforward包及其子包):
<?xml version="1.0" encoding="UTF-8"?>
<beans xmlns="http://www.springframework.org/schema/beans"
       xmlns:xsi="http://www.w3.org/2001/XMLSchema-instance"
       xmlns:context="http://www.springframework.org/schema/context"
       xsi:schemaLocation="http://www.springframework.org/schema/beans http://www.springframework.org/schema/beans/spring-beans.xsd http://www.springframework.org/schema/context http://www.springframework.org/schema/context/spring-context.xsd">

    <context:component-scan base-package="com.memoforward"/>
</beans>
4.2 常用注解
| 注解 | 功能 | 属性 | 作用位置 |
|---|---|---|---|
| 创建Bean的注解如下: | |||
| @Componnet | 创建对象的注解,和< bean >的功能相同 | value:创建的beanId,默认为类名(首字母变小写) | 一般作用在类上 |
| @Controller/@Serivce/@Repository | 针对MVC模式设计出来,功能同上,只是名字不一样 | value:创建的beanId,默认为类名 | 一般作用在类上 |
| 依赖注入的注解如下: | |||
| @Autowired(最常用) | 自动按类型注入,只要该类型在IOC容器中有唯一的bean对象 | 无 | 一般作用在成员变量和方法上(注入方法参数) |
| @Qulaifier | 在按类型注入的基础上,再按照名称注入 | value:beanId | 能单独在方法上注入参数,但不能直接在类上使用(与@Autowired同用) |
| @Resource | 直接按照bean 的id注入 | name:beanId | 类和方法上 |
| @Value | 注入String和基本类型 | value:SpEL表达式 | 成员变量和方法上 |
| 注意:集合类型只能xml注入 | |||
| 作用范围和生命周期相关的注解: | |||
| @Scope | 作用和< bean >中scope属性一样 | value:singleton和prototype | 作用在类上 |
| @PreDestroy和@PostConstruct | bean对象创建和销毁时调用的方法 | 无 | 作用在方法上 |
4.3 修改上述的代码,改用注解
- 持久层接口:StudentDao
package com.memoforward.dao;

public interface StudentDao {
	void save();
}
- 持久层实现:StudentDaoImpl(加上@Repository注解,表示这是一个持久层的Bean)
package com.memoforward.dao.impl;
import...
@Repository("stuDao")
public class StudentDaoImpl implements StudentDao{
	public StudentDaoImpl(){
    	System.out.println("StudnetDaoImpl被创建了...");
    }

	@Override
    public void save() {
        System.out.println("学生被保存了....");
    }

}
- 业务层接口:StudentService(调用持久层方法来实现业务逻辑,在数据CRUD中,两部分的功能是一模一样的)
package com.memoforward.service;
import com.memoforward.dao.StudentDao;

public interface StudentService {
	void save();
}
- 业务层实现:StudentServiceImpl(加上@Service注解,表示这是一个业务层的Bean;@Autowired自动注入StudentDao属性)
package com.memoforward.service.impl;
import...
@Service("stuService")
public interface StudentServiceImpl implements StudentService {
    @Autowired
    StudentDao stuDao;

    public StudentServiceImpl(){
        System.out.println("StudentServiceImpl被创建了...");
    }

    @Override
    public void save() {
        stuDao.save();

}
- 测试代码如下:
    @Test
    public void testSpringIOCAnnotation(){
        ApplicationContext ac = new ClassPathXmlApplicationContext("classpath:applicationContext.xml");
        System.out.println("******************");
        StudentService stuService = ac.getBean("stuService", StudentService.class);
        stuService.save();
        System.out.println("------------------");
        StudentDao stuDao = ac.getBean("stuDao", StudentDao.class);
        stuDao.save();
    }

	//结果如下:
	StudnetDaoImpl被创建了...
	StudentServiceImpl被创建了...
	******************
	学生被保存了....
	------------------
	学生被保存了....
·由上述例子可见:配置文件被加载时,所有加上与@Component功能一致的注解的Bean被创建,且是单例的。同时@Autowired确实成功注入了对象。
五、使用注解和XML的建议
· 实际工程中,建议使用“XML+注解”的开发模式,因为这种模式比较简单和直观。
· 如果是我们自己创建的Bean对象,推荐使用注解。
· 如果是jar包中的Bean对象,推荐使用XML进行开发。
· 因此,我们的配置文件中一般会有两个内容:一个是需要开启组件扫描,另一个是第三方的bean(比如数据库的DataSource)
· 在第三章,我们介绍了纯XML的开发,在这篇博客的最后,我们再简单介绍一下纯注解式开发。接下来,我们将使用“XML+注解”实现第二章的案例需求。
六、案例实现
6.1 添加增删改查方法
· 主要改动的地方有三处:添加学生Bean,修改StudentDao即它的实现类,修改StudentService即它的实现类。
- 创建Student类,并提供set、get以及toString方法。
package com.memoforward.domain;

public class Student {
    private Integer sid;
    private String sname;
    private Double grade;
    public Integer getSid() {
        return sid;
    }
    public void setSid(Integer sid) {
        this.sid = sid;
    }
    public String getSname() {
        return sname;
    }
    public void setSname(String sname) {
        this.sname = sname;
    }
    public Double getGrade() {
        return grade;
    }
    public void setGrade(Double grade) {
        this.grade = grade;
    }
    @Override
    public String toString() {
        return "Student{" +
                "sid=" + sid +
                ", sname='" + sname + '\'' +
                ", grade=" + grade +
                '}';
    }
}
- StudentService及实现
package com.memoforward.service;

import...

public interface StudentService {

    //1.查询所有学生
    List<Student> findAllStudents() throws SQLException;

    //2.查询某个学生
    Student findStudentBySid(Integer sid) throws SQLException;

    //3.添加某个学生
    void addStudent(Student stu) throws SQLException;

    //4.删除某个学生
    void deleteStudentBySid(Integer sid) throws SQLException;

    //5.修改某个学生
    void updateStudent(Student stu) throws SQLException;
}
注意:StudentServiceImpl类中注入了stuDao属性。
package com.memoforward.service.impl;

import ...

@Service("stuService")
public class StudentServiceImpl implements StudentService {
    @Autowired
    StudentDao stuDao;

    @Override
    public List<Student> findAllStudents() throws SQLException {
        return stuDao.findAllStudents();
    }

    @Override
    public Student findStudentBySid(Integer sid) throws SQLException {
        return stuDao.findStudentBySid(sid);
    }

    @Override
    public void addStudent(Student stu) throws SQLException {
        stuDao.addStudent(stu);
    }

    @Override
    public void deleteStudentBySid(Integer sid) throws SQLException {
        stuDao.deleteStudentBySid(sid);
    }

    @Override
    public void updateStudent(Student stu) throws SQLException {
        stuDao.updateStudent(stu);
    }
}
- StudentDao及它的实现类
package com.memoforward.dao;

import ...

public interface StudentDao {
    //1.查询所有学生
    List<Student> findAllStudents() throws SQLException;

    //2.查询某个学生
    Student findStudentBySid(Integer sid) throws SQLException;

    //3.添加某个学生
    void addStudent(Student stu) throws SQLException;

    //4.删除某个学生
    void deleteStudentBySid(Integer sid) throws SQLException;

    //5.修改某个学生
    void updateStudent(Student stu) throws SQLException;
}
注意:StudentDaoImpl类中注入了QueryRunner对象,该对象在第三方jar中,且其构造函数要传入数据库的数据源,因此在配置文件中还要创建两个bean,一个是QueryRunner,一个是C3p0的数据源对象。
package com.memoforward.dao.impl;

import ...

@Repository("stuDao")
public class StudentDaoImpl implements StudentDao {

    @Autowired
    QueryRunner runner;

    @Override
    public List<Student> findAllStudents() throws SQLException {
        List<Student> stuList = runner.query("select * from t_stu", new BeanListHandler<Student>(Student.class));
        return stuList;
    }

    @Override
    public Student findStudentBySid(Integer sid) throws SQLException {
        Student stu = runner.query("select * from t_stu where sid = ?", new BeanHandler<Student>(Student.class), sid);
        return stu;
    }

    @Override
    public void addStudent(Student stu) throws SQLException {
        runner.update("insert into t_stu(sname,grade) values(?,?)",stu.getSname(),stu.getGrade());
    }

    @Override
    public void deleteStudentBySid(Integer sid) throws SQLException {
        runner.update("delete from t_stu where sid = ?", sid);
    }

    @Override
    public void updateStudent(Student stu) throws SQLException {
        runner.update("update t_stu set sname=?,grade=? where sid=?",stu.getSname(),stu.getGrade(),stu.getSid());
    }
}
QueryRunner的使用并不是我们今日讨论的重点,就不说了。
- 由StudentDaoImpl的实现可知,我们的xml配置文件需要做出一点修改,完整的配置如下:
<?xml version="1.0" encoding="UTF-8"?>
<beans xmlns="http://www.springframework.org/schema/beans"
               xmlns:xsi="http://www.w3.org/2001/XMLSchema-instance"
               xmlns:context="http://www.springframework.org/schema/context"
               xsi:schemaLocation="http://www.springframework.org/schema/beans http://www.springframework.org/schema/beans/spring-beans.xsd http://www.springframework.org/schema/context http://www.springframework.org/schema/context/spring-context.xsd">

    <context:component-scan base-package="com.memoforward"/>

    <bean id="runner" class="org.apache.commons.dbutils.QueryRunner" scope="prototype">
        <constructor-arg name="ds" ref="dataSource"/>
    </bean>

    <bean id="dataSource" class="com.mchange.v2.c3p0.ComboPooledDataSource">
        <property name="driverClass" value="com.mysql.jdbc.Driver"/>
        <property name="jdbcUrl" value="jdbc:mysql:///springioc"/>
        <property name="user" value="root"/>
        <property name="password" value="123"/>
    </bean>
</beans>
- 现在我们就万事具备,只欠测试了!但是在测试前,为了测试的方便我还是要讲一个小知识点:Spring整合TestNG,实现在测试类中自动注入。
七. Spring整合TestNG
· 一般情况下,测试模块是不与Spring框架直接联系的,因为例如Junit和TestNG都集成了main方法,这个主方法去检测测试类中的方法上有没有@Test注解,来判断是否执行该方法。这个过程是通过反射的,不会注意到例如@Autowired这类的注解,为了测试的方便(不然每个测试的方法都要new一个StudentService),Spring提供了与TestNG整合的方法。方法如下:
(注:为什么不整合Junit,因为testNG在功能和性能上都比junit好很多)
- 1.添加必要的依赖:spring-text和testng
        <dependency>
            <groupId>org.springframework</groupId>
            <artifactId>spring-test</artifactId>
            <version>5.0.2.RELEASE</version>
        </dependency>

        <dependency>
            <groupId>org.testng</groupId>
            <artifactId>testng</artifactId>
            <version>7.0.0</version>
        </dependency>
- 2.使测试类继承AbstractTestNGSpringContextTests类
- 3.在测试类上添加注解@ContextConfiguration:开启测试类对配置的加载
- 该注解有两个属性数组:location,表示配置文件的位置;classes,表示配置类的位置(纯注解开发使用)
· 完成以上三步后,就可以在测试中注入IOC容器中的Bean了。
· 使用如下:
@ContextConfiguration(locations = "classpath:applicationContext.xml")
public class TestSpringAnnotation extends AbstractTestNGSpringContextTests {

    @Autowired
    StudentService stuService;

	//测试代码
	....
}
八. 进行案例测试
8.1 测试代码和结果
- 1."查"方法的测试
    @Test
    public void tsetFind(){
        try {
            List<Student> stuList = stuService.findAllStudents();
            for(Student student : stuList){
                System.out.println(student);
            }
            System.out.println("-----------------");
            Student stu = stuService.findStudentBySid(3);
            System.out.println(stu);
        } catch (SQLException e) {
            e.printStackTrace();
        }
    }
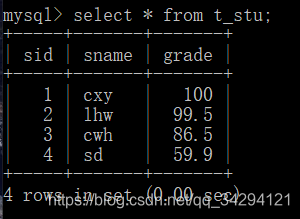
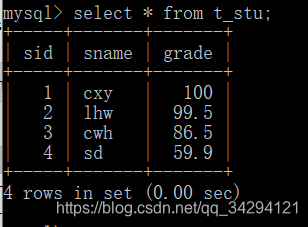
- "查"方法测试结果:可见查方法是没有问题的
Student{sid=1, sname='cxy', grade=100.0}
Student{sid=2, sname='lhw', grade=99.5}
Student{sid=3, sname='cwh', grade=86.5}
Student{sid=4, sname='sd', grade=59.9}
-----------------
Student{sid=3, sname='cwh', grade=86.5}
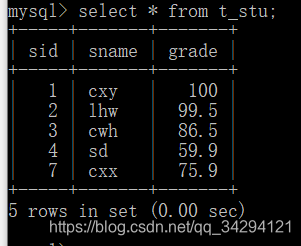
- 2."增"方法测试:增加了cxx学生,成绩为75.9
    @Test
    public void testAdd(){
        Student stu = new Student();
        stu.setSname("cxx");
        stu.setGrade(75.9);
        try {
            stuService.addStudent(stu);
        } catch (SQLException e) {
            e.printStackTrace();
        }
    }
- "增"方法测试结果:可见cxx已经成功被添加(sid为7是因为我之前自己做过测试)
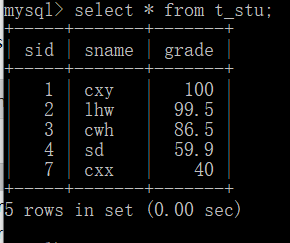
- 3."改"方法测试:将cxx的成绩改成40
    @Test
    public void testUpdate(){
        Student stu = new Student();
        stu.setSid(7);
        stu.setSname("cxx");
        stu.setGrade(40.0);
        try {
            stuService.updateStudent(stu);
        } catch (SQLException e) {
            e.printStackTrace();
        }
    }
- "改"方法测试结果:修改成功
- 4."删"方法测试
    @Test
    public void testDelete(){
        try {
            stuService.deleteStudentBySid(7);
        } catch (SQLException e) {
            e.printStackTrace();
        }
- "删"方法测试结果:删除成功
8.2 该案例存在的一点问题
· 很明显的一个问题,该案例没有实现事务管理。因为业务层的逻辑较为单一,所以对这个案例毫无影响,但是当业务层逻辑较为复杂时,就必须实现事务管理了,笔者的下一篇文章会介绍一下java的动态代理技术来对业务层的方法进行增强,从而实现事务管理(开启,提交,回滚,释放连接),文章已经写好了:java的动态代理实战。
九. IOC的纯注解开发(个人不喜欢用)
9.1 配置类
· 看过一本书叫做《Spring实战》,作者建议使用纯注解开发,于是我专门去学习了一下。其实纯注解的意思就是把配置文件变成了配置类,就像配置文件不一定只有一个一样,配置类也可以有多个。
· 配置类中有哪些内容呢?之前我们讲过,使用注解开发之后,在配置文件中一般有两个内容:一个是开启扫描组件,另一个是声明第三方的jar包。因此在配置类中,我们主要的就是解决这两个问题。
· 加载配置类的方法是AnnotationConfigApplicationContext(参数是注解类们的字节码),其实和ClassPathXmlAoolicationContext没什么不同嘛。
9.2 Spring有关配置类的注解
| 注解 | 功能 | 属性 | 作用位置 |
|---|---|---|---|
| @Configuration | 表示该类是一个配置类,当被ApplicationContext加载时可不写 | 无 | 作用在类上 |
| @ComponentScan | 需要扫描的包 | value/basePackages:指定包(可以是多个) | 作用在类上 |
| @Bean | 把当前方法的返回值作为bean对象存入spring的ioc容器中 | name:指定bean的Id | 作用在方法上(如果该方法有参数,则Spring会自动去IOC容器中查找Bean,没有则无法返回) |
| @import | 导入其他的配置类 | value(class):其他配置类的字节码(被import的是子类) | 作用在类上 |
| @PropertySource | 引入property配置文件 | value:“classpath:文件的配置” | 作用在类上 |
9.3 配置文件转化成配置类
- 1.原始配置文件如下:
<?xml version="1.0" encoding="UTF-8"?>
<beans xmlns="http://www.springframework.org/schema/beans"
               xmlns:xsi="http://www.w3.org/2001/XMLSchema-instance"
               xmlns:context="http://www.springframework.org/schema/context"
               xsi:schemaLocation="http://www.springframework.org/schema/beans http://www.springframework.org/schema/beans/spring-beans.xsd http://www.springframework.org/schema/context http://www.springframework.org/schema/context/spring-context.xsd">

    <context:component-scan base-package="com.memoforward"/>

    <bean id="runner" class="org.apache.commons.dbutils.QueryRunner" scope="prototype">
        <constructor-arg name="ds" ref="dataSource"/>
    </bean>

    <bean id="dataSource" class="com.mchange.v2.c3p0.ComboPooledDataSource">
        <property name="driverClass" value="com.mysql.jdbc.Driver"/>
        <property name="jdbcUrl" value="jdbc:mysql:///springioc"/>
        <property name="user" value="root"/>
        <property name="password" value="123"/>
    </bean>
</beans>
- 2.为了能把所有的注解都用上,建两个配置类,并把Datasource用properties文件存储。
- 配置文件:jdbc.properties
jdbc.driverClass=com.mysql.jdbc.Driver
jdbc.jdbcUrl=jdbc:mysql:///springioc
jdbc.user=root
jdbc.password=123
- JDBC配置类:JDBCConfig
package com.memoforward.configuration;

import ...

@Configuration
@PropertySource("classpath:jdbc.properties")
public class JDBCConfig {

    //通过配置文件注入属性
    @Value("${jdbc.driverClass}")
    private String driverClass;
    @Value("${jdbc.jdbcUrl}")
    private String jdbcUrl;
    @Value("${jdbc.user}")
    private String user;
    @Value("${jdbc.password}")
    private String password;

    @Bean
    @Scope("prototype")
    public QueryRunner createQueryRunner(DataSource ds){
        return new QueryRunner(ds);
    }

    @Bean
    public DataSource createDataSource(){
        ComboPooledDataSource ds = new ComboPooledDataSource();
        try {
            ds.setDriverClass(driverClass);
            ds.setJdbcUrl(jdbcUrl);
            ds.setUser(user);
            ds.setPassword(password);
        } catch (Exception e) {
            e.printStackTrace();
        }
        return ds;
    }
}
- 总配置类:IOCConfig
package com.memoforward.configuration;

import...

@Configuration
@ComponentScan("com.memoforward")
@Import(JDBCConfig.class)
public class IOCConfig {
}
- 使用时加载配置类(测试时如何使用?)
//@ContextConfiguration(locations = "classpath:applicationContext.xml")
//改用加载配置类的方式
@ContextConfiguration(classes = IOCConfig.class)
public class TestSpringAnnotation extends AbstractTestNGSpringContextTests {

    //如果没有整合就用如下的方式加载配置类
    //ApplicationContext ac = new AnnotationConfigApplicationContext(IOCConfig.class);

    @Autowired
    StudentService stuService;

	//以下是测试代码
	...
}
· 测试可以正常运行,说明我们配置成功了。这种方式,甚至比xml还要繁琐,而且也不是那么的简单易懂,我个人是很不喜欢这样用。
十. 总结
· IOC是Spring框架的重中之重,但是说白了就是一个Map集合的工厂类而已,这种设计理念是真的不错,我们要站在巨人的肩膀上,多加思考,让写代码变得越来越简单,目标就是在:让天下没有秃顶的程序员!


 934
934


 被折叠的 条评论
为什么被折叠?
被折叠的 条评论
为什么被折叠?
 到【灌水乐园】发言


