


说明:至少准备三台linux主机,此外kafka有内置zookeeper,也可以自己安装zookeeper,本文使用的是自己安装的
一、下载并解压kafka
cd到要安装的目录:
wget http://mirrors.tuna.tsinghua.edu.cn/apache/kafka/2.3.1/kafka_2.12-2.3.1.tgz
解压:tar -zxvf kafka_2.12-2.3.1.tgz
二、修改环境变量
vim /etc/profile例如小编的配置:
export ZOOKEEPER_HOME=/usr/local/zookeeper-3.4.9/
export PATH=$ZOOKEEPER_HOME/bin:$PATH
export KAFKA_HOME=/usr/local/kafka
export PATH=$KAFKA_HOME/bin:$PATH
export PATH
使配置生效:
source /etc/profile三、修改kafka 配置文件
[root@ms kafka]# cd config/
[root@ms config]# vim server.properties
修改的复方如下:
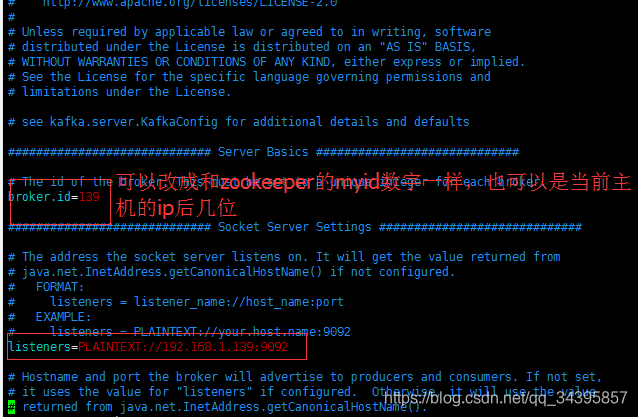
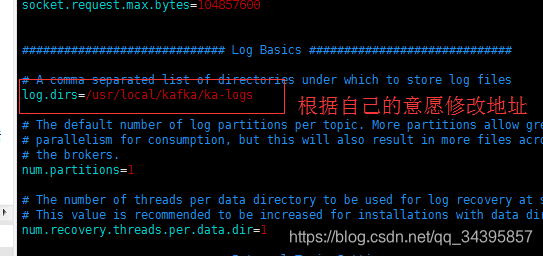
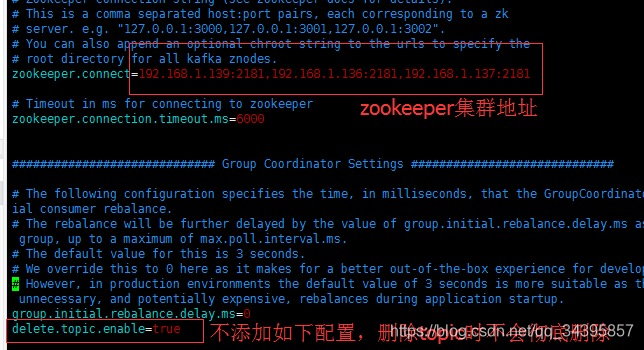
注:其他主机配置安装也一样
四、启动、关闭及先后循序
先启动zookeeper集群,再启动kafka集群,否则kafka启动失败。
1、启动(后台运行方式):
[root@ms kafka]# cd bin/
[root@ms bin]# ./kafka-server-start.sh -daemon config/server.properties 1>/dev/null 2>&1 &
2、关闭
[root@ms kafka]# cd bin/
[root@ms bin]# ./kafka-server-stop.sh
五、测试
在其中一台虚拟机创建topic
[root@ms kafka]#bin/kafka-topics.sh --create --zookeeper 192.168.1.139:2181 --replication-factor 3 -partitions 1 --topic mytopic查看创建的topic信息
[root@ms kafka]# bin/kafka-topics.sh --list --zookeeper 192.168.1.139:2181,192.168.1.136:2181,192.168.1.137:2181
mytopic

[root@ms kafka]# bin/kafka-topics.sh --describe --zookeeper 192.168.1.139:2181 --topic mytopic
[2019-11-01 11:14:32,440] ERROR Unable to open socket to 0.0.0.1/0.0.0.1:2181 (org.apache.zookeeper.ClientCnxnSocketNIO)
Topic:mytopic	PartitionCount:1	ReplicationFactor:3	Configs:
	Topic: mytopic	Partition: 0	Leader: 137	Replicas: 137,136,139	Isr: 137,136,139
删除topic:
[root@ms kafka]# bin/kafka-topics.sh --delete --zookeeper 192.168.1.139:2181,192.168.1.136:2181,192.168.1.137:2181 --topic mytopic
Topic mytopic is marked for deletion.
Note: This will have no impact if delete.topic.enable is not set to true.
[root@ms kafka]# bin/kafka-topics.sh --list --zookeeper 192.168.1.139:2181,192.168.1.136:2181,192.168.1.137:2181
[root@ms kafka]#
注:如果嫌弃命令太长,可以自己写shell脚本操作,生产、消费服务测试这里就不详细写了。
六、设置kafka服务自启
[root@ms ~]# cd /etc/init.d/
[root@ms init.d]# vim kafka

内容如下:

#!/bin/bash
#description: kafka start stop restart
#processname:kafka
#chkconfig: 2345 21 90

KAFKA_HOME=/usr/local/kafka

case $1 in
     start) ${KAFKA_HOME}/bin/kafka-server-start.sh -daemon ${KAFKA_HOME}/config/server.properties 1>/dev/null 2
>&1 &;;
     stop) ${KAFKA_HOME}/bin/kafka-server-stop.sh;;
     restart)
          ${KAFKA_HOME}/bin/kafka-server-stop.sh
          ${KAFKA_HOME}/bin/kafka-server-start.sh -daemon ${KAFKA_HOME}/config/server.properties 1>/dev/null 2>&1 &;;
     *) echo 'plase use:kafka {start|stop|restart}';;
esac
exit 0

修改权限:
[root@ms init.d]# chmod +x kafka
添加到服务:
[root@ms init.d]# chkconfig --add kafka
查看:
[root@ms init.d]# chkconfig --list kafka
设置kafka服务自启:
[root@ms init.d]# chkconfig kafka on

设置成功后,手动操作:
[root@ms init.d]# service kafka start
[root@ms init.d]# service kafka stop
[root@ms init.d]# service kafka restart注:(# chkconfig: 234 21 90)2345表示系统运行级别是2,3,4或者5时都启动此服务,21是启动的优先级(数字越低,优先级越高),90是关闭的优先级(数字越低,优先级越高),如果启动优先级配置的数太小时如0时,则有可能启动不成功,因为此时可能其依赖的网络服务还没有启动,从而导致自启动失败。优先级范围是0-100,数字越大,优先级越低。
# 缺省的运行级,RHS用到的级别如下:
0:关机
1:单用户模式
2:无网络支持的多用户模式
3:有网络支持的多用户模式
4:保留,未使用
5:有网络支持有X-Window支持的多用户模式
6:重新引导系统,即重启


 1355
1355

 被折叠的 条评论
为什么被折叠?
被折叠的 条评论
为什么被折叠?
 到【灌水乐园】发言


