


1、继承HorizontalScrollerView(水平滚动条),好处:无需判断高度只需考虑水平宽度,可以省去MOVE冲突的处理。
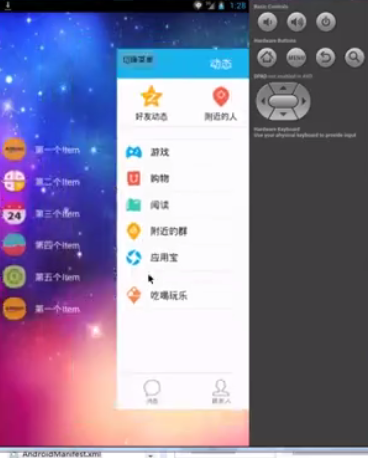
2、菜单布局文件left_menu.xml:
<?xml version="1.0" encoding="utf-8"?>
<RelativeLayout xmlns:android="http://schemas.android.com/apk/res/android"
    android:layout_width="match_parent"
    android:layout_height="match_parent"
    android:background="@drawable/img_frame_background"
    android:orientation="vertical" >

    <LinearLayout
        android:layout_width="match_parent"
        android:layout_height="wrap_content"
        android:orientation="vertical" >

          <TextView
            android:layout_width="wrap_content"
            android:layout_height="wrap_content"
            android:drawableLeft="@drawable/img_1"
            android:gravity="center"
            android:textColor="#ffffff"
            android:textSize="20sp"
            android:text="第一个文本" />
          <TextView
            android:layout_width="wrap_content"
            android:layout_height="wrap_content"
            android:drawableLeft="@drawable/img_2"
            android:gravity="center"
             android:textColor="#ffffff"
            android:textSize="20sp"
            android:text="第二个文本" />

    </LinearLayout>

</RelativeLayout>
mainActivity.xml文件:
<RelativeLayout xmlns:android="http://schemas.android.com/apk/res/android"
    xmlns:tools="http://schemas.android.com/tools"
    xmlns:dan="http://schemas.android.com/apk/res/com.example.recycleview"
    android:layout_width="match_parent"
    android:layout_height="match_parent" >

    <com.example.recycleview.view.SlidingMenu
        android:id="@+id/id_menu"
        android:layout_width="match_parent"
        android:layout_height="match_parent"
        dan:rightPadding="100dp" >

        <LinearLayout
            android:layout_width="wrap_content"
            android:layout_height="match_parent"
            android:orientation="horizontal" >

            <include layout="@layout/left_menu" />

            <LinearLayout
                android:layout_width="match_parent"
                android:layout_height="match_parent"
                android:background="@drawable/qq" >

                <Button
                    android:layout_width="wrap_content"
                    android:layout_height="wrap_content"
                    android:onClick="toggleMenu"
                    android:text="切换菜单" />
            </LinearLayout>
        </LinearLayout>
    </com.example.recycleview.view.SlidingMenu>

</RelativeLayout>
3、自定义View:SlidingMenu.java,继承水平滚动控件类
1、首先实现其两个参数的构造方法
2、将自定义的HorizontalScrollView名字改成自定义的属性名 包名+类名
…………………………
>
3、自定义ViewGroup:
(1)、onMeasure:决定内部View(子View)的宽和高以及自己的宽和高
(2)、onLayout:决定子View放置的位置
(3)、onTouchEvent:判断用户的手指状态
public class SlidingMenu extends HorizontalScrollView {
    private LinearLayout mWapper;
    private ViewGroup mMenu;
    private ViewGroup mContent;
    private int mScreenWidth;
    private int mMenuRightPadding = 50;// menu与屏幕右侧的距离dp
    private int mMenuWidth;
    private boolean once;// onMeasure会调用多次,设置一个boolean值
    private boolean isOpen; //默认打开时为false
    float scale;
    /*
     * 没有使用自定义属性时,调用这个参数
     */
    public SlidingMenu(Context context, AttributeSet attrs) {
        this(context, attrs,0);

    }

    /*
     * 自定义ViewGroup 1、onMeasure 决定内部view的宽和高 2、onLayout 决定子view的放置的位置
     * 3、onTouchEvent 判断用户的手指状态
     */

    /*
     * 当使用了自定义属性时,会调用此构造方法
     */

    public SlidingMenu(Context context, AttributeSet attrs, int defStyle) {
        super(context, attrs, defStyle);
        // 获取我们定义的属性
        TypedArray a = context.getTheme().obtainStyledAttributes(attrs,
                R.styleable.SlidingMenu, defStyle, 0);
        int n = a.getIndexCount();
        for (int i = 0; i < n; i++) {
            int attr = a.getIndex(i);
            switch (attr) {
            case R.styleable.SlidingMenu_rightPadding:
                mMenuRightPadding = a.getDimensionPixelSize(attr,
                        (int) TypedValue.applyDimension(
                                TypedValue.COMPLEX_UNIT_DIP, 50, context
                                        .getResources().getDisplayMetrics()));// attr是新赋值,第二个是默认值
                break;

            }
        }

        a.recycle();// 释放掉
        WindowManager wm = (WindowManager) context
                .getSystemService(Context.WINDOW_SERVICE);
        DisplayMetrics outMetrics = new DisplayMetrics();
        wm.getDefaultDisplay().getMetrics(outMetrics);// 宽高被赋值了
        mScreenWidth = outMetrics.widthPixels;

    }

    public SlidingMenu(Context context) {
        this(context, null);
        // TODO Auto-generated constructor stub
    }

    // 设置子view的宽和高,设置自己的宽和高
    @Override
    protected void onMeasure(int widthMeasureSpec, int heightMeasureSpec) {
        if (!once) {
            mWapper = (LinearLayout) getChildAt(0);
            mMenu = (ViewGroup) mWapper.getChildAt(0);// LinearLayout第一个元素
            mContent = (ViewGroup) mWapper.getChildAt(1);// LinearLayout第二个元素
            mMenuWidth = mMenu.getLayoutParams().width = mScreenWidth
                    - mMenuRightPadding;
            mContent.getLayoutParams().width = mScreenWidth;
            once = true;
        }

        super.onMeasure(widthMeasureSpec, heightMeasureSpec);
    }

    // 通过设置偏移量,将menu隐藏
    @Override
    protected void onLayout(boolean changed, int l, int t, int r, int b) {
        super.onLayout(changed, l, t, r, b);
        if (changed) {
            this.scrollTo(mMenuWidth, 0);// scrollTo是隐藏的方法,瞬间完成的动作

        }
    }

    @Override
    public boolean onTouchEvent(MotionEvent ev) {// 默认自动能把隐藏的滑出来,所以关心Action_UP
        int action = ev.getAction();
        switch (action) {
        case MotionEvent.ACTION_UP:
            int scrollX = getScrollX();// scrollX隐藏在左边的宽度
            if (scrollX >= mMenuWidth / 2) {
                this.smoothScrollTo(mMenuWidth, 0);// smoothScrollTo是动画隐藏的方法
                isOpen=false;
            } else {
                this.smoothScrollTo(0, 0);//打开menu
                isOpen=true;
            }
            return true;

        }

        return super.onTouchEvent(ev);
    }
//  打开菜单
    public void openMenu(){
        if (isOpen) return;
        this.smoothScrollTo(0, 0);
        isOpen=true;

    }
    public void closeMenu(){
        if (!isOpen) return;
        this.smoothScrollTo(mMenuWidth, 0);
        isOpen=false;
    }
    //切换菜单
    public void toggle(){
        if(isOpen){
            closeMenu();
        }else {
            openMenu();
        }

    }

@Override
protected void onScrollChanged(int l, int t, int oldl, int oldt) {
super.onScrollChanged(l, t, oldl, oldt);
 scale=l*1.0f/mMenuWidth;//1~0
//调用属性动画,设置TranslationX     mMenuWidth = mMenu.getLayoutParams().width = mScreenWidth- mMenuRightPadding;
 float rightScale=0.7f+0.3f*scale;
 float leftScale=1.0f-scale*0.3f;
 float leftAlpha=0.6f+0.4f*(1-scale);
 ViewHelper.setTranslationX(mMenu, mMenuWidth*scale*0.8f);
 ViewHelper.setScaleX(mMenu, leftScale);
 ViewHelper.setScaleY(mMenu,leftScale );
 ViewHelper.setAlpha(mMenu, leftAlpha);
// mContent的缩放及焦点
 ViewHelper.setScaleX(mContent,rightScale);
 ViewHelper.setScaleY(mContent,rightScale);
ViewHelper.setPivotX(mContent, 0);
ViewHelper.setPivotY(mContent, mContent.getHeight()/2);

}


}
4、、用户自定义属性
至此,侧滑已经实现。接下来加入自定义属性,可以让用户去设置菜单离屏幕右边的边距。
(1)、在values文件夹中创建一个xml文件,叫做attr.xml
(2)注意:在xml文件中编写自定义属性时是没有代码提示功能的,因此要注意代码拼写
(3)接下来要在mainActivity.xml文件中命名空间进行声明:
xmlns:dan=”http://schemas.android.com/apk/res/com.example.recycleview”
注意:这里的格式是xmlns:自己编写,可以是任何名字=”http://schemas.android.com/apk/res/当前应用的包名,而不是View的包名”
(4)、接下来将自定义属性放到View中进行使用
Alan:rightPadding=”100dp”
(5)、在刚才未使用自定义属性时,调用自身的构造方法,定义之后,需要生成另外两个构造方法:将原来两个参数构造方法中的方法拷贝到三个参数的构造方法之中,然后将两个参数构造方法的第三个参数设置为0,将一个参数的构造方法(传入上下文对象方法)的第二个参数设置为null,即调用两个参数的构造方法。
(6)、获取我们定义的属性:在三个参数的构造方法中获取:通过TypedArray这个类获得自定义属性,这里需要注意的是TypedArray这个类用完之后需要进行释放(recycled)。
5、attr.xml
<?xml version="1.0" encoding="utf-8"?>
<resources>

    <attr name="rightPadding" format="dimension"></attr>

    <declare-styleable name="SlidingMenu">
        <attr name="rightPadding"></attr>
    </declare-styleable>

</resources>
6、下面是MainActivity的实现
public class MainActivity extends Activity  {
    private SlidingMenu mLeftMenu;

    @Override
    protected void onCreate(Bundle savedInstanceState) {
        super.onCreate(savedInstanceState);
        requestWindowFeature(Window.FEATURE_NO_TITLE);
        setContentView(R.layout.activity_main);
        mLeftMenu=(SlidingMenu) findViewById(R.id.id_menu);


    }
    public void toggleMenu(View v){

        mLeftMenu.toggle();

    }
}


 563
563


 被折叠的 条评论
为什么被折叠?
被折叠的 条评论
为什么被折叠?
 到【灌水乐园】发言


