


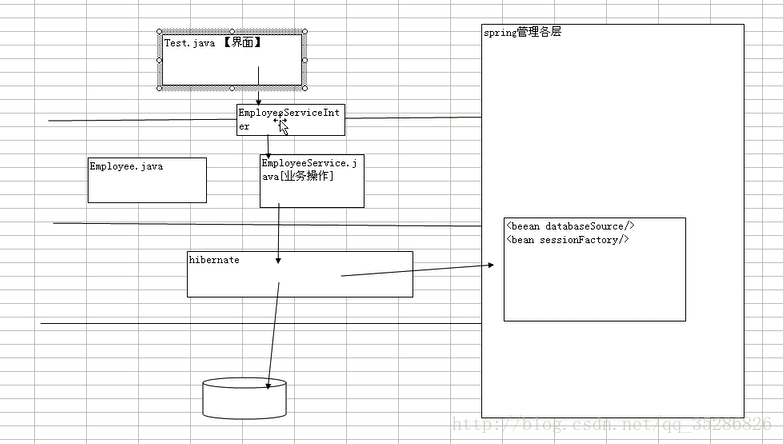
1、准备
引入spring包
(1)编写applicationContext.xml
(2)测试spring是否成功
引入Hibernate包
(3)applicationContext.xml配置数据源、配置sessionFactory
(4)配置pojo和pojo.hbm.xml
1、准备
引入spring2.5.6包
dist\spring.jar
dist\modules\spring-webmvc-struts.jar
lib\jakarta-commons\commons-logging.jar、commons-dbcp.jar、commons-pool.jar
lib\aspectj\aspectjweaver.jar、aspectjrt.jar
lib\cglib\cglib-nodep-2.1_3.jar
lib\j2ee\common-annotations.jar
lib\log4j\log4j-1.2.15.jar
(1)编写applicationContext.xml
(2)测试spring是否成功

<?xml version="1.0" encoding="UTF-8"?>
<beans xmlns="http://www.springframework.org/schema/beans"
    xmlns:xsi="http://www.w3.org/2001/XMLSchema-instance" xmlns:aop="http://www.springframework.org/schema/aop"
    xmlns:tx="http://www.springframework.org/schema/tx" xmlns:context="http://www.springframework.org/schema/context"
    xsi:schemaLocation="
       http://www.springframework.org/schema/beans
       http://www.springframework.org/schema/beans/spring-beans-3.0.xsd
       http://www.springframework.org/schema/tx
       http://www.springframework.org/schema/tx/spring-tx-3.0.xsd
       http://www.springframework.org/schema/context
       http://www.springframework.org/schema/context/spring-context-3.0.xsd
       http://www.springframework.org/schema/aop
       http://www.springframew     ork.org/schema/aop/spring-aop-3.0.xsd">
       <!-- 启用注解注入 -->
        <!-- <context:annotation-config/> -->
       <!-- 启用自动扫描 -->
    <!--  <context:component-scan base-package="com.journey.testDemo"/> -->

    <bean id="peo" class="com.journey.testDemo.People">
        <property name="name" value="春天"></property>
    </bean>
</beans>
写一个测试包
com.journey.testDemo
public class People {
private String name;
public String getName() {
    return name;
}
public void setName(String name) {
    this.name = name;
}
}
测试是否打印配置文件里的 春天
public class TestDemo {
    private static ApplicationContext ac;
    static {
        ac = new ClassPathXmlApplicationContext("applicationContext.xml");
    }
        @Test
        public void test1(){
    People  p=ac.getBeans("peo",People.class);
    System.out.println(p.getName());
    }
}
引入Hibernate包
hibernate3.jar
lib\required\*.jar
lib\optional\ehcache-1.2.3.jar
hibernate 注解安装包下的
lib\test\slf4j-log4j12.jar
(3)applicationContext.xml配置数据源、配置sessionFactory
<?xml version="1.0" encoding="UTF-8"?>
<beans xmlns="http://www.springframework.org/schema/beans"
    xmlns:xsi="http://www.w3.org/2001/XMLSchema-instance" xmlns:aop="http://www.springframework.org/schema/aop"
    xmlns:tx="http://www.springframework.org/schema/tx" xmlns:context="http://www.springframework.org/schema/context"
    xsi:schemaLocation="
       http://www.springframework.org/schema/beans
       http://www.springframework.org/schema/beans/spring-beans-3.0.xsd
       http://www.springframework.org/schema/tx
       http://www.springframework.org/schema/tx/spring-tx-3.0.xsd
       http://www.springframework.org/schema/context
       http://www.springframework.org/schema/context/spring-context-3.0.xsd
       http://www.springframework.org/schema/aop
       http://www.springframew     ork.org/schema/aop/spring-aop-3.0.xsd">
       <!-- 启用注解注入 -->
        <!-- <context:annotation-config/> -->
       <!-- 启用自动扫描 -->
    <!--  <context:component-scan base-package="com.journey.testDemo"/> -->
    <bean id="peo" class="com.journey.testDemo.People">
        <property name="name" value="春天"></property>
    </bean>

<bean id="dataSource" class="org.apache.commons.dbcp.BasicDataSource" destroy-method="close">
    <property name="driverClassName" value="oracle.jdbc.driver.OracleDriver"/>
    <property name="url" value="jdbc:oracle:thin:@127.0.0.1:1521:orcl"/>
    <property name="username" value="scott"/>
    <property name="password" value="tiger"/>
<!-- 连接池启动时的初始值 -->
    <property name="initialSize" value="3"/>
<!-- 连接池的最大值 -->
     <property name="maxActive" value="30"/>
 <!-- 最大空闲值.当经过一个高峰时间后,连接池可以慢慢将已经用不到的连接慢慢释放一部分,一直减少到maxIdle为止 -->
    <property name="maxIdle" value="2"/>
    <!--  最小空闲值.当空闲的连接数少于阀值时,连接池就会预申请去一些连接,以免洪峰来时来不及申请 -->
    <property name="minIdle" value="1"/>
</bean>

<!-- ******************************************分割线************************************************** -->
<!-- 配置sessionFactory -->
<bean id="sessionFactory" class="org.springframework.orm.hibernate3.LocalSessionFactoryBean">
<!-- 设置数据源 -->
     <property name="dataSource" ref="dataSource"/>
     <!-- 接管Hibernate对象映射文件 -->
     <property name="mappingResources">
        <list>
          <value>com/journey/pojo/Employee.hbm.xml</value>
        </list>
     </property>
     <property name="hibernateProperties">
        <value>
        hibernate.dialect=org.hibernate.dialect.OracleDialect
        hibernate.hbm2ddl.auto=update
        hibernate.show_sql=false
        hibernate.format_sql=false
        </value>
    </property>
</bean>
</beans>
(4)配置pojo和pojo.hbm.xml
工具包
//获取ApplicationContext
package com.journey.testDemo;
import org.springframework.context.ApplicationContext;
import org.springframework.context.support.ClassPathXmlApplicationContext;

public class ApplicationContextUtil {
    private static ApplicationContext ac;

    private ApplicationContextUtil() {

    }

    static {
        ac = new ClassPathXmlApplicationContext("applicationContext.xml");
    }
    public static ApplicationContext getApplicationContext(){
        return ac;
    }
}
//建立pojo 包
package com.journey.pojo;
import java.util.Date;
public class Employee {
private Integer id;
private String name;
private String email;
private Date hiredate;
private Float salary;
public Employee() {
}
public Employee(String name, String email, Date hiredate,
Float salary) {
this.name = name;
this.email = email;
this.hiredate = hiredate;
this.salary = salary;
}
public Integer getId() {
return id;
}
public void setId(Integer id) {
this.id = id;
}
public String getName() {
return name;
}
public void setName(String name) {
this.name = name;
}
public String getEmail() {
return email;
}
public void setEmail(String email) {
this.email = email;
}
public Date getHiredate() {
return hiredate;
}
public void setHiredate(Date hiredate) {
this.hiredate = hiredate;
}
public Float getSalary() {
return salary;
}
public void setSalary(Float salary) {
this.salary = salary;
}
}
Employee.hbm.xml配置
<?xml version="1.0"?>
<!DOCTYPE hibernate-mapping PUBLIC
    "-//Hibernate/Hibernate Mapping DTD 3.0//EN"
    "http://www.hibernate.org/dtd/hibernate-mapping-3.0.dtd">

    <!-- 操作的是哪个包 -->
<hibernate-mapping package="com.journey.pojo">
    <class name="Employee" table="employee0516">
    <!-- id用与指定主键属性 -->
        <id name="id" column="id" type="integer">
        <!-- generator用来指定主键生成策略hilo、uuid、increment、sequence、native -->
            <generator class="sequence">
                <param name="sequence">emp_seq</param>
            </generator>
        </id>
        <property name="name" type="string">
            <column name="name" not-null="false" />
        </property>
        <property name="email"  type="java.lang.String" >
            <column name="email" not-null="false" length="64"></column>
        </property>
        <property name="hiredate" type="java.util.Date">
            <column name="hiredate" not-null="false"></column>
        </property>
        <property name="salary" not-null="false" type="java.lang.Float"/>


    </class>

</hibernate-mapping>
测试Hibernate和Spring整合
package com.journey.testDemo;

import org.hibernate.Session;
import org.hibernate.SessionFactory;
import org.hibernate.Transaction;
import org.junit.Test;
import org.springframework.context.ApplicationContext;

import com.journey.pojo.Employee;

public class TestDemo {
        @Test
        public void test1(){
            ApplicationContext ac=ApplicationContextUtil.getApplicationContext();
            SessionFactory s=(SessionFactory) ac.getBean("sessionFactory");
            Session session=s.openSession();
            Employee e=new Employee("顺平", "2112@qq.com", new java.util.Date(), 500.0f);
            Transaction tr=session.beginTransaction();
            try {
                session.save(e);
                tr.commit();
            } catch (Exception e2) {
                if(tr!=null){
                    tr.rollback();
                }
            e2.printStackTrace();
            }finally{
                if(session!=null&&session.isOpen()){
                    session.close();
                }
            }
        }
}


 1752
1752

 被折叠的 条评论
为什么被折叠?
被折叠的 条评论
为什么被折叠?
 到【灌水乐园】发言


