


这篇是网上代码整理。(小白只会改皮毛,核心代码网上拿来)
首先:
public class RippleBackground extends RelativeLayout {

    private static final int DEFAULT_RIPPLE_COUNT = 6;
    private static final int DEFAULT_DURATION_TIME = 3000;
    private static final float DEFAULT_SCALE = 6.0f;
    private static final int DEFAULT_FILL_TYPE = 0;

    private int rippleColor;
    private float rippleStrokeWidth;
    private float rippleRadius;
    private int rippleDurationTime;
    private int rippleAmount;
    private int rippleDelay;
    private float rippleScale;
    private int rippleType;
    private Paint paint;
    private boolean animationRunning = false;
    private AnimatorSet animatorSet;
    private ArrayList<Animator> animatorList;
    private LayoutParams rippleParams;
    private ArrayList<RippleView> rippleViewList = new ArrayList<RippleView>();

    public RippleBackground(Context context) {
        super(context);
    }

    public RippleBackground(Context context, AttributeSet attrs) {
        super(context, attrs);
        init(context, attrs);
    }

    public RippleBackground(Context context, AttributeSet attrs, int defStyleAttr) {
        super(context, attrs, defStyleAttr);
        init(context, attrs);
    }

    private void init(final Context context, final AttributeSet attrs) {
        if (isInEditMode())
            return;

        if (null == attrs) {
            throw new IllegalArgumentException("Attributes should be provided to this view,");
        }

        final TypedArray typedArray = context.obtainStyledAttributes(attrs, R.styleable.RippleBackground);
        rippleColor = typedArray.getColor(R.styleable.RippleBackground_rb_color, getResources().getColor(R.color.rippelColor));
        rippleStrokeWidth = typedArray.getDimension(R.styleable.RippleBackground_rb_strokeWidth, getResources().getDimension(R.dimen.rippleStrokeWidth));
        rippleRadius = typedArray.getDimension(R.styleable.RippleBackground_rb_radius, getResources().getDimension(R.dimen.rippleRadius));
        rippleDurationTime = typedArray.getInt(R.styleable.RippleBackground_rb_duration, DEFAULT_DURATION_TIME);
        rippleAmount = typedArray.getInt(R.styleable.RippleBackground_rb_rippleAmount, DEFAULT_RIPPLE_COUNT);
        rippleScale = typedArray.getFloat(R.styleable.RippleBackground_rb_scale, DEFAULT_SCALE);
        rippleType = typedArray.getInt(R.styleable.RippleBackground_rb_type, DEFAULT_FILL_TYPE);
        typedArray.recycle();

        rippleDelay = rippleDurationTime / rippleAmount;

        paint = new Paint();
        paint.setAntiAlias(true);
        if (rippleType == DEFAULT_FILL_TYPE) {
            rippleStrokeWidth = 0;
            paint.setStyle(Paint.Style.FILL);
        } else
            paint.setStyle(Paint.Style.STROKE);
        paint.setColor(rippleColor);

        rippleParams = new LayoutParams((int) (2 * (rippleRadius + rippleStrokeWidth)), (int) (2 * (rippleRadius + rippleStrokeWidth)));
        rippleParams.addRule(CENTER_IN_PARENT, TRUE);

        animatorSet = new AnimatorSet();
        animatorSet.setInterpolator(new AccelerateDecelerateInterpolator());
        animatorList = new ArrayList<Animator>();

        for (int i = 0; i < rippleAmount; i++) {
            RippleView rippleView = new RippleView(getContext());
            addView(rippleView, rippleParams);
            rippleViewList.add(rippleView);
            final ObjectAnimator scaleXAnimator = ObjectAnimator.ofFloat(rippleView, "ScaleX", 1.0f, rippleScale);
            scaleXAnimator.setRepeatCount(ObjectAnimator.INFINITE);
            scaleXAnimator.setRepeatMode(ObjectAnimator.RESTART);
            scaleXAnimator.setStartDelay(i * rippleDelay);
            scaleXAnimator.setDuration(rippleDurationTime);
            animatorList.add(scaleXAnimator);
            final ObjectAnimator scaleYAnimator = ObjectAnimator.ofFloat(rippleView, "ScaleY", 1.0f, rippleScale);
            scaleYAnimator.setRepeatCount(ObjectAnimator.INFINITE);
            scaleYAnimator.setRepeatMode(ObjectAnimator.RESTART);
            scaleYAnimator.setStartDelay(i * rippleDelay);
            scaleYAnimator.setDuration(rippleDurationTime);
            animatorList.add(scaleYAnimator);
            final ObjectAnimator alphaAnimator = ObjectAnimator.ofFloat(rippleView, "Alpha", 1.0f, 0f);
            alphaAnimator.setRepeatCount(ObjectAnimator.INFINITE);
            alphaAnimator.setRepeatMode(ObjectAnimator.RESTART);
            alphaAnimator.setStartDelay(i * rippleDelay);
            alphaAnimator.setDuration(rippleDurationTime);
            animatorList.add(alphaAnimator);
        }

        animatorSet.playTogether(animatorList);
    }

    private class RippleView extends View {

        public RippleView(Context context) {
            super(context);
            this.setVisibility(View.INVISIBLE);
        }

        @Override
        protected void onDraw(Canvas canvas) {
            int radius = (Math.min(getWidth(), getHeight())) / 2;
            canvas.drawCircle(radius, radius, radius - rippleStrokeWidth, paint);
        }
    }

    public void startRippleAnimation() {
        if (!isRippleAnimationRunning()) {
            for (RippleView rippleView : rippleViewList) {
                rippleView.setVisibility(VISIBLE);
            }
            animatorSet.start();
            animationRunning = true;
        }
    }
    public void stopRippleAnimation(){
        if(isRippleAnimationRunning()){
            animatorSet.end();
            animationRunning=false;
        }
    }

    public boolean isRippleAnimationRunning(){
        return animationRunning;
    }
}
在attrs.xml下:
<declare-styleable name="RippleBackground">
    <attr name="rb_color" format="color" />
    <attr name="rb_strokeWidth" format="dimension"/>
    <attr name="rb_radius" format="dimension"/>
    <attr name="rb_duration" format="integer"/>
    <attr name="rb_rippleAmount" format="integer"/>
    <attr name="rb_scale" format="float"/>
    <attr name="rb_type" format="enum">
        <enum name="fillRipple" value="0"/>
        <enum name="strokeRipple" value="1"/>
    </attr>
</declare-styleable>
在colors.xml下:(配置需要的颜色)
<resources>
    <color name="rippelColor">#fe6362</color>
</resources>
新建dimens.xml:
<resources>
    <dimen name="activity_horizontal_margin">16dp</dimen>
    <dimen name="activity_vertical_margin">16dp</dimen>
</resources>
布局文件中:
<FrameLayout android:layout_width="match_parent"
    android:layout_height="match_parent"
    xmlns:app="http://schemas.android.com/apk/res-auto"
    app:orientation="vertical"
    xmlns:android="http://schemas.android.com/apk/res/android">
<com.包名.ripple.RippleBackground android:id="@+id/content"
    android:layout_height="match_parent"
    android:layout_width="match_parent"
    app:rb_color="#fe6362"
    app:rb_duration="3000"
    app:rb_radius="32dp"
    android:layout_gravity="center"
    app:rb_rippleAmount="6"
    app:rb_scale="6"
    xmlns:android="http://schemas.android.com/apk/res/android"
    xmlns:app="http://schemas.android.com/apk/res-auto">

    <ImageView
        android:id="@+id/centerImage"
        android:layout_centerInParent="true"
        android:layout_height="64dp"
        android:layout_width="64dp"
        android:visibility="gone"
        android:src="@mipmap/phone1" />

    <ImageView
        android:id="@+id/foundDevice"
        android:layout_above="@id/centerImage"
        android:layout_height="64dp"
        android:layout_marginBottom="32dp"
        android:layout_marginRight="6dp"
        android:layout_toLeftOf="@id/centerImage"
        android:layout_width="64dp"
        android:src="@mipmap/phone2"
        android:visibility="invisible" />
</com.xx.ripple.RippleBackground>
    <ImageView
        android:id="@+id/main_img1"
        android:layout_height="wrap_content"
        android:layout_width="wrap_content"
        android:src="@mipmap/ic_launcher"
        android:layout_gravity="center"
        />
</FrameLayout>
在MainActivity中:
public class MainActivity extends Activity {
private ImageView foundDevice,showView;
@Override
protected void onCreate(Bundle savedInstanceState) {
super.onCreate(savedInstanceState);
setContentView(R.layout.activity_main);
final RippleBackground hideView=(RippleBackground)findViewById(R.id.content);
// 可以用线程实现
// final Handler handler=new Handler();
// foundDevice=(ImageView)findViewById(R.id.foundDevice);
showView=(ImageView)findViewById(R.id.main_img1);
// button.setOnClickListener(new View.OnClickListener() {
// @Override
// public void onClick(View view) {
hideView.startRippleAnimation();
// handler.postDelayed(new Runnable() {
// @Override
// public void run() {
// buttonimg();
rippleBackground.setVisibility(rippleBackground.GONE);
buttonimg.setVisibility(buttonimg.VISIBLE);
// rippleBackground.stopRippleAnimation();
// }
// },3000);
// rippleBackground.setVisibility(rippleBackground.GONE);
showView.setAlpha(0f);
showView.setVisibility(View.VISIBLE);
showView.animate()
.alpha(1f)
.setDuration(5000)
.setListener(null);
hideView.animate()
.alpha(0f)
.setDuration(5000)
.setListener(new AnimatorListenerAdapter() {
@Override
public void onAnimationEnd(Animator animation) {
hideView.setVisibility(View.GONE);
}
});
}
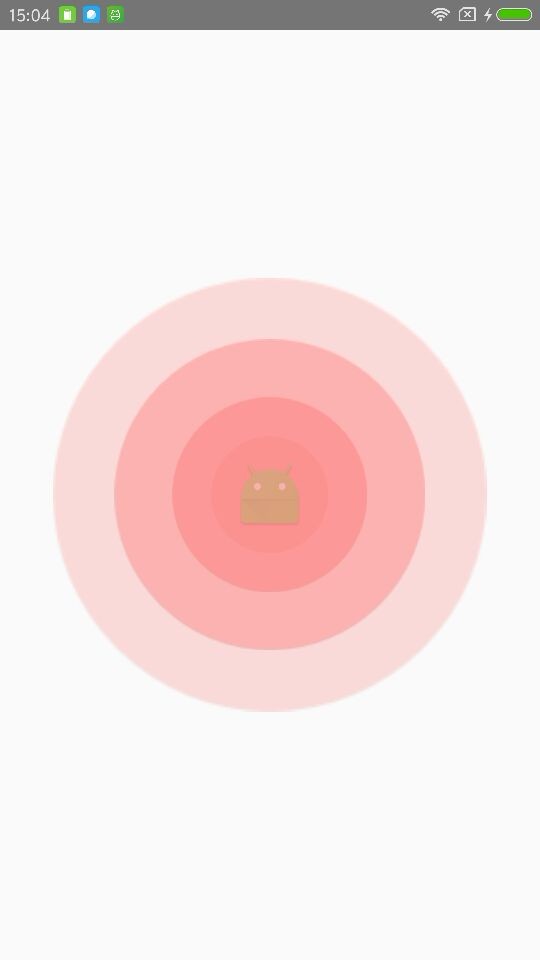
}这样就实现了类似于水波涟漪的效果。如图:


 1000
1000

 被折叠的 条评论
为什么被折叠?
被折叠的 条评论
为什么被折叠?
 到【灌水乐园】发言


