


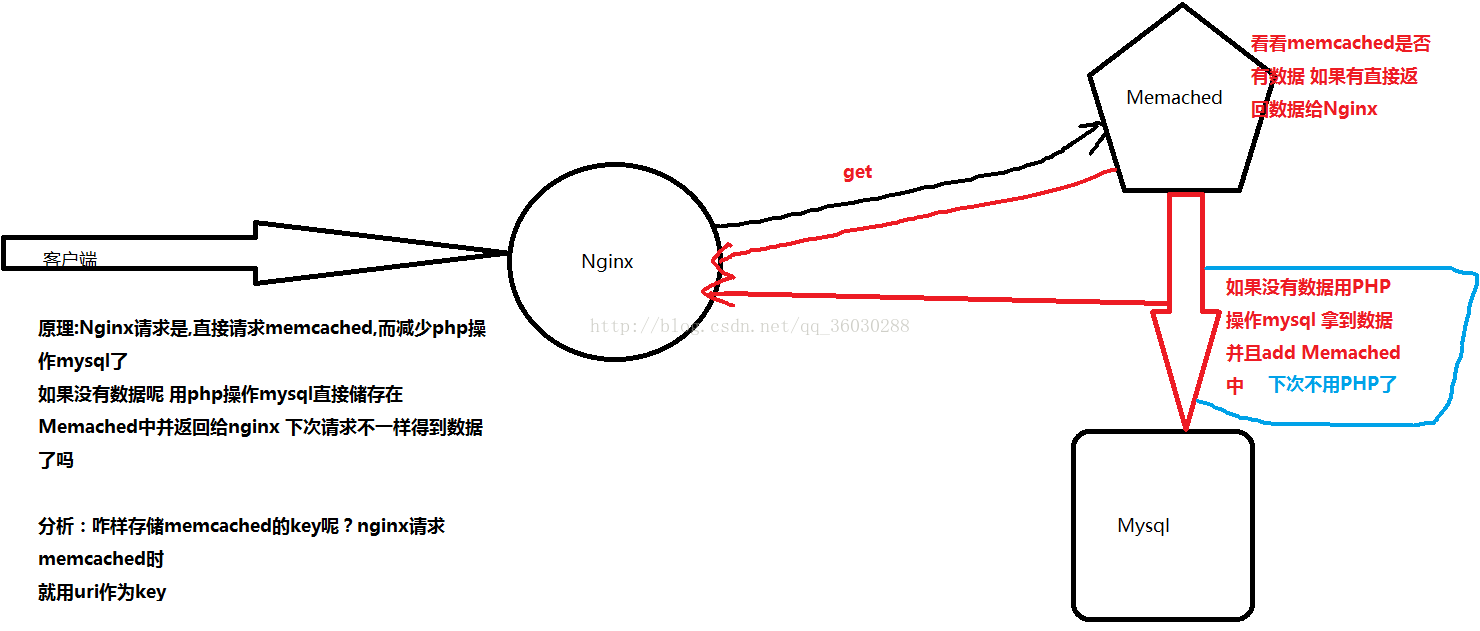
Nginx使用Memcached
	    第一步:Nginx服务器必须要安装吧 php也要安装吧 mysql无所谓 php操作memcached扩展也要安装上吧
	    如有不懂 请参看下面的文章
	    安装Nginx+PHP  http://blog.csdn.net/qq_36030288/article/details/53858357
	    安装Memached http://blog.csdn.net/qq_36030288/article/details/52613847
	    安装PHP操作memcached的扩展  http://blog.csdn.net/qq_36030288/article/details/52614703

	   第二步:修改Nginx的配置文件(我是安装上面的环境修改的)
	   启动你的memcached服务 /usr/local/memcached/bin/memcached -m 64 -p 11211 -u nobody -vv -d
	   启动你的php /usr/local/src/php/sbin/php-fpm
	   vim usr/local/src/nginx/conf/nginc.conf
	   在server中加上一段代码 如果不懂请看 location定位的用法(http://blog.csdn.net/qq_36030288/article/details/54576449)

	  location / {
              set $memcached_key $uri;
              memcached_pass memcacheserver;
              error_page 404 /callback.php;
      }
      在你的nginx中html目录创建一个callback.php 这个页面的内容自己模拟一下
      如:
       //获取uri
    $uri = $_SERVER['REQUEST_URI'];
    //new一个memcache对象出来
    $memcache = new Memcache;
    $memcache->addServer('127.0.0.1', 11211);
    $num = rand(1,999).$uri.'not use databases';
    $memcache->add($uri,$num );
    echo 'This is a',$uri,'sb memcache';
配置文件所有内容如下:
#user nobody;
worker_processes 2;
#error_log logs/error.log;
#error_log logs/error.log notice;
#error_log logs/error.log info;
#pid logs/nginx.pid;
events {
worker_connections 1024;
}
http {
include mime.types;
default_type application/octet-stream;
#日志的格式
log_format main '$remote_addr - $remote_user [$time_local] "$request" '
'$status $body_bytes_sent "$http_referer" '
'"$http_user_agent" "$http_x_forwarded_for"';
#access_log logs/access.log main;
sendfile on;
#tcp_nopush on;
#keepalive_timeout 0;
keepalive_timeout 65;
#显示目录
autoindex on;
autoindex_exact_size on;
autoindex_localtime on;
server {
listen 80;
server_name localhost;
#charset koi8-r;
#access_log logs/host.access.log main;
# location / {
# root html;
# index index.html index.htm;
# }
#error_page 404 /404.html;
# redirect server error pages to the static page /50x.html
#
error_page 500 502 503 504 /50x.html;
location = /50x.html {
root html;
}
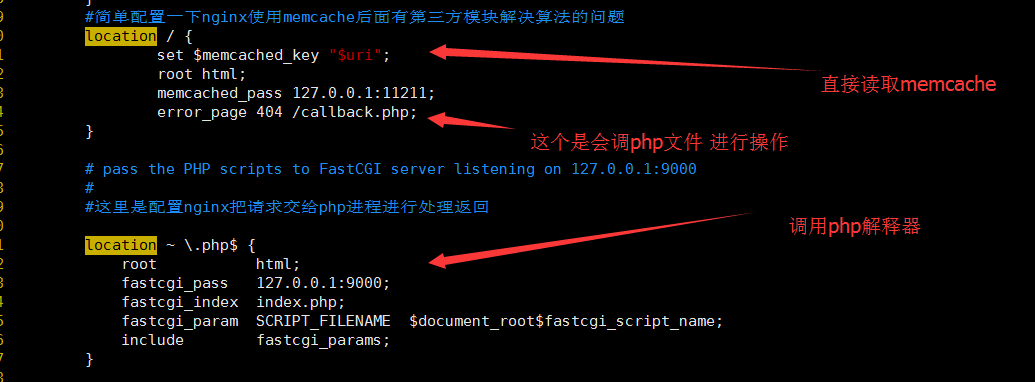
#简单配置一下nginx使用memcache后面有第三方模块解决算法的问题
location / {
set $memcached_key "$uri";
root html;
memcached_pass 127.0.0.1:11211;
error_page 404 /callback.php;
}
# pass the PHP scripts to FastCGI server listening on 127.0.0.1:9000
#
#这里是配置nginx把请求交给php进程进行处理返回
location ~ \.php$ {
root html;
fastcgi_pass 127.0.0.1:9000;
fastcgi_index index.php;
fastcgi_param SCRIPT_FILENAME $document_root$fastcgi_script_name;
include fastcgi_params;
}
}
}


 632
632

 被折叠的 条评论
为什么被折叠?
被折叠的 条评论
为什么被折叠?
 到【灌水乐园】发言


