android学习——使用TableLayout动态生成表格,并为tablerow中的列添加点击监听


在android中实现表格的形式主要有三种:一是Gridview ,实现网状布局,但是它的行和列的大小是定的;二是ListView,这在实际应用中应该用的最多的,它可以通过Layout_weight 属性,实现不同的尺寸列显示,但是当设定Layout_weight 值后,列的尺寸也是固定了的。三是TableLayout,这是文档中专门用于表格显示的布局,通过 android:shrinkColumns (自动缩进列长度) 和  android:stretchColumns (自动延伸列长度) 属性可以实现列尺寸的自动缩进和延伸。

     下面的例子也是结合了很多参考内容写出来的,在这只想和大家分享,希望能帮到有需要的人。

     首先,说说背景吧,最近在做毕设,这个例子也就是其中的一个模块——课程查询。该模块提供两种功能,一个是按学院名查询课程,另一个是按课程名查询课程。并将查询的结构显示在TableLayout布局中,TableLayout的使用可以找些博文,有些讲的非常清楚,在这我就不累赘。先贴一段布局文件的代码,没什么好解释的,都是些简单的布局,所以比较难看。
[html]  view plain  copy
  1. <?xml version="1.0" encoding="utf-8"?>  
  2. <LinearLayout xmlns:android="http://schemas.android.com/apk/res/android"  
  3.     android:layout_width="match_parent"  
  4.     android:layout_height="match_parent"  
  5.     android:background="@color/chat_background"  
  6.     android:orientation="vertical" >  
  7.   
  8.     <LinearLayout  
  9.         android:layout_width="fill_parent"  
  10.         android:layout_height="wrap_content"  
  11.         android:orientation="horizontal" >  
  12.   
  13.         <TextView  
  14.             android:layout_width="wrap_content"  
  15.             android:layout_height="wrap_content"  
  16.             android:text="@string/kechengchaxun_anxueyuanchaxun"  
  17.             android:textSize="18sp" />  
  18.   
  19.         <Spinner  
  20.             android:id="@+id/kccx_spinner1"  
  21.             android:layout_width="200dip"  
  22.             android:layout_height="50dp" />  
  23.   
  24.         <Button  
  25.             android:id="@+id/kccx_chaxun1"  
  26.             android:layout_width="wrap_content"  
  27.             android:layout_height="wrap_content"  
  28.             android:text="@string/kechengchaxun_chaxun" />  
  29.     </LinearLayout>  
  30.   
  31.     <View  
  32.         android:layout_width="fill_parent"  
  33.         android:layout_height="10.0dip"  
  34.         android:background="@drawable/fengeview" >  
  35.     </View>  
  36.   
  37.     <LinearLayout  
  38.         android:layout_width="fill_parent"  
  39.         android:layout_height="wrap_content" >  
  40.   
  41.         <TextView  
  42.             android:layout_width="wrap_content"  
  43.             android:layout_height="wrap_content"  
  44.             android:text="@string/kechengchaxun_ankechengchaxun"  
  45.             android:textSize="18sp" />  
  46.   
  47.         <EditText  
  48.             android:id="@+id/kccx_course_name"  
  49.             android:layout_width="200dip"  
  50.             android:layout_height="wrap_content"  
  51.             android:inputType="textCapWords" />  
  52.   
  53.         <Button  
  54.             android:id="@+id/kccx_chaxun2"  
  55.             android:layout_width="wrap_content"  
  56.             android:layout_height="wrap_content"  
  57.             android:text="@string/kechengchaxun_chaxun" />  
  58.     </LinearLayout>  
  59.   
  60.     <View  
  61.         android:layout_width="fill_parent"  
  62.         android:layout_height="20.0dip"  
  63.         android:background="@drawable/fengeview" >  
  64.     </View>  
  65.   
  66.     <ScrollView  
  67.         android:layout_width="fill_parent"  
  68.         android:layout_height="match_parent" >  
  69.   
  70.         <TableLayout  
  71.               
  72.             android:layout_width="fill_parent"  
  73.             android:layout_height="wrap_content"  
  74.             android:shrinkColumns="0"  
  75.             android:stretchColumns="*" >  
  76.   
  77.             <TableRow>  
  78.   
  79.                 <TextView  
  80.                     android:layout_height="wrap_content"  
  81.                     android:background="@drawable/table_title_shape"  
  82.                     android:padding="2.5dp"  
  83.                     android:text="@string/kechengchaxun_xueyuan" />  
  84.   
  85.                 <TextView  
  86.                     android:layout_height="wrap_content"  
  87.                     android:background="@drawable/table_title_shape"  
  88.                     android:padding="2.5dp"  
  89.                     android:text="@string/kechengchaxun_kechengming" />  
  90.   
  91.                 <TextView  
  92.                     android:layout_height="wrap_content"  
  93.                     android:background="@drawable/table_title_shape"  
  94.                     android:padding="2.5dp"  
  95.                     android:text="@string/kechengchaxun_xuefen" />  
  96.   
  97.                 <TextView  
  98.                     android:layout_height="wrap_content"  
  99.                     android:background="@drawable/table_title_shape"  
  100.                     android:padding="2.5dp"  
  101.                     android:text="@string/kechengchaxun_xianxiukecheng" />  
  102.   
  103.                 <TextView  
  104.                     android:layout_height="wrap_content"  
  105.                     android:background="@drawable/table_title_shape"  
  106.                     android:padding="2.5dp"  
  107.                     android:text="@string/kechengchaxun_kaikexueqi" />  
  108.             </TableRow>  
  109.   
  110.             <TableLayout  
  111.                 android:id="@+id/kccx_course_table"  
  112.                 android:stretchColumns="*"  
  113.                 android:shrinkColumns="0">  
  114.                   
  115.             </TableLayout>  
  116.         </TableLayout>  
  117.     </ScrollView>  
  118.   
  119. </LinearLayout>  
 在 < TableLayout> </ TableLayout   > 中嵌套了一个id为 kccx_course_table 的  TableLayout,自动生成的tablerow将显示在此 TableLayout。至于为什么在这多添加个 TableLayout,而不直接用第一个 TableLayout, 后面会解释,在这只是一种解决办法,可能还有更好的我没想到,知道的希望能告诉下。布局的效果如下:

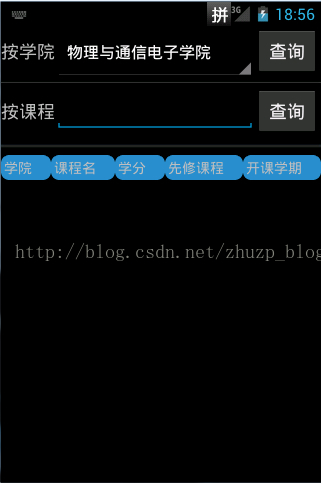
这里要解释下,spinner的用法,应该很容易找到相关的知识,所以就不多说了。主要提下这里的tablerow,它的显示是通过shape文件修改了的, kccx_course_table   TableLayout 中将自动生成的tablerow也是通过shape文件实现边框效果的。效果不是很好看,但大家可以自己摸索下,实现比较漂亮的效果。在这个例子中,定义了两个shape文件,一个用于修改显示 TableLayout布局中各列的 标题的,另一个用于显示自动生成的tablerow,其中的一个 shape文件如下:
[html]  view plain  copy
  1. <?xml version="1.0" encoding"utf-8"?>  
  2. <shape xmlns:android="http://schemas.android.com/apk/res/android" >  
  3.     <gradient  
  4.         android:startColor"#ff7fa4c9"  
  5.         android:endColor"#ff7fa4c9"  
  6.         android:angle"0"/>  
  7.     <padding android:left ="7dp"  
  8.         android:top"7dp"  
  9.         android:right"7dp"  
  10.         android:bottom"7dp" />  
  11.     <corners android:radius ="8dp" />  
  12. </shape>  

现在看看代码吧,
[java]  view plain  copy
  1. import java.util.ArrayList;  
  2. import java.util.List;  
  3.   
  4. import com.example.bean.Course;  
  5. import com.example.dialogs.ParamFromCodeDialogFrag;  
  6. import com.example.mobileelectivesystem.chakankecheng.KCInteractiveWebHelper;  
  7.   
  8. import android.app.Activity;  
  9. import android.os.AsyncTask;  
  10. import android.os.Bundle;  
  11. import android.util.Log;  
  12. import android.view.View;  
  13. import android.view.View.OnClickListener;  
  14. import android.widget.AdapterView;  
  15. import android.widget.AdapterView.OnItemSelectedListener;  
  16. import android.widget.ArrayAdapter;  
  17. import android.widget.Button;  
  18. import android.widget.EditText;  
  19. import android.widget.Spinner;  
  20. import android.widget.TableLayout;  
  21. import android.widget.TableRow;  
  22. import android.widget.TextView;  
  23. import android.widget.Toast;  
  24.   
  25. public class KeChengChaXunActivity extends Activity {  
  26.   
  27.     private TableLayout courseTable;  
  28.     private EditText courseNameEtext;  
  29.     private Spinner academySpinner;  
  30.     private Button academyButton;  
  31.     private Button courseNameButton;  
  32.     private String academySpinnerValue;  
  33.     private String couresName;  
  34.     private KCInteractiveWebHelper kh;  
  35.   
  36.     @Override  
  37.     protected void onCreate(Bundle savedInstanceState) {  
  38.         super.onCreate(savedInstanceState);  
  39.         setContentView(R.layout.kechengchaxun);  
  40.   
  41.         kh = new KCInteractiveWebHelper();  
  42.         findView();  
  43.         // Create an ArrayAdapter using the string array and a default spinner layout  
  44.         ArrayAdapter<CharSequence> adapter = ArrayAdapter.createFromResource(  
  45.                 this, R.array.academy_name,  
  46.                 android.R.layout.simple_spinner_item);  
  47.         // Specify the layout to use when the list of choices appears  
  48.         adapter.setDropDownViewResource(android.R.layout.simple_spinner_dropdown_item);  
  49.         // Apply the adapter to the spinner  
  50.         academySpinner.setAdapter(adapter);  
  51.         academySpinner.setOnItemSelectedListener(new OnItemSelectedListener() {  
  52.   
  53.             @Override  
  54.             public void onItemSelected(AdapterView<?> arg0, View arg1,  
  55.                     int arg2, long arg3) {  
  56.                 academySpinnerValue = academySpinner.getSelectedItem()  
  57.                         .toString();  
  58.                 Log.v("spinnerValue", academySpinnerValue);  
  59.             }  
  60.   
  61.             @Override  
  62.             public void onNothingSelected(AdapterView<?> arg0) {  
  63.                 Log.v("spinnerValue""nothing selected");  
  64.             }  
  65.         });  
  66.         academyButton.setOnClickListener(new OnClickListener() {  
  67.   
  68.             @Override  
  69.             public void onClick(View v) {  
  70.                 new MyTask1().execute();  
  71.             }  
  72.         });  
  73.   
  74.         courseNameButton.setOnClickListener(new OnClickListener() {  
  75.             @Override  
  76.             public void onClick(View v) {  
  77.                 new MyTask2().execute();  
  78.             }  
  79.         });  
  80.     }  
  81.   
  82.     void findView() {  
  83.         courseTable = (TableLayout) findViewById(R.id.kccx_course_table);  
  84.         courseNameEtext = (EditText) findViewById(R.id.kccx_course_name);  
  85.         academySpinner = (Spinner) findViewById(R.id.kccx_spinner1);  
  86.         academyButton = (Button) findViewById(R.id.kccx_chaxun1);  
  87.         courseNameButton = (Button) findViewById(R.id.kccx_chaxun2);  
  88.     }  
  89.   
  90.     /** 
  91.      *  
  92.      * @ClassName: MyTask1 
  93.      * @Description: 根据学院名查询课程的AsyncTask内部类 
  94.      * @author zhuzhp 
  95.      * @date 2014年4月8日 下午8:24:37 
  96.      */  
  97.     private class MyTask1 extends AsyncTask<String, Integer, String> {  
  98.   
  99.         List<Course> resultList = new ArrayList<Course>();  
  100.         int i = 0;  
  101.         @Override  
  102.         protected String doInBackground(String... params) {  
  103.             Log.v("spinnerValueInBackground", academySpinnerValue);  
  104.             resultList = kh.coursQueryByDepart(academySpinnerValue);  
  105.             return "flag";  
  106.         }  
  107.   
  108.         @Override  
  109.         /** 
  110.          * 该主要完成将查询得到的数据以tablerow形式显示。 
  111.          */  
  112.         protected void onPostExecute(String result) {  
  113.             int rows = resultList.size();  
  114.             if (result.equals("flag")) {  
  115.                 if (rows != 0) {  
  116.                     courseTable.removeAllViewsInLayout();//记得加上这一句,要不然上次查询的结果还是会显示在TableLayout之中  
  117.                     //动态生成表格。  
  118.                     for ( i = 0; i < rows; i++) {  
  119.                         TableRow tablerow = new TableRow(getBaseContext());  
  120.                         int k = resultList.get(i).getPropertyCount();  
  121.                         //动态生成有边框的单元行,边框的实现是通过table_shape来实现的 ,列的内容来源是从服务端返回得到的List集合里面的内容  
  122.                         for (int j = 0; j < k; j++) {  
  123.                             TextView text = new TextView(getBaseContext());  
  124.                             text.setBackgroundResource(R.drawable.table_shape);//使用shape文件将表格设置成边框显示效果。  
  125.                             text.setPadding(1111);  
  126.                             //给每以列填充显示的内容  
  127.                             text.setText(resultList.get(i).getProperty(j)  
  128.                                     .toString());  
  129.                             tablerow.addView(text, j);  
  130.                         }  
  131.                         //这里让自己头疼了很久,因为开始不知道怎样设置某一列的点击事件,汗。。。设置点击监听后,如歌用匿名内部类的话,  
  132.                         //String courseDiscription = resultList.get(m).getCoursDisc();因为匿名内部类中取不到外部类的非静态变量的值,所以采用自定义的监听类  
  133.                         //记得要自定义一个构造函数,并定义一个参数m,这样好把这里的i的值传入到myListener中的String courseDiscription = resultList.get(m).getCoursDisc();  
  134.                         //语句中的m,要不然会报错。  
  135.                         tablerow.getChildAt(1).setOnClickListener(new myListener(i));  
  136.                         courseTable.addView(tablerow);  
  137.   
  138.                     }  
  139.                 } else {  
  140.                     Toast.makeText(getBaseContext(), "无相关课程!",  
  141.                             Toast.LENGTH_SHORT).show();  
  142.                 }  
  143.             }  
  144.         }  
  145.           
  146.         private class myListener implements OnClickListener{  
  147.   
  148.             int m = 0;  
  149.             public myListener(int i) {  
  150.                 super();  
  151.                 this.m = i;  
  152.             }  
  153.   
  154.             @Override  
  155.             public void onClick(View v) {  
  156.                 String courseDiscription = resultList.get(m).getCoursDisc();  
  157.                 ParamFromCodeDialogFrag courseDiscDialog = new ParamFromCodeDialogFrag()  
  158.                         .courseInfoDalog("课程简介", courseDiscription);  
  159.                 courseDiscDialog.show(getFragmentManager(), "courseDialog");  
  160.             }  
  161.         }  
  162.     }  
在这只给出了一个按钮的监听事件的代码,另外一个完全类似。首先是以个spinner的实现,这应该没什么好讲的,在文档中都有例子。主要讲下继承了 AsyncTask的 MyTask1 类, AsyncTask 是android中实现异步机制之一,另外一种方式是Handler模式。 AsyncTask的定义如下:
public abstract class AsyncTask<Params, Progress, Result> {}

     三种泛型类型分别代表“启动任务执行的输入参数”、“后台任务执行的进度”“后台计算结果的类型”。在特定场合下,并不是所有类型都被使用,如果没有被使用,可以用Java.lang.Void类型代替。

一个异步任务的执行一般包括以下几个步骤:

1.execute(Params... params)执行一个异步任务,需要我们在代码中调用此方法,触发异步任务的执行

2.onPreExecute()在execute(Params... params)被调用后立即执行,一般用来在执行后台任务前对UI做一些标记。

3.doInBackground(Params... params),在onPreExecute()完成后立即执行,用于执行较为费时的操作,此方法将接收输入参数和返回计算结果。在执行过程中可以调用publishProgress(Progress... values)来更新进度信息。

4.onProgressUpdate(Progress... values)在调用publishProgress(Progress... values)时,此方法被执行,直接将进度信息更新到UI组件上。

5. onPostExecute(Result result)当后台操作结束时, 此方法将会被调用,计算结果将做为参数传递到此方法中,直接将结果显示到UI组件上。
AsyncTask的具体使用请参考一个大神的博客
     MyTask1 类中, doInBackground()方法主要是从webservice获得集合 resultList ,hk是负责与webservice交互的 KCInteractiveWebHelper 类的对象。这里主要讲下 onPostExecute(String result)方法里面的内容:
     首先记得加上这一句: courseTable .removeAllViewsInLayout();要不然显示的效果会是这样

他会把上一次查询结果也显示出来。同时,这里也就要解释下前面的,为什么添加 kccx_course_table TableLayout  ,如果不添加的话,在执行 removeAllViewsInLayout()方法时会将 移除掉。增加一个TableLayout  虽然会使得标题和显示的内容尺寸大小不一样,但也只能退而求其次了。
      还有些内容就在代码中注释, ParamFromCodeDialogFrag 是继承了DialogFragment的类,它主要用于显示提示信息,在这里用于显示课程简介。它的具体实现请参考 这里 ,只是要改变下参数的类型。
最后贴几张效果图


  • 3
    点赞
  • 6
    收藏
    觉得还不错? 一键收藏
  • 0
    评论
评论
添加红包

请填写红包祝福语或标题

红包个数最小为10个

红包金额最低5元

当前余额3.43前往充值 >
需支付:10.00
成就一亿技术人!
领取后你会自动成为博主和红包主的粉丝 规则
hope_wisdom
发出的红包
实付
使用余额支付
点击重新获取
扫码支付
钱包余额 0

抵扣说明:

1.余额是钱包充值的虚拟货币,按照1:1的比例进行支付金额的抵扣。
2.余额无法直接购买下载,可以购买VIP、付费专栏及课程。

余额充值