


搭建json格式的webservice服务器
本文为平时开发项目步骤记录,以备以后需要
一、所用技术
语言:Java
框架:spring mvc 3.1
二、所用技术
IDE:MyEclipse
web容器: Apache tomcat 6.0
三、所有详细步骤
1. 前期准备工作,比如安装MyEclipse,安装tomcat这些网上有非常多的教程就不再赘述了。
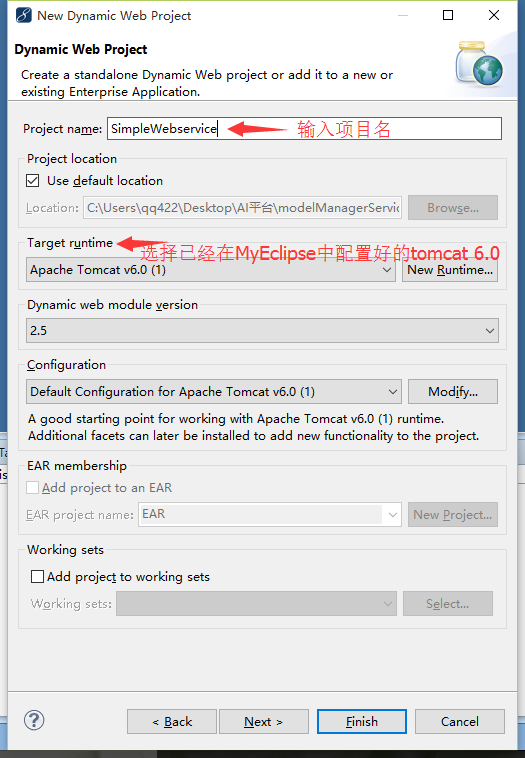
2. 打开MyEclipse,创建动态网站项目。
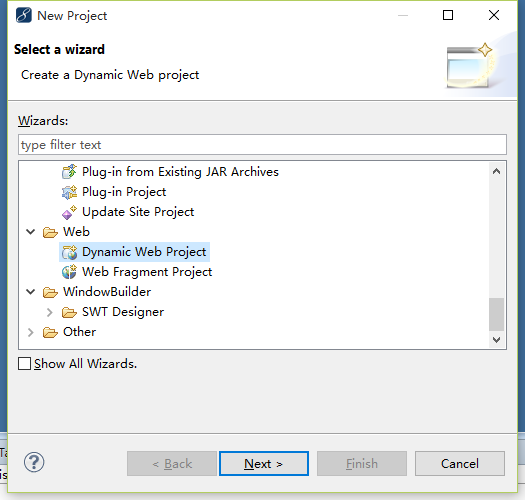
输入项目名,选择在MyEclipse中配置好的tomcat6.0,如何在MyEclipse中配置tomcat网上也有很多教程。点击完成创建。
3. 在WEB-INF的lib文件夹下,导入所需jar包,http://download.csdn.net/detail/qq_36221405/9804218
4. 在web.xml插件中添加一下代码,用于加载spring mvc和字符解析:
- 1
- 2
- 3
- 4
- 5
- 6
- 7
- 8
- 9
- 10
- 11
- 12
- 13
- 14
- 15
- 16
- 17
- 18
- 19
- 20
- 21
- 22
- 1
- 2
- 3
- 4
- 5
- 6
- 7
- 8
- 9
- 10
- 11
- 12
- 13
- 14
- 15
- 16
- 17
- 18
- 19
- 20
- 21
- 22
在web.xml文件的同级目录创建SimpleService-servlet.xml文件,在这里配置spring mvc的相关配置。一下给出的模板是用于自动request body转化为Java class 和 上传文件的相关配置,其他只需再添加用户所需的依赖注入即可。
- 1
- 2
- 3
- 4
- 5
- 6
- 7
- 8
- 9
- 10
- 11
- 12
- 13
- 14
- 15
- 16
- 17
- 18
- 19
- 20
- 21
- 22
- 23
- 24
- 25
- 26
- 27
- 28
- 29
- 30
- 31
- 32
- 33
- 34
- 35
- 36
- 37
- 38
- 39
- 40
- 41
- 42
- 43
- 44
- 45
- 46
- 47
- 48
- 49
- 50
- 51
- 52
- 53
- 1
- 2
- 3
- 4
- 5
- 6
- 7
- 8
- 9
- 10
- 11
- 12
- 13
- 14
- 15
- 16
- 17
- 18
- 19
- 20
- 21
- 22
- 23
- 24
- 25
- 26
- 27
- 28
- 29
- 30
- 31
- 32
- 33
- 34
- 35
- 36
- 37
- 38
- 39
- 40
- 41
- 42
- 43
- 44
- 45
- 46
- 47
- 48
- 49
- 50
- 51
- 52
- 53
至此整个框架已经搭建完毕,只需根据需求完成自己的代码即可。比如,想写一个接口,功能是别人发送GET请求,返回“hello world!”。
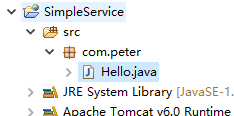
在src文件夹下创建Class(com.peter.Hello.java)
- 1
- 2
- 3
- 4
- 5
- 6
- 7
- 8
- 9
- 10
- 11
- 12
- 13
- 14
- 15
- 16
- 17
- 18
- 19
- 20
- 21
- 1
- 2
- 3
- 4
- 5
- 6
- 7
- 8
- 9
- 10
- 11
- 12
- 13
- 14
- 15
- 16
- 17
- 18
- 19
- 20
- 21
然后将项目部署到已经搭建好的tomcat中,然后启动tomcat,然后使用rest请求发送
至此整个简单项目已经搭建完毕,具体rest请求还有很多相关的东西,网上也有很多学习资料就不再赘述了。随手记录,如有问题,请博内留言以帮助我改正和完善,一起努力,一起学习,一起进步!


 713
713

 被折叠的 条评论
为什么被折叠?
被折叠的 条评论
为什么被折叠?
 到【灌水乐园】发言


