好文章自己先收藏一下,怕以后找不到。
文章转自:http://www.cnblogs.com/wj204/p/6031435.html
前面vue2.0和webpack都已经有接触了些(vue.js入门, webpack入门之简单例子跑起来 ),现在开始学习如何构造自己的vue2.0+webpack环境。

1.首先新建一个目录vue-wkdemo,这是我们的项目目录。执行 npm init 命令生成package.json文件。执行npm init之后,会提示你填写一些项目的信息,一直回车默认就好了,或者直接执行 npm init -y 直接跳过询问步骤。

2.安装项目依赖项
npm install webpack webpack-dev-server vue-loader vue-html-loader css-loader vue-style-loader
vue-hot-reload-api babel-loader babel-core babel-plugin-transform-runtime babel-preset-es2015 babel-runtime@5 --save-dev
npm install html-webpack-plugin --save-d
npm install vue --save
3.新建入口文件index.js,文件位置放置为:vue-wkdemo->app->index->index.js
import Vue from 'Vue'
import Favlist from './components/Favlist.vue'
Vue.config.debug = true;
window.onload = function () {
new Vue({
el: '#app',
components: {
'my-component': Favlist
}
});
}
4.构建index.html模版,文件位置放置为:vue-wkdemo->app->index->index.html
<!DOCTYPE html>
<html lang="zh">
    <head>
        <meta name="viewport" content="width=device-width, height=device-height, initial-scale=1.0, user-scalable=no">
        <meta charset="utf-8">
        <title>首页</title>
    </head>
    <body>
      <div id="app">

        <my-component></my-component>
      </div>
    </body>
</html>
5.构建vue组件Favlist.vue ,文件放置为:vue-wkdemo->app->components->Favlist.vue
<template id="template-home">
  <div>
    <div v-for="n in 10">div</div>
  </div>
</template>
<style>
body {
    color: red;
}
</style>
6.构建 webpack.config.js ,文件放置为:vue-wkdemo->build->webpack.config.js
var path = require('path');
var HtmlWebpackPlugin = require('html-webpack-plugin')
module.exports = {
entry: path.resolve(__dirname, '../app/index/index.js'),
output: {
path: path.resolve(__dirname, '../output/static'),
publicPath: 'static/',
filename: '[name].[hash].js',
chunkFilename: '[id].[chunkhash].js'
},
resolve: {
extensions: ['', '.js', '.vue'],
alias: {
'Vue': 'vue/dist/vue.js'
}
},
module: {
loaders: [
{
test: /\.vue$/,
loader: 'vue'
},
{
test: /\.js$/,
loader: 'babel?presets=es2015',
exclude: /node_modules/
}
]
},
Favlist: {
loaders: {
js: 'babel'
}
},
plugins: [
new HtmlWebpackPlugin({
filename: '../index.html',
template: path.resolve(__dirname, '../app/index/index.html'),
inject: true
})
]
}
- 1
- 2
- 3
- 4
- 5
- 6
- 7
- 8
- 9
- 10
- 11
- 12
- 13
- 14
- 15
- 16
- 17
- 18
- 19
- 20
- 21
- 22
- 23
- 24
- 25
- 26
- 27
- 28
- 29
- 30
- 31
- 32
- 33
- 34
- 35
- 36
- 37
- 38
- 39
- 40
- 41
- 42
- 43
- 44
- 45
- 1
- 2
- 3
- 4
- 5
- 6
- 7
- 8
- 9
- 10
- 11
- 12
- 13
- 14
- 15
- 16
- 17
- 18
- 19
- 20
- 21
- 22
- 23
- 24
- 25
- 26
- 27
- 28
- 29
- 30
- 31
- 32
- 33
- 34
- 35
- 36
- 37
- 38
- 39
- 40
- 41
- 42
- 43
- 44
- 45
7.运行构建命令 : ‘webpack –display-modules –display-chunks –config build/webpack.config.js’
可以看到输出文件:
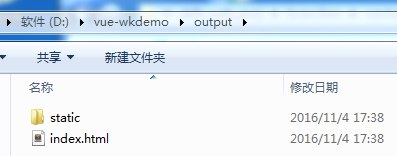
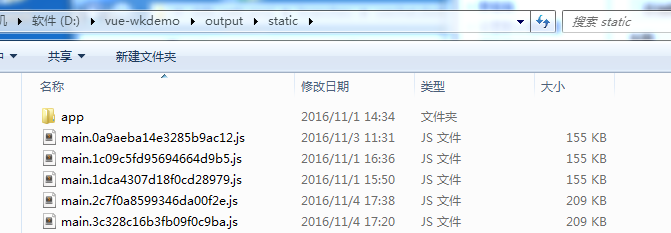
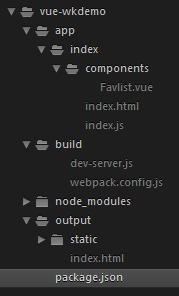
8.到这里,我们的目录结构为:
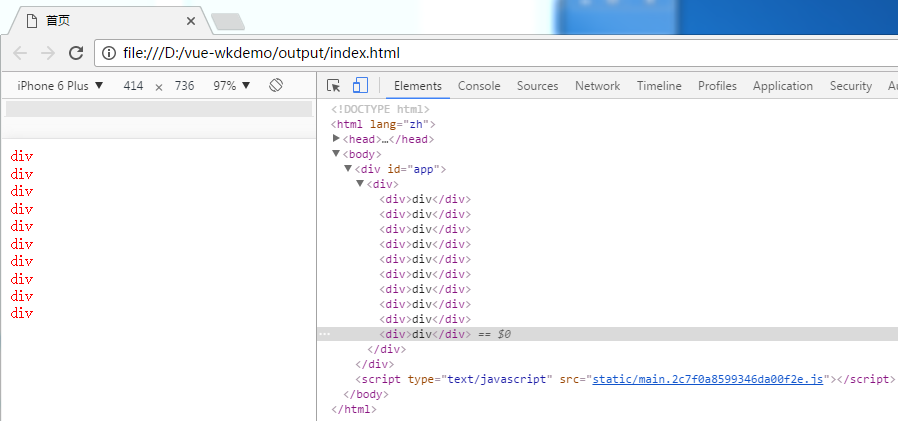
运行output->static->index.html这个文件,过程中遇到各种各样的坑 (省略几百字。。。)
最后终于看到结果了!!!
9.问题来了,每次都需要运行构建命令才能查看改变后的代码效果,这是很没有效率 ,于是还需要安装 webpack-dev-middleware 中间件和 webpack-hot-middleware 中间件
npm install webpack-dev-middleware webpack-hot-middleware --save-dev
另外还需要安装express
---
介绍下 webpack-dev-middleware 中间件,它是对webpack一个简单的包装,它可以通过连接服务器服务那些从webpack发射出来的文件,它有一下几点好处:
1、不会向硬盘写文件,而是在内存中,注意我们构建项目实际就是向硬盘写文件。
2、当文件改变的时候,这个中间件不会再服务旧的包,你可以直接刷新浏览器就能看到最新的效果,这样你就不必等待构建的时间,所见即所得。
在build目录中创建一个dev-server.js文件,并写入内容:
var express = require('express')
var webpack = require('webpack')
var config = require('./webpack.config')
var app = express()
var compiler = webpack(config)
var devMiddleware = require('webpack-dev-middleware')(compiler, {
publicPath: config.output.publicPath,
stats: {
colors: true,
chunks: false
}
})
app.use(devMiddleware)
app.listen(8888, function (err) {
if (err) {
console.log(err)
return
}
console.log('Listening at http://localhost:8888')
})
View Code
然后我们修改 webpack.config.js 配置文件
① 将 config.output.publicPath 修改为 ‘/‘:
output: {
path: path.resolve(__dirname, '../output/static'),
publicPath: '/',
filename: '[name].[hash].js',
chunkFilename: '[id].[chunkhash].js'
},
② 将 plugins 中 HtmlWebpackPlugin 中的 filename 修改为 ‘app/index/index.html’
plugins: [
new HtmlWebpackPlugin({
filename: 'app/index/index.html',
template: path.resolve(__dirname, '../app/index/index.html'),
inject: true
})
]
此时,我们在项目根目录运行下面的命令,开启服务:
node build/dev-server.js
在浏览器中输入 http:
不信?
为了不去修改webpack.config.js,在build目录下新建一个webpack.dev.conf.js文件,意思是开发模式下要读取的配置文件,并写入一下内容:
var HtmlWebpackPlugin = require('html-webpack-plugin')
var path = require('path');
var config = require('./webpack.config');
config.output.publicPath = '/';
config.plugins = [
new HtmlWebpackPlugin({
filename: 'app/index/index.html',
template: path.resolve(__dirname, '../app/index/index.html'),
inject: true
})
];
module.exports = config;
- 1
- 2
- 3
- 4
- 5
- 6
- 7
- 8
- 9
- 10
- 11
- 12
- 13
- 14
- 15
- 16
- 17
- 18
- 19
- 20
- 21
- 22
- 23
- 24
- 25
- 26
- 27
- 28
- 29
- 30
- 31
- 32
- 33
- 34
- 35
- 36
- 37
- 38
- 39
- 40
- 41
- 42
- 43
- 44
- 45
- 46
- 47
- 48
- 49
- 50
- 51
- 52
- 53
- 54
- 55
- 56
- 57
- 58
- 59
- 60
- 61
- 62
- 63
- 64
- 65
- 66
- 67
- 68
- 69
- 70
- 71
- 72
- 73
- 74
- 75
- 76
- 77
- 78
- 79
View Code
这样在dev环境下的配置文件覆盖了基本配置文件,只需要在dev-server.js中将
var config = require('./webpack.config')
改为:
var config = require('./webpack.dev.conf')
到这里,我们已经使用webpack-dev-middleware 搭建基本的开发环境了,但是每次修改代码后,还是需要我们手动刷新浏览器,接下来介绍热加载(所谓的热加载,意思就是说能够追踪我们代码的变化,并自动更新界面,甚至还能保留程序状态。),我们需要 webpack-hot-middleware 中间件来完成热加载。
配合 webpack-dev-middleware 使用,我们还需要做的是:
第一步:安装(上面我们已经安装过)
npm install webpack-dev-middleware --save-dev
第二步:在 webpack.dev.conf.js 配置文件中添加三个插件,如下:
var HtmlWebpackPlugin = require('html-webpack-plugin')
var path = require('path');
var webpack = require('webpack');
var config = require('./webpack.config');
config.output.publicPath = '/';
config.plugins = [
new webpack.optimize.OccurenceOrderPlugin(),
new webpack.HotModuleReplacementPlugin(),
new webpack.NoErrorsPlugin(),
new HtmlWebpackPlugin({
filename: 'app/index/index.html',
template: path.resolve(__dirname, '../app/index/index.html'),
inject: true
})
];
module.exports = config;
- 1
- 2
- 3
- 4
- 5
- 6
- 7
- 8
- 9
- 10
- 11
- 12
- 13
- 14
- 15
- 16
- 17
- 18
- 19
- 20
- 21
- 22
- 1
- 2
- 3
- 4
- 5
- 6
- 7
- 8
- 9
- 10
- 11
- 12
- 13
- 14
- 15
- 16
- 17
- 18
- 19
- 20
- 21
- 22
第三步:在 webpack.config.js 文件中入口配置中添加 ‘webpack-hot-middleware/client’,如下:
entry: ['webpack-hot-middleware/client', path.resolve(__dirname, '../app/index/index.js')],
第四步:在 dev-server.js 文件中使用插件
var express = require('express')
var webpack = require('webpack')
var config = require('./webpack.dev.conf')
var app = express()
var compiler = webpack(config)
var devMiddleware = require('webpack-dev-middleware')(compiler, {
publicPath: config.output.publicPath,
stats: {
colors: true,
chunks: false
}
})
var hotMiddleware = require('webpack-hot-middleware')(compiler)
app.use(devMiddleware)
app.use(hotMiddleware)
app.listen(8888, function (err) {
if (err) {
console.log(err)
return
}
console.log('Listening at http://localhost:8888')
})
现在重启的服务,然后修改 Favlist.vue 中的页面颜色为 ‘black’:
<style>
body {
color: black;
}
</style>
一保存就可以看到修改后的效果,不需要手动刷新浏览器啦啦啦~\(≧▽≦)/~啦啦啦。

var path = require('path');
var webpack = require('webpack');
var config = require('./webpack.config');
config.output.publicPath = '/';
config.plugins = [
new webpack.optimize.OccurenceOrderPlugin(),
new webpack.HotModuleReplacementPlugin(),
new webpack.NoErrorsPlugin(),
new HtmlWebpackPlugin({
filename: 'app/index/index.html',
template: path.resolve(__dirname, '../app/index/index.html'),
inject: true
})
];
var devClient = 'webpack-hot-middleware/client';
Object.keys(config.entry).forEach(function (name, i) {
var extras = [devClient]
config.entry[name] = extras.concat(config.entry[name])
})
module.exports = config;
View Code
然后将 webpack.config.js 文件中的入口配置修改为以下配置方式:
entry: {
index: [
path.resolve(__dirname, '../app/index/index.js')
]
},
- 1
- 2
- 3
- 4
- 5
- 6
- 7
- 8
- 9
- 10
- 11
- 12
- 13
- 14
- 15
- 16
- 17
- 18
- 19
- 20
- 21
- 22
- 23
- 24
- 25
- 26
- 27
- 28
- 29
- 30
- 31
- 32
- 33
- 34
- 35
- 36
- 37
- 38
- 39
- 40
- 41
- 42
- 43
- 44
- 45
- 46
- 47
- 48
- 49
- 50
- 51
- 52
- 53
- 54
- 55
- 56
- 57
- 58
- 59
- 60
- 61
- 62
- 63
- 64
- 65
- 66
- 67
- 68
- 69
- 70
- 71
- 72
- 73
- 74
- 75
- 76
- 77
- 78
- 79
- 80
- 81
- 82
- 83
- 84
重启服务,修改 Favlist.vue 中的背景色,再次查看浏览器,发现可以热加载。到这里还没结束,这里只是监听到Favlist.vue文件的改动,为了能监听到index.html文件的改动,我们还需要做一些工作。
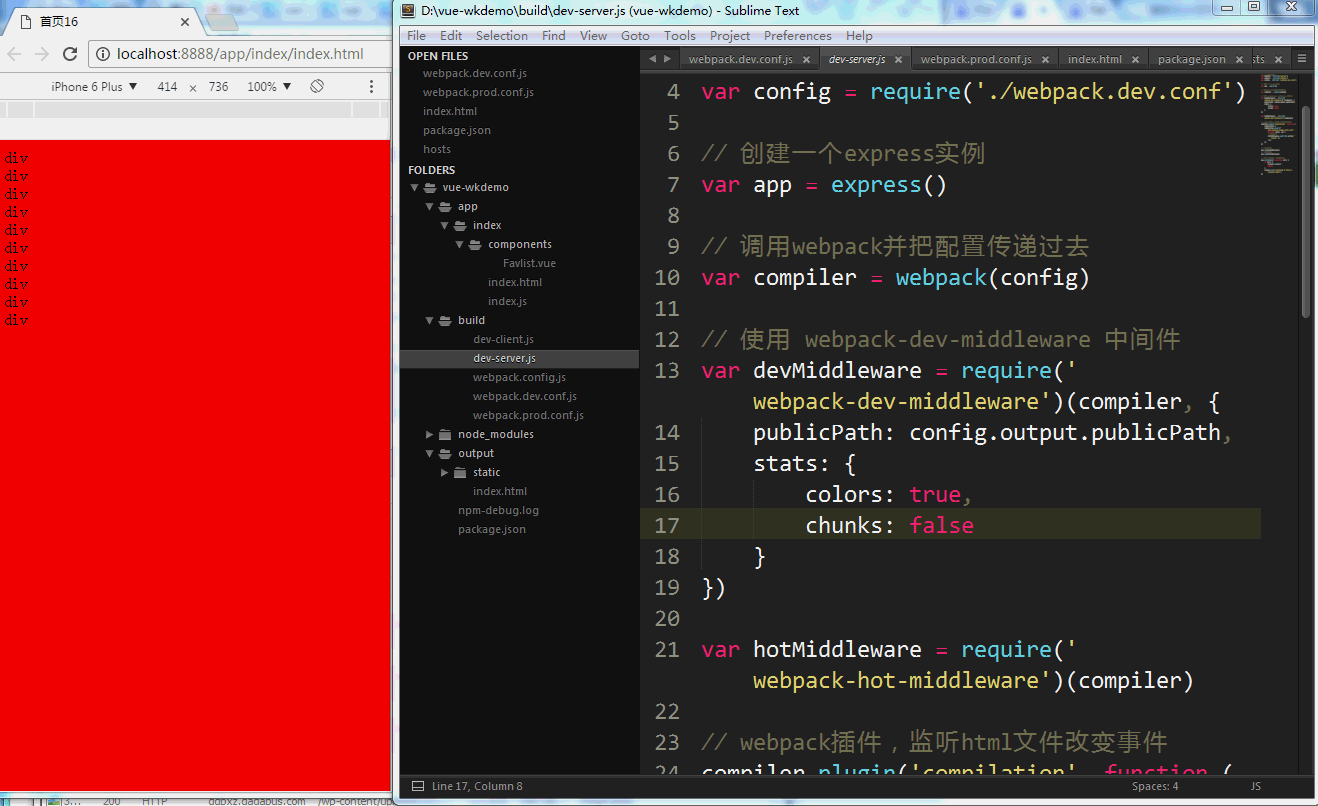
第一步:在dev-server.js文件中监听html文件改变事件,修改后的dev-server.js文件如下:
var express = require('express')
var webpack = require('webpack')
var config = require('./webpack.dev.conf')
var app = express()
var compiler = webpack(config)
var devMiddleware = require('webpack-dev-middleware')(compiler, {
publicPath: config.output.publicPath,
stats: {
colors: true,
chunks: false
}
})
var hotMiddleware = require('webpack-hot-middleware')(compiler)
compiler.plugin('compilation', function (compilation) {
compilation.plugin('html-webpack-plugin-after-emit', function (data, cb) {
hotMiddleware.publish({ action: 'reload' })
cb()
})
})
app.use(devMiddleware)
app.use(hotMiddleware)
app.listen(8888, function (err) {
if (err) {
console.log(err)
return
}
console.log('Listening at http://localhost:8888')
})
- 1
- 2
- 3
- 4
- 5
- 6
- 7
- 8
- 9
- 10
- 11
- 12
- 13
- 14
- 15
- 16
- 17
- 18
- 19
- 20
- 21
- 22
- 23
- 24
- 25
- 26
- 27
- 28
- 29
- 30
- 31
- 32
- 33
- 34
- 35
- 36
- 37
- 38
- 39
- 1
- 2
- 3
- 4
- 5
- 6
- 7
- 8
- 9
- 10
- 11
- 12
- 13
- 14
- 15
- 16
- 17
- 18
- 19
- 20
- 21
- 22
- 23
- 24
- 25
- 26
- 27
- 28
- 29
- 30
- 31
- 32
- 33
- 34
- 35
- 36
- 37
- 38
- 39
View Code
第二步:修改webpack.dev.conf.js文件
var HtmlWebpackPlugin = require('html-webpack-plugin')
var path = require('path');
var webpack = require('webpack');
var config = require('./webpack.config');
config.output.publicPath = '/';
config.plugins = [
new webpack.optimize.OccurenceOrderPlugin(),
new webpack.HotModuleReplacementPlugin(),
new webpack.NoErrorsPlugin(),
new HtmlWebpackPlugin({
filename: 'app/index/index.html',
template: path.resolve(__dirname, '../app/index/index.html'),
inject: true
})
];
var devClient = './build/dev-client';
Object.keys(config.entry).forEach(function (name, i) {
var extras = [devClient]
config.entry[name] = extras.concat(config.entry[name])
})
module.exports = config;
View Code
文件中修改了devClient变量,将 ‘webpack-hot-middleware/client’ 替换成 ‘./build/dev-client’,最终会导致,我们入口配置会变成下面这样:
entry: {
index: [
'./build/dev-client',
path.resolve(__dirname, '../app/index/index.js')
]
},
第三步:新建build/dev-client.js文件,并编辑如下内容:
var hotClient = require('webpack-hot-middleware/client')
hotClient.subscribe(function (event) {
if (event.action === 'reload') {
window.location.reload()
}
})
- 1
- 2
- 3
- 4
- 5
- 6
- 7
- 8
- 9
- 10
- 11
- 12
- 13
- 14
- 15
- 16
- 17
- 18
- 19
- 20
- 21
- 22
- 23
- 24
- 25
- 26
- 27
- 28
- 29
- 30
- 31
- 32
- 33
- 34
- 35
- 36
- 37
- 38
- 39
- 40
- 41
- 42
- 43
- 44
- 45
- 46
- 47
- 48
- 1
- 2
- 3
- 4
- 5
- 6
- 7
- 8
- 9
- 10
- 11
- 12
- 13
- 14
- 15
- 16
- 17
- 18
- 19
- 20
- 21
- 22
- 23
- 24
- 25
- 26
- 27
- 28
- 29
- 30
- 31
- 32
- 33
- 34
- 35
- 36
- 37
- 38
- 39
- 40
- 41
- 42
- 43
- 44
- 45
- 46
- 47
- 48
这里我们除了引入 ‘webpack-hot-middleware/client’ 之外订阅了一个事件,当 event.action === ‘reload’ 时触发,而在 dev-server.js 中有发布的事件:
compiler.plugin('compilation', function (compilation) {
compilation.plugin('html-webpack-plugin-after-emit', function (data, cb) {
hotMiddleware.publish({ action: 'reload' })
cb()
})
})
这样,当我们的html文件改变后,就可以监听的到,最终会执行页面刷新,而不需要我们手动刷新。看下效果:
至此,开发环境终于搞定了。


 4万+
4万+


 被折叠的 条评论
为什么被折叠?
被折叠的 条评论
为什么被折叠?
 到【灌水乐园】发言


