


MyBatis是我接触到的第一个框架,下面谈一谈我第一次使用MyBatis时的感悟。
首先是一些准备工作
-
下载相关的jar包。到GitHub上就行,上面有全面和完整的jar文件
-
在eclipse上安装MyBatis Generator插件(一款高效的ORM框架中的代码生成插件)
-
创建一个mybatis-config.xml文件,作用相当于一个全局性的文件,处理数据库连接和今后的mapper关系。
-
创建一个generatorConfig.xml文件,配置上连接的数据库的一些信息。和将要操作的bean的包啊,名称啊等等数据
-
然后就是生成bean层,里面会生成一个XXXXmapper.xml.在mybatis-config.xml中进行添加就可以了。
-
最后就是使用mybatis的api在Servlet文件中对数据库进行操作了。
然后是小实例咯
处理相关的各种文件之间的关系,真的是一件令人感到头疼的事,不过还好,这里有一个比较清晰的脉络,记住就好了。
我的目录结构如下:
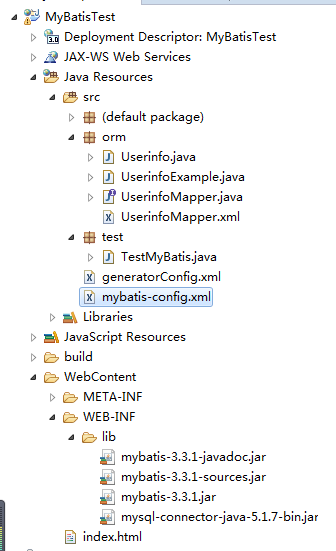
首先是创建一个mybatis-config.xml文件:
<?xml version="1.0" encoding="UTF-8"?>
<!DOCTYPE configuration PUBLIC "-//mybatis.org//DTD Config 3.0//EN" "http://mybatis.org/dtd/mybatis-3-config.dtd">
<configuration>
    <environments default="development">
        <environment id="development">
            <transactionManager type="JDBC" />
            <!-- 配置数据库连接信息 -->
            <dataSource type="POOLED">
                <property name="driver" value="com.mysql.jdbc.Driver" />
                <property name="url" value="jdbc:mysql://localhost:3306/mybatis" />
                <property name="username" value="root" />
                <property name="password" value="mysql" />
            </dataSource>
        </environment>
     </environments>
     <!-- 下面的这个mapping是必须的,其作用就是和bean对象连接起来 -->
     <mappers>
        <mapper resource="orm/UserinfoMapper.xml"/>
     </mappers>

</configuration>
- 1
- 2
- 3
- 4
- 5
- 6
- 7
- 8
- 9
- 10
- 11
- 12
- 13
- 14
- 15
- 16
- 17
- 18
- 19
- 20
- 21
- 1
- 2
- 3
- 4
- 5
- 6
- 7
- 8
- 9
- 10
- 11
- 12
- 13
- 14
- 15
- 16
- 17
- 18
- 19
- 20
- 21
再就是映射关系的配置文件的创建,我的如下:generatorConfig.xml
<?xml version="1.0" encoding="UTF-8" ?>
<!DOCTYPE generatorConfiguration PUBLIC "-//mybatis.org//DTD MyBatis Generator Configuration 1.0//EN" "http://mybatis.org/dtd/mybatis-generator-config_1_0.dtd" >
<generatorConfiguration >
  <context id="context1" >
    <jdbcConnection driverClass="com.mysql.jdbc.Driver" connectionURL="jdbc:mysql://localhost:3306/mybatis" userId="root" password="mysql" />
    <javaModelGenerator targetPackage="orm" targetProject="MyBatisTest" />
    <sqlMapGenerator targetPackage="orm" targetProject="MyBatisTest" />
    <javaClientGenerator targetPackage="orm" targetProject="MyBatisTest" type="XMLMAPPER" />
    <table schema="dbo" tableName="userinfo" >
      <!-- <columnOverride column="???" property="???" /> -->
      <!-- 下面的这个标签的作用是对于数据库表中的某些选项进行逐渐的自增长的设置,防止数据库中的表中数据项的异常错误! -->
      <!-- <generatedKey column="id" sqlStatement="mysql" identity="true"/> -->
    </table>
  </context>
</generatorConfiguration>
- 1
- 2
- 3
- 4
- 5
- 6
- 7
- 8
- 9
- 10
- 11
- 12
- 13
- 14
- 15
- 16
- 1
- 2
- 3
- 4
- 5
- 6
- 7
- 8
- 9
- 10
- 11
- 12
- 13
- 14
- 15
- 16
然后在那个映射文件orm/UserinfoMapper.xml中添加以下相关的设置即可。这里面大有文章的,其中比较重要的就是
<mapper namespace="orm.UserinfoMapper" >
  <resultMap id="BaseResultMap" type="orm.Userinfo" >
    <!--
      WARNING - @mbggenerated
      This element is automatically generated by MyBatis Generator, do not modify.
      This element was generated on Mon Apr 25 12:50:38 CST 2016.
    -->
    <id column="id" property="id" jdbcType="INTEGER" />
    <result column="username" property="username" jdbcType="VARCHAR" />
    <result column="password" property="password" jdbcType="VARCHAR" />
  </resultMap>
<select id="selectAllUserinfo" resultMap="BaseResultMap" parameterType="orm.Userinfo">
    select * from userinfo
  </select>
</mapper>
- 1
- 2
- 3
- 4
- 5
- 6
- 7
- 8
- 9
- 10
- 11
- 12
- 13
- 14
- 15

- 1
- 2
- 3
- 4
- 5
- 6
- 7
- 8
- 9
- 10
- 11
- 12
- 13
- 14
- 15
mappe的namespace是我们将在Servlet中引用的第一个参数的命名空间,搭配着标签select中的id就可以唯一的确定是使用的哪一个sql语句。
而resultMap是相关于数据库中的表结构来实现的。我们通常会把值这个作为CRUD的标签语句的parameterType的属性值。最后在自己的CRUD标签体内写上需要的sql语句就可以了(如果需要外界的参数,就使用#{values}来进行占位就可以了。
再就是编写测试代码了,这里我使用的是Servlet来进行操作。如下:
package test;

import java.io.IOException;
import java.io.InputStream;

import javax.servlet.ServletException;
import javax.servlet.annotation.WebServlet;
import javax.servlet.http.HttpServlet;
import javax.servlet.http.HttpServletRequest;
import javax.servlet.http.HttpServletResponse;

import org.apache.ibatis.io.Resources;
import org.apache.ibatis.session.SqlSession;
import org.apache.ibatis.session.SqlSessionFactory;
import org.apache.ibatis.session.SqlSessionFactoryBuilder;

import orm.Userinfo;

/**
 * Servlet implementation class TestMyBatis
 */
@WebServlet("/TestMyBatis")
public class TestMyBatis extends HttpServlet {
    private static final long serialVersionUID = 1L;

    /**
     * Default constructor.
     */
    public TestMyBatis() {
        // TODO Auto-generated constructor stub
    }

    /**
     * @see HttpServlet#doGet(HttpServletRequest request, HttpServletResponse response)
     */
    protected void doGet(HttpServletRequest request, HttpServletResponse response) throws ServletException, IOException {
        // TODO Auto-generated method stub
        response.getWriter().append("Served at: ").append(request.getContextPath());


        try {


            String resource = "mybatis-config.xml";
            InputStream is = Resources.getResourceAsStream(resource);
            SqlSessionFactory sqlSessionFactory = new SqlSessionFactoryBuilder().build(is);
            SqlSession sqlSession = sqlSessionFactory.openSession();
            Userinfo userinfo = sqlSession.selectOne("orm.UserinfoMapper.selectAllUserinfo", 1);

            System.out.println(userinfo.getUsername());
            System.out.println(userinfo.getPassword());
            sqlSession.commit();
            sqlSession.close();


        } catch (Exception e) {
            // TODO Auto-generated catch block
            e.printStackTrace();
        }


    }

    /**
     * @see HttpServlet#doPost(HttpServletRequest request, HttpServletResponse response)
     */
    protected void doPost(HttpServletRequest request, HttpServletResponse response) throws ServletException, IOException {
        // TODO Auto-generated method stub
        doGet(request, response);
    }

}
- 1
- 2
- 3
- 4
- 5
- 6
- 7
- 8
- 9
- 10
- 11
- 12
- 13
- 14
- 15
- 16
- 17
- 18
- 19
- 20
- 21
- 22
- 23
- 24
- 25
- 26
- 27
- 28
- 29
- 30
- 31
- 32
- 33
- 34
- 35
- 36
- 37
- 38
- 39
- 40
- 41
- 42
- 43
- 44
- 45
- 46
- 47
- 48
- 49
- 50
- 51
- 52
- 53
- 54
- 55
- 56
- 57
- 58
- 59
- 60
- 61
- 62
- 63
- 64
- 65
- 66
- 67
- 68
- 69
- 70
- 71
- 72
- 73
- 74
- 75
- 76
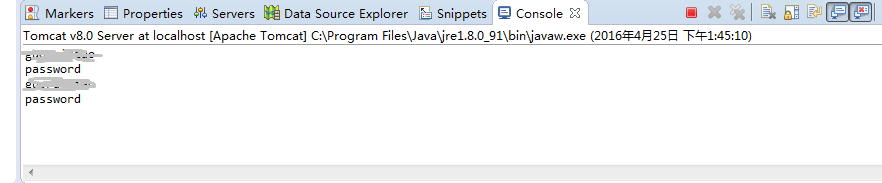
结果在Eclipse的控制台上就可以看到这样的一句话了。
小总结
看着上面的代码感觉是有点凌乱,那我还是对每一步来点总结好了。
- 导包(mybatis的jar,mysql的jar。统统的拷贝到项目的lib目录下)
-
写Mybatis的配置文件,作用就是连接数据库的信息,以及映射的关系。
-
写映射文件,里面的内容包括数据库信息,表信息,以及将要生成的包的名称等等,可以在标签中轻松的读懂。
-
然后是将生成的代码放到src目录下,将里面的xxxxmapper.xml文件在之前下创建的mytais-config.xml文件中进行关联。
-
最后就是创建测试的Servlet了,在doGet或者doPost方法中借助于MyBatis的api完成相应的数据操作。这样就算是大功告成了。
其中的关键点,就在于
- 配置文件的写法
- Mybatis的Api的用法
- 各种ORM关系的配合等等。


 1万+
1万+


 被折叠的 条评论
为什么被折叠?
被折叠的 条评论
为什么被折叠?
 到【灌水乐园】发言


