


一、实验环境
vir1   master  172.25.18.21
vir2   minion  172.25.18.22
vir3   minion  172.25.18.23
二、saltstack快速安装
为了安装saltstack的一些包,首先要扩展YUM源。
[root@vir1 ~]# cat /etc/yum.repos.d/yum.repo
[rhel6]
name="YUM   6"
baseurl=http://172.25.18.18/rhel6          ##这是真实主机的路径
enabled=1
gpgcheck=0
[root@vir1 ~]# yum repolist
repo id repo name status
Yum "YUM 7.3" 4,751
rhel7 "YUM 7" 19
repolist: 4,770
安装并启动salt-master
[root@vir1 ~]# yum install -y salt-master
[root@vir1 ~]# systemctl restart salt-master
在minion端:
[root@vir1 ~]# yum install -y salt-minion
[root@vir2 ~]# vim /etc/salt/minion         ##slave端配置文件
master: 172.25.18.21
[root@vir2 ~]# systemctl start salt-minion
SaltStack认证
建立连接:
[root@vir1 ~]# salt-key -L
Accepted Keys:
Denied Keys:
Unaccepted Keys:
vir2
Rejected Keys:
[root@vir1 ~]# salt-key -A
The following keys are going to be accepted:
Unaccepted Keys:
vir2
Proceed? [n/Y] Y
Key for minion vir2 accepted.
salt-key :
# List all accepted, unaccepted and rejected minion keys:
salt-key -L
# Accept a minion key by name:
salt-key -a MINION_ID
# Reject a minion key by name:
salt-key -r MINION_ID
# Print fingerprints of all public keys:
salt-key -F测试一下saltstack:
[root@vir1 ~]# salt vir2 test.ping
vir2:
    True
[root@vir1 ~]# salt vir2 cmd.run hostname
vir2:
    vir2
##再开一台minion测下
[root@vir1 haproxy]# salt vir? test.ping
vir2:
    True
vir1:
    True
[root@vir1 haproxy]# salt vir* test.ping
vir1:
    True
vir2:
    True
[root@vir1 ~]# salt vir2 cmd.run 'df -h'
vir2:
    Filesystem             Size  Used Avail Use% Mounted on
    /dev/mapper/rhel-root   17G  1.2G   16G   7% /
    devtmpfs               234M     0  234M   0% /dev
    tmpfs                  245M   12K  245M   1% /dev/shm
    tmpfs                  245M  4.5M  240M   2% /run
    tmpfs                  245M     0  245M   0% /sys/fs/cgroup
    /dev/vda1             1014M  139M  876M  14% /boot
    tmpfs                   49M     0   49M   0% /run/user/0
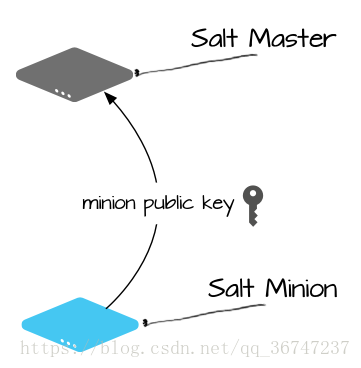
通过测试,salt master可以访问控制minion端。而且public key也被master接受到。 Salt master 重启或 Salt minion 解除验证后,该可变动的 AES 密钥均会自动更新。
[root@vir1 ~]# md5sum /etc/salt/pki/master/master.pub
9c1d3238bf403fdfcd6e2a287299f36d  /etc/salt/pki/master/master.pub

[root@vir2 salt]# md5sum /etc/salt/pki/minion/minion_master.pub
9c1d3238bf403fdfcd6e2a287299f36d  /etc/salt/pki/minion/minion_master.pub
[root@vir1 master]# tree .
.
├── master.pem
├── master.pub
├── minions
│ └── vir2
├── minions_autosign
├── minions_denied
├── minions_pre
└── minions_rejected三、SLS文件编写:
SLS(代表SaLt State文件)是Salt State系统的核心。SLS描述了系统的目标状态,由格式简单的数据构成。
本次以apache&php为例:
首先设置salt管理的root路径
[root@vir1 master]# vim /etc/salt/master
##开启master'
file_roots:
  base:
- /srv/salt[root@vir1 master]# mkdir /srv/salt
[root@vir1 salt]# mkdir httpd
##安装apache
[root@vir1 salt]# vim httpd/install.sls
apache-install:
pkg.installed: ##注意格式,不能使用Tab键
- pkgs:
- httpd
- php启动服务并更改配置文件等
[root@vir1 salt]# yum install python-setproctitle.x86_64 -y ##用于修改进程
[root@vir1 httpd]# mkdir files    ##创建目录存放SLS运行需要使用到的配置,安装包等
[root@vir1 httpd]# ls
files  install.sls
##配置文件并且修改端口测试
[root@vir2 salt]# scp /etc/httpd/conf/httpd.conf vir1:/srv/salt/httpd/files/
[root@vir1 httpd]# vim files/httpd.conf
Listen 8080##注意:此时两个文件的md5校验码不同
[root@vir2 salt]# md5sum /etc/httpd/conf/httpd.conf f5e7449c0f17bc856e86011cb5d152ba /etc/httpd/conf/httpd.conf
[root@vir1 httpd]# md5sum files/httpd.conf
04e9239e7bd5d5b9b85864226d60eee5 files/httpd.conf[root@vir1 httpd]# vim install.sls
apache-install:
pkg.installed:
- pkgs:
- httpd
- php ##安装的包
##配置文件
file.managed:
- name: /etc/httpd/conf/httpd.conf
- source: salt://httpd/files/httpd.conf
- mode: 644
- user: root
##开启服务
service.running:
- name: httpd
- enable: True
- reload: True
- watch:
- file: apache-install[root@vir1 httpd]# systemctl restart salt-master
[root@vir1 httpd]# salt vir2 state.sls httpd.install
vir2:
----------
ID: apache-install
Function: pkg.installed
Result: True
Comment: All specified packages are already installed
Started: 23:06:56.411742
Duration: 485.055 ms
Changes:
----------
ID: apache-install
Function: file.managed
Name: /etc/httpd/conf/httpd.conf
Result: True
Comment: File /etc/httpd/conf/httpd.conf updated
Started: 23:06:56.932617
Duration: 24.896 ms
Changes:
----------
diff:
---
+++
@@ -39,7 +39,7 @@
# prevent Apache from glomming onto all bound IP addresses.
#
#Listen 12.34.56.78:80
-Listen 80
+Listen 8080
#
# Dynamic Shared Object (DSO) Support
----------
ID: apache-install
Function: service.running
Name: httpd
Result: True
Comment: Service httpd is already enabled, and is running
Started: 23:06:56.958266
Duration: 169.688 ms
Changes:
----------
httpd:
True
Summary for vir2
------------
Succeeded: 3 (changed=2)
Failed: 0
------------
Total states run: 3
Total run time: 679.639 ms显示httpd安装成功,我们再测试一下端口和服务状态:
[root@vir2 salt]# systemctl status httpd | grep Active
   Active: active (running) since Thu 2018-08-16 23:06:57 EDT; 23s ago

[root@vir2 salt]# netstat -antlp | grep httpd
tcp6       0      0 :::8080                 :::*                    LISTEN      12666/httpd
而且,文件的md5 checksums都一致了。
[root@vir1 httpd]# md5sum files/httpd.conf
04e9239e7bd5d5b9b85864226d60eee5 files/httpd.conf
[root@vir2 salt]# md5sum /etc/httpd/conf/httpd.conf 04e9239e7bd5d5b9b85864226d60eee5 /etc/httpd/conf/httpd.conf四、使用SaltStack搭建Haproxy集群
使用源码安装Nginx:
[root@vir1 salt]# mkdir nginx
[root@vir1 salt]# vim nginx/install.sls

nginx-install:
  pkg.installed:
    - pkgs:
      - pcre-devel
      - openssl-devel
      - gcc                 ##依赖的安装包

  file.managed:            ##将nginx安装包从source路径传送到minion端
    - name: /mnt/nginx-1.14.0.tar.gz
    - source: salt://nginx/files/nginx-1.14.0.tar.gz
  cmd.run:
    - name: cd /mnt && tar zxf nginx-1.14.0.tar.gz && cd nginx-1.14.0 && sed -i.bak 's/#define NGINX_VER          "nginx\/" NGINX_VERSION/#define NGINX_VER          "nginx"/g' src/core/nginx.h && sed -i.bak 's/CFLAGS="$CFLAGS -g"/#CFLAGS="$CFLAGS -g"/g' auto/cc/gcc && ./configure --prefix=/usr/local/nginx --with-http_ssl_module --with-http_stub_status_module && make && make install && ln -s /usr/local/nginx/sbin/nginx /usr/sbin/nginx
    - creates: /usr/local/nginx
[root@vir1 salt]# salt vir2 state.sls nginx.install
vir2:
----------
ID: nginx-install
Function: pkg.installed
Result: True
Comment: 3 targeted packages were installed/updated.
Started: 02:03:28.277506
Duration: 26908.018 ms
Changes:
ID: nginx-install
Function: file.managed
Name: /mnt/nginx-1.14.0.tar.gz
Result: True
Comment: File /mnt/nginx-1.14.0.tar.gz updated
Started: 02:03:55.188380
Duration: 189.225 ms
Changes:
----------
diff:
New file
mode:
0644
----------
ID: nginx-install
Summary for vir2
------------
Succeeded: 3 (changed=3)
Failed: 0
------------
Total states run: 3
Total run time: 54.129 s除了编译,还需要添加nginx用户:
[root@vir1 salt]# vim nginx/nginx.sls
nginx-group:
  group.present:
    - name: nginx
    - gid: 800

nginx-user:
  user.present:
    - name: nginx
    - uid: 800
    - gid: 800
[root@vir1 salt]# salt vir2 state.sls nginx.nginx
vir2:
----------
ID: nginx-group
Function: group.present
Name: nginx
Result: True
Comment: New group nginx created
Changes:
----------
gid:
800
members:
name:
nginx
passwd:
x
----------
ID: nginx-user
Function: user.present
Name: nginx
Result: True
Changes:
----------
fullname:
gid:
800
groups:
- nginx
home:
/home/nginx
homephone:
name:
nginx
passwd:
x
roomnumber:
shell:
/bin/bash
uid:
800
workphone:
Summary for vir2
------------
Succeeded: 2 (changed=2)
Failed: 0
------------
Total states run: 2
Total run time: 663.453 msHaproxy配置
[root@vir1 salt]# pwd
/etc/salt
[root@vir1 salt]# mkdir /srv/salt/haproxy
[root@vir1 salt]# cd haproxy/


[root@vir1 haproxy]# mkdir files
[root@vir1 haproxy]# cp /etc/haproxy/haproxy.cfg ./files/
[root@vir1 haproxy]# vim install.sls
[root@vir1 haproxy]# vim install.sls
haproxy-install:
  pkg.installed:
    - pkgs:
      - haproxy

  file.managed:
    - name: /etc/haproxy/haproxy.cfg
    - source: salt://haproxy/files/haproxy.cfg

  service.running:
    - name: haproxy
    - reload: True
    - watch:
      - file: haproxy-install
[root@vir1 haproxy]# vim files/haproxy.cfg
frontend  main *:80
    default_backend             app

backend app
    balance     roundrobin
    server  app1 172.25.18.2:80 check
    server  app2 172.25.18.3:80 check

[root@vir1 haproxy]# cd ..
[root@vir1 salt]# vim /srv/salt/top.sls
base:
  ‘vir1’:
    - haproxy.install
  'vir2':
    - httpd.install
  'vir3':
    - nginx.service
[root@vir1 haproxy]# salt master state.sls haproxy.install
五、grains配置
[root@vir1 haproxy]# salt vir2 grains.item ipv4
vir2:
    ----------
    ipv4:
        - 127.0.0.1
        - 172.25.18.22
[root@vir1 haproxy]# salt vir2 grains.item os
vir2:
    ----------
    os:
        RedHat
[root@vir2 mnt]# vim /etc/salt/minion
grains:
roles:
- apache
[root@vir2 mnt]# systemctl restart salt-minion
[root@vir1 haproxy]# salt '*' grains.item roles
vir2:
----------
roles:
- apache
vir3:
----------
roles:
vir1:
----------[root@vir3 srv]# vim /etc/salt/grains
[root@vir3 srv]# systemctl restart salt-minion
roles:
nginx
[root@vir1 haproxy]# salt '*' grains.item roles
vir1:
----------
roles:
vir2:
----------
roles:
- apache
vir3:
----------
roles:
nginx[root@vir1 salt]# mkdir _grains
[root@vir1 salt]# cd _grains/
[root@vir1 _grains]# vim grains.py
---==---==---==---==---==---==---==---==---==---==---==---==
#!/usr/bin/enc python
def my_grains():
grains = {}
grains['hello'] = 'kitty'
grains['west'] = 'cow'
return grains
---==---==---==---==---==---==---==---==---==---==---==---==[root@vir1 _grains]# salt vir2 saltutil.sync_grains
vir2:
- grains.grains
[root@vir1 _grains]# salt vir2 grains.item hello
vir2:
    ----------
    hello:
        kitty


[root@vir1 _grains]# salt '*' grains.item west
vir3:
    ----------
    west:
vir2:
    ----------
    west:
        cow
vir1:
    ----------
    west:
[root@vir1 httpd]# cat install.sls
httpd:
pkg.installed
php:
pkg.installed
apache:
service.running:
- name: httpd
- enable: True
- reload: True
- watch:
- file: /etc/httpd/conf/httpd.conf
/etc/httpd/conf/httpd.conf:
file.managed:
- source: salt://httpd/files/httpd.conf
- mode: 644
- user: root
- template: jinja
- context:
bind: {{ grains['ipv4'][-1] }}
port: 8080
[root@vir1 httpd]# salt minion1 state.sls httpd.install六、pillar
| pillar和grains不一样,pillar是在master上定义的,并且是针对minion定义的信息,他不需要到minion上进行操作。 像一些重要的数据密码都可以存储在pillar上,pillar存储的是动态信息。 |
pillar是存储在master端,缓存在minion端,存储的是minion的一些配置信息。
- pillar是存储在master端,缓存在minion端,存储的是minion端的配置信息,是动态数据,不需要在minion上操作。需要在master的配置文件上开启pillar,并给每个pillar定义一个top入口。
- grains是存储在minion端,缓存在master端,存储的是minion在刚启动时收集的静态数据,如系统、cpu、内存等信息。需要在minion上定义grains。
[root@vir1 pillar]# vim /etc/salt/master
pillar_roots:              ##添加pillar根路径
  base:
    - /srv/pillar
[root@vir1 pillar]# vim top.sls
base:
'*':
- web.install[root@vir1 pillar]# salt '*' saltutil.refresh_pillar
vir3:
True
vir2:
True
vir1:
True
[root@vir1 pillar]# salt '*' pillar.items
vir1:
----------
vir2:
----------
webserver:
httpd
vir3:
----------
webserver:
nginx[root@vir1 pillar]# vim web/install.sls
{% if grains['fqdn'] == 'vir2' %}
webserver: httpd
{% elif grains['fqdn'] == 'vir3' %}
webserver: nginx
{% endif %}[root@vir1 pillar]# salt -G 'roles:apache' test.ping
vir2:
True
[root@vir1 pillar]# salt -G 'roles:nginx' test.ping
vir3:
True[root@vir1 pillar]# salt -I 'webserver:httpd' test.ping
vir2:
True
[root@vir1 pillar]# salt -I 'webserver:nginx' test.ping
vir3:
True七、Jinja模板
Jinja2是Python下一个被广泛应用的模版引擎。这是使用jinja模板在进行
[root@vir1 pillar]# vim /srv/salt/httpd/install.sls
httpd:
  pkg.installed

php:
  pkg.installed

apache:
  service.running:
    - name: httpd
    - enable: True
    - reload: True
    - watch:
      - file: /etc/httpd/conf/httpd.conf

/etc/httpd/conf/httpd.conf:    ##配置文件
  file.managed:
    - source: salt://httpd/files/httpd.conf
    - mode: 644
    - user: root
    - template: jinja
    - context:
        bind: 172.25.18.2   ##文件中添加的变量,便于批量管理
        port: 8080
[root@vir1 salt]# vim httpd/files/httpd.conf
Listen {{ bind }}:{{ port }}
[root@vir1 salt]# salt vir2 state.sls httpd.install
vir2:
----------
ID: httpd
Function: pkg.installed
Result: True
Comment: Package httpd is already installed
Started: 05:57:12.068949
Duration: 580.286 ms
Changes:
----------
ID: php
Function: pkg.installed
Result: True
Comment: Package php is already installed
Started: 05:57:12.649426
Duration: 0.55 ms
Changes:
----------
ID: /etc/httpd/conf/httpd.conf
Function: file.managed
Result: True
Comment: File /etc/httpd/conf/httpd.conf is in the correct state
Started: 05:57:12.652392
Duration: 59.618 ms
Changes:
----------
ID: apache
Function: service.running
Name: httpd
Result: True
Comment: The service httpd is already running
Started: 05:57:12.712211
Duration: 36.321 ms
Changes:
Summary for vir2
------------
Succeeded: 4
Failed: 0
------------
Total states run: 4
Total run time: 676.775 ms再minion端检测:
[root@vir2 mnt]# netstat -antlup | grep :80
tcp6       0      0 :::8080                 :::*                    LISTEN      12666/httpd
前面是直接在salt state文件中更改,除此之外,可以另外写一个SLS,再导入配置中,效果相同。
[root@vir1 httpd]# vim lib.sls
[root@vir1 httpd]# cat lib.sls
{% set port = 80 %}
[root@vir1 httpd]# cat install.sls
httpd:
  pkg.installed

php:
  pkg.installed

apache:
  service.running:
    - name: httpd
    - enable: True
    - reload: True
    - watch:
      - file: /etc/httpd/conf/httpd.conf

/etc/httpd/conf/httpd.conf:
  file.managed:
    - source: salt://httpd/files/httpd.conf
    - mode: 644
    - user: root
    - template: jinja
    - context:
        bind: 172.25.54.2
        port: 8080
[root@vir1 httpd]# vim files/httpd.conf
 {% from 'httpd/lib.sls' import port with context %}            ##在首行添加
[root@vir1 httpd]# salt minion1 state.sls httpd.install

+==+==+==+==+==+==+==+==+==+==+==+==+==+==+==+==
[root@vir2 minion]# cat /etc/httpd/conf/httpd.conf | head -n 137 | tail -n 1
Listen 172.25.54.2:80
[root@vir2 minion]#


 759
759


 被折叠的 条评论
为什么被折叠?
被折叠的 条评论
为什么被折叠?
 到【灌水乐园】发言


