


一,前期准备
1.下载hibernate相关jar包
2.mysql或者oracle数据库
二,项目搭建
1.新建java项目并导入hibernate相关jar包(http://hibernate.org/orm/releases/5.4/)及对应数据库驱动包
2.项目src目录下创建hibernate的配置文件 名为 hibernate.cfg.xml 配置连接数据库的信息
注意:在这里经过配置以后,数据库会自动生成实体类对应的表,无需手动创表
<?xml version="1.0" encoding="UTF-8"?>
<!DOCTYPE hibernate-configuration PUBLIC
    "-//Hibernate/Hibernate Configuration DTD 3.0//EN"
    "http://www.hibernate.org/dtd/hibernate-configuration-3.0.dtd">

<hibernate-configuration>
	<session-factory>
		<!-- property 元素用于配置Hibernate中的属性 键:值 -->
		<!-- hibernate.connection.driver_class : 连接数据库的驱动 -->
		<property name="hibernate.connection.driver_class">com.mysql.jdbc.Driver</property>

		<!-- hibernate.connection.username : 连接数据库的用户名 -->
		<property name="hibernate.connection.username">root</property>

		<!-- hibernate.connection.password : 连接数据库的密码 -->
		<property name="hibernate.connection.password">a</property>

		<!-- hibernate.connection.url : 连接数据库的地址,路径 -->
		<property name="hibernate.connection.url">jdbc:mysql://localhost:3306/test</property>

		<!-- show_sql: 操作数据库时,会 向控制台打印sql语句 -->
		<property name="show_sql">true</property>

		<!-- format_sql: 打印sql语句前,会将sql语句先格式化 -->
		<property name="format_sql">true</property>

		<!-- hbm2ddl.auto: 生成表结构的策略配置 update(最常用的取值): 如果当前数据库中不存在表结构,那么自动创建表结构.
			如果存在表结构,并且表结构与实体一致,那么不做修改 如果存在表结构,并且表结构与实体不一致,那么会修改表结构.会保留原有列.
			create(很少):无论是否存在表结构.每次启动Hibernate都会重新创建表结构.(数据会丢失)
			create-drop(极少): 无论是否存在表结构.每次启动Hibernate都会重新创建表结构.每次Hibernate运行结束时,删除表结构.
			validate(很少):不会自动创建表结构.也不会自动维护表结构.Hibernate只校验表结构. 如果表结构不一致将会抛出异常. -->
		<property name="hbm2ddl.auto">update</property>

		<!-- 数据库方言配置 org.hibernate.dialect.MySQLDialect (选择最短的) -->
		<property name="hibernate.dialect">org.hibernate.dialect.MySQLDialect</property>

		<!-- hibernate.connection.autocommit: 事务自动提交 -->
		<property name="hibernate.connection.autocommit">true</property>

		<!-- 将Session与线程绑定=> 只有配置了该配置,才能使用getCurrentSession -->
		<property name="hibernate.current_session_context_class">thread</property>

		<!-- 引入ORM 映射文件 填写src之后的路径 -->
		<mapping resource="com/hibernate/pojo/product.hbm.xml" />
	</session-factory>
</hibernate-configuration>
3. 实体类 Product
package com.hibernate.pojo;

import java.io.Serializable;

public class Product implements Serializable {

	private static final long serialVersionUID = -366926015333601797L;
	private Integer id; // 唯一标志符
	private String name; // 产品名称
	private Double price; // 价格
	private String factory;// 生产商
	private String remark; // 备注

	public Product() {
		super();
		// TODO Auto-generated constructor stub
	}

	public Product(Integer id, String name, Double price, String factory, String remark) {
		super();
		this.id = id;
		this.name = name;
		this.price = price;
		this.factory = factory;
		this.remark = remark;
	}

	public Integer getId() {
		return id;
	}

	public void setId(Integer id) {
		this.id = id;
	}

	public String getName() {
		return name;
	}

	public void setName(String name) {
		this.name = name;
	}

	public Double getPrice() {
		return price;
	}

	public void setPrice(Double price) {
		this.price = price;
	}

	public String getFactory() {
		return factory;
	}

	public void setFactory(String factory) {
		this.factory = factory;
	}

	public String getRemark() {
		return remark;
	}

	public void setRemark(String remark) {
		this.remark = remark;
	}

	@Override
	public String toString() {
		return "Product [id=" + id + ", name=" + name + ", price=" + price + ", factory=" + factory + ", remark="
				+ remark + "]";
	}

}
4.实体类映射文件 product.hbm.xml (注意:命名规则以 .hbm.xml 结尾)
<?xml version="1.0" encoding="UTF-8"?>
<!DOCTYPE hibernate-mapping PUBLIC
    "-//Hibernate/Hibernate Mapping DTD 3.0//EN"
    "http://www.hibernate.org/dtd/hibernate-mapping-3.0.dtd">
<hibernate-mapping>
	<class name="com.hibernate.pojo.Product" table="tb_product">
		<id name="id" column="id" type="int">
			<!-- 此处定义主键生成策略:native(根据底层数据库对自动从生成标志符的支持能力选择identity,sequence或hilo) -->
			<generator class="native" />
		</id>
		<property name="name" type="string" not-null="true" length="50">
			<column name="name" ></column>
		</property>
		<property name="price" type="double" not-null="true">
			<column name="price" ></column>
		</property>
		<property name="factory" type="string" not-null="true"
			length="50">
			<column name="factory" ></column>
		</property>
		<property name="remark" type="string" not-null="true" length="50">
			<column name="remark" ></column>
		</property>
	</class>
</hibernate-mapping>
5. 获取 session的工具类 HibernateUtil
这里采用 ThreadLocal保存session,ThreadLocal用于保存某个线程共享变量:对于同一个static ThreadLocal,
不同线程只能从中get,set,remove自己的变量,而不会影响其他线程的变量,避免了多线程共享数据的问题。
package com.hibernate.util;

import org.hibernate.HibernateException;
import org.hibernate.Session;
import org.hibernate.SessionFactory;
import org.hibernate.cfg.Configuration;

public class HibernateUtil {
	// ThreadLocal用于保存某个线程共享变量:对于同一个static ThreadLocal,
	// 不同线程只能从中get,set,remove自己的变量,而不会影响其他线程的变量,避免了多线程共享数据的问题。
	private static final ThreadLocal<Session> threadLocal = new ThreadLocal<Session>();
	private static SessionFactory sessionFactory = null; // sessionFactory对象
	// 获取sessionFactory

	static {
		try {
			// 加载hibernate配置文件(默认加载classpath根目录下的hibernate.cfg.xml)
			Configuration cfg = new Configuration().configure();
			sessionFactory = cfg.buildSessionFactory();// 创建sessionFactory对象
		} catch (HibernateException e) {
			// TODO Auto-generated catch block
			e.printStackTrace();
		}
	}

	/**
	 * 获取session
	 *
	 * @return
	 * @throws HibernateException
	 */

	public static Session getSession() throws HibernateException {
		Session session = (Session) threadLocal.get();
		if (session == null || !session.isOpen()) { // session为空或session关闭
			if (sessionFactory == null) {
				rebuildSessionFactory();
			}
			session = (sessionFactory != null) ? sessionFactory.openSession() : null;
			threadLocal.set(session);
		}

		return session;
	}

	/**
	 * 重建会话工厂
	 */
	public static void rebuildSessionFactory() {
		try {
			Configuration cfg = new Configuration().configure();// 加载hibernate配置文件
			sessionFactory = cfg.buildSessionFactory();// 创建sessionFactory对象
		} catch (HibernateException e) {
			System.err.println("创建会话工厂失败...");
			e.printStackTrace();
		}
	}

	/**
	 * 获取sessionFactory对象
	 */
	public static SessionFactory getSessionFactory() {
		return sessionFactory;
	}

	/**
	 * 关闭session
	 */
	public static void closeSession() throws HibernateException {
		Session session = (Session) threadLocal.get();
		threadLocal.set(null);
		if (session != null) {
			session.close();
		}
	}

}
6.和数据库进行交互,实现增删查改 ProductDao
package com.hibernate.dao;

import org.hibernate.HibernateException;
import org.hibernate.Session;

import com.hibernate.pojo.Product;
import com.hibernate.util.HibernateUtil;

public class ProductDao {

	/**
	 * 添加
	 *
	 * @param product
	 */
	public void add(Product product) {
		Session session = null;// 声明session对象
		// hibernate的持久化操作
		try {
			session = HibernateUtil.getSession();// 获取session
			session.beginTransaction();// 开启事务
			session.save(product);// 执行数据库添加操作
			session.getTransaction().commit();// 提交事务
			System.out.println("数据添加成功...");
		} catch (HibernateException e) {
			session.getTransaction().rollback();// 回滚
			System.err.println("数据添加失败!");
			e.printStackTrace();
		} finally {
			HibernateUtil.closeSession();// 关闭session对象
		}
	}

	/**
	 * 查询
	 *
	 * @param id
	 */
	public void select(Integer id) {
		Session session = null;// 声明session对象
		// hibernate的持久化操作
		try {
			session = HibernateUtil.getSession();// 获取session
			Product product = (Product) session.get(Product.class, id);// 根据id查询,装载product对象
			System.out.println("查询结果: " + product);
		} catch (HibernateException e) {
			System.err.println("数据查询失败!");
			e.printStackTrace();
		} finally {
			HibernateUtil.closeSession();// 关闭session对象
		}
	}

	/**
	 * 删除
	 *
	 * @param id
	 */
	public void delete(Integer id) {
		Session session = null;// 声明session对象
		// hibernate的持久化操作
		try {
			session = HibernateUtil.getSession();// 获取session
			Product product = (Product) session.get(Product.class, id);// 根据id装载product对象
			session.delete(product); // 删除持久化对象
			session.flush();// 强制刷新提交
			System.out.println("已成功删除id为: " + product.getId()+"的信息!");
		} catch (HibernateException e) {
			System.err.println("数据删除失败!");
			e.printStackTrace();
		} finally {
			HibernateUtil.closeSession();// 关闭session对象
		}
	}

	/**
	 * 修改
	 *
	 * @param product
	 */
	public void update(Product newProduct) {
		Session session = null;// 声明session对象
		// hibernate的持久化操作
		try {
			session = HibernateUtil.getSession();// 获取session
			Product product = (Product) session.get(Product.class, newProduct.getId());// 根据id装载product对象
			product.setRemark(newProduct.getRemark());
			session.flush();// 强制刷新提交
			System.out.println("数据修改成功...");
		} catch (HibernateException e) {
			System.err.println("数据修改失败!");
			e.printStackTrace();
		} finally {
			HibernateUtil.closeSession();// 关闭session对象
		}
	}

}
7.单元测试类 ProductTest (在需要执行的方法上右击运行即可)
package com.hibernate.test;

import org.junit.Before;
import org.junit.Test;

import com.hibernate.dao.ProductDao;
import com.hibernate.pojo.Product;

public class ProductTest {
	ProductDao productDao = null;

	@Before
	public void init() {
		productDao = new ProductDao();
	}

	@Test
	public void addTest() {

		Product product = new Product();
		product.setName("Hibernate初级");
		product.setPrice(78.0);
		product.setFactory("ByVean");
		product.setRemark("无");
		productDao.add(product); // 添加操作
	}

	@Test
	public void selectTest() {
		productDao.select(1);// 查询操作(根据id查)
	}

	@Test
	public void updateTest() {
		Product product = new Product();
		product.setId(1); //需要修改的id
		product.setRemark("已修改"); //修改指定属性
		productDao.update(product);
	}

	@Test
	public void deleteTest() {
		productDao.delete(1);// 删除操作(根据id删)
	}
}
三,运行结果
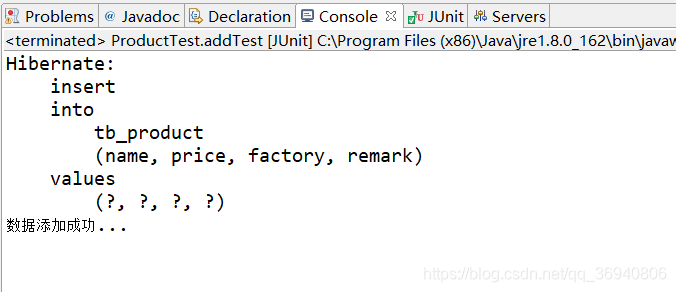
1.添加操作
控制台打印信息
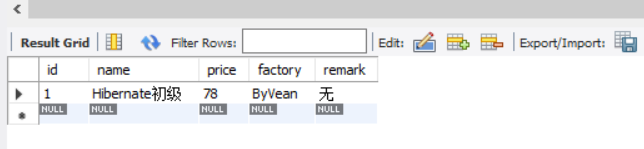
数据库信息
2.查找操作
控制台打印信息

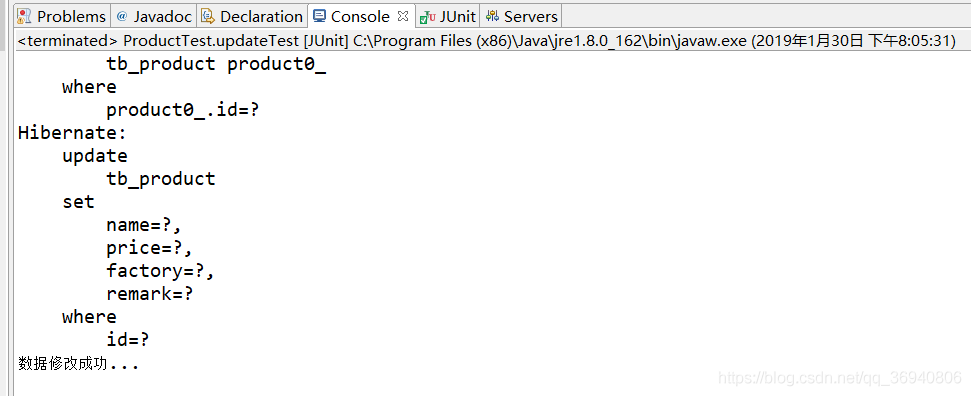
3.修改操作
控制台打印信息
数据库信息

4.删除操作
控制台打印信息

数据库信息


 1707
1707


 被折叠的 条评论
为什么被折叠?
被折叠的 条评论
为什么被折叠?
 到【灌水乐园】发言


