


一. 项目实现
此项目的目的很简单, 只是一个小白练手项目, 简单的登录注册操作.
使用工具: Mysql7.0 Myeclipse2017 相关jar包( 如果找不到可以留言, 我可以发邮箱)
实现的功能 : 数据库中存有用户数据, 用户通过用户名和密码登录到系统. 访客通过注册也可以登录系统, 可以进行进一步的操作.
二. 项目流程
(1). 项目数据库设计
本人安装的是Mysql7, 使用Navicat进行操作.
新建数据库personmessage数据库, 创建表格user, 表格设计如下:
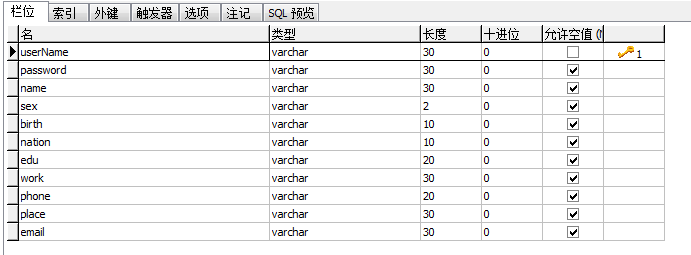
ps: 由于此项目会有后续开发, 所以表格中会多一些其它的属性. 并不影响操作
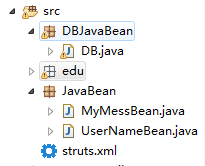
(2). 项目文件结构
src:
WebRoot:
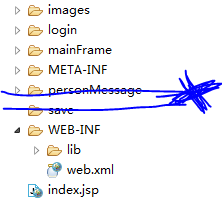
被涂画掉的和未使用的是暂时不需要的部分.
(3). 用户登录和注册功能的实现
基础工作, 新建Web Service Project工程, 按照上文的目录结构创建目录.
Step 1: 页面JSP设计:
先导入配置包Struts2.1包. 因为我们这是我们的框架, 这里我们用上的是s标签.
代码如下, 注意点:
1. 使用s标签需要加入第七行的代码, @与taglib之间不要有空格
<%@taglib prefix="s" uri="/struts-tags" %>
使用s标签时同时也要注意, 例如
<s:form action="loginAction" methon="post">中间的s:form也不要有空格.
2. 第八行的代码也别忘记<%=request.getContextPath() %>, 因为本人在做事就出现图片无法显示的问题, 是应为相对路径不可用. 所以加上这行代码, 吧路径变为绝对路径, 这样图片才可以正常显示.
3. 编码的话就用UTF-8.
登录页面: index.jsp
<%@ page language="java" import="java.util.*" pageEncoding="UTF-8"%>
<%
String path = request.getContextPath();
String basePath = request.getScheme()+"://"+request.getServerName()+":"+request.getServerPort()+path+"/";
%>
<!-- s标签不要空格!!!!!! -->
<%@taglib prefix="s"  uri="/struts-tags" %>
<%=request.getContextPath() %>
<!DOCTYPE HTML PUBLIC "-//W3C//DTD HTML 4.01 Transitional//EN">
<html>
  <head>

    <title>My JSP 'index.jsp' starting page</title>
    <meta http-equiv="Content-Type" content="text/html; charset=UTF-8">
	<meta http-equiv="pragma" content="no-cache">
	<meta http-equiv="cache-control" content="no-cache">
	<meta http-equiv="expires" content="0">
	<meta http-equiv="keywords" content="keyword1,keyword2,keyword3">
	<meta http-equiv="description" content="This is my page">
	<!--
	<link rel="stylesheet" type="text/css" href="styles.css">
	-->

  </head>

  <body bgcolor="#CCCCFF">
		<s:form action="loginAction" methon="post">
		<table align="center" width ="100%">
			<tr>
				<td align="right" width="50%">
					<img src="../images/cc.gif" alt="为之则易, 不为则难"
					height="80"/>
				</td>
				<td align="left" width="50%">
					<h1>个人信息管理系统</h1>
				</td>
			</tr>
			<tr>
				<td colspan="2">
					<hr align="center" width="100%" size="20"
					color="green"/>
				</td>
			</tr>
			<tr>
				<td width="30%" align="center">
					<img src="../images/a.jpg" alt="长城"  height="280"/>
				</td>
				<td width="70%">
					<table border ="5" align= "center" bgcolor="#99aadd">
						<tr>
							<td>
								<s:textfield name="userName"
								lable="登录名" size="16"/>
							</td>
						</tr>
						<tr>
							<td>
								<s:password name="password"
								lable="登录密码" size="18"/>
							</td>
						</tr>
						<tr>
							<td colspan="2" align="center">
								<input type="submit"	 value="确定">

								<input type="reset" value="清空">
							</td>
						</tr>
						<tr>
							<td colspan="2" align="center">
								<s:a href="http://localhost:8080/Information_system/login/register.jsp">注册</s:a>
							</td>
						</tr>
					</table>
				</td>
			</tr>
		</table>
	</s:form>

	</body>
</html>
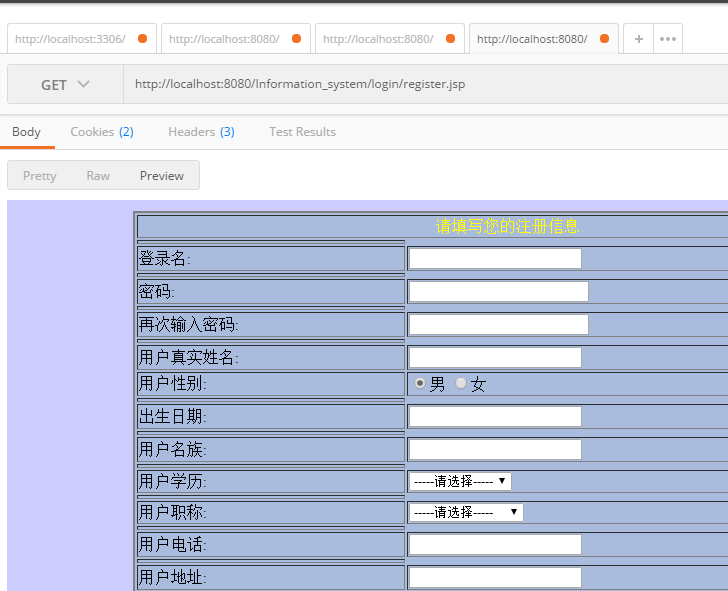
注册按钮: register.jsp
<%@ page language="java" import="java.util.*" pageEncoding="UTF-8"%>
<%
String path = request.getContextPath();
String basePath = request.getScheme()+"://"+request.getServerName()+":"+request.getServerPort()+path+"/";
%>
<%@taglib prefix="s"  uri="/struts-tags" %>
<!DOCTYPE HTML PUBLIC "-//W3C//DTD HTML 4.01 Transitional//EN">
<html>
  <head>
    <base href="<%=basePath%>">

    <title>注册页面</title>

	<meta http-equiv="pragma" content="no-cache">
	<meta http-equiv="cache-control" content="no-cache">
	<meta http-equiv="expires" content="0">
	<meta http-equiv="keywords" content="keyword1,keyword2,keyword3">
	<meta http-equiv="description" content="This is my page">
	<!--
	<link rel="stylesheet" type="text/css" href="styles.css">
	-->

  </head>

 <body bgcolor="#CCCCFF">
		<s:form action="registerAction" methon="post">
		<table align="center" >
			<tr>
				<td width="40%">
					<table border="2" bgcolor="#AABBCCDD"
					width="100% " align="center">
					<tr>
						<td colspan="2" align="center">
							<font color="yellow">
								<s:text name="请填写您的注册信息"/>

							</font>

						</td>
					</tr>
					<tr>
						<td>
							<s:textfield name="userName"
							label="登录名"/>
						</td>
					</tr>
					<tr>
						<td>
							<s:password name="password1"
							label="密码" size="21"/>

						</td>
					</tr>
					<tr>
						<td>
							<s:password name="password2"
							label="再次输入密码" size="21"/>

						</td>
					</tr>
					<tr>
						<td>
							<s:textfield name="name"
							label="用户真实姓名"/>

						</td>
					</tr>
					<tr>
						<td>
							<s:text name="用户性别:"></s:text>
						</td>
						<td>
							<input type="radio" name="sex"
							value="男" checked/>男
							<input type="radio" name="sex"
							value="女" />女
						</td>
					</tr>
					<tr>
						<td>
							<s:textfield name="birth" label="出生日期"/>

						</td>
					</tr>
					<tr>
						<td>
							<s:textfield name="nation"
							label="用户名族"/>

						</td>
					</tr>
					<tr>
						<td>
							<s:select name="edu" label="用户学历"
							headerValue="-----请选择-----"
							headerKey="1" list="{'博士','硕士','本科','专科','高中','初中','小学','其它'}">
							</s:select>
						</td>
					</tr>
					<tr>
						<td>
							<s:select name="work" label="用户职称"
							headerValue="-----请选择-----"
							headerKey="1" list="{'软件测试工程师','软件开发工程师','教师','学生','职员','经理','老板','公务员','其它'}">
							</s:select>
						</td>
					</tr>
					<tr>
						<td>
							<s:textfield name="phone"
							label="用户电话"/>
						</td>
					</tr>
					<tr>
						<td>
							<s:textfield name="place"
							label="用户地址"/>
						</td>
					</tr>
					<tr>
						<td>
							<s:textfield name="email"
							label="用户邮箱"/>
						</td>
					</tr>
					<tr>
						<td colspan="2" align="center">
							<input type="submit" value="确定"/>

							<input type="reset" value="清空"/>

							<s:a href="http://localhost:8080/Information_system/login/index.jsp">返回</s:a>

						</td>
					</tr>


					</table>
				</td>

		</table>
	</s:form>

	</body>
</html>
Step2: 实现数据库通用类JavaBean
这一步是最简单的了, 我是非此专业学生不太清除, 如有不对请多多指教. 大概操作是: 定义该数据库某张表的所有变量, 只需要写4到12行代码, 下面的都出来了. 用getter和setter方法直接生成后面的get和set方法.
package JavaBean;

public class MyMessBean {
	private String name;
	private String sex;
	private String birth;
	private String nation;
	private String edu;
	private String work;
	private String phone;
	private String place;
	private String email;
	public MyMessBean(){

	}
	public String getName() {
		return name;
	}
	public void setName(String name) {
		this.name = name;
	}
	public String getSex() {
		return sex;
	}
	public void setSex(String sex) {
		this.sex = sex;
	}
	public String getBirth() {
		return birth;
	}
	public void setBirth(String birth) {
		this.birth = birth;
	}
	public String getNation() {
		return nation;
	}
	public void setNation(String nation) {
		this.nation = nation;
	}
	public String getEdu() {
		return edu;
	}
	public void setEdu(String edu) {
		this.edu = edu;
	}
	public String getWork() {
		return work;
	}
	public void setWork(String work) {
		this.work = work;
	}
	public String getPhone() {
		return phone;
	}
	public void setPhone(String phone) {
		this.phone = phone;
	}
	public String getPlace() {
		return place;
	}
	public void setPlace(String place) {
		this.place = place;
	}
	public String getEmail() {
		return email;
	}
	public void setEmail(String email) {
		this.email = email;
	}


}
Step3: 数据库连接及操作类DB.java
这一步还是很关键的, 因为连接数据库就靠这个类了, 在后面的登录和注册的Action的要通过这个类进行连接数据库, 和数据库操作. 即这个类封装了项目中所有与数据库有关的方法.
几点注意事项:
1.关于数据库连接, 我在Myeclipse里没有找到相应的包, 希望知道的能够留言告诉我. 我是自己复制了mysql-connection-bin.jar包到我的lib目录下.
2. 14,15,16请改为自己数据库的相关内容.
3. 数据库是否安装并正确启用请参考: 数据库连接测试
package DBJavaBean;
import java.sql.Connection;
import java.sql.DriverManager;
import java.sql.ResultSet;
import java.sql.Statement;
import java.util.ArrayList;
import javax.servlet.http.HttpServletRequest;
import javax.servlet.http.HttpSession;
import org.apache.struts2.interceptor.ServletRequestAware;
import JavaBean.MyMessBean;
import JavaBean.UserNameBean;
public class DB implements ServletRequestAware {
	private String driverName = "com.mysql.jdbc.Driver";
	private String url = "jdbc:mysql://localhost:3306/personmessage";
	private String username = "root";
	private String password = "root";
	private Connection conn = null;
	private Statement st = null;
	private ResultSet rs = null;
	private HttpServletRequest request;
	public DB() {
	}
	public String getDriverName() {
		return driverName;
	}
	public void setDriverName(String driverName) {
		this.driverName = driverName;
	}
	public String getUrl() {
		return url;
	}
	public void setUrl(String url) {
		this.url = url;
	}
	public String getUsername() {
		return username;
	}
	public void setUsername(String username) {
		this.username = username;
	}
	public String getPassword() {
		return password;
	}
	public void setPassword(String password) {
		this.password = password;
	}
	@Override
	public void setServletRequest(HttpServletRequest hsr) {
		// TODO Auto-generated method stub
		request = hsr;
	}
	public Statement getStatement() {
		try {
			Class.forName(getDriverName());
			conn = DriverManager.getConnection(url, username, password);
			return conn.createStatement();
		} catch (Exception e) {
			e.printStackTrace();
			return null;
		}
	}
	public ResultSet selectMess(HttpServletRequest request, String userName) {
		try {
			String sql = "select * from user where userName='" + userName + "'";
			st = getStatement();
			return st.executeQuery(sql);
		} catch (Exception e) {
			e.printStackTrace();
			return null;
		}
	}
	public String myMessage(HttpServletRequest request, String userName) {
		try {
			ArrayList listName = null;
			HttpSession session = request.getSession();
			listName = new ArrayList();
			rs = selectMess(request, userName);
			while (rs.next()) {
				MyMessBean mess = new MyMessBean();
				mess.setName(rs.getString("name"));
				mess.setSex(rs.getString("sex"));
				mess.setBirth(rs.getString("birth"));
				mess.setEdu(rs.getString("edu"));
				mess.setWork(rs.getString("work"));
				mess.setPhone(rs.getString("phone"));
				mess.setPlace(rs.getString("place"));
				mess.setEmail(rs.getString("email"));
				listName.add(mess);
				session.setAttribute("MyMess", listName);
			}
			return "ok";
		} catch (Exception e) {
			e.printStackTrace();
			return null;
		}
	}
	public ResultSet selectLogin(HttpServletRequest request, String userName,
			String password) {
		try {
			String sql = "select * from user where userName='" + userName
					+ "' and password='" + password + "'";
			st = getStatement();
			return st.executeQuery(sql);
		} catch (Exception e) {
			e.printStackTrace();
			return null;
		}
	}
	public String myLogin(HttpServletRequest request, String userName) {
		try {
			ArrayList listName = null;
			HttpSession session = request.getSession();
			listName = new ArrayList();
			rs = selectMess(request, userName);
			if (rs.next()) {
				rs = selectMess(request, userName);
				while (rs.next()) {
					UserNameBean mess=new UserNameBean();
					mess.setUserName(rs.getString("userName"));
					mess.setPassword(rs.getString("password"));
					listName.add(mess);
					session.setAttribute("userName",listName);
				}
			} else {
				session.setAttribute("userName", listName);
			}
			return "ok";
		} catch (Exception e) {
			e.printStackTrace();
			return null;
		}
	}
	public String addList(HttpServletRequest request, String userName) {
		String sure = null;
		String login = myLogin(request, userName);
		if (login.equals("ok")) {
			sure = "ok";
		} else {
			sure = null;
		}
		return sure;
	}
	public String insertMess(HttpServletRequest request, String userName,
			String password, String name, String sex, String birth,
			String nation, String edu, String work, String phone, String place,
			String email) {
		try {
			String sure = null;
			rs = selectMess(request, userName);
			if (rs.next()) {
				sure = "one";
			} else {
				String sql = "insert into user values('" + userName + "','"
						+ password + "','" + name + "','" + sex + "','" + birth
						+ "','" + nation + "','" + edu + "','" + work + "','"
						+ phone + "','" + place + "','" + email + "')";
				st=getStatement();
				int row=st.executeUpdate(sql);
				if(row==1){
					String mess=myMessage(request, userName);
					if(mess.equals("ok")){
						sure="ok";
					}else{
						sure=null;
					}
				}else{
					sure=null;
				}
			}
			return sure;
		} catch (Exception e) {
			e.printStackTrace();
			return null;
		}
	}
}
Step4: 登录页面对应的业务控制器类LoginAction
代码的第七行, ActionSupport和ServletRequestAware是自带的包中的类, 直接鼠标悬停导入他推荐的包就好了.
调用了之前写的DB.java中的很多方法去操作数据库
package edu.login.Action;
import java.sql.ResultSet;
import javax.servlet.http.HttpServletRequest;
import org.apache.struts2.interceptor.ServletRequestAware;
import DBJavaBean.DB;
import com.opensymphony.xwork2.ActionSupport;
public class LoginAction extends ActionSupport implements ServletRequestAware {
	private String userName;
	private String password;
	private ResultSet rs = null;
	private String message = ERROR;
	private HttpServletRequest request;
	public String getUserName() {
		return userName;
	}
	public void setUserName(String userName) {
		this.userName = userName;
	}
	public String getPassword() {
		return password;
	}
	public void setPassword(String password) {
		this.password = password;
	}
	@Override
	public void setServletRequest(HttpServletRequest hsr) {
		// TODO Auto-generated method stub
		request=hsr;
	}
	public void validate(){
		if(this.getUserName()==null||this.getUserName().length()==0){
			addFieldError("username", "请输入登录名字!");
		}else{
			try{
				DB mysql=new DB();
				rs=mysql.selectMess(request, this.getUserName());
				if(!rs.next()){
					addFieldError("username", "此用户尚未注册!");
				}
			}catch(Exception e){
				e.printStackTrace();
			}
		}
		if(this.getPassword()==null||this.getPassword().length()==0){
			addFieldError("password", "请输入登录密码!");
		}else{
			try{
				DB mysql=new DB();
				rs=mysql.selectMess(request, this.getUserName());
				if(rs.next()){
					rs=mysql.selectLogin(request, this.getUserName(), this.getPassword());
				}
				if(!rs.next()){
					addFieldError("password", "登录密码错误!");
				}
			}catch(Exception e){
				e.printStackTrace();
			}
		}
	}
	public String execute() throws Exception{
		DB mysql=new DB();
		String add=mysql.addList(request,this.getUserName());
		if(add.equals("ok")){
			message=SUCCESS;
		}
		return message;
	}
}
Step5: 注册页面对应的业务控制器类RegisterAction
调用了之前写的DB.java中的很多方法去操作数据库
package edu.login.Action;
import java.sql.ResultSet;
import javax.servlet.http.HttpServletRequest;
import org.apache.struts2.interceptor.ServletRequestAware;
import DBJavaBean.DB;
import com.opensymphony.xwork2.ActionSupport;
public class RegisterAction extends ActionSupport implements
		ServletRequestAware {
	private String userName;
	private String password1;
	private String password2;
	private String name;
	private String sex;
	private String birth;
	private String nation;
	private String edu;
	private String work;
	private String phone;
	private String place;
	private String email;
	private ResultSet rs = null;
	private String message = ERROR;
	private HttpServletRequest request;
	public String getUserName() {
		return userName;
	}
	public void setUserName(String userName) {
		this.userName = userName;
	}
	public String getPassword1() {
		return password1;
	}
	public void setPassword1(String password1) {
		this.password1 = password1;
	}
	public String getPassword2() {
		return password2;
	}
	public void setPassword2(String password2) {
		this.password2 = password2;
	}
	public String getName() {
		return name;
	}
	public void setName(String name) {
		this.name = name;
	}
	public String getSex() {
		return sex;
	}
	public void setSex(String sex) {
		this.sex = sex;
	}
	public String getBirth() {
		return birth;
	}
	public void setBirth(String birth) {
		this.birth = birth;
	}
	public String getNation() {
		return nation;
	}
	public void setNation(String nation) {
		this.nation = nation;
	}
	public String getEdu() {
		return edu;
	}
	public void setEdu(String edu) {
		this.edu = edu;
	}
	public String getWork() {
		return work;
	}
	public void setWork(String work) {
		this.work = work;
	}
	public String getPhone() {
		return phone;
	}
	public void setPhone(String phone) {
		this.phone = phone;
	}
	public String getPlace() {
		return place;
	}
	public void setPlace(String place) {
		this.place = place;
	}
	public String getEmail() {
		return email;
	}
	public void setEmail(String email) {
		this.email = email;
	}
	@Override
	public void setServletRequest(HttpServletRequest hsr) {
		// TODO Auto-generated method stub
		request = hsr;
	}
	public void validate() {
		if (this.getUserName() == null || this.getUserName().length() == 0) {
			addFieldError("username", "登录名字不允许为空!");
		} else {
			try {
				DB mysql = new DB();
				rs = mysql.selectMess(request, this.getUserName());
				if (rs.next()) {
					addFieldError("userName", "此登录名字已存在!");
				}
			} catch (Exception e) {
				e.printStackTrace();
			}
		}
		if (this.getPassword1() == null || this.getPassword1().length() == 0) {
			addFieldError("password1", "登录密码不允许为空!");
		}
		if (this.getPassword2() == null || this.getPassword2().length() == 0) {
			addFieldError("password2", "重复密码不允许为空!");
		}
		if (!(getPassword1().equals(getPassword2()))) {
			addFieldError("password2", "两次密码不一致!");
		}
		if (this.getName() == null || this.getName().length() == 0) {
			addFieldError("name", "用户姓名不允许为空!");
		}
		if (this.getBirth() == null || this.getBirth().length() == 0
				|| getBirth().equals("yyyy-MM-dd")) {
			addFieldError("birth", "用户生日不允许为空!");
		} else {
			if (getBirth().length() != 10) {
				addFieldError("birth", "用户生日格式为'yyyy-MM-dd'!");
			} else {
				String an = this.getBirth().substring(4, 5);
				String bn = this.getBirth().substring(7, 8);
				if (!(an.equals("-")) || !(bn.equals("-"))) {
					addFieldError("birth", "用户生日格式为'yyyy-MM-dd'!");
				}
			}
		}
		if (this.getNation() == null || this.getNation().length() == 0) {
			addFieldError("nation", "用户民族不允许为空!");
		}
		if (getEdu().equals("1")) {
			addFieldError("edu", "请选择用户学历!");
		}
		if (getWork().equals("1")) {
			addFieldError("work", "请选择用户工作!");
		}
		if (this.getPhone() == null || this.getPhone().length() == 0) {
			addFieldError("phone", "用户电话不允许为空!");
		}
		if (this.getPlace() == null || this.getPlace().length() == 0) {
			addFieldError("place", "用户地址不允许为空!");
		}
		if (this.getEmail() == null || this.getEmail().length() == 0) {
			addFieldError("email", "用户email不允许为空!");
		}
	}
	public String execute() throws Exception {
		DB mysql = new DB();
		String mess = mysql.insertMess(request, this.getUserName(),
				this.getPassword1(), this.getName(), this.getSex(),
				this.getBirth(), this.getNation(), this.getEdu(),
				this.getWork(), this.getPhone(), this.getPlace(),
				this.getEmail());
		if (mess.equals("ok")) {
			message = SUCCESS;
		} else if (mess.equals("one")) {
			message = INPUT;
		}
		return message;
		// return "success";
	}
}
Step6: 在struts.xml中配置Action
这点也是很关键, 因为以上所有的操作都是靠这个文件来调配的.
注意一点你导入的struts的版本是多小就写多少, 最好要对应, 一面发生错误.
<?xml version="1.0" encoding="UTF-8"?>
<!DOCTYPE struts PUBLIC
"-//Apache Software Foundation//DTD Struts Configuration 2.1//EN"
"http://struts.apache.org/dtds/struts-2.1.dtd">
<struts>
		        <!--Configuration for the default packet.-->
		<package name="default"  extends="struts-default">
			<action name="loginAction" class="edu.login.Action.LoginAction">
				<result name="success">/mainFrame/main.jsp</result>
				<result name="input">/login/index.jsp</result>
				<result name="error">/login/index.jsp</result>
			</action>
			<action name="registerAction" class="edu.login.Action.RegisterAction">
				<result name="success">/login/index.jsp</result>
				<result name="input">/login/register.jsp</result>
				<result name="error">/login/register.jsp</result>
			</action>
	</package>
</struts>
Step7: 创建UserNameBean类
创建过程就不多讲了, 和上面的Bean操作一样
通过DB中的myLogin()方法把用户登录名保存在session里,并在jsp页面中通过调用session方法,获取在DB类中myLogin()方法保存的数据。
package JavaBean;

public class UserNameBean {
	private String userName;
	private String password;
	public UserNameBean(){

	}
	public String getUserName() {
		return userName;
	}
	public void setUserName(String userName) {
		this.userName = userName;
	}
	public String getPassword() {
		return password;
	}
	public void setPassword(String password) {
		this.password = password;
	}

}
Step8: 系统主页
这是登录成功后的页面, 自由设计吧
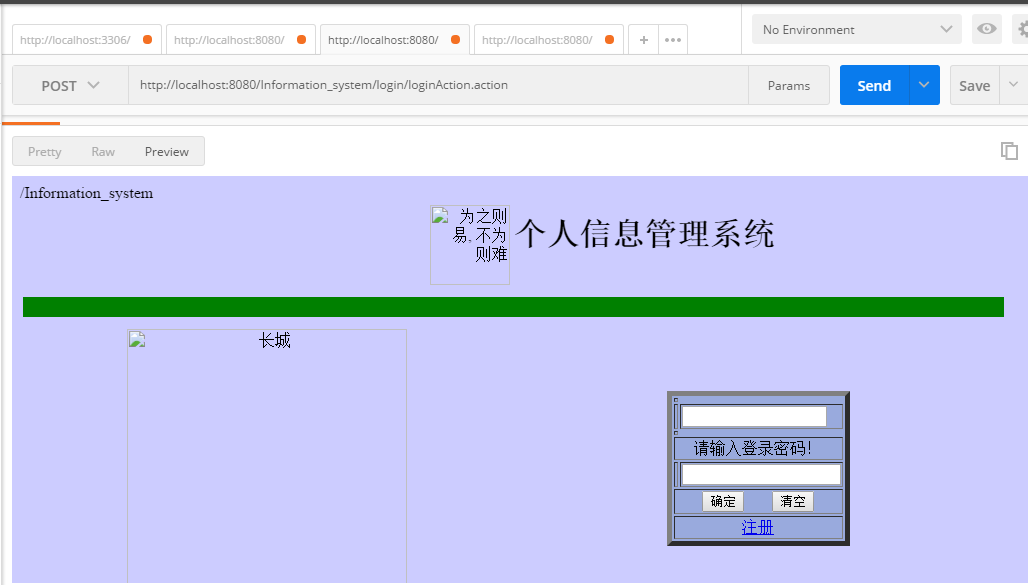
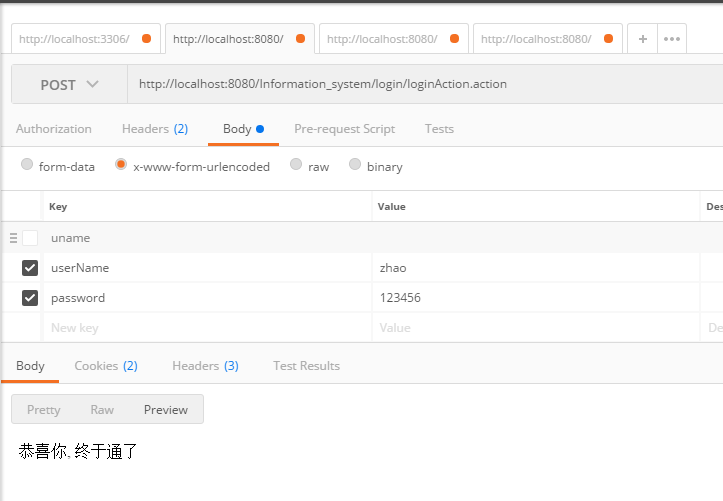
三. POSTMAN调试
调试结果


 2万+
2万+


 被折叠的 条评论
为什么被折叠?
被折叠的 条评论
为什么被折叠?
 到【灌水乐园】发言


