


SSH
Struts 简单应用
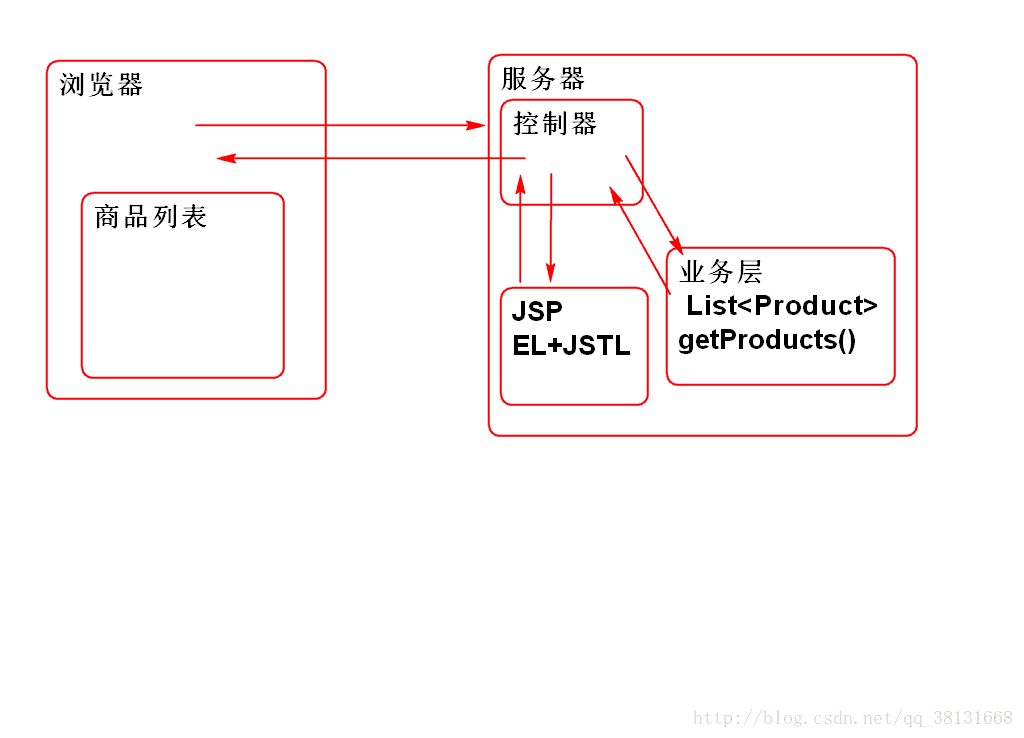
实现一个简单的列表功能
创建项目导入相关的包:
<dependency>
    <groupId>org.apache.struts</groupId>
    <artifactId>struts2-core</artifactId>
    <version>2.3.8</version>
</dependency>

<dependency>
    <groupId>org.apache.struts</groupId>
    <artifactId>struts2-spring-plugin</artifactId>
    <version>2.3.8</version>
</dependency>

<dependency>
  <groupId>jstl</groupId>
  <artifactId>jstl</artifactId>
  <version>1.2</version>
</dependency>
导入目标服务器运行环境 Tomcat Runtime
配置Struts2 和 Spring: web.xml
  <filter>
    <display-name>StrutsPrepareAndExecuteFilter</display-name>
    <filter-name>StrutsPrepareAndExecuteFilter</filter-name>
    <filter-class>org.apache.struts2.dispatcher.ng.filter.StrutsPrepareAndExecuteFilter</filter-class>
  </filter>
  <filter-mapping>
    <filter-name>StrutsPrepareAndExecuteFilter</filter-name>
    <url-pattern>/*</url-pattern>
  </filter-mapping>
  <listener>
    <listener-class>org.springframework.web.context.ContextLoaderListener</listener-class>
  </listener>
  <context-param>
     <param-name>contextConfigLocation</param-name>
     <param-value>classpath:spring-*.xml</param-value>
  </context-param>
添加 Spring 和 Struts2 的配置文件
spring-web.xml
<?xml version="1.0" encoding="UTF-8"?>
<beans xmlns="http://www.springframework.org/schema/beans"
    xmlns:xsi="http://www.w3.org/2001/XMLSchema-instance"
    xmlns:context="http://www.springframework.org/schema/context"
    xmlns:jdbc="http://www.springframework.org/schema/jdbc"
    xmlns:jee="http://www.springframework.org/schema/jee"
    xmlns:tx="http://www.springframework.org/schema/tx"
    xmlns:aop="http://www.springframework.org/schema/aop"
    xmlns:mvc="http://www.springframework.org/schema/mvc"
    xmlns:util="http://www.springframework.org/schema/util"
    xmlns:jpa="http://www.springframework.org/schema/data/jpa"
    xsi:schemaLocation="
        http://www.springframework.org/schema/beans http://www.springframework.org/schema/beans/spring-beans-3.0.xsd
        http://www.springframework.org/schema/context http://www.springframework.org/schema/context/spring-context-3.0.xsd
        http://www.springframework.org/schema/jdbc http://www.springframework.org/schema/jdbc/spring-jdbc-3.0.xsd
        http://www.springframework.org/schema/jee http://www.springframework.org/schema/jee/spring-jee-3.0.xsd
        http://www.springframework.org/schema/tx http://www.springframework.org/schema/tx/spring-tx-3.0.xsd
        http://www.springframework.org/schema/data/jpa http://www.springframework.org/schema/data/jpa/spring-jpa-1.3.xsd
        http://www.springframework.org/schema/aop http://www.springframework.org/schema/aop/spring-aop-3.0.xsd
        http://www.springframework.org/schema/mvc http://www.springframework.org/schema/mvc/spring-mvc-3.0.xsd
        http://www.springframework.org/schema/util http://www.springframework.org/schema/util/spring-util-3.0.xsd">

    <context:component-scan
        base-package="cn.tedu.controller"/>

    <context:component-scan
        base-package="cn.tedu.service"/>

</beans>
struts.xml:
<?xml version="1.0" encoding="UTF-8"?>
<!DOCTYPE struts PUBLIC
    "-//Apache Software Foundation//DTD Struts Configuration 2.3//EN"
    "http://struts.apache.org/dtds/struts-2.3.dtd">
<struts>

</struts>
创建业务层:
@Service
public class ProductService {

    List<Product> products;

    @PostConstruct
    private void init(){
        products = new ArrayList<Product>();
        products.add(new Product(
            1,"大黄蜂",24.5,"变形金刚经典系列"));
        products.add(new Product(
            2,"擎天柱",88.5,"变形金刚经典系列"));
        products.add(new Product(
            3,"光头强",12.5,"大笨熊你粗来!"));
        products.add(new Product(
            4,"李老师",22.5,"胡说派诗人!"));
        products.add(new Product(
            5,"范传奇",23.5,"变形金刚消费者!"));
    }

    public List<Product> getProducts(){
        return products;
    }
}
创建控制器
@Controller
@Scope("prototype")
public class ProductAction {

    @Resource
    private ProductService productService;

    private List<Product> products;
    public List<Product> getProducts() {
        return products;
    }
    public void setProducts(List<Product> products) {
        this.products = products;
    }

    private String name;
    public String getName() {
        return name;
    }
    public void setName(String name) {
        this.name = name;
    }

    //控制器方法
    public String list(){
        name = "list";
        products = productService.getProducts();

        ActionContext context =
                ActionContext.getContext();
        context.getSession().put(
            "loginUser", "老王");

        return "success";
    }
}
创建 list.jsp
<%@ page contentType="text/html; charset=utf-8"
    pageEncoding="utf-8"%>
<%@ taglib prefix="c"
    uri="http://java.sun.com/jsp/jstl/core" %>
<!DOCTYPE html>
<html>
<head>
<meta charset="utf-8">
<title>产品管理</title>
<style type="text/css">
table {
    border-collapse: collapse;
}
td, th{
    padding: 5px 10px;
}
th{
    border-bottom: 2px solid #ddd;
}
td{
    border-top: 1px solid #ccc;
}
</style>
</head>
<body>
    <h1>产品管理</h1>
    <table>
        <thead>
            <tr>
                <th>编号</th>
                <th>名称</th>
                <th>价格</th>
                <th>描述</th>
            </tr>
        </thead>
        <tbody>
            <c:forEach items="${products}" var="p">
                <tr>
                    <td>${p.id}</td>
                    <td>${p.name}</td>
                    <td>${p.price}</td>
                    <td>${p.description}</td>
                </tr>
            </c:forEach>
        </tbody>
    </table>
</body>
</html>
配置struts.xml
<package name="product"
    namespace="/product"
    extends="struts-default">

    <action name="list" class="productAction"
        method="list">
        <result>
            /WEB-INF/jsp/list.jsp
        </result>
    </action>
</package>
测试:
http://localhost:8080/ssh3/product/list.action
ValueStack
Struts 中共享数据的一个机制, 利用ValueStack可以在Struts组件之间共享数据:
Struts组件包括:
- 构造器 Action
- 结果 Result
- 视图 JSP
- 配置文件 struts.xml
JSP 中使用 s:debug 标签可以显示 ValueStack 对象
案例:
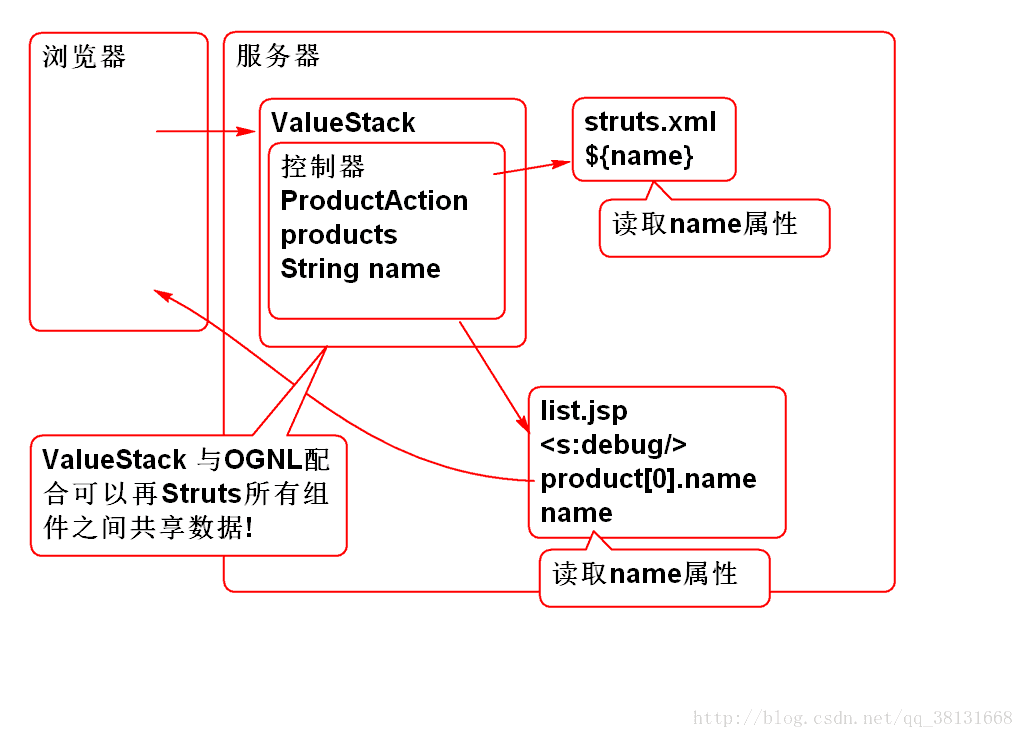
创建vs.jsp
<%@ page contentType="text/html; charset=utf-8"
    pageEncoding="utf-8"%>
<%@ taglib prefix="s" uri="/struts-tags"%>
<!DOCTYPE html>
<html>
<head>
<meta charset="utf-8">
<title>产品管理</title>
<style type="text/css">
table {
    border-collapse: collapse;
}
td, th{
    padding: 5px 10px;
}
th{
    border-bottom: 2px solid #ddd;
}
td{
    border-top: 1px solid #ccc;
}
</style>
</head>
<body>
    <h2>ValueStack</h2>
    <s:debug></s:debug>
    <h2>利用OGNL表的式读取ValueStack中的数据</h2>
    <p>读取ValueStack中的Action对象的数据</p>
    <s:property value="products[0].name"/>
    <h3>利用ValueStack 和 OGNL 显示商品列表</h3>
    <table>
        <thead>
            <tr>
                <th>ID</th>
                <th>名称</th>
                <th>价格</th>
                <th>描述</th>
            </tr>
        </thead>
        <tbody>
            <s:iterator value="products" var="p">
                <tr>
                    <td><s:property value="id"/></td>
                    <td><s:property value="name"/></td>
                    <td><s:property value="price"/></td>
                    <td><s:property value="description"/></td>
                </tr>
            </s:iterator>
        </tbody>
    </table>

</body>
</html>
配置struts.xml
<action name="vs" class="productAction"
    method="list">
    <result>
        /WEB-INF/jsp/vs.jsp
    </result>
</action>
重用控制器 productAction
测试:
http://localhost:8080/ssh3/product/vs.action说明使用 ValueStack 和 OGNL 也可以显示产品列表.
使用OGNL表达式可以读取 ValueStack 中的数据
JSP 中 可以使用 Struts 标签配合 OGNL 表达式读取 ValueStack中的数据, 由于Action对象被放到了 ValueStack中这样就可以, Action 到 JSP共享数据了.
关于 ValueStack 和 OGNL
- Struts2 中利用ValueStack 在所有组件之间共享数据
- 其中 控制器也被放到 ValueStack 中
- 在任何组件中可以使用 ONGL 表达式读取ValueStack中的数据, 包含读取控制器 Action 中的数据
- 在使用OGNL读取ValueStack数据时候是按照从顶到下顺序查找!
- 建议不要将数据的名字重复,避免遮挡!
- Struts2 底层接管了 EL和JSTL, 将EL数据读取转到了ValueStack上! EL的读取结果与 ONGL 一样!
- Struts 标签和ONGL配合 与 EL和JSTL配合的结果是一样的!
- 如果需要读取ValueStack的Context区域,就必须使用OGNL
- 如:
<s:property value="#session.loginUser"/>
- 如:
案例:
编写控制器
/**
 * 利用 ValueStack 共享数据
 */
@Controller
@Scope("prototype")
public class DataAction extends AbstractAction{

    //在内容区域共享数据, 利用控制器的Bean属性
    private String name;
    private int age;
    //@Value("#{cfg.data}")
    private String target; //目标网页名

    public String getName() {
        return name;
    }
    public void setName(String name) {
        this.name = name;
    }
    public int getAge() {
        return age;
    }
    public void setAge(int age) {
        this.age = age;
    }
    public String getTarget() {
        return target;
    }
    public void setTarget(String target) {
        this.target = target;
    }

    public String execute(){

        //上下文区域(环境) Context 区域, 共享数据
        request.put("message", "Struts 测试");
        session.put("loginState", "已经登录");
        application.put("count", 55);

        name="老王";
        age = 123;
        target = "show.jsp";//目标视图页面

        return SUCCESS;
    }
}
编写 show.jsp
<%@ page contentType="text/html; charset=utf-8"
    pageEncoding="utf-8"%>
<%@ taglib prefix="c"
    uri="http://java.sun.com/jsp/jstl/core" %>
<%@ taglib prefix="s" uri="/struts-tags"%>
<!DOCTYPE html>
<html>
<head>
<meta charset="utf-8">
<title>ValueStack</title>
</head>
<body>
    <h1>ValueStack</h1>
    <h2>读取内容区域的值</h2>
    <s:property value="name"/>
    <s:property value="age"/>
    <s:property value="target"/>

    <h2>读取上下文区域的值</h2>
    <p>读取上下文区域使用#为开头的表达式</p>
    <s:property value="#request.message"/>
    <s:property value="#session.loginState"/>
    <s:property value="#application.count"/>

</body>
</html>
配置 struts.xml
<!-- 利用 OGNL 读取ValueStack中的数据 -->
<action name="data" class="dataAction">
    <result>
        /WEB-INF/jsp/${target}
    </result>
</action>
表达式${target} 就是利用ValueStack从控制器读取了属性值.
测试
http://localhost:8080/ssh3/product/data.action
Hibernate
Struts : 架子
Spring : 春天
Hibernate 冬眠: 把对象冬眠一样持久的保存到数据库中.
核心想法: java程序员按照面向对象的方式操作数据库, 不再需要使用SQL.
Hibernate 的问题
- 不用写SQL, 但是要重新学习 HQL
- 会生成不理想的SQL, 影响数据库性能
- 特殊操作, 无法实现!
解决了 ORM 问题: 对象关系映射问题
Hibernate 结构
使用Hibernate
导入包:
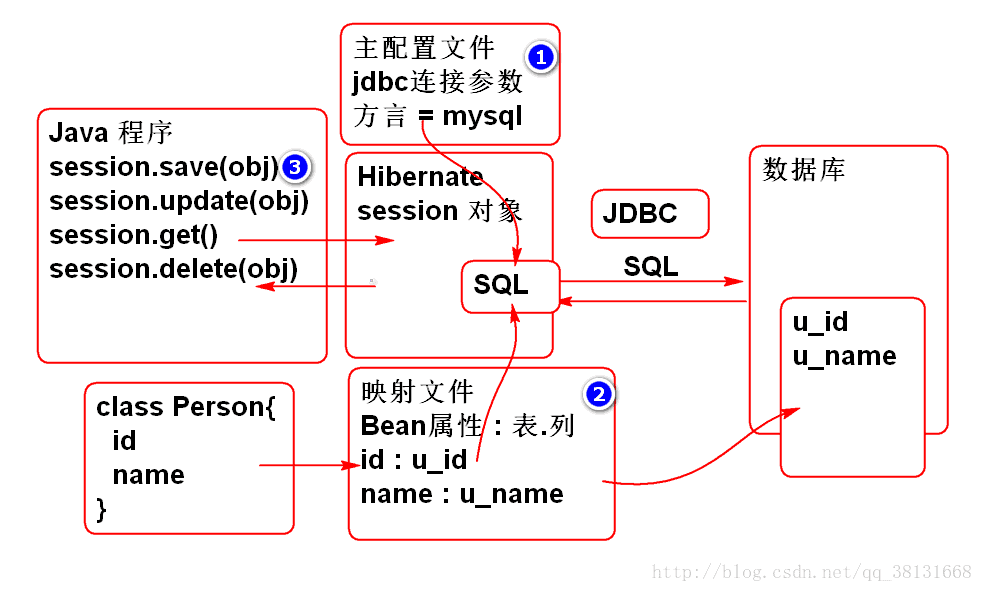
<dependency>
  <groupId>org.hibernate</groupId>
  <artifactId>hibernate-core</artifactId>
  <version>3.6.9.Final</version>
</dependency>

<dependency>
    <groupId>mysql</groupId>
    <artifactId>mysql-connector-java</artifactId>
    <version>5.1.6</version>
</dependency>
配置Hibernate主配置文件 hibernate.cfg.xml:
<?xml version='1.0' encoding='UTF-8'?>
<!DOCTYPE hibernate-configuration PUBLIC
    "-//Hibernate/Hibernate Configuration DTD 3.0//EN"
    "http://www.hibernate.org/dtd/hibernate-configuration-3.0.dtd">
<hibernate-configuration>
    <session-factory>
        <property name="dialect">
            org.hibernate.dialect.MySQLDialect
        </property>
        <property name="connection.username">root</property>
        <property name="connection.password">root</property>
        <property name="connection.url">
            jdbc:mysql://localhost:3306/cloud_note
        </property>
        <property name="connection.driver_class">
            com.mysql.jdbc.Driver
        </property>
        <property name="show_sql">true</property>
        <property name="format_sql">true</property>
        <mapping resource="Person.hbm.xml"/>
    </session-factory>
</hibernate-configuration>
主配置文件主要是提供 数据库 连接参数和MySQL方言
注意: 面试时候经常有人问方言!!!
show_sql 和 format_sql 属性用于调试阶段, 在控制台显示Hibernate生成并且执行的SQL语句.
创建表:
create table p_person(
    id int not null AUTO_INCREMENT,
    name varchar(100),
    primary key(id)
);

insert into p_person (name) values ('李老师');
insert into p_person (id, name) values (null,'李老师');
创建实体类 Person
public class Person implements Serializable{

    private Integer id;
    private String name;

    public Person() {
    }

    public Person(Integer id, String name) {
        super();
        this.id = id;
        this.name = name;
    }

    public Integer getId() {
        return id;
    }

    public void setId(Integer id) {
        this.id = id;
    }

    public String getName() {
        return name;
    }

    public void setName(String name) {
        this.name = name;
    }

    @Override
    public String toString() {
        return "Person [id=" + id + ", name=" + name + "]";
    }

    @Override
    public int hashCode() {
        final int prime = 31;
        int result = 1;
        result = prime * result + ((id == null) ? 0 : id.hashCode());
        return result;
    }

    @Override
    public boolean equals(Object obj) {
        if (this == obj)
            return true;
        if (obj == null)
            return false;
        if (getClass() != obj.getClass())
            return false;
        Person other = (Person) obj;
        if (id == null) {
            if (other.id != null)
                return false;
        } else if (!id.equals(other.id))
            return false;
        return true;
    }

}
编写映射文件
<?xml version="1.0" encoding="utf-8"?>
<!DOCTYPE hibernate-mapping PUBLIC
 "-//Hibernate/Hibernate Mapping DTD 3.0//EN"
 "http://www.hibernate.org/dtd/hibernate-mapping-3.0.dtd">
<!-- Hibernate 映射文件负责:
映射 实体和表的对应关系, 映射实体属性和列的对应关系
Class Person{          p_person(
  id                     id
  name                   name
}                      )
 -->
<hibernate-mapping>
    <class name="cn.tedu.entity.Person"
            table="p_person">
        <!-- id 属性是主键, 使用id标签映射 -->
        <id name="id" column="id">
            <!-- class=identity 用于处理自增类型 -->
            <generator class="identity"/>
        </id>
        <!-- 映射普通属性
          Person.name -> p_person.name -->
        <property name="name" column="name"/>
    </class>
</hibernate-mapping>
Hibernate 映射文件负责: 映射 实体和表的对应关系, 映射实体属性和列的对应关系
编写测试案例:
public class HibernateTest {

    @Test
    public void testSavePerson(){
        //参考: Hibernate 官方手册!

        //读取配置文件
        Configuration cfg=new Configuration();
        cfg.configure("hibernate.cfg.xml");
        //创建Session工厂
        SessionFactory factory =
                cfg.buildSessionFactory();
        //利用Session工厂创建Session
        Session session=factory.openSession();
        //session 自动提供了对象的 CRUD 操作方法

        //从数据库中查询id为1的person对象
        Person p =
            (Person)session.get(Person.class,1);
        System.out.println(p);

        //最后务必关闭 session
        session.close();
    }
}
测试…
Hibernate 可以自动的完成CRUD方法:
重构测试案例:
public class HibernateTest {

    SessionFactory factory;
    Session session;
    @Before
    public void init(){
        Configuration cfg=new Configuration();
        cfg.configure("hibernate.cfg.xml");
        factory = cfg.buildSessionFactory();
        session = factory.openSession();
    }

    @After
    public void destory(){
        session.close();
        factory.close();
    }

    @Test
    public void testGet(){
        Person p = (Person)session.get(
                Person.class, 7);
        System.out.println(p);
    }
    @Test
    public void testAdd(){
        //将新对象保存到数据库中, 需要开启事务
        Transaction tx=session.beginTransaction();
        Person one = new Person(null, "熊大");
        session.save(one);
        tx.commit();//提交事务
        System.out.println(one);
    }

    @Test
    public void testUpdate(){
        //更新数据
        Transaction tx = session.beginTransaction();
        Person p = (Person)session.get(
                Person.class, 7);
        p.setName("范传奇");
        session.update(p);
        tx.commit();
    }

    @Test
    public void testDelete(){
        //更新数据
        Transaction tx = session.beginTransaction();
        Person p = (Person)session.get(
                Person.class, 7);
        session.delete(p);
        tx.commit();
    }


    @Test
    public void testSavePerson(){
        //参考: Hibernate 官方手册!

        //读取配置文件
        Configuration cfg=new Configuration();
        cfg.configure("hibernate.cfg.xml");
        //创建Session工厂
        SessionFactory factory =
                cfg.buildSessionFactory();
        //利用Session工厂创建Session
        Session session=factory.openSession();
        //session 自动提供了对象的 CRUD 操作方法

        //从数据库中查询id为1的person对象
        Person p =
            (Person)session.get(Person.class,1);
        System.out.println(p);

        //最后务必关闭 session
        session.close();
    }
}
测试
整合 Spring 和 Hibernate
Spring 提供了整合Hibernate功能, 使Hibernate的使用更加简洁方便:
- 提供了 LocalSessionFactoryBean 简化 Configuration 和 SessionFactory
- 提供了 HibernateTempalte 简化 session 的使用.
配置使用:
导入包:
<dependency>
  <groupId>org.springframework</groupId>
  <artifactId>spring-orm</artifactId>
  <version>3.0.5.RELEASE</version>
</dependency>

<dependency>
  <groupId>commons-dbcp</groupId>
  <artifactId>commons-dbcp</artifactId>
  <version>1.4</version>
</dependency>
添加Spring配置文件 spring-orm.xml
配置数据源, 用于连接数据库:
<!-- 1. 配置数据库连接池 -->
<bean id="dataSource"
    class="org.apache.commons.dbcp.BasicDataSource">
    <property name="driverClassName"
        value="com.mysql.jdbc.Driver"/>
    <property name="url"
        value="jdbc:mysql://localhost:3306/cloud_note"/>
    <property name="username"
        value="root"/>
    <property name="password"
        value="root"/>
</bean>
配置SessionFactory
<!-- 2. 配置Session工厂-->
<!-- Spring orm提供了一个工厂Bean, 用于管理Hibernate
的 Session 工厂 -->
<bean id="sessionFactory"
    class="org.springframework.orm.hibernate3.LocalSessionFactoryBean">
    <property name="dataSource"
        ref="dataSource"/>
    <property name="hibernateProperties">
        <props>
            <prop key="hibernate.dialect">
                org.hibernate.dialect.MySQLDialect
            </prop>
            <prop key="hibernate.show_sql">true</prop>
            <prop key="hibernate.format_sql">true</prop>
        </props>
    </property>
    <property name="mappingLocations">
        <list>
            <value>classpath:Person.hbm.xml</value>
        </list>
    </property>
</bean>
配置 HibernateTemplate
<!-- 3. 配置HibernateTemplate -->
<bean id="hibernateTemplate"
    class="org.springframework.orm.hibernate3.HibernateTemplate">
    <property name="sessionFactory"
        ref="sessionFactory"/>
</bean>
测试:
public class SpringHibernateTest {

    ClassPathXmlApplicationContext ctx;
    HibernateTemplate temp;
    @Before
    public void init(){
        ctx = new ClassPathXmlApplicationContext(
            "spring-orm.xml");
        temp = ctx.getBean(
                "hibernateTemplate",
                HibernateTemplate.class);
    }
    @After
    public void destroy(){
        ctx.close();
    }

    @Test
    public void testGet(){
        //HibernateTemplate 可以替代 session
        //并且使用更加简便(可以不用管理事务,等)
        Person p = temp.get(Person.class, 1);
        System.out.println(p);
    }
}


 被折叠的 条评论
为什么被折叠?
被折叠的 条评论
为什么被折叠?
 到【灌水乐园】发言


