文章目录
转载申明
本博客转自:linux下安装mysql8及使用
原创不易,尊重作者!
1、下载mysql软件包
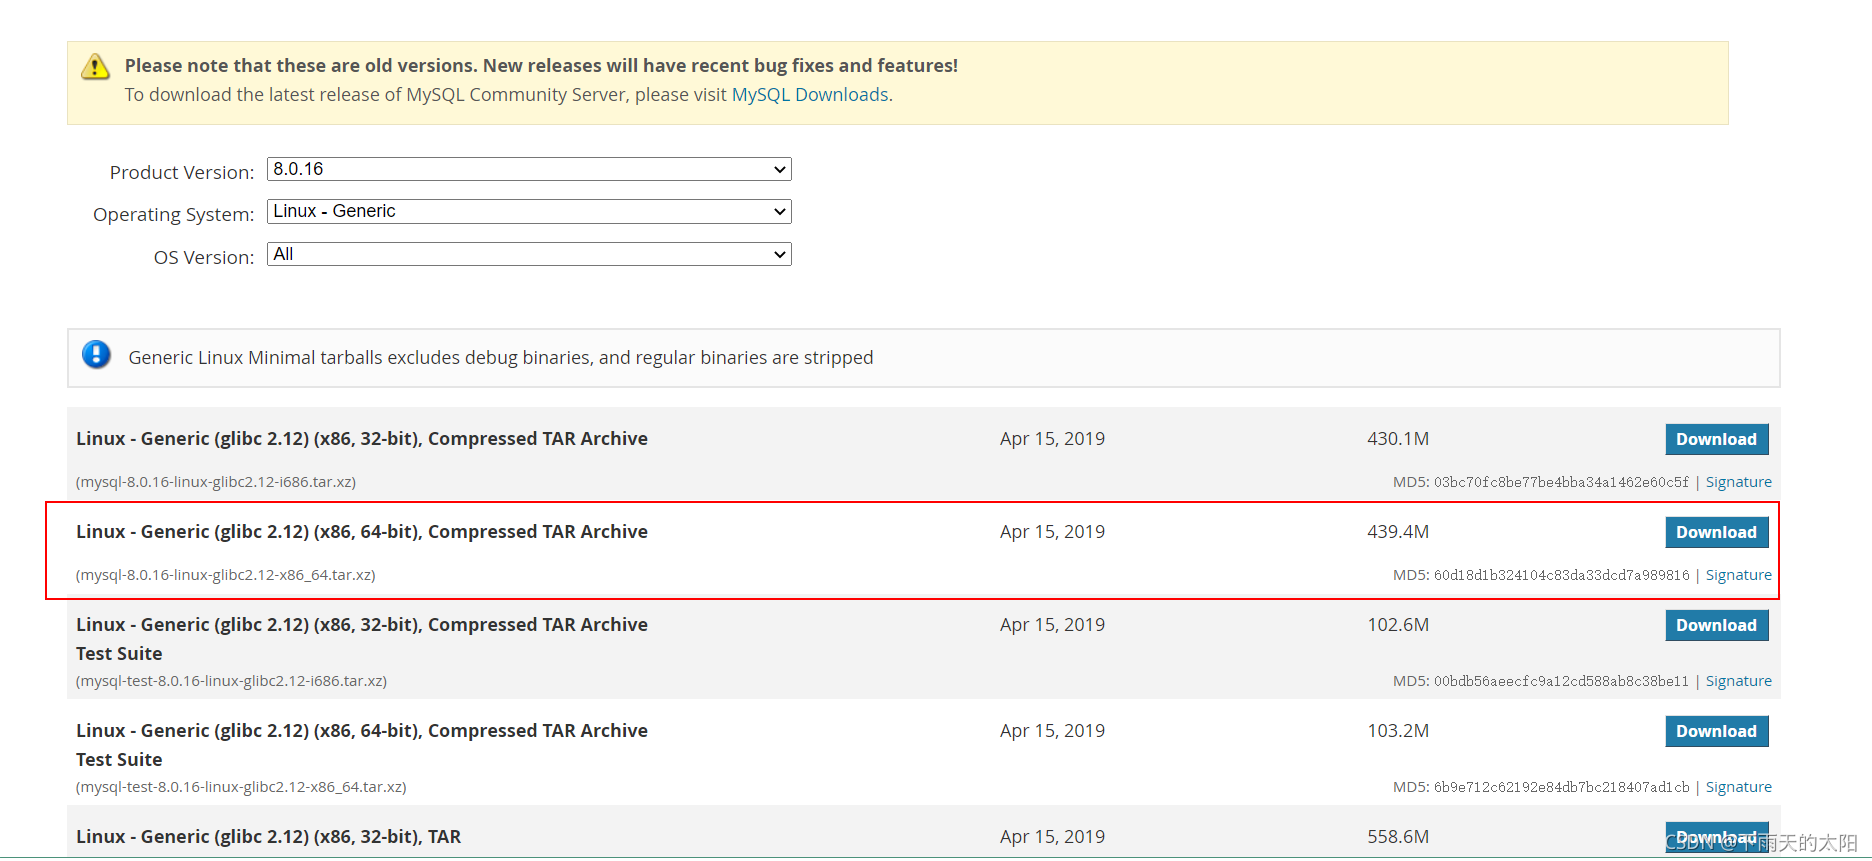
mysql下载
下载mysql压缩包,上传到/usrlocal/src/目录下
2、解压缩包
使用命令tar -xvf mysql-8.0.16-linux-glibc2.12-x86_64.tar.xz解压缩包
3、移动MySQL文件
将解压后的文件重命名为mysql,并且移动到/usr/local目录下
mv mysql-8.0.16-linux-glibc2.12-x86_64 mysql
mv mysql …/
[root@localhost src]# mv mysql-8.0.16-linux-glibc2.12-x86_64 mysql
[root@localhost src]# ls
mysql  mysql-8.0.16-linux-glibc2.12-x86_64.tar.xz
[root@localhost src]# mv mysql ../
[root@localhost src]# cd ../
[root@localhost local]# ls
bin  etc  games  include  lib  lib64  libexec  mysql  sbin  share  src
[root@localhost local]#
4、添加用户和用户组
添加mysql用户和用户组:useradd mysql
[root@localhost local]# useradd mysql
[root@localhost local]# id mysql
uid=1001(mysql) gid=1001(mysql) groups=1001(mysql)
[root@localhost local]#
5、创建/data/mysql目录
使用mkdir -p /data/mysql命令创建mysql目录,并且将修改权限:chown mysql:mysql -R /data/mysql
[root@localhost local]# useradd mysql
[root@localhost local]# id mysql
uid=1001(mysql) gid=1001(mysql) groups=1001(mysql)
[root@localhost local]# mkdir -p /data/mysql
[root@localhost local]# cd /
[root@localhost /]# ls
bin  boot  data  dev  etc  home  lib  lib64  media  mnt  opt  proc  root  run  sbin  srv  sys  tmp  usr  var
[root@localhost /]# chown mysql:mysql -R /data/mysql
[root@localhost /]# ls -la
total 28
dr-xr-xr-x.  18 root root  236 Sep 21 11:23 .
dr-xr-xr-x.  18 root root  236 Sep 21 11:23 ..
lrwxrwxrwx.   1 root root    7 Nov  3  2020 bin -> usr/bin
dr-xr-xr-x.   5 root root 4096 Feb  8  2021 boot
drwxr-xr-x.   3 root root   19 Sep 21 11:23 data
drwxr-xr-x.  20 root root 3200 Sep 21 11:09 dev
drwxr-xr-x. 141 root root 8192 Sep 21 11:22 etc
drwxr-xr-x.   4 root root   31 Sep 21 11:22 home
lrwxrwxrwx.   1 root root    7 Nov  3  2020 lib -> usr/lib
lrwxrwxrwx.   1 root root    9 Nov  3  2020 lib64 -> usr/lib64
drwxr-xr-x.   2 root root    6 Nov  3  2020 media
drwxr-xr-x.   3 root root   18 Nov  3  2020 mnt
drwxr-xr-x.   2 root root    6 Nov  3  2020 opt
dr-xr-xr-x. 362 root root    0 Sep 21 11:09 proc
dr-xr-x---.  16 root root 4096 Sep 21 11:10 root
drwxr-xr-x.  43 root root 1240 Sep 21 11:12 run
lrwxrwxrwx.   1 root root    8 Nov  3  2020 sbin -> usr/sbin
drwxr-xr-x.   2 root root    6 Nov  3  2020 srv
dr-xr-xr-x.  13 root root    0 Sep 21 11:09 sys
drwxrwxrwt.  14 root root 4096 Sep 21 11:19 tmp
drwxr-xr-x.  12 root root  144 Feb  8  2021 usr
drwxr-xr-x.  21 root root 4096 Feb  8  2021 var
[root@localhost /]# cd data
[root@localhost data]# ls -la
total 0
drwxr-xr-x.  3 root  root   19 Sep 21 11:23 .
dr-xr-xr-x. 18 root  root  236 Sep 21 11:23 ..
drwxr-xr-x.  2 mysql mysql   6 Sep 21 11:23 mysql
[root@localhost data]#
6、创建/etc/my.cnf文件
创建/etc/my.cnf文件,并添加下面内容
[mysqld]
bind-address=0.0.0.0      //绑定到指定的ip上
port=3306
user=mysql
basedir=/usr/local/mysql
datadir=/data/mysql
socket=/tmp/mysql.sock
log-error=/data/mysql/mysql.err
pid-file=/data/mysql/mysql.pid
#character config
character_set_server=utf8
#symbolic-links=0
#explicit_defaults_for_timestamp=true
7、 安装libaio
执行yum install -y libaio命令安装libaio包
8、初始化mysql
进入/usr/local/mysql/bin目录,初始化mysql
初始化命令如下:
./mysqld --defaults-file=/etc/my.cnf --basedir=/usr/local/mysql/ --datadir=/data/mysql/ --user=mysql --initialize
9、查看数据库密码
查看数据库首次登录密码:cat /data/mysql/mysql.err
[root@localhost bin]# cat /data/mysql/mysql.err
2021-09-21T15:32:28.547395Z 0 [System] [MY-013169] [Server] /usr/local/mysql/bin/mysqld (mysqld 8.0.16) initializing of server in progress as process 43232
2021-09-21T15:32:35.938131Z 5 [Note] [MY-010454] [Server] A temporary password is generated for root@localhost: RYIwftw4FL?a
2021-09-21T15:32:37.923324Z 0 [System] [MY-013170] [Server] /usr/local/mysql/bin/mysqld (mysqld 8.0.16) initializing of server has completed
10、重命名mysql.server并移动到/etc/init.d/目录
将mysql.server重命名并且移动到/etc/init.d/目录下
cp /usr/local/mysql/support-files/mysql.server /etc/init.d/mysql
11、启动mysql
(1)第一种启动方式
/etc/init.d/mysql start
[root@localhost init.d]# ./mysql start
Starting MySQL.Logging to '/data/mysql/mysql.err'.
. SUCCESS!
(2)第二种启动方式
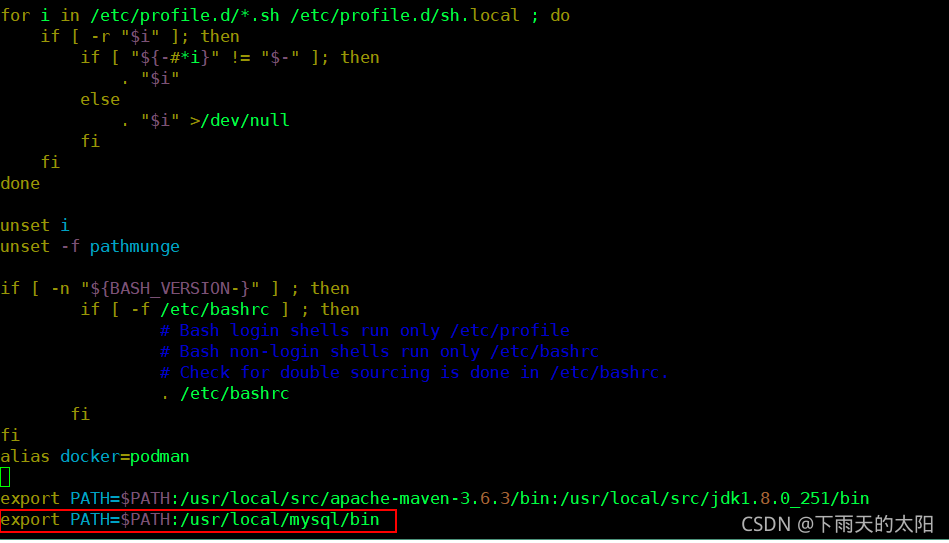
先将mysql的bin目录配置成全局可用的:
编辑/etc/profile文件
vim /etc/profile
在profile末尾加上export PATH=$PATH:/usr/local/mysql/bin
使设置生效
source /etc/profile
注意:如果此时报错说明设置有问题,重新检查设置
启动mysql,末尾加&表示后台启动
mysqld  --defaults-file=/etc/my.cnf  &
ps -ef|grep mysql查看MySQL服务是否启动,如下图所示表示mysql已经启动

(3)第三种启动方式
同样需要设置将mysql的bin目录配置成全局可用的,同方式二
mysqld_safe --defaults-file=/etc/my.cnf &

ps -ef|grep mysql 查看mysql是否启动

【注意】:这里第二种方式和第三种方式类似,但是不一样,第二种方式只会启动mysqld一个进程,而第三种方式有两个进程,一个是守护进程,一个是mysqld进程,当有人操作或是某种情况导致mysqld进程挂掉,守护进程会重新拉起mysqld进程。
12、 登录数据库
mysql -u root -p登录数据库,
此时可能汇报command not find
[root@localhost init.d]# mysql -u root -p
bash: mysql: command not found...
Packages providing this file are:
'mariadb'
'mysql'
解决办法:ln -s /usr/local/mysql/bin/mysql /usr/bin
===========================================================

登录mysql时可能会遇到如下问题mysql: error while loading shared libraries: libtinfo.so.5: cannot open shared object file: No such file or directory
[root@localhost init.d]# mysql -u root -p
mysql: error while loading shared libraries: libtinfo.so.5: cannot open shared object file: No such file or directory
[root@localhost init.d]#
解决办法:
ln -s /usr/lib64/libtinfo.so.6.1 /usr/lib64/libtinfo.so.5
===========================================================

登陆后首次执行命令汇报这个:
You must reset your password using ALTER USER statement before executing this statement.
解决办法:alter user user() identified by "root";双引号号的值即修改后的密码。

===========================================================
以下是mysql登录情况:
[root@localhost init.d]# mysql -u root -p
Enter password:
Welcome to the MySQL monitor.  Commands end with ; or \g.
Your MySQL connection id is 9
Server version: 8.0.16

Copyright (c) 2000, 2019, Oracle and/or its affiliates. All rights reserved.

Oracle is a registered trademark of Oracle Corporation and/or its
affiliates. Other names may be trademarks of their respective
owners.

Type 'help;' or '\h' for help. Type '\c' to clear the current input statement.

mysql> show databases;
ERROR 1820 (HY000): You must reset your password using ALTER USER statement before executing this statement.
mysql> alter user user() identified by "root";
Query OK, 0 rows affected (0.01 sec)

mysql>
13、关闭mysql
第一种关闭方式
/etc/init.d/mysql/mysql stop

第二种关闭方式
mysqladmin -uroot -proot -S /tmp/mysql.sock shutdown

第三种关闭方式
ps -ef|grep mysql 查询mysql的进程
再使用 kill -9 mysql进程号
[root@localhost /]# ps -ef|grep mysql
mysql       4254    3208  2 20:38 pts/1    00:00:01 mysqld --defaults-file=/etc/my.cnf
root        4368    4320  0 20:39 pts/0    00:00:00 grep --color=auto mysql
[root@localhost /]# kill -9 4254
[root@localhost /]# ps -ef|grep mysql
root        4371    4320  0 20:40 pts/0    00:00:00 grep --color=auto mysql
[root@localhost /]#
【注意】:一般情况下不会采用第三种方式关闭MySQL,除非其他命令都无法关闭而被迫采用这种方式,第二种方式显示也不是太好,因为它暴露了用户密码,是不安全的
14、忘记密码怎么办
(1)修改配置文件
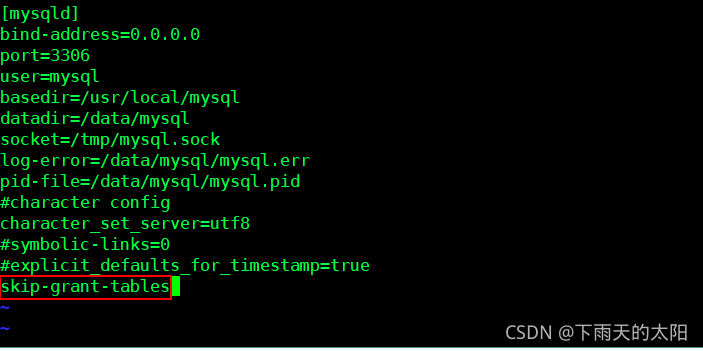
vim /etc/my.cnf
在[mysqld]的最下面加上这么一行
skip-grant-tables
可以跳过输密码阶段直接进入数据库
保存配置文件后,重新启动mysql
mysqld --defaults-file=/etc/my.cnf &
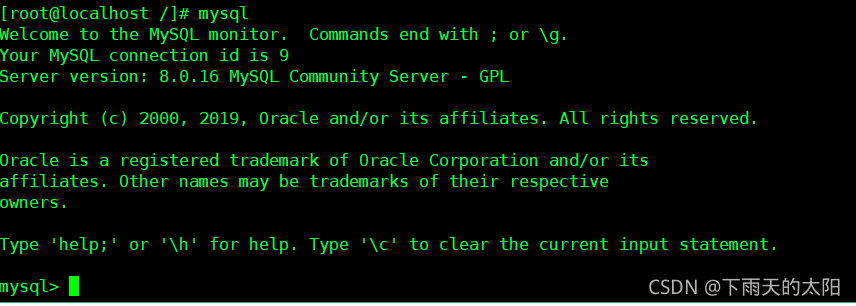
然后直接执行mysql就可以进入数据库了
最后修改密码,执行下面两条命令
[root@localhost /]# vim /etc/my.cnf   //这里修改/etc/my.cnf配置文件,在[mysqld]的最后一行加上skip-grant-tables,然后保存退出
[root@localhost /]# /etc/init.d/mysql/mysql start     //启动mysql服务或是重启mysql服务
Starting MySQL... SUCCESS!
[root@localhost /]# ps -ef|grep mysql       //查看mysql石佛普启动
root        7810       1  0 22:16 pts/1    00:00:00 /bin/sh /usr/local/mysql/bin/mysqld_safe --datadir=/data/mysql --pid-file=/data/mysql/mysql.pid
mysql       8033    7810  4 22:16 pts/1    00:00:01 /usr/local/mysql/bin/mysqld --basedir=/usr/local/mysql --datadir=/data/mysql --plugin-dir=/usr/local/mysql/lib/plugin --user=mysql --log-error=/data/mysql/mysql.err --pid-file=/data/mysql/mysql.pid --socket=/tmp/mysql.sock --port=3306
root        8086    3208  0 22:16 pts/1    00:00:00 grep --color=auto mysql
[root@localhost /]# mysql        //跳过密码验证登录进mysql数据库
Welcome to the MySQL monitor.  Commands end with ; or \g.
Your MySQL connection id is 7
Server version: 8.0.16 MySQL Community Server - GPL

Copyright (c) 2000, 2019, Oracle and/or its affiliates. All rights reserved.

Oracle is a registered trademark of Oracle Corporation and/or its
affiliates. Other names may be trademarks of their respective
owners.

Type 'help;' or '\h' for help. Type '\c' to clear the current input statement.

mysql> use mysql     //进入mysql库,因为user表在这个库
Reading table information for completion of table and column names
You can turn off this feature to get a quicker startup with -A

Database changed
mysql> update user set authentication_string = '' where user = 'root';     //置空root用户密码
Query OK, 1 row affected (0.01 sec)
Rows matched: 1  Changed: 1  Warnings: 0

mysql> quit     //退出数据库
Bye
[root@localhost /]# vim /etc/my.cnf    编辑/etc/my.cnf配置文件,删除skip-grant-tables,然后保存退出
[root@localhost /]# /etc/init.d/mysql/mysql restart     //重启mysql服务
Shutting down MySQL... SUCCESS!
Starting MySQL.. SUCCESS!
[root@localhost /]# mysql -u root -p       //执行这行命令直接回车进入数据库,因为此时root用户密码为空
Enter password:
Welcome to the MySQL monitor.  Commands end with ; or \g.
Your MySQL connection id is 8
Server version: 8.0.16 MySQL Community Server - GPL

Copyright (c) 2000, 2019, Oracle and/or its affiliates. All rights reserved.

Oracle is a registered trademark of Oracle Corporation and/or its
affiliates. Other names may be trademarks of their respective
owners.

Type 'help;' or '\h' for help. Type '\c' to clear the current input statement.

mysql> use mysql;    //进入mysql库
Reading table information for completion of table and column names
You can turn off this feature to get a quicker startup with -A

Database changed
mysql> alter user 'root'@'localhost' identified with mysql_native_password BY '123456';        //重新设置root用户密码为你想要设置的密码
Query OK, 0 rows affected (0.00 sec)

mysql> flush privileges;       //刷新用户权限信息
Query OK, 0 rows affected (0.00 sec)

mysql> select host,user,authentication_string from user;    //查询用户信息表
+-----------+------------------+------------------------------------------------------------------------+
| host      | user             | authentication_string                                                  |
+-----------+------------------+------------------------------------------------------------------------+
| localhost | mysql.infoschema | $A$005$THISISACOMBINATIONOFINVALIDSALTANDPASSWORDTHATMUSTNEVERBRBEUSED |
| localhost | mysql.session    | $A$005$THISISACOMBINATIONOFINVALIDSALTANDPASSWORDTHATMUSTNEVERBRBEUSED |
| localhost | mysql.sys        | $A$005$THISISACOMBINATIONOFINVALIDSALTANDPASSWORDTHATMUSTNEVERBRBEUSED |
| localhost | root             | *6BB4837EB74329105EE4568DDA7DC67ED2CA2AD9                              |
+-----------+------------------+------------------------------------------------------------------------+
4 rows in set (0.00 sec)

mysql> quit      //退出mysql数据库
Bye
[root@localhost /]# /etc/init.d/mysql/mysql restart     //重新启动mysql服务
Shutting down MySQL.. SUCCESS!
Starting MySQL.. SUCCESS!
[root@localhost /]# mysql -u root -p123456      //用重置后的密码登录数据库,下面成功登录
mysql: [Warning] Using a password on the command line interface can be insecure.
Welcome to the MySQL monitor.  Commands end with ; or \g.
Your MySQL connection id is 8
Server version: 8.0.16 MySQL Community Server - GPL

Copyright (c) 2000, 2019, Oracle and/or its affiliates. All rights reserved.

Oracle is a registered trademark of Oracle Corporation and/or its
affiliates. Other names may be trademarks of their respective
owners.

Type 'help;' or '\h' for help. Type '\c' to clear the current input statement.

mysql>
【注意】:mysql8.0以后版本忘记密码后重置密码,必须先将用户密码设置为空,然后以空密码进入数据库(必须要经过中间这一环节),最后重新设置你想要设置的密码,退出数据库,重启数据库服务,再用新密码就可以登录了
15、一台linux服务器上安装多个MySQL实例
MySQL实例与数据库是一一对应的关系,也就是一个实例对应一个数据库,为什么要安装多个实例呢?其实在有些高性能服务器如果只安装一个MySQL实例未免有点台浪费物理硬件资源了,所以为了充分利用资源,这里来记录一下怎么在一台Linux服务器上安装多个MySQL实例
(1)修改/etc/my.cnf配置文件,添加以下部分
[mysqld]
server-id=1
bind-address=0.0.0.0
port=3306
user=mysql
basedir=/usr/local/mysql
datadir=/data/mysql
socket=/tmp/mysql.sock
log-error=/data/mysql/mysql.err
pid-file=/data/mysql/mysql.pid
#character config
character_set_server=utf8
#symbolic-links=0
plugin-load=validate_password.so    //这个需要添加
#skip-grant-tables

//下面这些都是需要添加的,这里打算安装两个MySQL实例,端口分别是3406,3407
[mysqld_multi]
mysqld=/usr/local/mysql/bin/mysqld
mysqladmin=/usr/local/mysql/bin/mysqladmin
log=/usr/local/mysql/mysqld_multi.log

[mysqld1]
port=3406
datadir=/data1
log-error=/data1/mysql.err1
socket=/tmp/mysql.sock1

[mysqld2]
port=3407
datadir=/data2
log-error=/data2/mysql.err2
socket=/tmp/mysql.sock2
(2)初始化MySQL实例
mysqld --initialize --datadir=/data1
mysqld --initialize --datadir=/data2
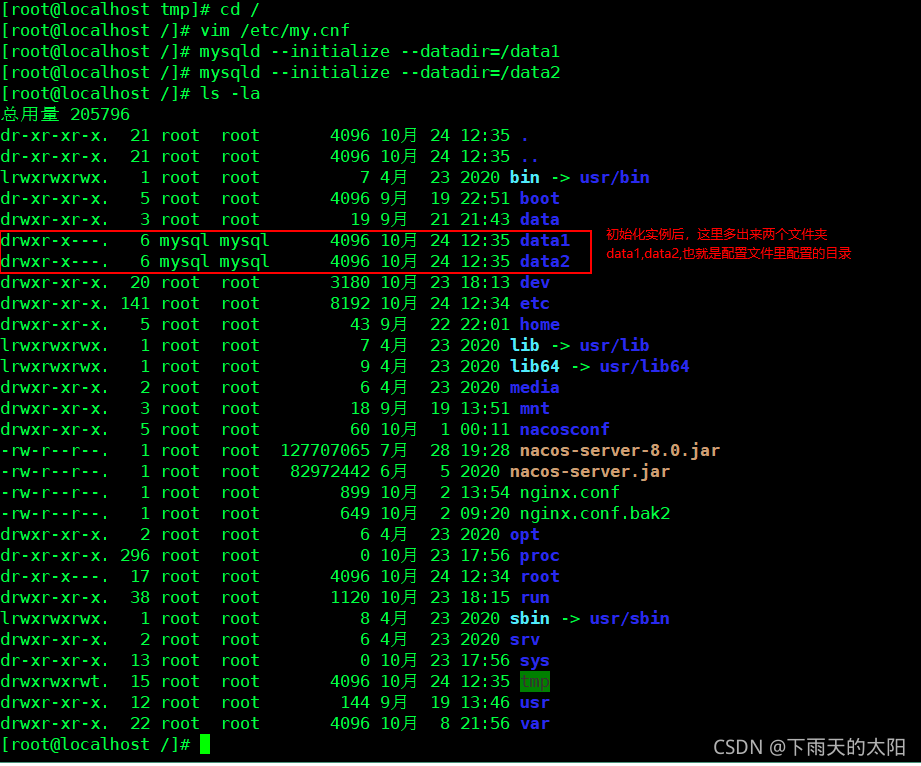
查看刚才两个实例的首次登录密码,登录成功后需要修改密码,否则不允许进行其他操作
tail -f /data/mydql/mysql.err

(3)启动MySQL实例
mysqld_multi start 1,2    //启动两个MySQL实例
ps -ef|grep mysqld        //查看实例是否启动成功

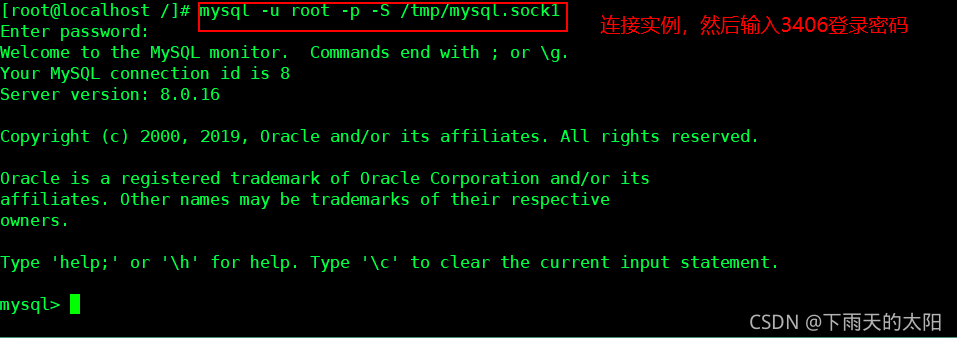
(4)登录MySQL实例
mysql -u root -p -S /tmp/mysql.sock1    //执行此命令连接3406实例输入密码 VsaurA*wr9Up
如下页面显示3406实例登录成功
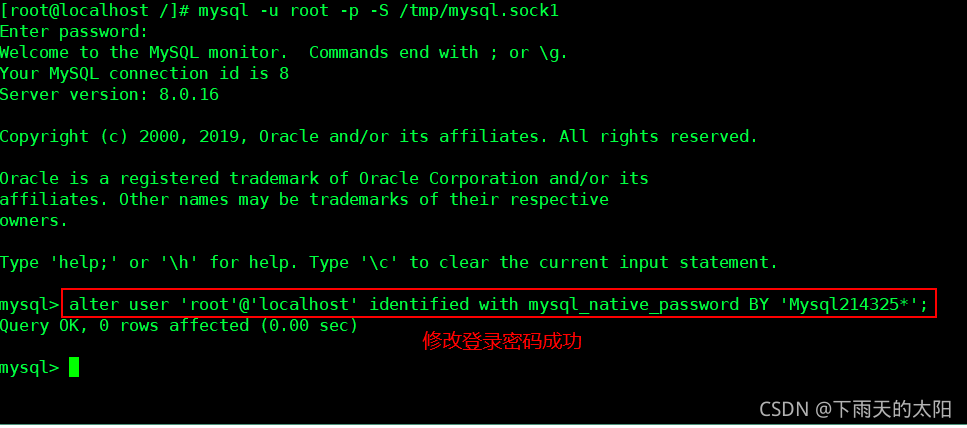
修改3406登录密码
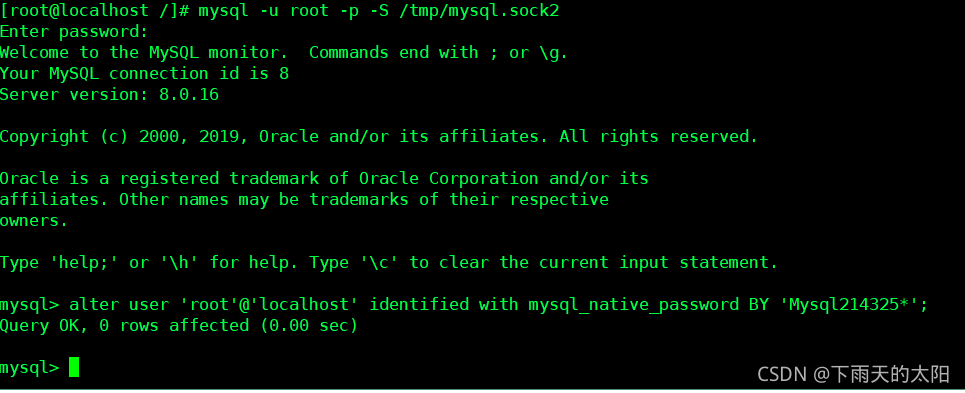
alter user 'root'@'localhost' identified with mysql_native_password BY 'Mysql214325*';
显示如下图修改登陆密码成功
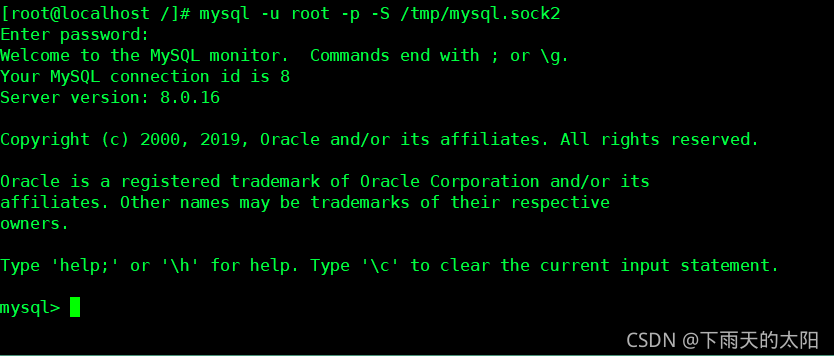
mysql -u root -p -S /tmp/mysql.sock2    //执行此命令连接3407实例输入密码 etpvCy4dHZ(4
如下页面显示3407实例登录成功
修改3407登录密码
alter user 'root'@'localhost' identified with mysql_native_password BY 'Mysql214325*';
显示如下图修改登陆密码成功
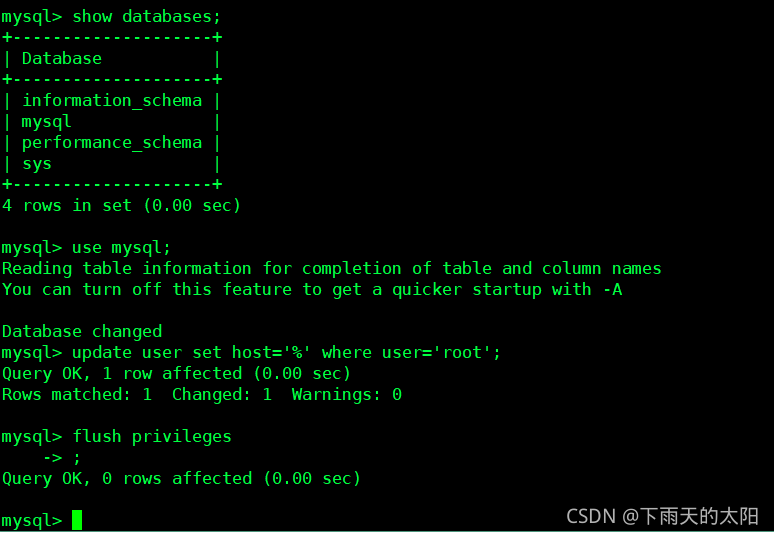
下面分别用客户端连接两个实例,在连接之前需要执行下面命令,否则无法登录
use mysql;   //进入mysql库
update user set host='%' where user='root';    //修改用户登录ip权限,可以在服务器本地之外的地方登录
flush privileges;  //刷新刚才的设置,这一就可以登录了
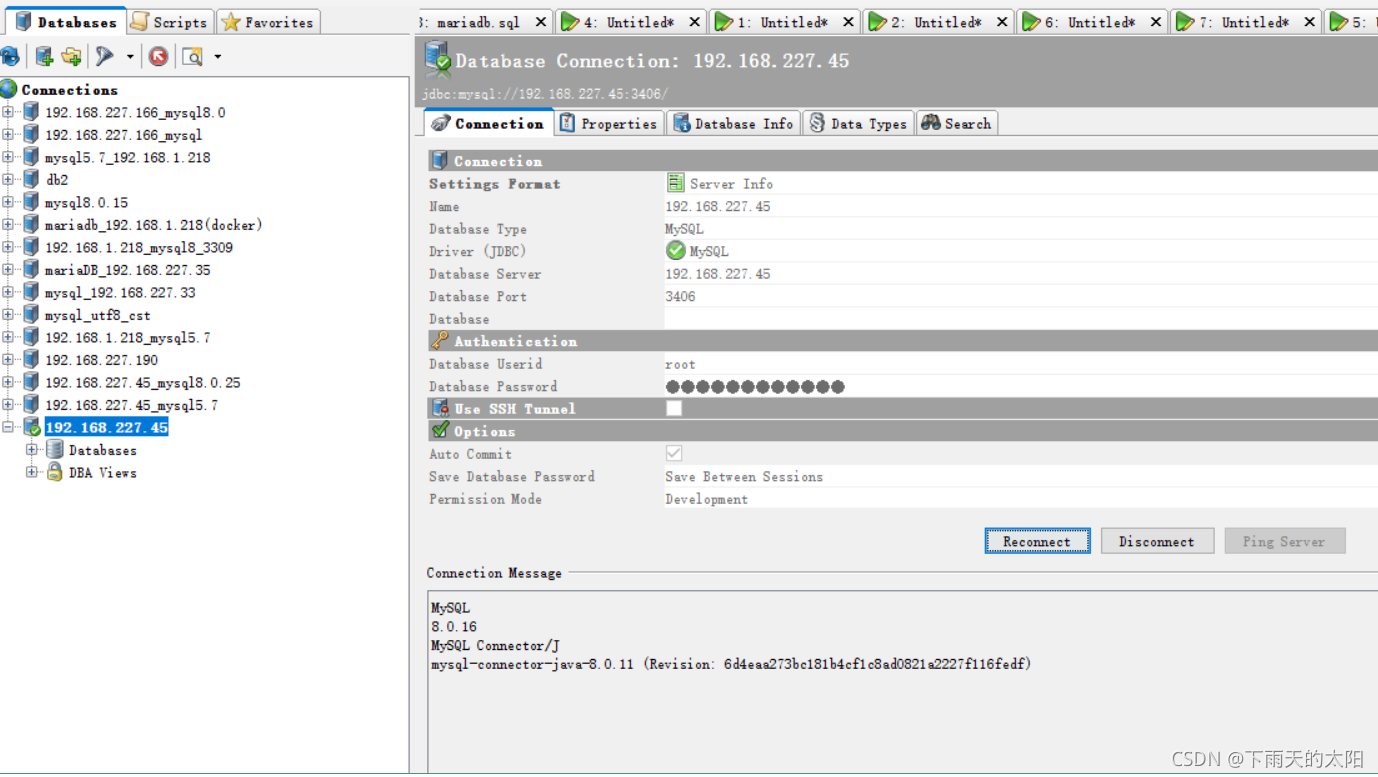
这里使用dbvisualizer客户端登录,显示如下登录3406实例成功,登录3407实例操作同上
关闭实例
执行下面这行命令,然后输入密码就可以了
mysqladmin -u root -p -S /tmp/mysql.sock2 shutdown

16、慢查询日志
(1)修改配置文件my.cnf,在[mysqld]下面加上红色方框中的内容
vim /etc/my.cnf
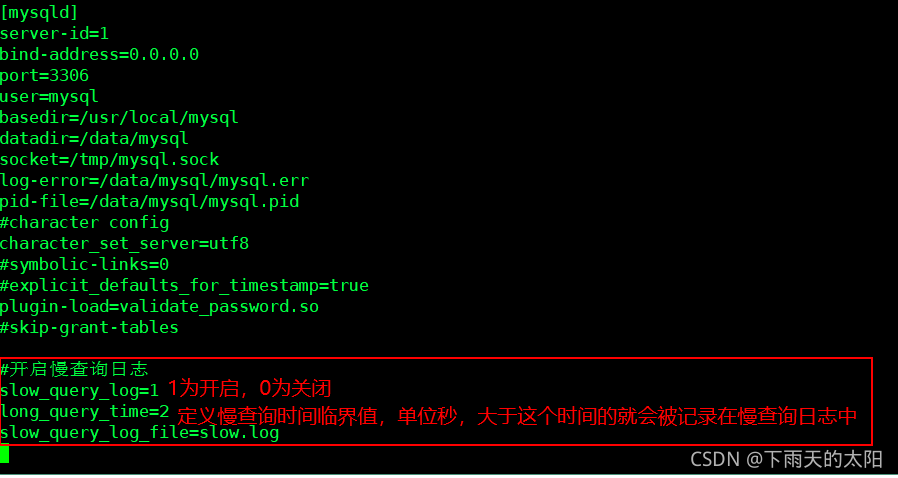
(2)查看慢查询设置是否成功
[root@localhost tmp]# /etc/init.d/mysql/mysql stop
Shutting down MySQL.. SUCCESS!
[root@localhost tmp]# vim /etc/my.cnf
[root@localhost tmp]# /etc/init.d/mysql/mysql start
Starting MySQL.. SUCCESS!
[root@localhost tmp]# mysql -u root -p
Enter password:
Welcome to the MySQL monitor.  Commands end with ; or \g.
Your MySQL connection id is 8
Server version: 8.0.16 MySQL Community Server - GPL

Copyright (c) 2000, 2019, Oracle and/or its affiliates. All rights reserved.

Oracle is a registered trademark of Oracle Corporation and/or its
affiliates. Other names may be trademarks of their respective
owners.

Type 'help;' or '\h' for help. Type '\c' to clear the current input statement.

mysql> show variables like '%slow_query%'        //ON表示慢查询日志已经开启
    -> ;
+---------------------+----------+
| Variable_name       | Value    |
+---------------------+----------+
| slow_query_log      | ON       |
| slow_query_log_file | slow.log |
+---------------------+----------+
2 rows in set (0.01 sec)

mysql> show variables like 'long%';        //可以看到慢查询时间为2秒,大于这个时间的sql都会被记录到slow.log日志文件中
+-----------------+----------+
| Variable_name   | Value    |
+-----------------+----------+
| long_query_time | 2.000000 |
+-----------------+----------+
1 row in set (0.01 sec)

mysql>
(3)测试慢查询日志效果
select sleep(2); //模拟慢查询

(4)慢查询日志时间时区调整
默认情况下慢日志查询时间和本地时间不一样,需要执行下面命令来修改
ln -sf /usr/share/zoneinfo/Asia/Shanghai /etc/localtime   //设定linux服务器的时区为上海(东八区)
set global log_timestamps=SYSTEM;     //在mysql里执行这个设置命令修改日志时间和本地系统时间同步一致
注意:一般情况下不开启慢查询日志,有需要可以根据实际情况开启
18、字符集设置
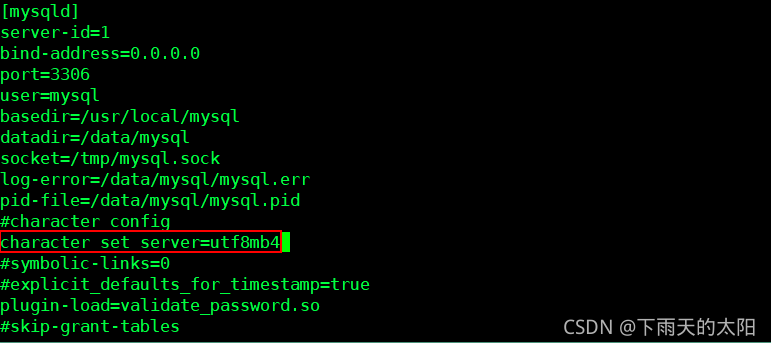
编辑my.cnf配置文件,在[client]下面加上default-character-set=utf8
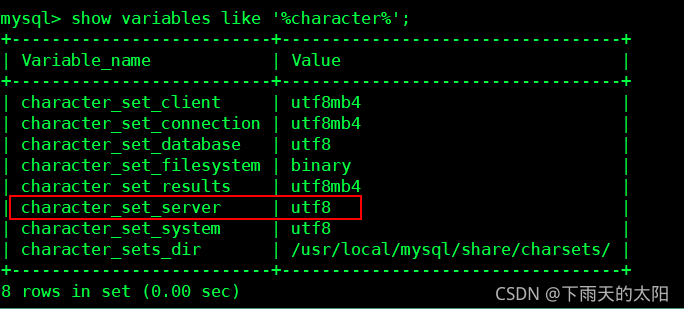
在[mysqld]下面加上character_set_server=utf8mb4,然后重启mysql即可。
修改前:
修改后:
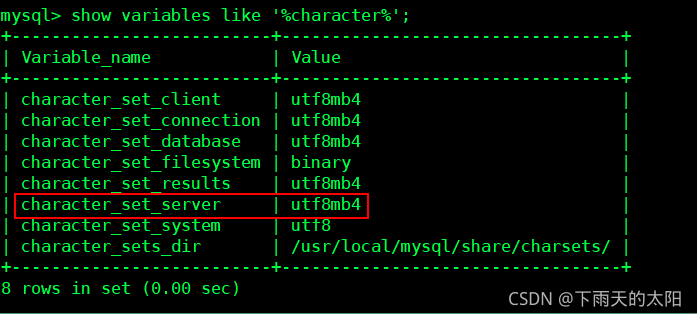
【注意】:对于MySQL来说,utf8mb4才是真正的utf8字符集
utf8 只有3个字节,utf8mb4为4字节。
18、用户管理
(1)创建用户
create user 'jamy'@'localhost' identified with mysql_native_password BY '123456';
jamy        //用户名
localhost   //服务器地址
123456      //密码
(2)用户授权
grant all privileges on *.* to 'jamy'@'%'  with grant option;
all privileges  //所有权限,也可以是select、update、delete、insert等中的一个
第一个*  //表名,*代表所有
第二个*  //数据库名,*代表所有
jamy   //用户名
%      //服务器地址,%代表所有地址
例子:
授予所有权限
grant all privileges on *.* to '用户名'@'允许访问的IP地址,多个IP地址使用逗号区分或者配置%允许所有IP地址' IDENTIFIED BY '密码' with grant option;
授予增删改查权限
grant select,insert,update,delete on *.* to '用户名'@'允许访问的IP地址,多个IP地址使用逗号区分或者配置%允许所有IP地址' with grant option;
授予只读权限
grant select on *.* to '用户名'@'允许访问的IP地址,多个IP地址使用逗号区分或者配置%允许所有IP地址' IDENTIFIED BY 'password';
(3)查看用户权限
show grants for '用户名'@'允许访问的IP地址,多个IP地址使用逗号区分或者配置%允许所有IP地址';

(4)用户撤销权限
revoke all privileges on *.* from '用户名'@'允许访问的IP地址,多个IP地址使用逗号区分或者配置%允许所有IP地址';
(5)用户删除
drop user '用户名'@'允许访问的IP地址,多个IP地址使用逗号区分或者配置%允许所有IP地址';
注意:操作权限只能管理员(root)用户可以,其他用户无权操作

19、mysql的rpm包安装
(1)下载mysql-8.0.16-2.el7.x86_64.rpm-bundle.tar压缩包
mysql的rpm安装包下载
(2)检查是否有安装mariadb
rpm -qa|grep mariadb

(3)卸载mariadb(如果没有安装mariadb无需执行这一步)
rpm -e --nodeps mariadb-libs-5.5.60-1.el7_5.x86_64
(4)创建mysql目录并将下载的压缩包放入mysql目录
mkdir /usr/local/src/mysql
(5)进入mysql目录并解压
cd mysql
tar -xvf mysql-8.0.16-2.el7.x86_64.rpm-bundle.tar
(6)安装mysql
rpm -ivh *.rpm --force --nodeps

(7)启动MySQL服务并将mysqld服务设置为开机启动
systemctl start mysqld
systemctl enable mysqld
(8)查询初始密码
grep “temporary password” /var/log/mysqld.log

(9)登录mysql
mysql -u root -p
(10)修改密码强度策略
set global validate_password.policy=0;
set global validate_password.length=4;
(11)修改密码
alter user 'root'@'localhost' identified with mysql_native_password by '123456';
flush privileges;
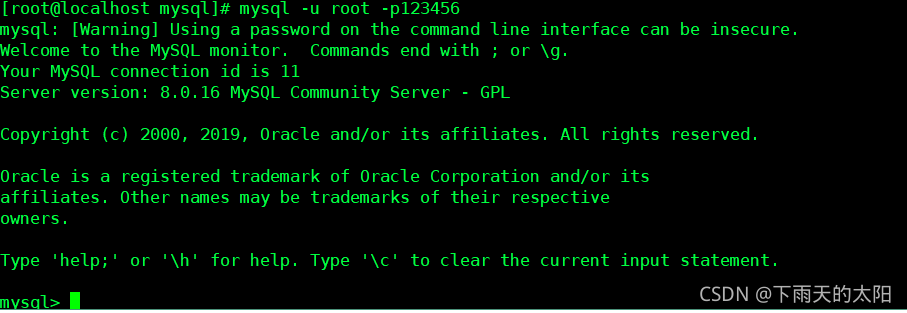
(12)重新登录mysql
mysql -u root -p123456
20、mysql的yum安装
(1)检查是否有安装mariadb
rpm -qa|grep mariadb
(2)卸载mariadb
rpm -e --nodeps mariadb-libs-5.5.60-1.el7_5.x86_64
(3)安装mysql80-community-release-el7-3.noarch.rpm
yum -y install https://repo.mysql.com//mysql80-community-release-el7-3.noarch.rpm

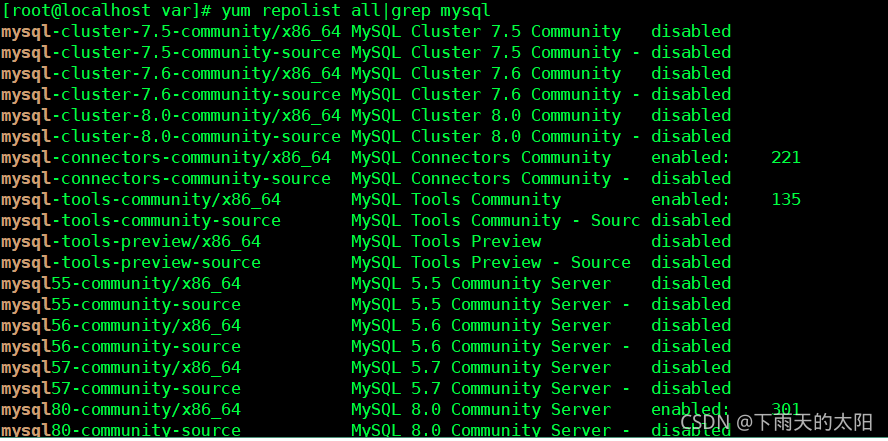
(4)查询mysql版本列表
yum repolist all|grep mysql
(5)安装mysql
yum install -y mysql-community-server
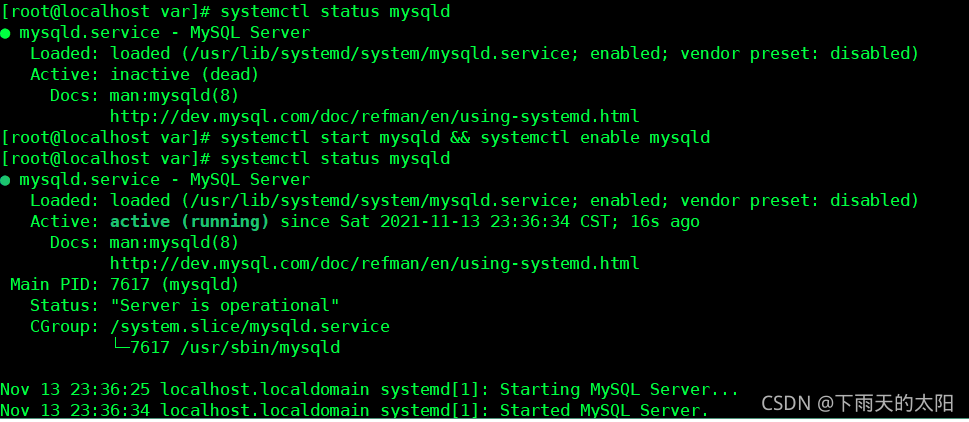
(6)启动mysql服务
systemctl status mysqld
systemctl start mysqld && systemctl enable mysqld
(7)查询mysql初始密码
grep “temporary password” /var/log/mysqld.log

(8)登录mysql
mysql -u root -p
(9)修改mysql登录密码
alter user ‘root’@‘localhost’ identified with mysql_native_password by ‘Mysql123456*’;
(10)退出MySQL重新登录MySQL
mysql -u root -pMysql123456*;
21、 mysql的deb包安装
mysql的deb包安装适用于在Ubuntu、Debian上安装
(1)下载MySQL的deb安装包
mysql的deb安装包下载
(2)上传deb安装包
上传deb安装包到usr/local/src
mkdir mysql     // 创建mysql文件夹
tar -xvf  -C mysql mysql-server_8.0.17-1ubuntu19.04_amd64.deb-bundle.tar      //解压deb安装包到mysql文件夹
(3)安装依赖
apt-get install libmecab2 libjson-perl
(4)安装mysql
dpkg -i mysql-*.deb
在安装时会报错,但是不用担心,可以使用下面命令来修复依赖
sudo apt-get -f -y install
(5)设置密码
修复依赖后会弹出设置mysql的root用户密码的弹框
(4)登录MySQL
设置密码后使用mysql -u root -p登录即可,输入密码后会进入MySQL。


 336
336


 被折叠的 条评论
为什么被折叠?


