


前言:
之前构建LSTM网络是通过Tensorflow,虽然也不错,可是接触到keras后觉得Keras真香!(虽然Tensorflow为默认后端)
Keras是一个高层神经网络API,Keras由纯Python编写而成并基Tensorflow、Theano以及CNTK后端。Keras 为支持快速实验而生,能够把你的idea迅速转换为结果,如果你有如下需求,请选择Keras:
- 简易和快速的原型设计(keras具有高度模块化,极简,和可扩充特性)
- 支持CNN和RNN,或二者的结合
- 无缝CPU和GPU切换
Keras适用的Python版本是:Python 2.7-3.6
1.构建LSTM实例
# design network
model = Sequential()
model.add(LSTM(30, input_shape=(train_x.shape[1], train_x.shape[2]),return_sequences=True))
model.add(LSTM(15, return_sequences=False))
model.add(Dropout(0.5)) #防止过拟合,每次更新参数时随机断开一定百分比(rate)的输入神经元
model.add(Dense(6, activation='softmax'))
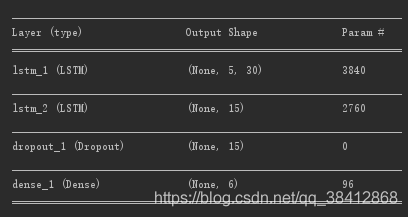
model.summary() #打印出模型概况
以上几句便已经构建好了用于分类的LSTM网络,网络结构如下图所示
接着是训练和测试网络
# fit network
history = model.fit(train_x,train_y, epochs=1000, batch_size=72, validation_data=(test_x, test_y), verbose=2, shuffle=True)
# test the model
score = model.evaluate(test_x, test_y, verbose=2) #evaluate函数按batch计算在某些输入数据上模型的误差
print('Test loss:', score[0])
print('Test accuracy:', score[1])
score = model.evaluate(train_x, train_y, verbose=2) #evaluate函数按batch计算在某些输入数据上模型的误差
print('Train loss:', score[0])
print('Train accuracy:', score[1])
然后可以利用history存储的训练信息,看到随着迭代次数的变化得到的模型在测试集和训练集上的表现
# plot history
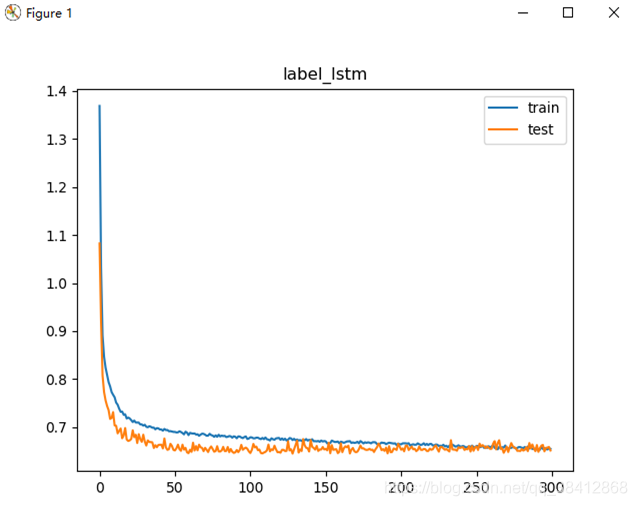
pyplot.plot(history.history['loss'], label='train')
pyplot.plot(history.history['val_loss'], label='test')
pyplot.legend()
pyplot.title("label_lstm")
pyplot.show()
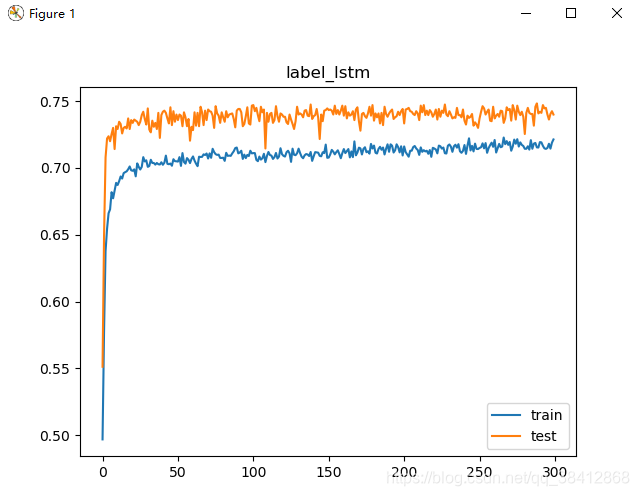
pyplot.plot(history.history['acc'], label='train')
pyplot.plot(history.history['val_acc'], label='test')
pyplot.legend()
pyplot.title("label_lstm")
pyplot.show()loss及accuracy随着迭代次数的变化曲线图:
2.LSTM层
keras.layers.recurrent.LSTM(units, activation='tanh', recurrent_activation='hard_sigmoid', use_bias=True, kernel_initializer='glorot_uniform', recurrent_initializer='orthogonal', bias_initializer='zeros', unit_forget_bias=True, kernel_regularizer=None, recurrent_regularizer=None, bias_regularizer=None, activity_regularizer=None, kernel_constraint=None, recurrent_constraint=None, bias_constraint=None, dropout=0.0, recurrent_dropout=0.0)2.1.参数:
- units:输出维度,也是LSTM的门结构里隐藏层节点数目
- input_dim:输入维度,如果该lstm为网络第一层时,需要指定
- input_length:输入的序列长度,
input_dim和input_length可以用input_shape统一代劳,
# as the first layer in a Sequential model
model = Sequential()
model.add(LSTM(32, input_shape=(10, 64)))
# now model.output_shape == (None, 32)
# note: `None` is the batch dimension.
-----------------------------------------------------------

# the following is identical:
model = Sequential()
model.add(LSTM(32, input_dim=64, input_length=10))

------------------------------------------------------------

# for subsequent layers, no need to specify the input size:
model.add(LSTM(16))- return_sequences:布尔值,默认False,控制返回类型。若为True则返回整个序列,否则仅返回输出序列的最后一个输出
2.2函数输入及输出shape:
输入shape :
(samples,timesteps,input_dim)3D张量
输出shape:
如果return_sequences=True:返回(samples,timesteps,output_dim)的3D张量
否则,返回(samples,output_dim)的2D张量,return_sequences默认为False
所以当LSTM层后面仍然有LSTM层的话,需要设置return_sequences=True
# to stack recurrent layers, you must use return_sequences=True
# on any recurrent layer that feeds into another recurrent layer.
# note that you only need to specify the input size on the first layer.
model = Sequential()
model.add(LSTM(64, input_dim=64, input_length=10, return_sequences=True))
model.add(LSTM(32, return_sequences=True))
model.add(LSTM(10))基于keras的lstm完整代码(含数据)见https://github.com/fff2zrx/lstm_example
参考:
- https://keras-cn.readthedocs.io/en/latest/layers/recurrent_layer/#lstm
- https://blog.csdn.net/jiangpeng59/article/details/77646186


 714
714


 被折叠的 条评论
为什么被折叠?
被折叠的 条评论
为什么被折叠?
 到【灌水乐园】发言


