


文章目录
一、ElasticSearch环境搭建
安装版本介绍
- ElasticSearch搭建版本:elasticsearch-7.6.2
- 分词器:elasticsearch-analysis-ik-7.6.2
1.解压
tar -zxvf elasticsearch-7.6.2-linux-x86_64.tar.gz
解压后目录结构
.
├── bin
├── config
├── jdk
├── lib
├── LICENSE.txt
├── logs
├── modules
├── NOTICE.txt
├── plugins
└── README.asciidoc
- config文件夹:es的配置文件信息其中包括jvm参数配置、es基本配置和用户角色等配置
- jdk文件夹:es自带jdk,7.6.2自带jdk版本为13.0.2在jdk文件夹下
- modules文件夹:es的使用的相关模块
- plugins文件夹:es相关插件
2.修改配置
es所有的配置文件都在config目录下,修改config目录下的配置文件
(1)jvm.options
jvm.options主要用于配置jvm相关的参数包括堆大小、垃圾收集器(默认使用G1)、GC日志等。jvm.options配置文件中默认的堆大小为1g,可根据服务器情况进行适当调整,但是堆最大和最小的值应保证相同,默认配置如下
-Xms1g
-Xmx1g
(2)elasticsearch.yml
修改配置如下:
cluster.name: es-test                   # 集群名称
node.name: node-10.20.128.24            # 节点名称
path.data: /export/source/elasticsearch-7.6.2/info/data     # es文档数据存储路径
path.logs: /export/source/elasticsearch-7.6.2/info/logs     # 日志存储路径
network.host: 10.20.128.24              # 外部访问的ip地址
http.port: 9200                         # 外部访问端口
http.cors.enabled: true                 # 跨域问题解决
http.cors.allow-origin: "*"
discovery.seed_hosts: [10.20.128.24]    # 设置集群服务器列表
cluster.initial_master_nodes: [node-10.20.128.24]   # 集群中的节点,节点名为node.name配置
3.启动ES
ES启动文件bin/elasticsearch,由于es启动不能使用root用户启动,因此需要切换至一个非root用户来执行
(1)新增用户并授权
新增用户esuser,并设置该用户密码(shch200818):
useradd esuser
passwd esuser
新增好用户后,给该用户在elasticsearch-7.6.2文件夹中授权
chown -R esuser ./elasticsearch-7.6.2
(2)启动es
使用esuser用户运行bin/elasticsearch文件
# 直接运行
./bin/elasticsearch
# 守护线程运行
./bin/elasticsearch -d 或者 nohup ./bin/elasticsearch &
当日志中出现即可
[2020-07-08T10:50:22,989][INFO ][o.e.n.Node ] [node-10.20.128.24] started
(3)验证启动是否成功
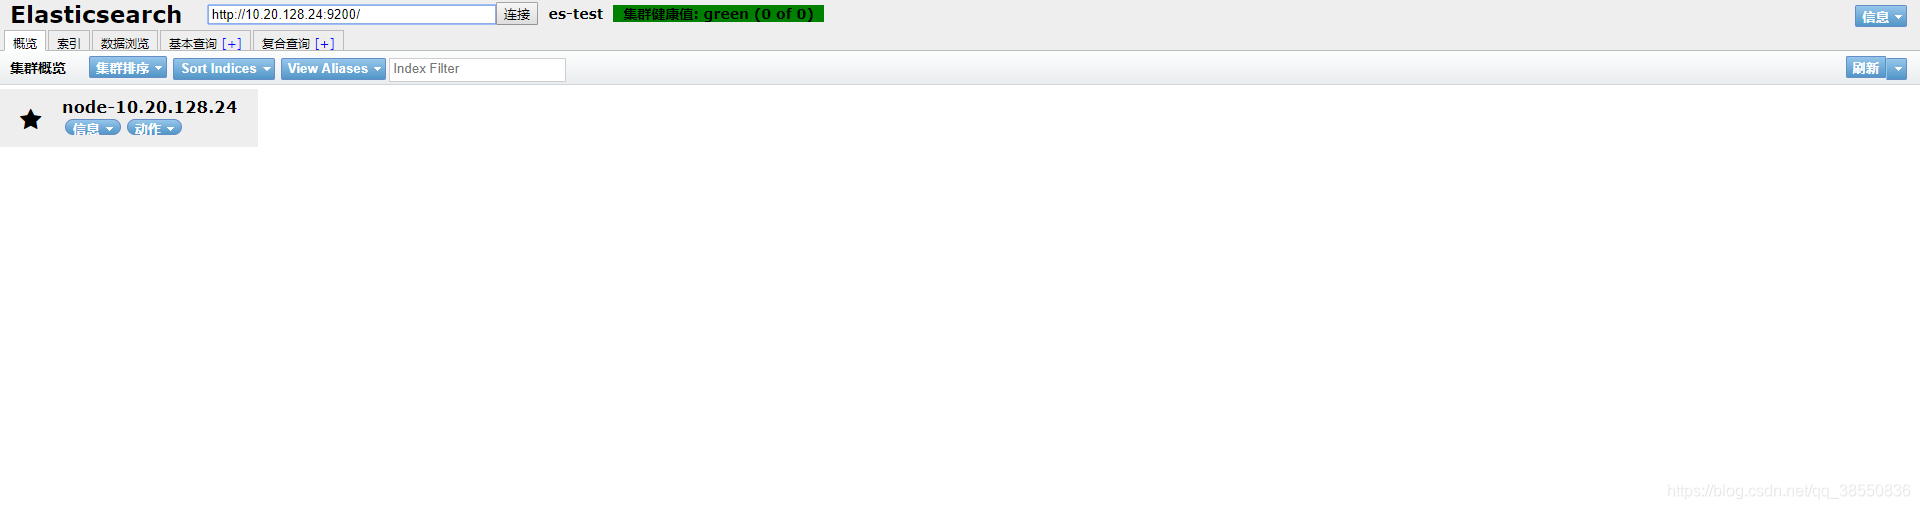
访问 服务器地址:9200 测试,出现 如下页面则表示es启动成功

二、elasticsearch-head插件安装
新版本中的elasticsearch-head插件安装与老版本安装不同,新版本要复杂很多需要安装node.js、grunt等
1.安装node.js
curl --silent --location https://rpm.nodesource.com/setup_10.x | bash -
yum install -y nodejs
# 测试安装
[root@localhost source]# node -v
v10.21.0
[root@localhost source]# npm -v
6.14.4
2.安装elasticsearch-head
# 安装git
yum install -y git
# 克隆elasticsearch-head
git clone git://github.com/mobz/elasticsearch-head.git
进入elasticsearch-head后安装
cd elasticsearch-head
npm install
3.运行elasticsearch-head
修改配置文件Gruntfile.js,在配置文件中添加配置:hostname: “10.20.128.24”(此安装插件的IP)。
修改前:
connect: {
            server: {
                        options: {
                                port: 9100,
                                base: '.',
                                keepalive: true
                        }
                }
        }
修改后:
connect: {
            server: {
                        options: {
                                port: 9100,
                                base: '.',
                                keepalive: true,
                                hostname: "10.20.128.24"
                        }
                }
        }
启动elasticsearch-head
npm start

> elasticsearch-head@0.0.0 start /export/source/elasticsearch-head
> grunt server

Running "connect:server" (connect) task
Waiting forever...
Started connect web server on http://10.20.128.24:9100
进入浏览器查看9100得到以下界面表示head插件安装完成
三、ik分词器添加
1.添加ik分词器插件
(1)在es的plugins文件夹下创建文件夹analysis-ik
(2)解压elasticsearch-analysis-ik-7.6.2.zip文件
unzip elasticsearch-analysis-ik-7.6.2.zip -d ./elasticsearch-7.6.2/plugins/analysis-ik/
(3)重启es服务,
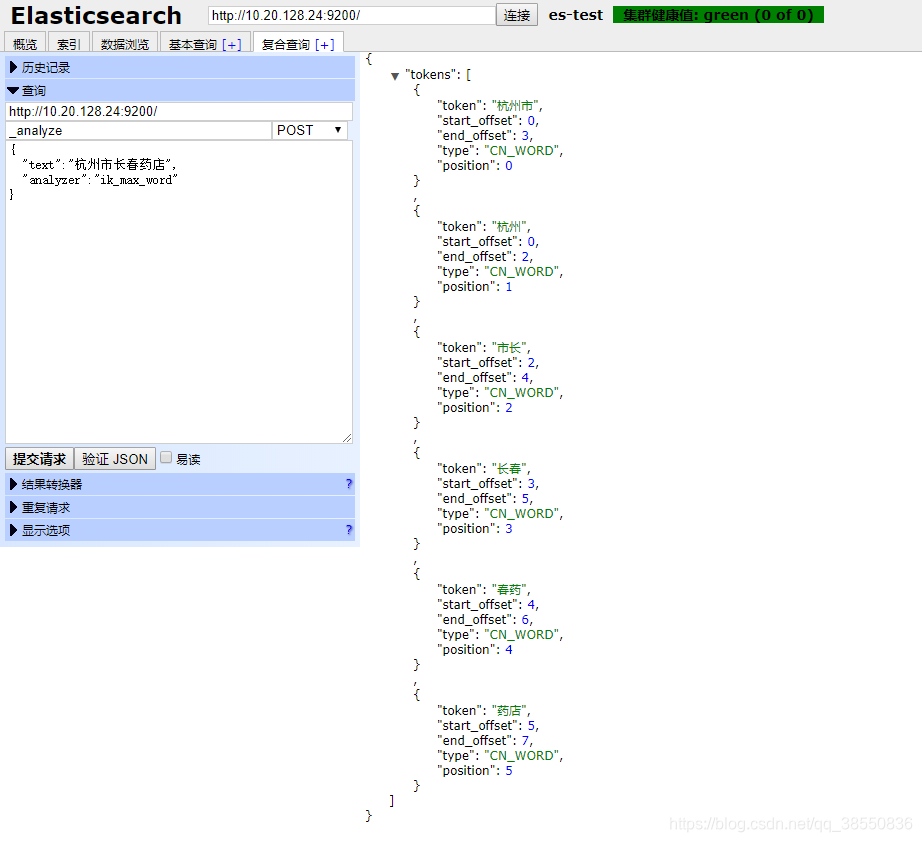
2.测试分词器是否安装成功
进入 服务器:9100 head控制台,通过rest请求测试
curl --location --request POST 'http://10.20.128.24:9200/_analyze' --header 'Content-Type: application/json' --data '{"text":"杭州市长春药店", "analyzer":"ik_max_word"}'
得到返回结果
{
    "tokens": [
        {
            "token": "杭州市",
            "start_offset": 0,
            "end_offset": 3,
            "type": "CN_WORD",
            "position": 0
        },
        {
            "token": "杭州",
            "start_offset": 0,
            "end_offset": 2,
            "type": "CN_WORD",
            "position": 1
        },
        {
            "token": "市长",
            "start_offset": 2,
            "end_offset": 4,
            "type": "CN_WORD",
            "position": 2
        },
        {
            "token": "长春",
            "start_offset": 3,
            "end_offset": 5,
            "type": "CN_WORD",
            "position": 3
        },
        {
            "token": "春药",
            "start_offset": 4,
            "end_offset": 6,
            "type": "CN_WORD",
            "position": 4
        },
        {
            "token": "药店",
            "start_offset": 5,
            "end_offset": 7,
            "type": "CN_WORD",
            "position": 5
        }
    ]
}
分词成功
四、遇到的坑
1.不能用root用户启动
java.lang.RuntimeException: can not run elasticsearch as root
	at org.elasticsearch.bootstrap.Bootstrap.initializeNatives(Bootstrap.java:105)
	at org.elasticsearch.bootstrap.Bootstrap.setup(Bootstrap.java:172)
	at org.elasticsearch.bootstrap.Bootstrap.init(Bootstrap.java:349)
	at org.elasticsearch.bootstrap.Elasticsearch.init(Elasticsearch.java:170)
	at org.elasticsearch.bootstrap.Elasticsearch.execute(Elasticsearch.java:161)
	at org.elasticsearch.cli.EnvironmentAwareCommand.execute(EnvironmentAwareCommand.java:86)
	at org.elasticsearch.cli.Command.mainWithoutErrorHandling(Command.java:125)
	at org.elasticsearch.cli.Command.main(Command.java:90)
	at org.elasticsearch.bootstrap.Elasticsearch.main(Elasticsearch.java:126)
	at org.elasticsearch.bootstrap.Elasticsearch.main(Elasticsearch.java:92)
- 问题原因:es不能使用root启动
- 解决方案:使用非root用户启动,并为该用户提供elasticsearch-7.6.2权限
2.文件权限不够
Likely root cause: java.nio.file.AccessDeniedException: /export/source/elasticsearch-7.6.2/config/elasticsearch.keystore
	at java.base/sun.nio.fs.UnixException.translateToIOException(UnixException.java:90)
	at java.base/sun.nio.fs.UnixException.rethrowAsIOException(UnixException.java:111)
	at java.base/sun.nio.fs.UnixException.rethrowAsIOException(UnixException.java:116)
	at java.base/sun.nio.fs.UnixFileSystemProvider.newByteChannel(UnixFileSystemProvider.java:219)
	at java.base/java.nio.file.Files.newByteChannel(Files.java:374)
	at java.base/java.nio.file.Files.newByteChannel(Files.java:425)
	at org.apache.lucene.store.SimpleFSDirectory.openInput(SimpleFSDirectory.java:77)
	at org.elasticsearch.common.settings.KeyStoreWrapper.load(KeyStoreWrapper.java:219)
	at org.elasticsearch.bootstrap.Bootstrap.loadSecureSettings(Bootstrap.java:234)
	at org.elasticsearch.bootstrap.Bootstrap.init(Bootstrap.java:305)
	at org.elasticsearch.bootstrap.Elasticsearch.init(Elasticsearch.java:170)
	at org.elasticsearch.bootstrap.Elasticsearch.execute(Elasticsearch.java:161)
	at org.elasticsearch.cli.EnvironmentAwareCommand.execute(EnvironmentAwareCommand.java:86)
	at org.elasticsearch.cli.Command.mainWithoutErrorHandling(Command.java:125)
	at org.elasticsearch.cli.Command.main(Command.java:90)
	at org.elasticsearch.bootstrap.Elasticsearch.main(Elasticsearch.java:126)
	at org.elasticsearch.bootstrap.Elasticsearch.main(Elasticsearch.java:92)
- 问题原因:使用root用户启动报错后会生成一些root用户所有的文件,但esuser没有这样的权限
- 解决方案:因此需要删除这些文件或者给esuser赋予这些文件的权限
chown -R esuser ./elasticsearch-7.6.2
3.启动日志报错
(1) 最大文件描述符太低
[1]: max file descriptors [4096] for elasticsearch process is too low, increase to at least [65535]
- 问题原因:为es分配的最大文件描述符太低
- 解决方案:修改/etc/security/limits.conf文件进行调整
* - nofile 65536
* - memlock unlimited
(2) 虚拟内太低
[2]: max virtual memory areas vm.max_map_count [65530] is too low, increase to at least [262144]
- 问题原因:虚拟内存的max_map_count太低,至少需要调整到262144
- 解决方案:修改/etc/sysctl.conf文件,添加配置
vim /etc/sysctl.conf
# 文件中添加如下配置
vm.max_map_count=655360
# 执行命令生效配置
sysctl -p
4.安装head失败
npm ERR! code ELIFECYCLE
npm ERR! errno 1
npm ERR! phantomjs-prebuilt@2.1.16 install: `node install.js`
npm ERR! Exit status 1
npm ERR!
npm ERR! Failed at the phantomjs-prebuilt@2.1.16 install script.
npm ERR! This is probably not a problem with npm. There is likely additional logging output above.

npm ERR! A complete log of this run can be found in:
npm ERR!     /root/.npm/_logs/2020-07-08T03_37_28_096Z-debug.log
- 问题原因:没安装phantomjs
- 解决方案:执行命令
npm install phantomjs-prebuilt@2.1.16 --ignore-script
5.在elasticsearch-head中npm安装时报错
Error extracting archive
Phantom installation failed { Error: Command failed: tar jxf /tmp/phantomjs/phantomjs-2.1.1-linux-x86_64.tar.bz2
tar (child): bzip2: Cannot exec: No such file or directory
tar (child): Error is not recoverable: exiting now
tar: Child returned status 2
tar: Error is not recoverable: exiting now
- 问题原因:bzip2不存在
- 解决方案:安装bzip2
yum install -y bzip2


 1490
1490


 被折叠的 条评论
为什么被折叠?
被折叠的 条评论
为什么被折叠?
 到【灌水乐园】发言


