


文章目录
一、Flume概述
1.1 Flume定义
Flume是Cloudera提供的一个高可用的,高可靠的,分布式的海量日志采集、聚合和传输的系统。Flume基于流式架构,灵活简单。
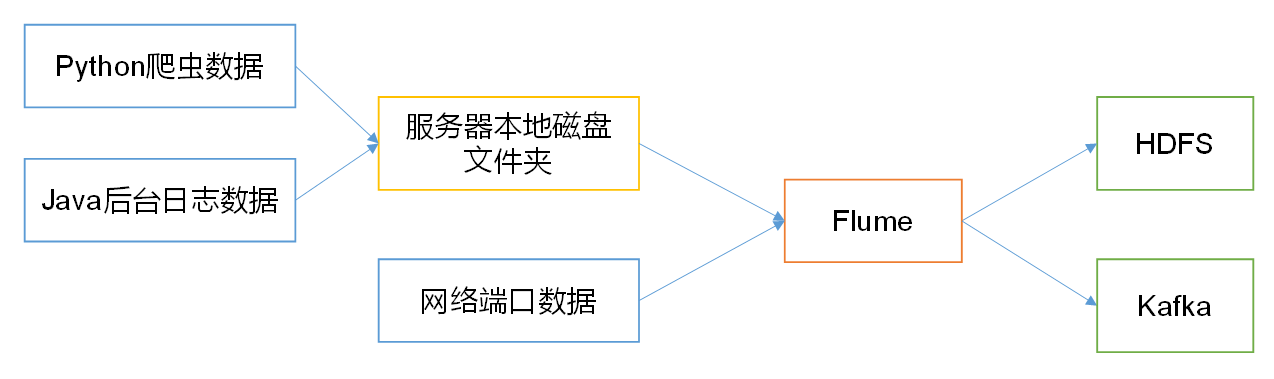
Flume最主要的作用就是,实时读取服务器本地磁盘的数据,将数据写入到HDFS。
1.2 Flume的优点
- 可以和任意存储进程集成
- 输入的的数据速率大于写入目的存储的速率,
Flume会进行缓冲,减小HDFS的压力。 Flume中的事务基于Channel,使用了两个事务模型(sender+receiver),确保消息被可靠发送。
Flume使用两个独立的事务分别负责从soucrce到channel,以及从channel到sink的事件传递。一旦事务中所有的数据全部成功提交到channel,那么source才认为该数据读取完成。同理,只有成功被sink写出去的数据,才会从channel中移除。
1.3 Flume组成架构
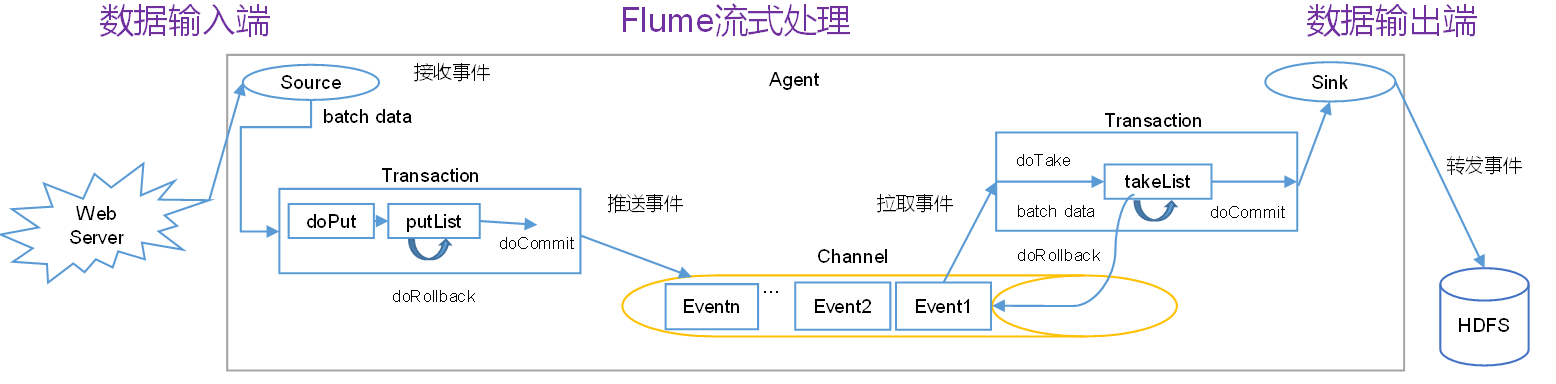
Put事务流程:
doPut:将批数据先写入临时缓冲区putListdoCommit:检查channel内存队列是否足够合并。doRollback:channel内存队列空间不足,回滚数据
Take事务:
doTake:先将数据取到临时缓冲区takeListdoCommit:如果数据全部发送成功,则清除临时缓冲区takeListdoRollback:数据发送过程中如果出现异常,rollback将临时缓冲区takeList中的数据归还给channel内存队列。
下面我们来详细介绍一下Flume架构中的组件。
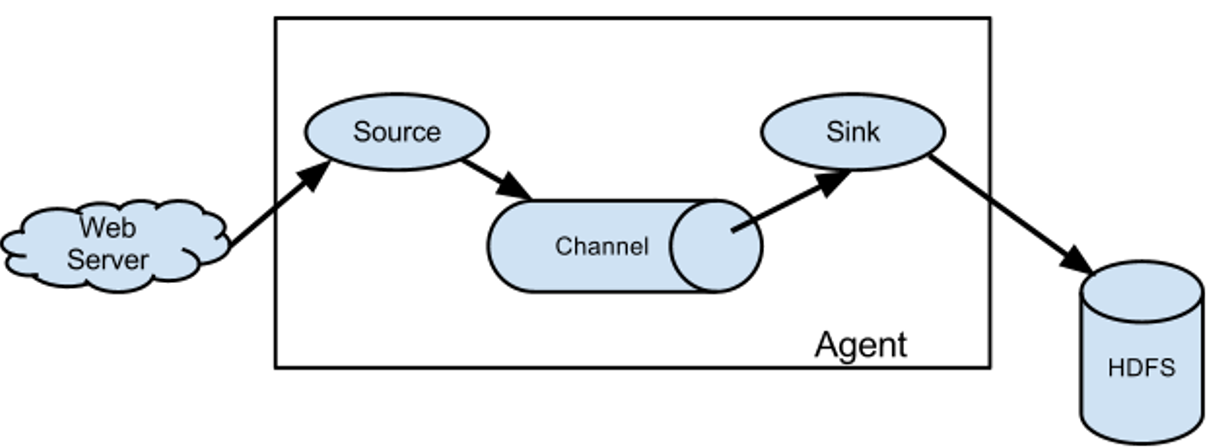
①Agent
Agent是一个JVM进程,它以事件的形式将数据从源头送至目的。
Agent主要有3个部分组成:Source、Channel、Sink。
②Source
Source是负责接收数据到Flume Agent的组件。Source组件可以处理各种类型、各种格式的日志数据,包括avro、thrift、exec、jms、spooling directory、netcat、sequence generator、syslog、http、legacy。
③Channel
Channel是位于Source和Sink之间的缓冲区。因此,Channel允许Source和Sink运作在不同的速率上。Channel是线程安全的,可以同时处理几个Source的写入操作和几个Sink的读取操作。
Flume自带两种Channel:Memory Channel和File Channel。
Memory Channel:内存中的队列。Memory Channel在不需要关心数据丢失的情景下适用。如果需要关心数据丢失,那么Memory Channel就不应该使用,因为程序死亡、机器宕机或者重启都会导致数据丢失。
File Channel:将所有事件写到磁盘。因此在程序关闭或机器宕机的情况下不会丢失数据。
④Sink
Sink不断地轮询Channel中的事件且批量地移除它们,并将这些事件批量写入到存储或索引系统、或者被发送到另一个Flume Agent。
Sink是完全事务性的。在从Channel批量删除数据之前,每个Sink用Channel启动一个事务。批量事件一旦成功写出到存储系统或下一个Flume Agent,Sink就利用Channel提交事务。事务一旦被提交,该Channel从自己的内部缓冲区删除事件。
Sink组件目的地包括hdfs、logger、avro、thrift、ipc、file、null、HBase、solr、自定义
⑤Event
Flume数据传输的基本单元,以事件的形式将数据从源头送至目的地。Event由可选的header和载有数据的一个byte array构成。Header是容纳了key-value字符串对的HashMap。

1.4 Flume拓扑结构
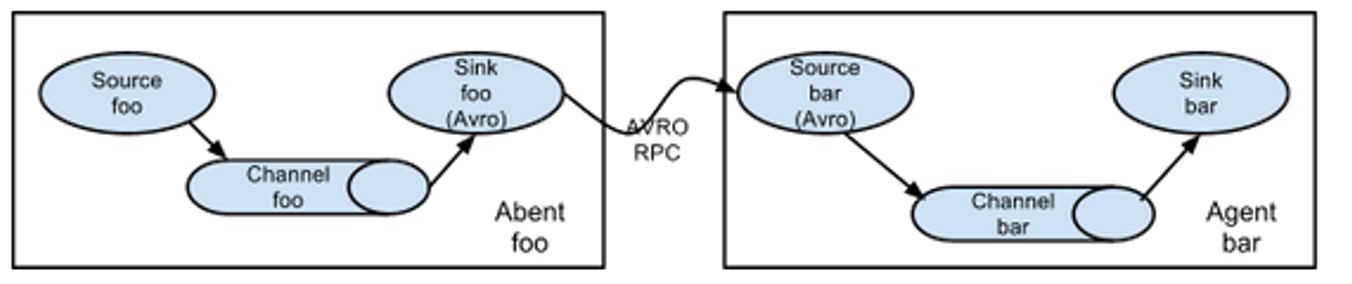
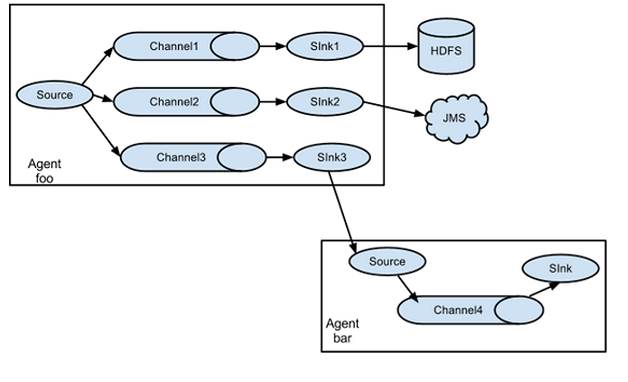
①Flume Agent连接
这种模式是将多个Flume给顺序连接起来了,从最初的Source开始到最终Sink传送的目的存储系统。此模式不建议桥接过多的Flume数量,Flume数量过多不仅会影响传输速率,而且一旦传输过程中某个节点Flume宕机,会影响整个传输系统。
②单source,多channel、sink
Flume支持将事件流向一个或者多个目的地。这种模式将数据源复制到多个Channel中,每个Channel都有相同的数据,Sink可以选择传送的不同的目的地。
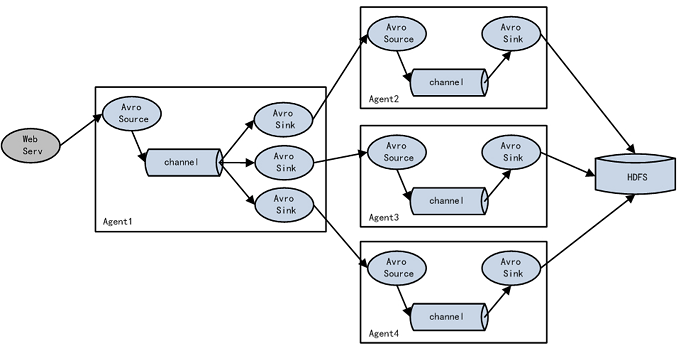
③Flume负载均衡
Flume支持使用将多个Sink逻辑上分到一个Sink组,Flume将数据发送到不同的Sink,主要解决负载均衡和故障转移问题。
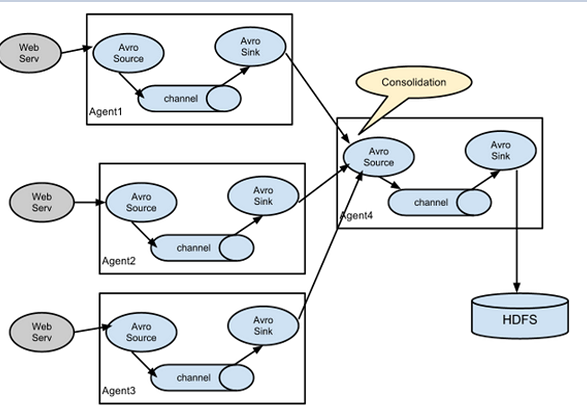
④ Flume Agent聚合
这种模式是我们最常见的,也非常实用,日常web应用通常分布在上百个服务器,大者甚至上千个、上万个服务器。产生的日志,处理起来也非常麻烦。用Flume的这种组合方式能很好的解决这一问题,每台服务器部署一个Flume采集日志,传送到一个集中收集日志的Flume,再由此Flume上传到hdfs、hive、hbase、jms等,进行日志分析。
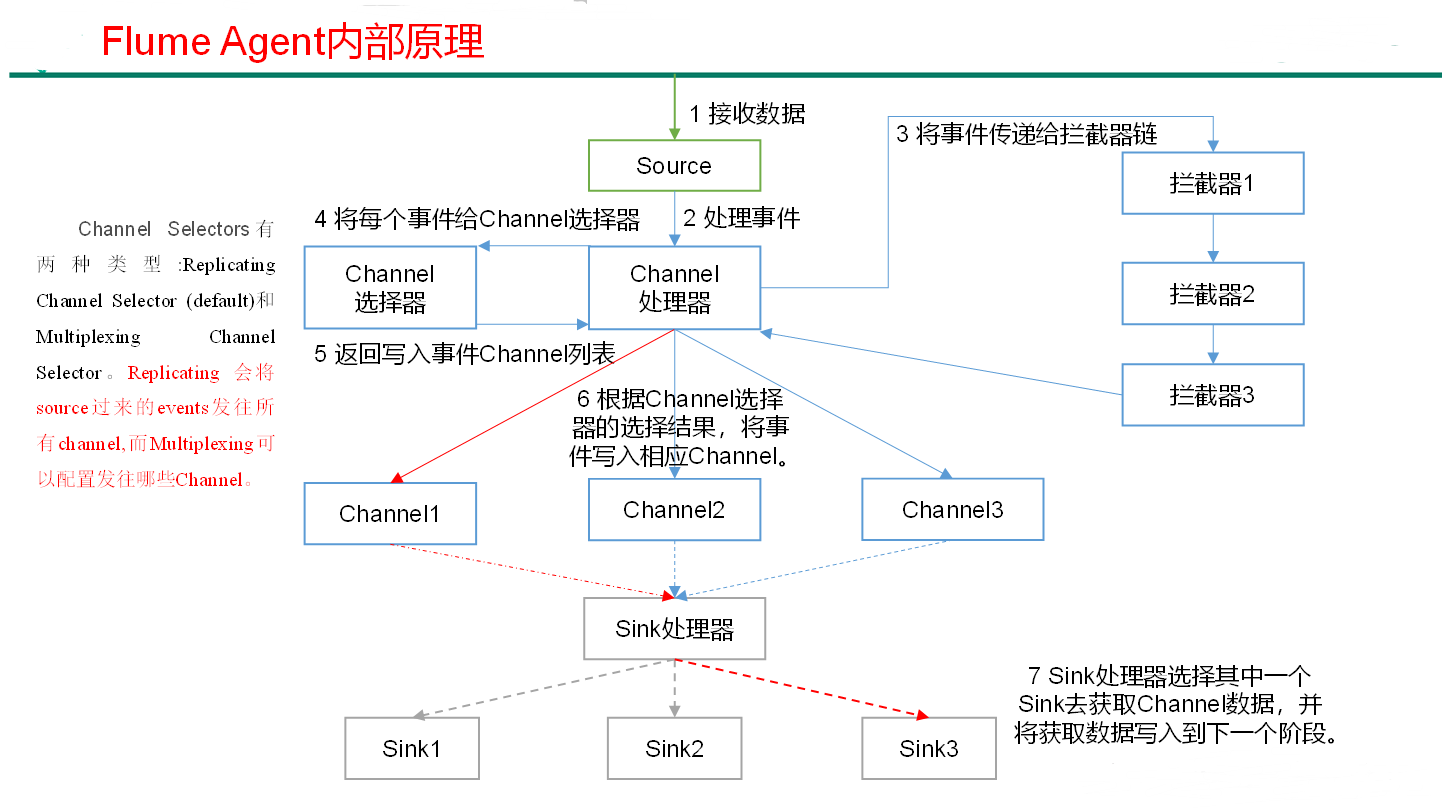
1.5 Flume Agent内部原理
1.6 Flume安装
- 解压
apache-flume-1.7.0-bin.tar.gz到/opt/module/目录下
[root@hadoop100 software]$ tar -zxf apache-flume-1.7.0-bin.tar.gz -C
/opt/module/
2.复制conf下的flume-env.sh.template为flume-env.sh,并配置JAVA_HOME
[root@hadoop100 conf]$ mv flume-env.sh.template flume-env.sh
[root@hadoop100 conf]$ vi flume-env.sh
export JAVA_HOME=/opt/module/jdk1.8.0_144
二、企业开发案例
2.1 监控端口数据
案例需求: 首先启动Flume任务,监控本机44444端口,服务端;然后通过netcat工具向本机44444端口发送消息,客户端;最后Flume将监听的数据实时显示在控制台。
实现步骤:
① 创建Flume Agent配置文件flume-netcat-logger.conf
- 在
Flume目录下创建Job文件夹并进入Job文件夹
[root@hadoop100 flume]# mkdir job
[root@hadoop100 flume]# cd job/
- 创建
Flume Agent配置文件flume-netcat-logger.conf
[root@hadoop100 flume]# vim flume-netcat-logger.conf
# Name the components on this agent
# a1 :表示agent的名称
a1.sources = r1  #r1 :表示a1的输入源
a1.sinks = k1 #k1 :表示a1的输出目的地
a1.channels = c1 #c1:表示a1的缓冲区

# Describe/configure the source
a1.sources.r1.type = netcat #表示a1的输入源类型为netcat端口类型
a1.sources.r1.bind = localhost #表示a1的监听的主机
a1.sources.r1.port = 44444 #表示a1的监听的端口号

# Describe the sink
a1.sinks.k1.type = logger #表示a1的输出目的地是控制台logger类型

# Use a channel which buffers events in memory
a1.channels.c1.type = memory #表示a1的channel类型是memory内存型
a1.channels.c1.capacity = 1000 #表示al的channel总容量1000个event
#表示a1的channel传输时收集到了100条event以后再去提交事务
a1.channels.c1.transactionCapacity = 100

# Bind the source and sink to the channel
a1.sources.r1.channels = c1 #表示将r1和c1连接起来
a1.sinks.k1.channel = c1 # 表示将k1和c1连接起来
②开启Flume监听端口
第一种写法:
[root@hadoop100 flume]# bin/flume-ng agent --conf conf/ --name a1
--conf-file job/flume-netcat-logger.conf -Dflume.root.logger=INFO,console
第二种写法:
[root@hadoop100 flume]$ bin/flume-ng agent -c conf/ -n a1 –f
job/flume-netcat-logger.conf -Dflume.root.logger=INFO,console
参数说明:
--conf conf/:表示配置文件存储在conf/目录--name a1:表示给agent起名为a1--conf-file job/flume-netcat.conf:flume本次启动读取的配置文件是在job文件夹下的flume-telnet.conf文件。-Dflume.root.logger==INFO,console:-D表示flume运行时动态修改flume.root.logger参数属性值,并将控制台日志打印级别设置为INFO级别。日志级别包括:log、info、warn、error。
③ 使用netcat工具向44444端口发送内容
[root@hadoop100 flume]$ nc localhost 44444
Hello Flume
④在Flume监听页面观察接收数据情况

2.2 实时读取本地文件到HDFS
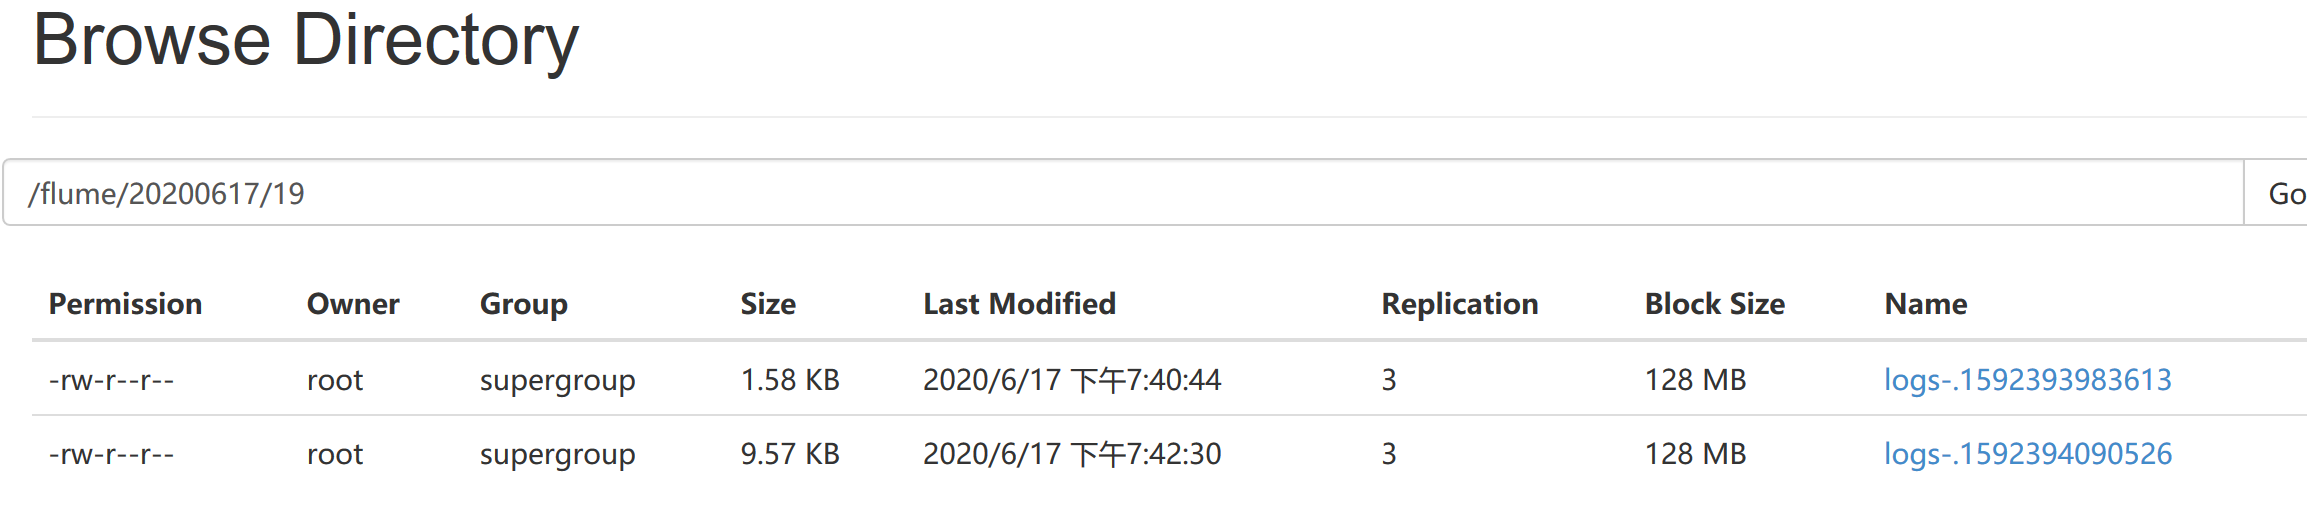
案例需求: 实时监控Hive日志,并上传到HDFS中
实现步骤:
①Flume要想将数据输出到HDFS,必须持有Hadoop相关jar包
将commons-configuration-1.6.jar、hadoop-auth-2.7.2.jar、hadoop-common-2.7.2.jar、hadoop-hdfs-2.7.2.jar、commons-io-2.4.jar、htrace-core-3.1.0-incubating.jar拷贝到/opt/module/flume/lib文件夹下。
②创建flume-file-hdfs.conf文件
内容如下:
# Name the components on this agent
a2.sources = r2
a2.sinks = k2
a2.channels = c2

# Describe/configure the source
a2.sources.r2.type = exec
a2.sources.r2.command = tail -F /opt/module/hive-1.2.1/logs/hive.log
a2.sources.r2.shell = /bin/bash -c

# Describe the sink
a2.sinks.k2.type = hdfs
a2.sinks.k2.hdfs.path = hdfs://hadoop100:9000/flume/%Y%m%d/%H
#上传文件的前缀
a2.sinks.k2.hdfs.filePrefix = logs-
#是否按照时间滚动文件夹
a2.sinks.k2.hdfs.round = true
#多少时间单位创建一个新的文件夹
a2.sinks.k2.hdfs.roundValue = 1
#重新定义时间单位
a2.sinks.k2.hdfs.roundUnit = hour
#是否使用本地时间戳
a2.sinks.k2.hdfs.useLocalTimeStamp = true
#积攒多少个Event才flush到HDFS一次
a2.sinks.k2.hdfs.batchSize = 1000
#设置文件类型,可支持压缩
a2.sinks.k2.hdfs.fileType = DataStream
#多久生成一个新的文件
a2.sinks.k2.hdfs.rollInterval = 60
#设置每个文件的滚动大小
a2.sinks.k2.hdfs.rollSize = 134217700
#文件的滚动与Event数量无关
a2.sinks.k2.hdfs.rollCount = 0

# Use a channel which buffers events in memory
a2.channels.c2.type = memory
a2.channels.c2.capacity = 1000
a2.channels.c2.transactionCapacity = 100

# Bind the source and sink to the channel
a2.sources.r2.channels = c2
a2.sinks.k2.channel = c2
注意:对于所有与时间相关的转义序列,Event Header中必须存在以"timestamp"的key(除非hdfs.useLocalTimeStamp设置为true,此方法会使用TimestampInterceptor自动添加timestamp),即设置a3.sinks.k3.hdfs.useLocalTimeStamp = true。
③ 执行监控配置
[root@hadoop100 flume]# bin/flume-ng agent --conf conf/ --name a2
--conf-file job/flume-file-hdfs.conf
④开启Hadoop和Hive并操作Hive产生日志
[root@hadoop100 hadoop-2.7.2]$ sbin/start-dfs.sh
[root@hadoop101 hadoop-2.7.2]$ sbin/start-yarn.sh

[root@hadoop100 hive]$ bin/hive
hive (default)>
⑤在HDFS上查看文件
2.3 实时读取目录文件到HDFS
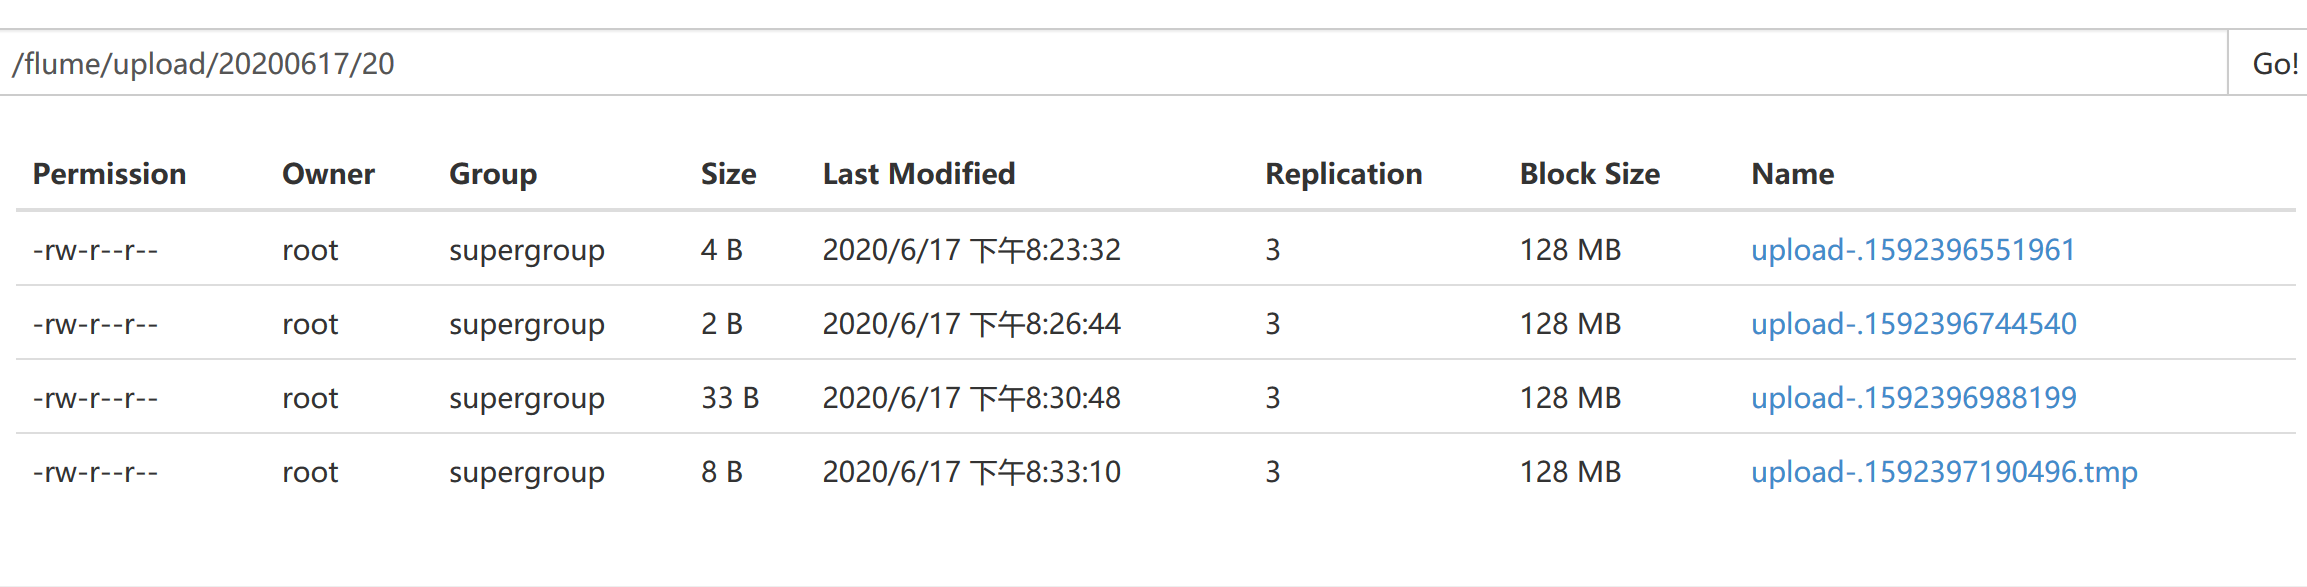
案例需求: 使用Flume监听整个目录的文件
实现步骤:
① 创建配置文件flume-dir-hdfs.conf
a3.sources = r3
a3.sinks = k3
a3.channels = c3

# Describe/configure the source
a3.sources.r3.type = spooldir
#监控的地址
a3.sources.r3.spoolDir = /opt/module/flume-1.7.0/upload
a3.sources.r3.fileSuffix = .COMPLETED
a3.sources.r3.fileHeader = true
#忽略所有以.tmp结尾的文件,不上传
a3.sources.r3.ignorePattern = ([^ ]*\.tmp)

# Describe the sink
a3.sinks.k3.type = hdfs
#文件上传到hdfs的路径
a3.sinks.k3.hdfs.path = hdfs://hadoop100:9000/flume/upload/%Y%m%d/%H
#上传文件的前缀
a3.sinks.k3.hdfs.filePrefix = upload-
#是否按照时间滚动文件夹
a3.sinks.k3.hdfs.round = true
#多少时间单位创建一个新的文件夹
a3.sinks.k3.hdfs.roundValue = 1
#重新定义时间单位
a3.sinks.k3.hdfs.roundUnit = hour
#是否使用本地时间戳
a3.sinks.k3.hdfs.useLocalTimeStamp = true
#积攒多少个Event才flush到HDFS一次
a3.sinks.k3.hdfs.batchSize = 100
#设置文件类型,可支持压缩
a3.sinks.k3.hdfs.fileType = DataStream
#多久生成一个新的文件
a3.sinks.k3.hdfs.rollInterval = 60
#设置每个文件的滚动大小大概是128M
a3.sinks.k3.hdfs.rollSize = 134217700
#文件的滚动与Event数量无关
a3.sinks.k3.hdfs.rollCount = 0

# Use a channel which buffers events in memory
a3.channels.c3.type = memory
a3.channels.c3.capacity = 1000
a3.channels.c3.transactionCapacity = 100

# Bind the source and sink to the channel
a3.sources.r3.channels = c3
a3.sinks.k3.channel = c3
②启动监控文件夹命令
[root@hadoop100 flume]$ bin/flume-ng agent --conf conf/ --name a3 --conf-file job/flume-dir-hdfs.conf
说明:
加粗样式
- 不要在监控目录中创建并持续修改文件
- 上传完成的文件会以
.COMPLETED结尾 - 被监控文件夹每500毫秒扫描一次文件变动
②向upload文件夹中添加文件
[root@hadoop100 flume]$ mkdir upload
[root@hadoop100 upload]$ vim  test.txt
123
456
③查看HDFS上的数据
 、
、
④查看upload文件夹

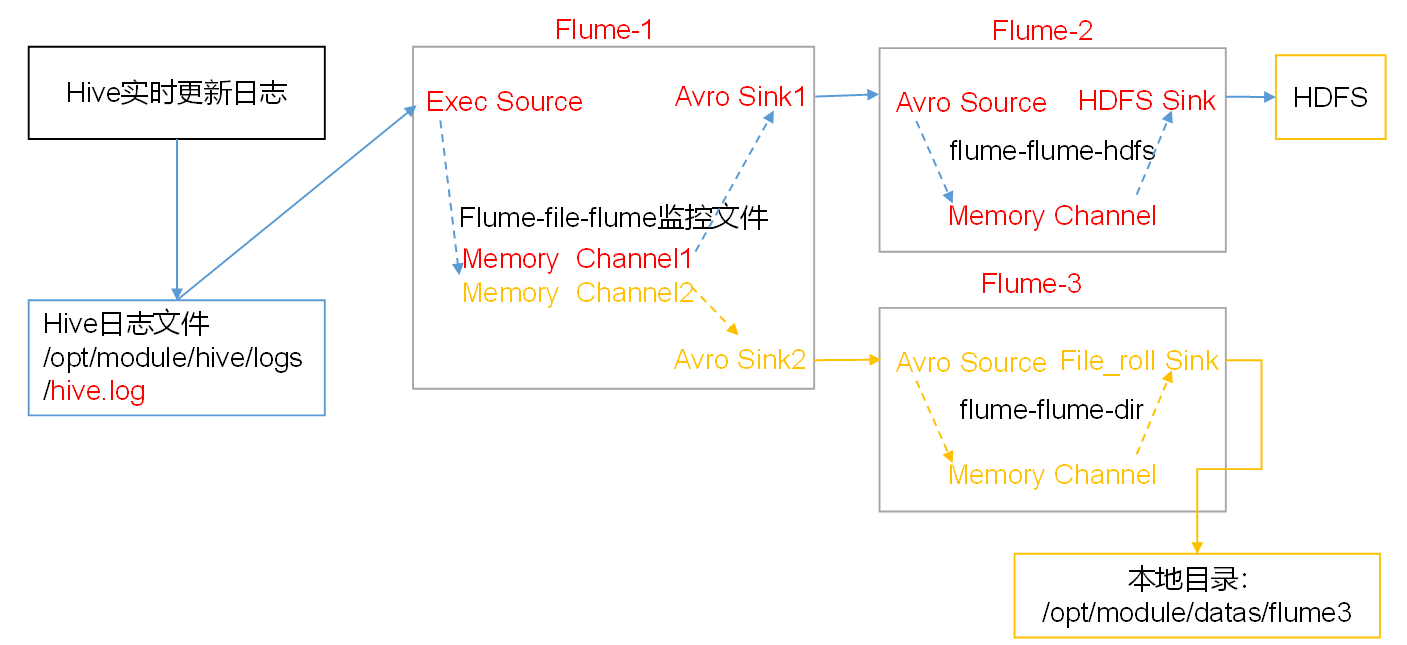
2.4 单数据源多出口案例(选择器)
案例需求: 使用Flume-1监控文件变动,Flume-1将变动内容传递给Flume-2,Flume-2负责存储到HDFS。同时Flume-1将变动内容传递给Flume-3,Flume-3负责输出到Local FileSystem。
实现步骤:
①准备工作
在/opt/module/flume/job目录下创建group1文件夹:
[root@hadoop100 job]# mkdir group1/
在/opt/module/data/目录下创建flume3文件夹
[root@hadoop100 data]# mkdir flume3
②创建flume-file-flume.conf
配置1个接收日志文件的source和两个channel、两个sink,分别输送给flume-flume-hdfs和flume-flume-dir。
# Name the components on this agent
a1.sources = r1
a1.sinks = k1 k2
a1.channels = c1 c2
# 将数据流复制给所有channel
a1.sources.r1.selector.type = replicating

# Describe/configure the source
a1.sources.r1.type = exec
a1.sources.r1.command = tail -F /opt/module/hive-1.2.1/logs/hive.log
a1.sources.r1.shell = /bin/bash -c

# Describe the sink
# sink端的avro是一个数据发送者
a1.sinks.k1.type = avro
a1.sinks.k1.hostname = hadoop100
a1.sinks.k1.port = 4141

a1.sinks.k2.type = avro
a1.sinks.k2.hostname = hadoop100
a1.sinks.k2.port = 4142

# Describe the channel
a1.channels.c1.type = memory
a1.channels.c1.capacity = 1000
a1.channels.c1.transactionCapacity = 100

a1.channels.c2.type = memory
a1.channels.c2.capacity = 1000
a1.channels.c2.transactionCapacity = 100

# Bind the source and sink to the channel
a1.sources.r1.channels = c1 c2
a1.sinks.k1.channel = c1
a1.sinks.k2.channel = c2
注:Avro是由Hadoop创始人Doug Cutting创建的一种语言无关的数据序列化和RPC框架。
③创建flume-flume-hdfs.conf
配置上级Flume输出的Source,输出是到HDFS的Sink。
# Name the components on this agent
a1.sources = r1
a1.sinks = k1 k2
a1.channels = c1 c2
# 将数据流复制给所有channel
a1.sources.r1.selector.type = replicating

# Describe/configure the source
a1.sources.r1.type = exec
a1.sources.r1.command = tail -F /opt/module/hive-1.2.1/logs/hive.log
a1.sources.r1.shell = /bin/bash -c

# Describe the sink
# sink端的avro是一个数据发送者
a1.sinks.k1.type = avro
a1.sinks.k1.hostname = hadoop100
a1.sinks.k1.port = 4141

a1.sinks.k2.type = avro
a1.sinks.k2.hostname = hadoop100
a1.sinks.k2.port = 4142

# Describe the channel
a1.channels.c1.type = memory
a1.channels.c1.capacity = 1000
a1.channels.c1.transactionCapacity = 100

a1.channels.c2.type = memory
a1.channels.c2.capacity = 1000
a1.channels.c2.transactionCapacity = 100

# Bind the source and sink to the channel
a1.sources.r1.channels = c1 c2
a1.sinks.k1.channel = c1
a1.sinks.k2.channel = c2

[root@hadoop100 group1]#
[root@hadoop100 group1]# cat flume-flume-hdfs.conf
# Name the components on this agent
a2.sources = r1
a2.sinks = k1
a2.channels = c1

# Describe/configure the source
# source端的avro是一个数据接收服务
a2.sources.r1.type = avro
a2.sources.r1.bind = hadoop100
a2.sources.r1.port = 4141

# Describe the sink
a2.sinks.k1.type = hdfs
a2.sinks.k1.hdfs.path = hdfs://hadoop100:9000/flume2/%Y%m%d/%H
#上传文件的前缀
a2.sinks.k1.hdfs.filePrefix = flume2-
#是否按照时间滚动文件夹
a2.sinks.k1.hdfs.round = true
#多少时间单位创建一个新的文件夹
a2.sinks.k1.hdfs.roundValue = 1
#重新定义时间单位
a2.sinks.k1.hdfs.roundUnit = hour
#是否使用本地时间戳
a2.sinks.k1.hdfs.useLocalTimeStamp = true
#积攒多少个Event才flush到HDFS一次
a2.sinks.k1.hdfs.batchSize = 100
#设置文件类型,可支持压缩
a2.sinks.k1.hdfs.fileType = DataStream
#多久生成一个新的文件
a2.sinks.k1.hdfs.rollInterval = 600
#设置每个文件的滚动大小大概是128M
a2.sinks.k1.hdfs.rollSize = 134217700
#文件的滚动与Event数量无关
a2.sinks.k1.hdfs.rollCount = 0

# Describe the channel
a2.channels.c1.type = memory
a2.channels.c1.capacity = 1000
a2.channels.c1.transactionCapacity = 100

# Bind the source and sink to the channel
a2.sources.r1.channels = c1
a2.sinks.k1.channel = c1
④创建flume-flume-dir.conf
配置上级Flume输出的Source,输出是到本地目录的Sink。
# Name the components on this agent
a3.sources = r1
a3.sinks = k1
a3.channels = c2

# Describe/configure the source
a3.sources.r1.type = avro
a3.sources.r1.bind = hadoop100
a3.sources.r1.port = 4142

# Describe the sink
a3.sinks.k1.type = file_roll
a3.sinks.k1.sink.directory = /opt/module/data/flume3

# Describe the channel
a3.channels.c2.type = memory
a3.channels.c2.capacity = 1000
a3.channels.c2.transactionCapacity = 100

# Bind the source and sink to the channel
a3.sources.r1.channels = c2
a3.sinks.k1.channel = c2
⑤执行配置文件
[root@hadoop100 flume-1.7.0]$ bin/flume-ng agent --conf conf/ --name a3
 --conf-file job/group1/flume-flume-dir.conf

[root@hadoop100 flume-1.7.0]$ bin/flume-ng agent --conf conf/ --name a2
 --conf-file job/group1/flume-flume-hdfs.conf

[root@hadoop100 flume-1.7.0]$ bin/flume-ng agent --conf conf/ --name a1
 --conf-file job/group1/flume-file-flume.conf
⑥执行Hive命令
[root@hadoop100 hive]$ bin/hive
hive (default)> select * from stu;
⑦检查数据
HDFS:

本地: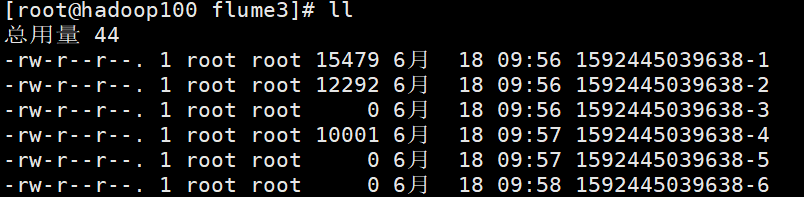
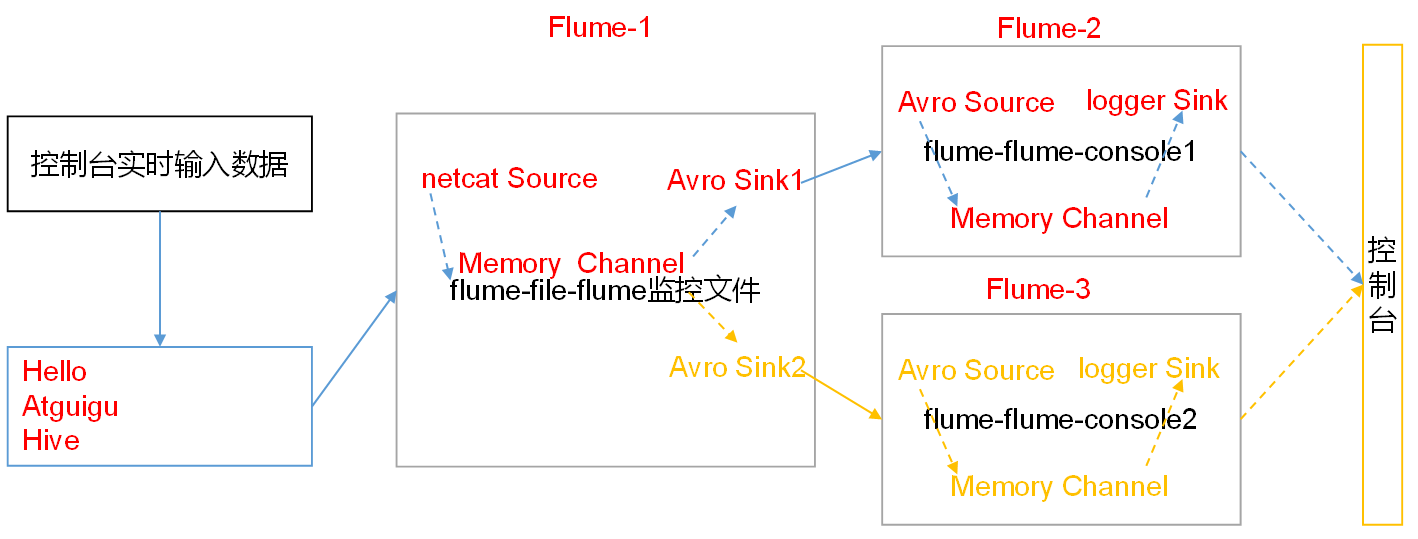
2.5 单数据源多出口案例(Sink组)
案例需求: 使用Flume-1监控控制台实时输入数据,Flume-1将内容轮训分别传递给Flume-2,Flume-3然后在控制台打印。
实现步骤:
①准备工作
在/opt/module/flume/job下group2文件夹
[root@hadoop100 job]# mkdir group2
②创建flume-netcat-flume.conf
配置1个接收日志文件的source和1个channel、两个sink,分别输送给flume-flume-console1和flume-flume-console2。
# Name the components on this agent
a1.sources = r1
a1.channels = c1
a1.sinkgroups = g1
a1.sinks = k1 k2

# Describe/configure the source
a1.sources.r1.type = netcat
a1.sources.r1.bind = localhost
a1.sources.r1.port = 44444

a1.sinkgroups.g1.processor.type = load_balance
a1.sinkgroups.g1.processor.backoff = true
a1.sinkgroups.g1.processor.selector = round_robin
a1.sinkgroups.g1.processor.selector.maxTimeOut=10000

# Describe the sink
a1.sinks.k1.type = avro
a1.sinks.k1.hostname = hadoop100
a1.sinks.k1.port = 4141

a1.sinks.k2.type = avro
a1.sinks.k2.hostname = hadoop100
a1.sinks.k2.port = 4142

# Describe the channel
a1.channels.c1.type = memory
a1.channels.c1.capacity = 1000
a1.channels.c1.transactionCapacity = 100

# Bind the source and sink to the channel
a1.sources.r1.channels = c1
a1.sinkgroups.g1.sinks = k1 k2
a1.sinks.k1.channel = c1
a1.sinks.k2.channel = c1
③创建flume-flume-console1.conf和flume-flume-console2.conf
配置上级Flume输出的Source,输出是到本地控制台。
flume-flume-console1.conf:
# Name the components on this agent
a2.sources = r1
a2.sinks = k1
a2.channels = c1

# Describe/configure the source
a2.sources.r1.type = avro
a2.sources.r1.bind = hadoop100
a2.sources.r1.port = 4141

# Describe the sink
a2.sinks.k1.type = logger

# Describe the channel
a2.channels.c1.type = memory
a2.channels.c1.capacity = 1000
a2.channels.c1.transactionCapacity = 100

# Bind the source and sink to the channel
a2.sources.r1.channels = c1
a2.sinks.k1.channel = c1
flume-flume-console2.conf:
# Name the components on this agent
a3.sources = r1
a3.sinks = k1
a3.channels = c2

# Describe/configure the source
a3.sources.r1.type = avro
a3.sources.r1.bind = hadoop100
a3.sources.r1.port = 4142

# Describe the sink
a3.sinks.k1.type = logger

# Describe the channel
a3.channels.c2.type = memory
a3.channels.c2.capacity = 1000
a3.channels.c2.transactionCapacity = 100

# Bind the source and sink to the channel
a3.sources.r1.channels = c2
a3.sinks.k1.channel = c2
④执行配置文件
[root@hadoop100 flume-1.7.0]#  bin/flume-ng agent --conf conf/ --name a3
--conf-file job/group2/flume-flume-console2.conf
-Dflume.root.logger=INFO,console

[root@hadoop100 flume-1.7.0]#  bin/flume-ng agent --conf conf/ --name a2
--conf-file job/group2/flume-flume-console1.conf
-Dflume.root.logger=INFO,console

[root@hadoop100 flume-1.7.0]#  bin/flume-ng agent --conf conf/ --name a1
--conf-file job/group2/flume-netcat-flume.conf
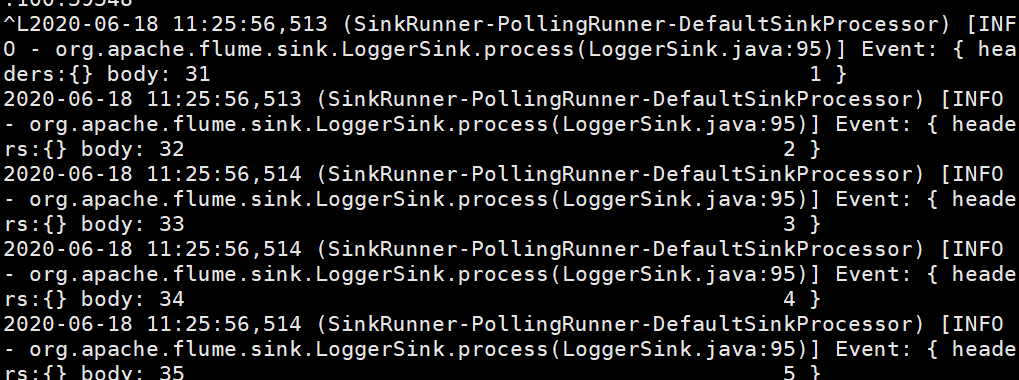
⑤查看Flume2及Flume3的控制台打印日志

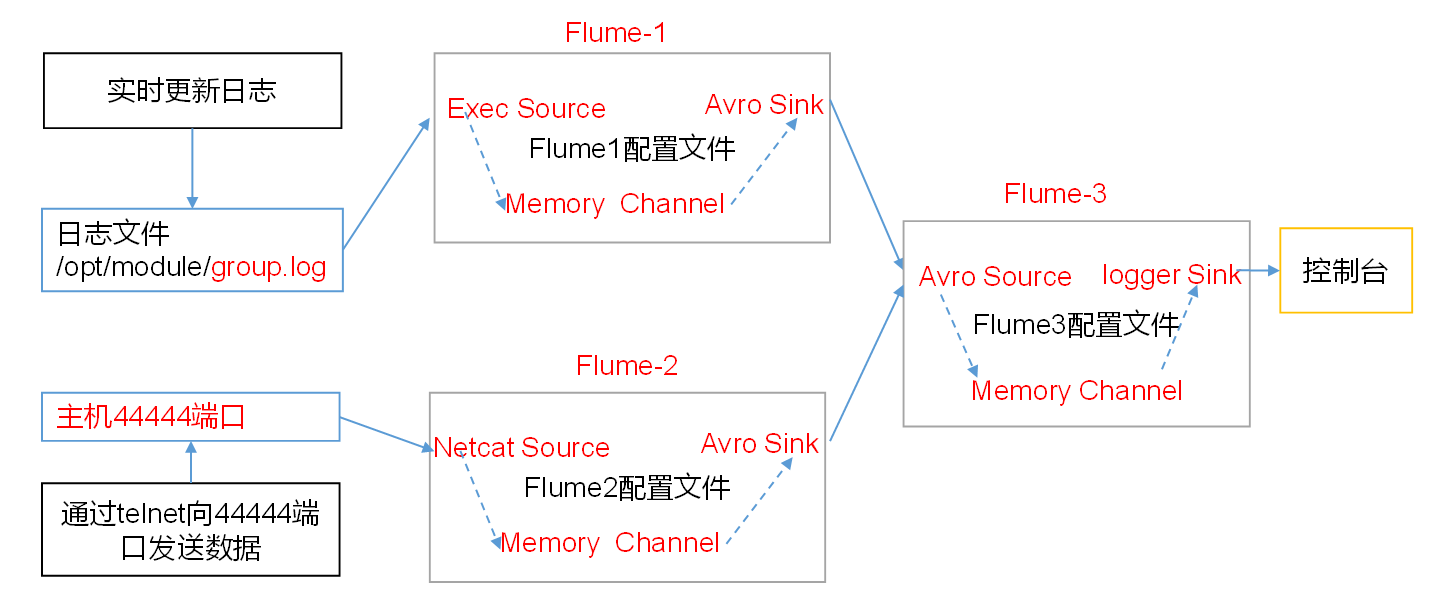
2.6 多数据源汇总案例
案例需求:
Hadoop100上的Flume-1监控文件/opt/module/group.log;
Hadoop101上的Flume-2监控某一个端口的数据流;
Flume-1与Flume-2将数据发送给hadoop102上的Flume-3,Flume-3将最终数据打印到控制台。
实现步骤:
①准备工作
在/opt/module/flume/job下group3文件夹
[root@hadoop100 job]# mkdir group3
②创建flume1-logger-flume.conf
Hadoop100:配置Source用于监控hive.log文件,配置Sink输出数据到下一级Flume。
# Name the components on this agent
a1.sources = r1
a1.sinks = k1
a1.channels = c1

# Describe/configure the source
a1.sources.r1.type = exec
a1.sources.r1.command = tail -F /opt/module/hive-1.2.1/logs/hive.log
a1.sources.r1.shell = /bin/bash -c

# Describe the sink
a1.sinks.k1.type = avro
a1.sinks.k1.hostname = hadoop102
a1.sinks.k1.port = 4141

# Describe the channel
a1.channels.c1.type = memory
a1.channels.c1.capacity = 1000
a1.channels.c1.transactionCapacity = 100

# Bind the source and sink to the channel
a1.sources.r1.channels = c1
a1.sinks.k1.channel = c1
③创建flume2-netcat-flume.conf
Hadoop101:配置Source监控端口44444数据流,配置Sink数据到下一级Flume。
# Name the components on this agent
a2.sources = r1
a2.sinks = k1
a2.channels = c1

# Describe/configure the source
a2.sources.r1.type = netcat
a2.sources.r1.bind = hadoop101
a2.sources.r1.port = 44444

# Describe the sink
a2.sinks.k1.type = avro
a2.sinks.k1.hostname = hadoop102
a2.sinks.k1.port = 4141

# Use a channel which buffers events in memory
a2.channels.c1.type = memory
a2.channels.c1.capacity = 1000
a2.channels.c1.transactionCapacity = 100

# Bind the source and sink to the channel
a2.sources.r1.channels = c1
a2.sinks.k1.channel = c1
④创建flume3-flume-logger.conf
Hadoop102:配置source用于接收flume1与flume2发送过来的数据流,最终合并后sink到控制台。
# Name the components on this agent
a3.sources = r1
a3.sinks = k1
a3.channels = c1

# Describe/configure the source
a3.sources.r1.type = avro
a3.sources.r1.bind = hadoop102
a3.sources.r1.port = 4141

# Describe the sink
# Describe the sink
a3.sinks.k1.type = logger

# Describe the channel
a3.channels.c1.type = memory
a3.channels.c1.capacity = 1000
a3.channels.c1.transactionCapacity = 100

# Bind the source and sink to the channel
a3.sources.r1.channels = c1
a3.sinks.k1.channel = c1
⑤执行配置文件
[root@hadoop102 flume-1.7.0]#   bin/flume-ng agent --conf conf/ --name a3
--conf-file job/group3/flume3-flume-logger.conf
 -Dflume.root.logger=INFO,console

[root@hadoop101 flume-1.7.0]#   bin/flume-ng agent --conf conf/ --name a2
--conf-file job/group3/flume2-netcat-flume.conf

[root@hadoop100 flume-1.7.0]#   bin/flume-ng agent --conf conf/ --name a1
--conf-file job/group3/flume1-logger-flume.conf


 1876
1876


 被折叠的 条评论
为什么被折叠?
被折叠的 条评论
为什么被折叠?
 到【灌水乐园】发言


