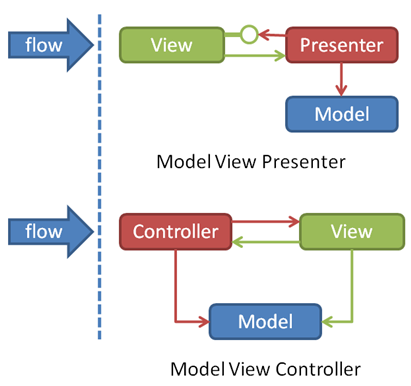
MVP
View和Model的交互都由Persenter完成(View和Model的接口都只在Personter中被调用)
- View 对应于Activity,负责View的绘制以及与用户交互
- Model 依然是业务逻辑和实体模型
- Presenter 负责完成View于Model间的交互
MVP 与 MVC 区别

MVC: View允许与View进行交互
MVP: Model与View之间的交互由Presenter完成,Presenter与View之间的交互是通过接口的
效果
先来创建Bean对象
public class User {
    public User(String username, String password) {
        this.username = username;
        this.password = password;
    }

    public String getUsername() {
        return username;
    }

    public void setUsername(String username) {
        this.username = username;
    }

    public String getPassword() {
        return password;
    }

    public void setPassword(String password) {
        this.password = password;
    }

    private String username;
    private String password;
}
- 1
- 2
- 3
- 4
- 5
- 6
- 7
- 8
- 9
- 10
- 11
- 12
- 13
- 14
- 15
- 16
- 17
- 18
- 19
- 20
- 21
- 22
- 23
- 24
- 25
- 26
创建View和Model的接口
先写接口,后写实现
Model的登录接口
public interface IUserMode {
    /**
     * 登录
     *
     * @param user
     * @return 约定返回"true"为登录成功,其他为登录失败的错误信息
     */
    String login(User user);
}
- 1
- 2
- 3
- 4
- 5
- 6
- 7
- 8
- 9
- 10
View的登录接口
public interface IUserView {
    /**
     * 登录成功
     */
    void onLoginSuccess();

    /**
     * 登录失败
     *
     * @param error
     */
    void onLoginFailed(String error);
}
- 1
- 2
- 3
- 4
- 5
- 6
- 7
- 8
- 9
- 10
- 11
- 12
- 13
- 14
创建Presenter
public class UserPresenter {
    private final IUserView userView;
    private final UserMode userMode;

    public UserPresenter(IUserView userView) {
        this.userView = userView;
        this.userMode = new UserMode();
    }

    /**
     * 登录
     *
     * @param user
     */
    public void login(final User user) {
        new Thread() {
            @Override
            public void run() {
                final String res = userMode.login(user);
                new Handler(Looper.getMainLooper()).post(new Runnable() {
                    @Override
                    public void run() {
                        if ("true".equals(res)) {
                            userView.onLoginSuccess();
                        } else {
                            userView.onLoginFailed(res);
                        }
                    }
                });
            }
        }.start();
    }
}
- 1
- 2
- 3
- 4
- 5
- 6
- 7
- 8
- 9
- 10
- 11
- 12
- 13
- 14
- 15
- 16
- 17
- 18
- 19
- 20
- 21
- 22
- 23
- 24
- 25
- 26
- 27
- 28
- 29
- 30
- 31
- 32
- 33
- 34
其中,login方法虽然实现了登录操作,并且通过new Handler(Looper.getMainLooper())使IUserView的回调运行在主线程,但是这显然代码太臃肿了,如果使用JAVA8的Lambda表达式,就会简洁很多,在Android Studio中使用Lambda,请参考这里
创建View和Model的实现类
Model的登录实现类
public class UserMode implements IUserMode {
    @Override
    public String login(User user) {
        boolean networkError = false; //网络是否异常

        try {
            Thread.sleep(3000);//模拟网络连接
            if (networkError) {
                return "网络异常";
            } else if ("ethanco".equals(user.getUsername()) && "123456".equals(user.getPassword())) {
                return "true";
            } else {
                return "账号或密码错误";
            }
        } catch (InterruptedException e) {
            e.printStackTrace();
            return e.getMessage();
        }
    }
}
- 1
- 2
- 3
- 4
- 5
- 6
- 7
- 8
- 9
- 10
- 11
- 12
- 13
- 14
- 15
- 16
- 17
- 18
- 19
- 20
- 21
View的登录实现 - Activity
public class MainActivity extends AppCompatActivity implements IUserView, View.OnClickListener {

    private UserPresenter userPresenter;
    private EditText etUserName;
    private EditText etPassword;
    private ProgressDialog loginProgreess;

    @Override
    protected void onCreate(Bundle savedInstanceState) {
        super.onCreate(savedInstanceState);
        setContentView(R.layout.activity_main);

        etUserName = (EditText) findViewById(R.id.et_userName);
        etPassword = (EditText) findViewById(R.id.et_password);
        findViewById(R.id.btn_login).setOnClickListener(this);
        userPresenter = new UserPresenter(this);
    }

    @Override
    public void onLoginSuccess() {
        loginProgreess.dismiss();
        Toast.makeText(getApplicationContext(), "登录成功", Toast.LENGTH_SHORT).show();
    }

    @Override
    public void onLoginFailed(String error) {
        loginProgreess.dismiss();
        Toast.makeText(getApplicationContext(), "登录失败:" + error, Toast.LENGTH_SHORT).show();
    }

    @Override
    public void onClick(View v) {
        String username = etUserName.getText().toString().trim();
        String password = etPassword.getText().toString().trim();

        if (TextUtils.isEmpty(username) || TextUtils.isEmpty(password)) {
            Toast.makeText(getApplicationContext(), "账号或密码不能为空", Toast.LENGTH_SHORT).show();
            return;
        }

        loginProgreess = ProgressDialog.show(this, "登录", "正在登录...");
        userPresenter.login(new User(username, password));
    }
}
- 1
- 2
- 3
- 4
- 5
- 6
- 7
- 8
- 9
- 10
- 11
- 12
- 13
- 14
- 15
- 16
- 17
- 18
- 19
- 20
- 21
- 22
- 23
- 24
- 25
- 26
- 27
- 28
- 29
- 30
- 31
- 32
- 33
- 34
- 35
- 36
- 37
- 38
- 39
- 40
- 41
- 42
- 43
- 44
- 45
参考文章
http://blog.csdn.net/lmj623565791/article/details/46596109
http://blog.csdn.net/knxw0001/article/details/39637273


 被折叠的 条评论
为什么被折叠?


