


由于课题需要,深入了解了一下加壳技术以及代码自动化实现,本文不在原理方面详细介绍加壳技术,如果有需要可以参考以下博客,博主也拜读了这些文章受益匪浅。
作者:Jack_Jia 链接:https://blog.csdn.net/androidsecurity/article/details/8678399
作者:DeMonnnnnn 链接:https://blog.csdn.net/DeMonliuhui/article/details/78269234
好了废话少说开始我们的加壳之旅:
原材料
【1】需要加壳的源程序(下文的demo.apk)
【2】加壳工程(下文的DexShellTool)
【3】解壳程序(下文的shell.apk)
源程序
直接戳:https://github.com/LiuShouChun/AndroidShellScheme/tree/master/Demo
加壳工程
import java.io.*;
import java.security.MessageDigest;
import java.security.NoSuchAlgorithmException;
import java.util.zip.Adler32;

/**
 * Created by DeMon on 2017/10/17.
 */
public class DexShellTool {
    /**
     * @param args
     */
    public static void main(String[] args) {
        // TODO Auto-generated method stub
        try {
            File payloadSrcFile = new File("force/demo.apk");   //需要加壳的程序
            System.out.println("apk size:"+payloadSrcFile.length());
            File unShellDexFile = new File("force/shell.dex");    //解壳dex
            byte[] payloadArray = encrpt(readFileBytes(payloadSrcFile));//以二进制形式读出apk,并进行加密处理//对源Apk进行加密操作
            byte[] unShellDexArray = readFileBytes(unShellDexFile);//以二进制形式读出dex
            int payloadLen = payloadArray.length;
            int unShellDexLen = unShellDexArray.length;
            int totalLen = payloadLen + unShellDexLen +4;//多出4字节是存放长度的。
            byte[] newdex = new byte[totalLen]; // 申请了新的长度
            //添加解壳代码
            System.arraycopy(unShellDexArray, 0, newdex, 0, unShellDexLen);//先拷贝dex内容
            //添加加密后的解壳数据
            System.arraycopy(payloadArray, 0, newdex, unShellDexLen, payloadLen);//再在dex内容后面拷贝apk的内容
            //添加解壳数据长度
            System.arraycopy(intToByte(payloadLen), 0, newdex, totalLen-4, 4);//最后4为长度
            //修改DEX file size文件头
            fixFileSizeHeader(newdex);
            //修改DEX SHA1 文件头
            fixSHA1Header(newdex);
            //修改DEX CheckSum文件头
            fixCheckSumHeader(newdex);

            String str = "force/classes.dex";
            File file = new File(str);
            if (!file.exists()) {
                file.createNewFile();
            }

            FileOutputStream localFileOutputStream = new FileOutputStream(str);
            localFileOutputStream.write(newdex);
            localFileOutputStream.flush();
            localFileOutputStream.close();


        } catch (Exception e) {
            e.printStackTrace();
        }
    }

    //直接返回数据,读者可以添加自己加密方法
    private static byte[] encrpt(byte[] srcdata){
        for(int i = 0;i<srcdata.length;i++){
            srcdata[i] = (byte)(0xFF ^ srcdata[i]);
        }
        return srcdata;
    }

    /**
     * 修改dex头,CheckSum 校验码
     * @param dexBytes
     */
    private static void fixCheckSumHeader(byte[] dexBytes) {
        Adler32 adler = new Adler32();
        adler.update(dexBytes, 12, dexBytes.length - 12);//从12到文件末尾计算校验码
        long value = adler.getValue();
        int va = (int) value;
        byte[] newcs = intToByte(va);
        //高位在前,低位在前掉个个
        byte[] recs = new byte[4];
        for (int i = 0; i < 4; i++) {
            recs[i] = newcs[newcs.length - 1 - i];
            System.out.println(Integer.toHexString(newcs[i]));
        }
        System.arraycopy(recs, 0, dexBytes, 8, 4);//效验码赋值(8-11)
        System.out.println(Long.toHexString(value));
        System.out.println();
    }


    /**
     * int 转byte[]
     * @param number
     * @return
     */
    public static byte[] intToByte(int number) {
        byte[] b = new byte[4];
        for (int i = 3; i >= 0; i--) {
            b[i] = (byte) (number % 256);
            number >>= 8;
        }
        return b;
    }

    /**
     * 修改dex头 sha1值
     * @param dexBytes
     * @throws NoSuchAlgorithmException
     */
    private static void fixSHA1Header(byte[] dexBytes)
            throws NoSuchAlgorithmException {
        MessageDigest md = MessageDigest.getInstance("SHA-1");
        md.update(dexBytes, 32, dexBytes.length - 32);//从32为到结束计算sha--1
        byte[] newdt = md.digest();
        System.arraycopy(newdt, 0, dexBytes, 12, 20);//修改sha-1值(12-31)
        //输出sha-1值,可有可无
        String hexstr = "";
        for (int i = 0; i < newdt.length; i++) {
            hexstr += Integer.toString((newdt[i] & 0xff) + 0x100, 16)
                    .substring(1);
        }
        System.out.println(hexstr);
    }

    /**
     * 修改dex头 file_size值
     * @param dexBytes
     */
    private static void fixFileSizeHeader(byte[] dexBytes) {
        //新文件长度
        byte[] newfs = intToByte(dexBytes.length);
        System.out.println(Integer.toHexString(dexBytes.length));
        byte[] refs = new byte[4];
        //高位在前,低位在前掉个个
        for (int i = 0; i < 4; i++) {
            refs[i] = newfs[newfs.length - 1 - i];
            System.out.println(Integer.toHexString(newfs[i]));
        }
        System.arraycopy(refs, 0, dexBytes, 32, 4);//修改(32-35)
    }


    /**
     * 以二进制读出文件内容
     * @param file
     * @return
     * @throws IOException
     */
    private static byte[] readFileBytes(File file) throws IOException {
        byte[] arrayOfByte = new byte[1024];
        ByteArrayOutputStream localByteArrayOutputStream = new ByteArrayOutputStream();
        FileInputStream fis = new FileInputStream(file);
        while (true) {
            int i = fis.read(arrayOfByte);
            if (i != -1) {
                localByteArrayOutputStream.write(arrayOfByte, 0, i);
            } else {
                return localByteArrayOutputStream.toByteArray();
            }
        }
    }
}
代码直接戳:https://github.com/LiuShouChun/AndroidShellScheme/tree/master/DexShellTool
解壳程序(重点)
代码直接戳:https://github.com/LiuShouChun/AndroidShellScheme/tree/master/MyUnshell
需要注意的点:
【1】修改AndroidManifest.xml:将源apk的AndroidManifest.xml内容 复制到解壳的AndroidManifest.xml中
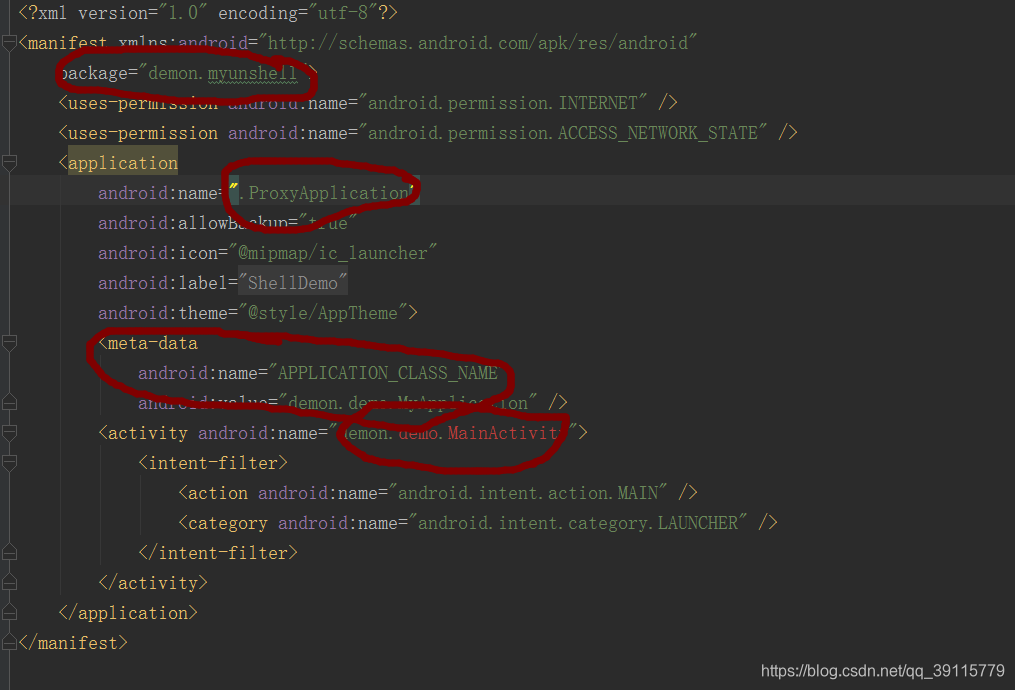
需要修改的内容如上图:
1.package 修改为解壳程序的包名
2.application 修改为壳程序的application
3.添加<meta - data/>标签如上
4.activity的name 用全名(包名+类名)
操作步骤
1.编译demo为demo.apk。
2.编译shell为shell.apk。
3.抽取shell.apk 中的 classes.dex 文件。
4.将抽取出来的classes.dex和demo.apk 通过加壳工程融合为新的classes.dex文件。
5.将新的classses.dex添加到shell.apk中。
6.重新签名shell.apk。
注意事项
不要解压apk文件添加.dex文件再压缩,这样压缩出来的文件不能正确安装;
先删除压缩文件里面的.dex文件再添加新的.dex文件即可
c#自动化实现
博主将以上步骤用c#做了自动化实现有兴趣的可以看看
https://github.com/LiuShouChun/AutomaticStacking


 9487
9487


 被折叠的 条评论
为什么被折叠?
被折叠的 条评论
为什么被折叠?
 到【灌水乐园】发言


