


天下皆知美之为美,恶已;皆知善,斯不善矣。有无之相生也,难易之相成也,长短之相刑,高下之相盈也,音声之相和也,先后之相随,恒也。是以圣人居无为之事,行不言之教,万物作而弗始也,为而弗志也,成功而弗居也。夫唯弗居,是以弗去 ----《道德经-第二章》
1.LinearLayout布局
线性布局有两种方式
从左到右 :android:orientation=”horizontal”
从上到下 :android:orientation=”vertical”
<?xml version="1.0" encoding="utf-8"?>
<LinearLayout xmlns:android="http://schemas.android.com/apk/res/android"
    xmlns:app="http://schemas.android.com/apk/res-auto"
    xmlns:tools="http://schemas.android.com/tools"
    android:layout_width="match_parent"
    android:layout_height="match_parent"
    android:orientation="vertical">

    <LinearLayout
        android:layout_width="match_parent"
        android:layout_height="250dp"
        android:orientation="horizontal">

        <TextView
            android:layout_width="96dp"
            android:layout_height="match_parent"
            android:background="#157109" />

        <TextView
            android:layout_width="96dp"
            android:layout_height="match_parent"
            android:background="#48EF30" />

        <TextView
            android:layout_width="96dp"
            android:layout_height="match_parent"
            android:background="#93F585" />

        <TextView
            android:layout_width="96dp"
            android:layout_height="match_parent"
            android:background="#CBFAC5" />
    </LinearLayout>

    <LinearLayout
        android:layout_width="match_parent"
        android:layout_height="250dp"
        android:orientation="vertical">

        <TextView
            android:layout_width="match_parent"
            android:layout_height="96dp"
            android:background="#157109" />

        <TextView
            android:layout_width="match_parent"
            android:layout_height="96dp"
            android:background="#48EF30" />

        <TextView
            android:layout_width="match_parent"
            android:layout_height="96dp"
            android:background="#93F585" />

        <TextView
            android:layout_width="match_parent"
            android:layout_height="96dp"
            android:background="#CBFAC5" />
    </LinearLayout>

</LinearLayout>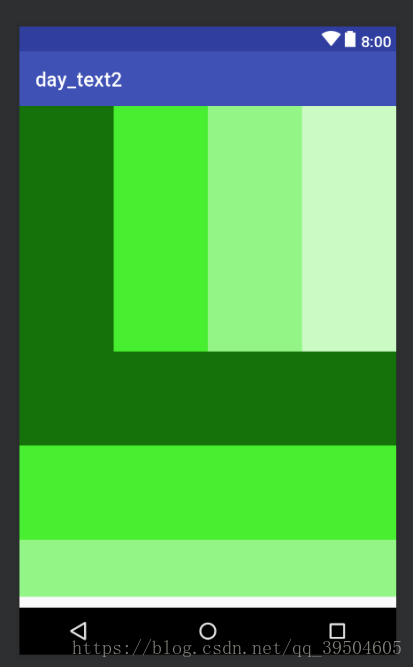
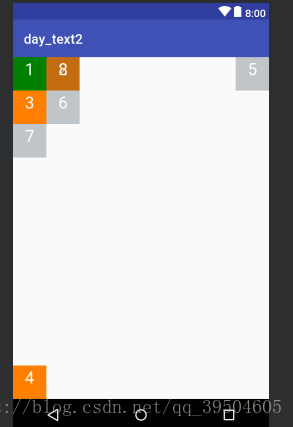
2.RelativeLayout布局
参考其他控件进行布局,默认为父控件。
有三种类型的属性:
· 属性值是true或false
· android:layout_centerHrizontal 水平居中
· android:layout_centerVertical 垂直居中
· android:layout_centerInparent 相对于父元素完全居中。
· android:layout_alignParentBottom 位于父元素的下边缘
· android:layout_alignParentTop 位于父元素的上边缘
· android:layout_alignParentLeft 位于父元素的左边缘
· android:layout_alignParentRight 位于父元素的右边缘
· 属性值是”@id/*“
· android:layout_below 在某元素的下方
· android:layout_above 在某元素的上方
· andorid:layout_toRightOf 在某元素的右方
· android:layout_toLeftOf 在某元素的左方
· android:layout_alignBottom 和某元素下方对齐
· android:layout_alignTop 和某元素上方对齐
· android:layout_alignRight 和某元素右方对齐
· android:layout_alignLeft 和某元素左方对齐
· 属性值是数值
· android:layout_marginLeft 离某元素左边缘的距离
· android:layout_marginRight 离某元素右边缘的距离
· android:layout_marginTop 离某元素上边缘的距离
· android:layout_marginBottom 离某元素下边缘的距离
<?xml version="1.0" encoding="utf-8"?>
<RelativeLayout
    xmlns:android="http://schemas.android.com/apk/res/android" android:layout_width="match_parent"
    android:layout_height="match_parent">
   <TextView
       android:id="@+id/text1"
       android:layout_width="50dp"
       android:background="#008000"
       android:layout_height="50dp"
       android:text="1"
       android:textAlignment="center"
       android:textSize="25dp"
       android:textColor="#FFFFFF"
       />

    <TextView
        android:id="@+id/text2"
        android:layout_width="50dp"
        android:background="#FF8000"
        android:layout_height="50dp"
        android:layout_toRightOf="@id/text1"
        android:text="2"
        android:textAlignment="center"
        android:textSize="25dp"
        android:textColor="#FFFFFF"
        />

    <TextView
        android:id="@+id/text3"
        android:layout_width="50dp"
        android:background="#FF8000"
        android:layout_height="50dp"
        android:layout_below="@id/text2"
        android:text="3"
        android:textAlignment="center"
        android:textSize="25dp"
        android:textColor="#FFFFFF"
        />
    <TextView
        android:id="@+id/text4"
        android:layout_width="50dp"
        android:background="#FF8000"
        android:layout_height="50dp"
        android:layout_alignParentBottom="true"
        android:text="4"
        android:textAlignment="center"
        android:textSize="25dp"
        android:textColor="#FFFFFF"
        />
    <TextView
        android:id="@+id/text5"
        android:layout_width="50dp"
        android:background="#4234"
        android:layout_height="50dp"
        android:layout_alignParentRight="true"
        android:text="5"
        android:textAlignment="center"
        android:textSize="25dp"
        android:textColor="#FFFFFF"

        />
    <TextView
        android:id="@+id/text6"
        android:layout_width="50dp"
        android:background="#4234"
        android:layout_height="50dp"
        android:layout_marginLeft="50dp"
        android:layout_marginTop="50dp"
        android:text="6"
        android:textAlignment="center"
        android:textSize="25dp"
        android:textColor="#FFFFFF"

        />
    <TextView
        android:id="@+id/text7"
        android:layout_width="50dp"
        android:background="#4234"
        android:layout_height="50dp"
        android:layout_below="@id/text3"
        android:text="7"
        android:textAlignment="center"
        android:textSize="25dp"
        android:textColor="#FFFFFF"

        />
    <TextView
        android:id="@+id/text8"
        android:layout_width="50dp"
        android:background="#4234"
        android:layout_height="50dp"
        android:layout_toRightOf="@id/text4"
        android:text="8"
        android:textAlignment="center"
        android:textSize="25dp"
        android:textColor="#FFFFFF"

        />

</RelativeLayout>
效果如下
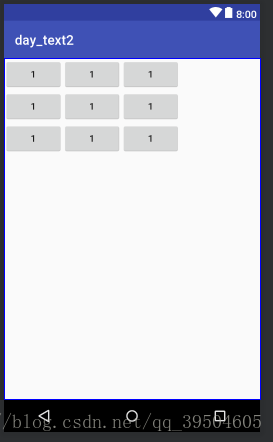
3.TableLayout布局
<?xml version="1.0" encoding="utf-8"?>
<TableLayout
    xmlns:android="http://schemas.android.com/apk/res/android"
    android:layout_width="match_parent"
    android:layout_height="match_parent"
    >
    <TableRow>
        <Button android:text="1"/>
        <Button android:text="1"/>
        <Button android:text="1"/>
    </TableRow>
    <TableRow>
        <Button android:text="1"/>
        <Button android:text="1"/>
        <Button android:text="1"/>
    </TableRow>
    <TableRow>
        <Button android:text="1"/>
        <Button android:text="1"/>
        <Button android:text="1"/>
    </TableRow>
</TableLayout>
效果如下


 827
827


 被折叠的 条评论
为什么被折叠?
被折叠的 条评论
为什么被折叠?
 到【灌水乐园】发言


