


0.Ready
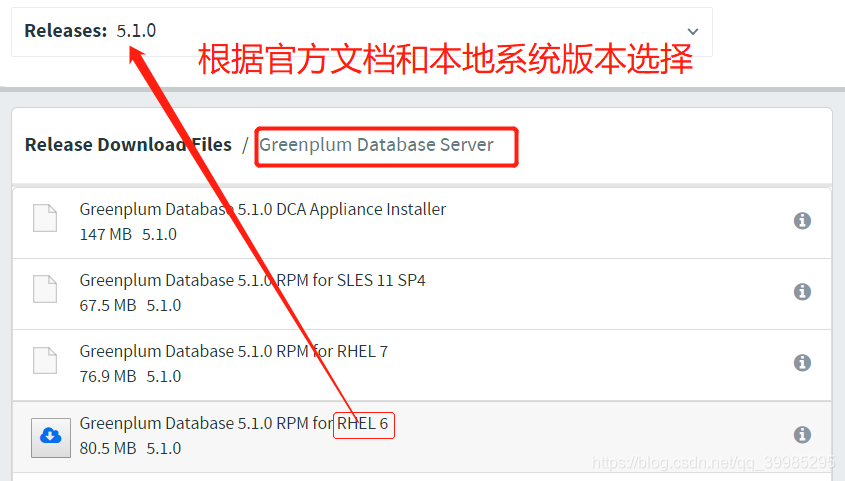
rhel6.4;
greenplum-db-5.1.0-rhel6-x86_64.rpm, 其他版本下载地址>> |
对应版本官方文档>> | 官方教程>> | 入门学习>> |
硬件需求:Master需要较高的CPU(2核+)和内存,Segment配置相同;
| 节点名称 | IP地址(*改为自己虚拟机的网段) | 内存 | 硬盘容量 | 角色 |
|---|---|---|---|---|
| gp-mst | 192.168.*. 199 | 16G | segment,master | |
| gp-sgm1 | 192.168.*. 201 | 32G | segment,standby | |
| gp-sgm2 | 192.168.*. 202 | 32G | segment | |
| gp-sgm 3 | 192.168.*. 203 | 32G | segment |
[root@gp-mst ~]# echo root用户/root操作:
1.系统基本设置
1.1 添加所有节点到host
~]# vi /etc/hosts
192.168.1.199  gp-mst
192.168.1.201  gp-sgm1
192.168.1.202  gp-sgm2
192.168.1.203  gp-sgm3
1.2 主机系统必须禁用SELinux和防火墙
~]# sestatus
SELinuxstatus: disabled
#else 需要更改SELINUX参数中的配置文件并重新启动系统(可最后重启重新验证)
~]# vi /etc/selinux/config
SELINUX=disabled
~
~]# /sbin/chkconfig --list iptables
#else 关闭,然后重启系统
~]# /sbin/chkconfig iptables off
~]# systemctl status firewalld		#// 检查防火墙状态
...Active: inactive (dead)
~]# systemctl stop firewalld.service	#// 禁止启动
~]# systemctl disable firewalld.service	#// 禁止开机启动防火墙
1.3 内核参数设置
~]# vi /etc/sysctl.conf
[root@gp-mst ~]# vi /etc/sysctl.conf
# Kernel sysctl configuration file for Red Hat Linux
# For binary values, 0 is disabled, 1 is enabled.  See sysctl(8) and
# sysctl.conf(5) for more details.
#
# Use '/sbin/sysctl -a' to list all possible parameters.

# Controls IP packet forwarding
net.ipv4.ip_forward = 0

# Controls source route verification
net.ipv4.conf.default.rp_filter = 1

# Do not accept source routing
net.ipv4.conf.default.accept_source_route = 0

# Controls the System Request debugging functionality of the kernel
kernel.sysrq = 1

# Controls whether core dumps will append the PID to the core filename.
# Useful for debugging multi-threaded applications.
kernel.core_uses_pid = 1

# Controls the use of TCP syncookies
net.ipv4.tcp_syncookies = 1

# Disable netfilter on bridges
#net.bridge.bridge-nf-call-ip6tables = 0
#net.bridge.bridge-nf-call-iptables = 0
#net.bridge.bridge-nf-call-arptables = 0

# Controls the default maxmimum size of a mesage queue
kernel.msgmnb = 65536

# Controls the maximum size of a message, in bytes
kernel.msgmax = 65536
kernel.msgmni = 2048

kernel.sem = 250 512000 100 2048

# Controls the maximum shared segment size, in bytes
#kernel.shmmax = 68719476736
kernel.shmmax = 500000000
kernel.shmmni = 4096

# Controls the maximum number of shared memory segments, in pages
#kernel.shmall = 4294967296
kernel.shmall = 4000000000

net.ipv4.tcp_tw_recycle=1
net.ipv4.tcp_max_syn_backlog=4096
net.ipv4.ip_local_port_range = 1025 65535
net.core.netdev_max_backlog=10000
vm.overcommit_memory=2
net.ipv4.conf.all.arp_filter = 1
net.core.rmem_max = 2097152
net.core.wmem_max = 2097152
~
1.4 用户限制
~]# vi /etc/security/limits.conf
#greenplum configs
* soft nofile 65536
* hard nofile 65536
* soft nproc 131072
* hard nproc 131072
1.5 磁盘访问I/O优化策略
~]# vi /boot/grub/menu.lst
#greenplum configs
elevator=deadline
然后重启系统使配置生效 ~]# reboot
1.6 验证配置
~]# sestatus	#// 验证SELINUX是否禁止
~]# /sbin/chkconfig --list iptables

local]# ntpq -p						#// 查看ntp同步情况
2.接着准备安装GP
在Master上运行安装程序,并设置GP路径(greenplum_path.sh)
2.1 创建超级用户gpadmin
~]# useradd gpadmin
~]# passwd gpadmin
~]# su gpadmin		#// 切换用户
2.2 设置gpadmin用户环境
~]$ cd /home/gpadmin
~]$ vi .bashrc
source /usr/local/greenplum-db/greenplum_path.sh
export MASTER_DATA_DIRECTORY=/data1/gpdata/master/gpseg-1
~
~]$ vi .bash_profile
source /usr/local/greenplum-db/greenplum_path.sh
export MASTER_DATA_DIRECTORY=/data1/gpdata/master/gpseg-1
~
~]$ source .bashrc		#// 使生效
~]$ source .bash_profile
2.3 上传GP到/opt/greenplum/
按提示输入回车或yes 这将会将安装包解压到/usr/local/下,并建立软连接greenplum-db
greenplum]# /bin/bash greenplum-db-4.3.6.2-build-1-RHEL5-x86_64.bin
2.4 准备节点服务器信息文件
后面的批量安装会用到这两个文件,如果all_host和all_segment内容一样,可以只创建一个文件
opt]# mkdir -p /opt/gpinit/
gpinit]# touch all_host
gpinit]# touch all_segment
all_host和all_segment内容:
gp-mst
gp-sgm1
gp-sgm2
gp-sgm3
2.5 建立节点服务器间的信任,批量安装
注:按照提示输入root密码,记住这一步不能输入gpadmin的密码,
因为批量安装时需要在/usr/local下创建目录,需要root权限;
local]# gpssh-exkeys -f /opt/gpinit/all_host	#// 交换秘钥,建立信任
local]# gpseginstall -f /opt/gpinit/all_host -u gpadmin -p gpadmin	#// 批量安装
local]# gpssh -f /opt/gpinit/all_host -e ls -l $GPHOME	#// 检查批量安装情况,各节点目录一致则成功
2.6 各节点存储目录创建
master
[root@gp-mst local]# mkdir -p /data1/gpdata/master
[root@gp-mst local]# chown gpadmin:gpadmin /data1/gpdata/master

segment
[root@gp-mst local]# gpssh -f /opt/gpinit/all_host -e 'mkdir -p /data1/gpdata/primary'
[root@gp-mst local]# gpssh -f /opt/gpinit/all_host -e 'chown gpadmin:gpadmin /data1/gpdata/primary'

mirror
[root@gp-mst local]# gpssh -f /opt/gpinit/all_segment -e 'mkdir -p /data1/gpdata/mirror'
[root@gp-mst local]# gpssh -f /opt/gpinit/all_segment -e 'chown gpadmin:gpadmin /data1/gpdata/mirror'
2.7 ntp时间同步
在server第一行添加下面两行
local]# vi /etc/ntp.conf
server 192.168.1.1
server 192.168.1.2
local]# /etc/init.d/ntpd restart	#// 重启ntpd服务
local]# ntpq -p						#// 查看ntp同步情况
local]# chkconfig --level 0123456 ntpd on	#// 使ntpd服务重启服务器后也启动
2.8 创建并修改GP初始化文件
[gpadmin@gp-mst ~]$ mkdir /home/gpadmin/gpconfigs
[gpadmin@gp-mst ~]$ cp /usr/local/greenplum-db/docs/cli_help/gpconfigs/gpinitsystem_config /home/gpadmin/gpconfigs/gpinitsystem_config
[gpadmin@tj-soc-c04-csfb1 gpconfigs]$ chmod 775 gpinitsystem_config

[gpadmin@gp-mst gpconfigs]$ vi gpinitsystem_config
[gpadmin@gp-mst gpconfigs]$ vi gpinitsystem_config


# FILE NAME: gpinitsystem_config

# Configuration file needed by the gpinitsystem

################################################
#### REQUIRED PARAMETERS
################################################

#### Name of this Greenplum system enclosed in quotes.
ARRAY_NAME="BJ Greenplum DW"

#### Naming convention for utility-generated data directories.
SEG_PREFIX=gpseg

#### Base number by which primary segment port numbers
#### are calculated.
PORT_BASE=40000

#### File system location(s) where primary segment data directories
#### will be created. The number of locations in the list dictate
#### the number of primary segments that will get created per
#### physical host (if multiple addresses for a host are listed in
#### the hostfile, the number of segments will be spread evenly across
#### the specified interface addresses).
declare -a DATA_DIRECTORY=(/data1/gpdata/primary /data1/gpdata/primary)

#### OS-configured hostname or IP address of the master host.
MASTER_HOSTNAME=gp-mst

#### File system location where the master data directory
#### will be created.
MASTER_DIRECTORY=/data1/gpdata/master

#### Port number for the master instance.
MASTER_PORT=5432

#### Shell utility used to connect to remote hosts.
TRUSTED_SHELL=ssh

#### Maximum log file segments between automatic WAL checkpoints.
CHECK_POINT_SEGMENTS=8

#### Default server-side character set encoding.
ENCODING=UNICODE

################################################
#### OPTIONAL MIRROR PARAMETERS
################################################

#### Base number by which mirror segment port numbers
#### are calculated.
MIRROR_PORT_BASE=50000

#### Base number by which primary file replication port
#### numbers are calculated.
REPLICATION_PORT_BASE=41000

#### Base number by which mirror file replication port
#### numbers are calculated.
MIRROR_REPLICATION_PORT_BASE=51000

#### File system location(s) where mirror segment data directories
#### will be created. The number of mirror locations must equal the
#### number of primary locations as specified in the
#### DATA_DIRECTORY parameter.
declare -a MIRROR_DATA_DIRECTORY=(/data1/gpdata/mirror /data1/gpdata/mirror)


################################################
#### OTHER OPTIONAL PARAMETERS
################################################

#### Create a database of this name after initialization.
DATABASE_NAME=bj_gp

#### Specify the location of the host address file here instead of
#### with the the -h option of gpinitsystem.
#MACHINE_LIST_FILE=/home/gpadmin/gpconfigs/hostfile_gpinitsystem
2.9 初始化GP集群
[gpadmin@gp-mst ~]$ gpinitsystem -c /home/gpadmin/gpconfigs/gpinitsystem_config -h /opt/gpinit/all_host
// 中间需要输入一次:Y
过程中如果没有报ERROR,GP数据库就安装好了。
3.优化GP使高可用
3.1 增加standby和mirror(数据备份)
// root在standby服务器上执行
[root@gp-sgm1 ~]# mkdir /data1/gpdata/master
[root@gp-sgm1 ~]# chown gpadmin:gpadmin /data1/gpdata/master

// 切换用户在master服务器上执行
[gpadmin@gp-mst ~]$ gpinitstandby -s gp-sgm1	// 中间输入一次 Y

// 如果前面在GP初始化文件里忘记配置mirror了,请按照下面的方法添加
[gpadmin@gp-mst ~]$ gpaddmirrors -p 1000	// 运行过程中需要输入两次mirror路径:/data1/gpdata/mirror
3.2 设置访问权限和访问方式
// 打开/data1/gpdata/master/gpseg-1/pg_hba.conf 按照最下面的格式添加客户端ip或网段
#user define
host    all     all     192.168.1.0/24   trust
host    all     all     127.0.0.1/28    trust

// 可以用命令行来访问,下面来说一下命令行访问的方式,loach是后面添加的用户
[gpadmin@gp-mst ~]$ psql -d tj_csfb -h gp-mst -p 5432 -U gpadmin
[gpadmin@gp-mst ~]$ psql -d tj_csfb -h gp-mst -p 5432 -U loach
// 也可以通过gpAdmin桌面客户端来访问.
3.3 创建用户
通过命令行登录以后,执行下面的命令
CREATE ROLE loach WITH LOGIN;
ALTER ROLE loach WITH PASSWORD ‘loach’;
其他待测试步骤:
硬件验证、测试:
读写速度:gpcheckpref
存储带宽: gpcheckpref
网络传输速度:gpcheckpref /gpchecknet
系统环境设置:gpcheckos
压力测试: bonnie++
设定附加环境变量)master和热备机的.bashrc文件
init GP库系统:
- 创建主机列表文件(所有segment主机名称)
- 编辑系统配置文件(gp_init_config)
- master上运行gpinitsystem命令:gpinitsystem -c gp_init_config


 554
554


 被折叠的 条评论
为什么被折叠?
被折叠的 条评论
为什么被折叠?
 到【灌水乐园】发言


