


文章目录
Web开发
1.简介
使用SpringBoot:
1)、创建SpringBoot应用,选中需要的模块。
2)、SpringBoot已经默认将这些场景配置好了,只需要在配置文件中指定少量配置就可以运行起来。
3)、自己编写业务代码。
自动配置原理?
这个场景SpringBoot帮我们配置了什么?能不能修改?能修改哪些配置?能不能扩展?xxx
xxxxAutoConfiguration:帮我们给容器中自动配置组件。
xxxxProperties:配置类来封装配置文件的内容。
2.SpringBoot对静态资源的映射规则
1.ResourceProperties
/**
 * 用于配置资源处理的属性。
 */
@ConfigurationProperties(prefix = "spring.resources", ignoreUnknownFields = false)
public class ResourceProperties {
	//可以设置和静态资源有关的参数,缓存时间等。
2.WebMvcAutoConfiguration
@Configuration
@ConditionalOnWebApplication(type = Type.SERVLET)
@ConditionalOnClass({ Servlet.class, DispatcherServlet.class, WebMvcConfigurer.class })
@ConditionalOnMissingBean(WebMvcConfigurationSupport.class)
@AutoConfigureOrder(Ordered.HIGHEST_PRECEDENCE + 10)
@AutoConfigureAfter({ DispatcherServletAutoConfiguration.class,ValidationAutoConfiguration.class })
public class WebMvcAutoConfiguration {
	@Override
	public void addResourceHandlers(ResourceHandlerRegistry registry) {
		if (!this.resourceProperties.isAddMappings()) {
			logger.debug("Default resource handling disabled");
			return;
		}
		Duration cachePeriod = this.resourceProperties.getCache().getPeriod();
		CacheControl cacheControl = this.resourceProperties.getCache()
				.getCachecontrol().toHttpCacheControl();
		if (!registry.hasMappingForPattern("/webjars/**")) {
			customizeResourceHandlerRegistration(registry
					.addResourceHandler("/webjars/**")
					.addResourceLocations("classpath:/META-INF/resources/webjars/")
					.setCachePeriod(getSeconds(cachePeriod))
					.setCacheControl(cacheControl));
		}
		String staticPathPattern = this.mvcProperties.getStaticPathPattern();
		//静态资源文件夹映射
		if (!registry.hasMappingForPattern(staticPathPattern)) {
			customizeResourceHandlerRegistration(
					registry.addResourceHandler(staticPathPattern)
							.addResourceLocations(getResourceLocations(
									this.resourceProperties.getStaticLocations()))
							.setCachePeriod(getSeconds(cachePeriod))
							.setCacheControl(cacheControl));
		}
	}

	//配置欢迎页映射
	@Bean
	public WelcomePageHandlerMapping welcomePageHandlerMapping(
			ApplicationContext applicationContext) {
		return new WelcomePageHandlerMapping(
				new TemplateAvailabilityProviders(applicationContext),
				applicationContext, getWelcomePage(),
				this.mvcProperties.getStaticPathPattern());
	}

	//配置喜欢的图标
	@Configuration
	@ConditionalOnProperty(value = "spring.mvc.favicon.enabled", matchIfMissing = true)
	public static class FaviconConfiguration implements ResourceLoaderAware {

		private final ResourceProperties resourceProperties;

		private ResourceLoader resourceLoader;

		public FaviconConfiguration(ResourceProperties resourceProperties) {
			this.resourceProperties = resourceProperties;
		}

		@Override
		public void setResourceLoader(ResourceLoader resourceLoader) {
			this.resourceLoader = resourceLoader;
		}

		@Bean
		public SimpleUrlHandlerMapping faviconHandlerMapping() {
			SimpleUrlHandlerMapping mapping = new SimpleUrlHandlerMapping();
			mapping.setOrder(Ordered.HIGHEST_PRECEDENCE + 1);
			//所有 **/favicon.ico
			mapping.setUrlMap(Collections.singletonMap("**/favicon.ico",faviconRequestHandler()));
			return mapping;
		}

		@Bean
		public ResourceHttpRequestHandler faviconRequestHandler() {
			ResourceHttpRequestHandler requestHandler = new ResourceHttpRequestHandler();
			requestHandler.setLocations(resolveFaviconLocations());
			return requestHandler;
		}

		private List<Resource> resolveFaviconLocations() {
			String[] staticLocations = getResourceLocations(
					this.resourceProperties.getStaticLocations());
			List<Resource> locations = new ArrayList<>(staticLocations.length + 1);
			Arrays.stream(staticLocations).map(this.resourceLoader::getResource).forEach(locations::add);
			locations.add(new ClassPathResource("/"));
			return Collections.unmodifiableList(locations);
		}
	}
1.所有 /webjars/** ,都去 classpath:/META-INF/resources/webjars/ 找资源。
webjars:以jar包的方式引入静态资源。
<!‐‐引入jquery‐webjar‐‐>在访问的时候只需要写webjars下面资源的名称即可
<dependency>
    <groupId>org.webjars</groupId>
    <artifactId>jquery</artifactId>
    <version>3.5.0</version>
</dependency>

http://localhost:8080/webjars/jquery/3.5.0/jquery.js
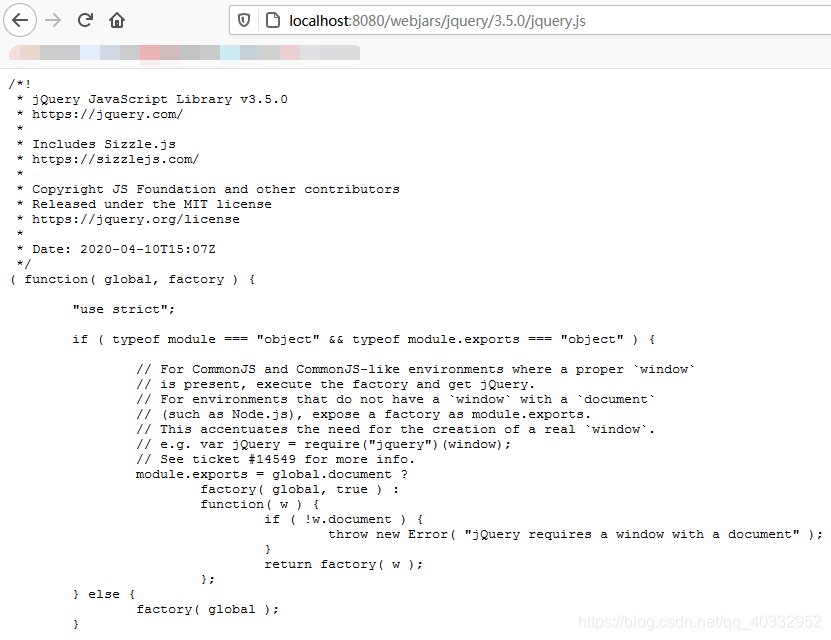
webjars文档:http://www.webjars.org/,里面有很多静态资源都是以jar包的方式。

2."/**" 访问当前项目的任何资源,都去(静态资源的文件夹)找映射
"classpath:/META‐INF/resources/",
"classpath:/resources/",
"classpath:/static/",
"classpath:/public/",
"/":当前项目的根路径
http://localhost:8080/abc —> 默认去上面的静态资源文件夹里面找abc
3.欢迎页,静态资源文件夹下的所有index.html页面,被"/**"映射;
http://localhost:8080/ 找index页面
4.所有的 **/favicon.ico 都是在静态资源文件下找
3.模板引擎
JSP、Velocity、Freemarker、Thymeleaf
 SpringBoot推荐的Thymeleaf:语法更简单,功能更强大。
thymeleaf中文文档:https://pan.baidu.com/s/1VAJC22Jvx2LnvMep9f55hg 提取码:qs4d
thymeleaf中文文档:http://www.75271.com/20088.html
thymeleaf中文文档:https://www.kaifaxueyuan.com/frontend/thymeleaf3/thymeleaf-index.html
1.引入thymeleaf
因为老师使用的是1.5.9版本springboot,thymeleaf是2.1.6版本太低了,所以要提高thymeleaf版本。
<dependency>
	<groupId>org.springframework.boot</groupId>
	<artifactId>spring‐boot‐starter‐thymeleaf</artifactId>
</dependency>

切换thymeleaf版本(提高thymeleaf版本,随着layout也要提高为什么呢?)
<properties>
	<thymeleaf.version>3.0.9.RELEASE</thymeleaf.version>
	<!‐‐ 布局功能的支持程序 thymeleaf版本3 需要layout2以上版本做支持。 ‐‐>
	<!‐‐ thymeleaf2 layout1‐‐>
	<thymeleaf‐layout‐dialect.version>2.2.2</thymeleaf‐layout‐dialect.version>
</properties>
 我现在使用springboot2.0.1版本随着spring‐boot‐starter‐thymeleaf和thymeleaf‐layout‐dialect也会提升,就不用覆盖了。

2.Thymeleaf使用
@ConfigurationProperties(prefix = "spring.thymeleaf")
public class ThymeleafProperties {

	private static final Charset DEFAULT_ENCODING = StandardCharsets.UTF_8;

	public static final String DEFAULT_PREFIX = "classpath:/templates/";

	public static final String DEFAULT_SUFFIX = ".html";
只要把HTML页面放在classpath:/templates/,thymeleaf就能自动渲染。
1.导入thymeleaf的名称空间(就有语法提示了)
<html lang="en" xmlns:th="http://www.thymeleaf.org">
2.使用thymeleaf语法
success.html
<!DOCTYPE html>
<html lang="en" xmlns:th="http://www.thymeleaf.org">
<head>
    <meta charset="UTF‐8">
    <title>Title</title></head>
<body><h1>成功!</h1>
    <!--th:text 将div里面的文本内容设置为-->
    <div th:text="${hello}">这是显示欢迎信息</div>
</body>
</html>
HelloController
@Controller
public class HelloController {
    @RequestMapping("/hello")
    public String sayHello(Map<String,String> map){
        //默认会存到request域中
        map.put("hello","你好");
        return "success";
    }
}
测试结果

3.语法规则
1.th:任意html属性,来替换原生属性的值
th:text,改变当前元素里面的文本内容
在thymeleaf的第10章:

2.表达式
在thymeleaf的第4章:
1.简单表达式
- 变量表达式: ${…}
- 选择变量表达式: *{…}
- 消息表达: #{…}
- 链接URL表达式: @{…}
- 片段表达式: ~{…}
1.变量表达式: ${…}
获取变量值,OGNL,获取对象的属性调用方法,使用内置的基本对象。
表达式基本对象:
#ctx:上下文对象。
#vars: 上下文变量。
#locale:上下文语言环境。
#request:(仅在Web上下文中)HttpServletRequest对象。
#response:(仅在Web上下文中)HttpServletResponse对象。
#session:(仅在Web上下文中)HttpSession对象。
#servletContext:(仅在Web上下文中)ServletContext对象。
表达工具对象:
#execInfo:有关正在处理的模板的信息。
#messages:用于获取变量表达式内的外部化消息的方法,与使用#{…}语法获得消息的方法相同。
#uris:用于转义部分URL / URI的方法
#conversions:用于执行已配置的转换服务(如果有)的方法。
#dates:java.util.Date对象的方法:格式化,组件提取等。
#calendars:类似于#dates,但用于java.util.Calendar对象。
#numbers:格式化数字对象的方法。
#strings:String对象的方法:包含,startsWith,前置/追加等。
#objects:一般对象的方法。
#bools:布尔值评估的方法。
#arrays:数组方法。
#lists:列表方法。
#sets:套方法。
#maps:地图方法。
#aggregates:用于在数组或集合上创建聚合的方法。
#ids:用于处理可能重复的id属性的方法(例如,由于迭代的结果)。
2.选择变量表达式: *{…}
变量表达式不仅可以写成${…},而且还可以写成*{…}。
但是,有一个重要的区别:星号语法在选定对象而不是整个上下文上评估表达式。也就是说,只要没有选定的对象,美元和星号的语法就完全一样。
什么是选定对象?使用该th:object属性的表达式的结果。让我们在用户个人资料(userprofile.html)页面中使用一个:

完全等同于:

当然,美元和星号语法可以混合使用:

选择对象后,选定的对象也可以作为#object表达式变量用于美元表达式:

如前所述,如果尚未执行任何对象选择,则美元和星号语法是等效的。

3.消息表达: #{…}:获取国际化内容
众所周知,#{…}消息表达式使我们可以链接以下内容:

…对此:

但是,我们仍然没有想到的一个方面:如果消息文本不是完全静态的,会发生什么?例如,如果我们的应用程序知道随时有谁在访问该站点,而我们想按名称打招呼该怎么办?

这意味着我们需要在消息中添加一个参数。像这样:

参数是根据java.text.MessageFormat标准语法指定的,这意味着您可以按照API文档中为java.text.*包中的类指定的格式格式化数字和日期。
为了给我们的参数指定一个值,并给定一个HTTP会话属性user,我们可以拥有:

注意th:utext这里的使用意味着格式化的消息将不会被转义。本示例假定user.name已被转义。
可以指定几个参数,以逗号分隔。
消息密钥本身可以来自变量:

4.链接URL表达式: @{…}
由于URL的重要性,URL是Web应用程序模板中的一等公民,而Thymeleaf Standard Dialect为它们提供了一种特殊的语法,该@语法为:@{…}。
URL有不同类型:
	绝对网址: http://www.thymeleaf.org
	相对URL,可以是:
		相对页面: user/login.html
		上下文相关:(/itemdetails?id=3服务器中的上下文名称将自动添加)
		相对于服务器:(~/billing/processInvoice允许在同一服务器中的另一个上下文(=应用程序)中调用URL。
		相对协议网址: //code.jquery.com/jquery-2.0.3.min.js
这些表达式的实际处理以及它们到将要输出的URL的转换是通过org.thymeleaf.linkbuilder.ILinkBuilder注册到ITemplateEngine所使用的对象的接口实现来完成的。
默认情况下,该类的该接口的单个实现被注册org.thymeleaf.linkbuilder.StandardLinkBuilder,这对于脱机(非Web)和基于Servlet API的Web场景都足够。其他场景(例如与非ServletAPI Web框架集成)可能需要链接构建器接口的特定实现。
让我们使用这种新语法。符合th:href属性:
<!-- Will produce 'http://localhost:8080/gtvg/order/details?orderId=3' (plus rewriting) -->
<a href="details.html" th:href="@{http://localhost:8080/gtvg/order/details(orderId=${o.id})}">view</a>

<!-- Will produce '/gtvg/order/details?orderId=3' (plus rewriting) -->
<a href="details.html" th:href="@{/order/details(orderId=${o.id})}">view</a>

<!-- Will produce '/gtvg/order/3/details' (plus rewriting) -->
<a href="details.html" th:href="@{/order/{orderId}/details(orderId=${o.id})}">view</a>
这里要注意一些事情:
- th:href是修饰符属性:处理后,它将计算要使用的链接URL,并将该值设置href为标记的属性。
- 我们被允许对URL参数使用表达式(如您在中所见orderId=${o.id})。所需的URL参数编码操作也将自动执行。
- 如果需要几个参数,这些将用逗号分隔:@{/order/process(execId=${execId},execType=‘FAST’)}
- URL路径中也允许使用变量模板: @{/order/{orderId}/details(orderId=${orderId})}
- 以/(例如:)开头的相对URL /order/details将自动以应用程序上下文名称作为前缀。
- 如果未启用Cookie或尚不知道,则";jsessionid=…"可能会将后缀添加到相对URL中,以便保留会话。这称为URL重写,并且Thymeleaf允许您通过使用response.encodeURL(…)ServletAPI中的机制为每个URL 插入自己的重写过滤器。
- 该th:href属性允许我们(可选)href在模板中具有有效的静态属性,以便当直接打开原型进行原型设计时,浏览器仍可导航我们的模板链接。
与消息语法(#{…})一样,URL基也可以是求值另一个表达式的结果:

主页的菜单
现在,我们知道了如何创建链接URL,如何在主页中为站点中的其他页面添加一个小菜单?

服务器根目录相对URL
可以使用其他语法来创建相对于服务器根目录的URL(而不是上下文根目录的URL),以便链接到同一服务器中的不同上下文。这些网址的指定方式如下@{~/path/to/something}
5.片段表达式: ~{…}
片段表达式是表示标记片段并将其在模板中移动的简便方法。这使我们能够复制它们,并将它们作为参数传递给其他模板,依此类推。
最常见的用途是使用th:insert或th:replace(在后面的部分中有更多关于)的片段插入:

但是它们可以在任何地方使用,就像其他任何变量一样:

在本教程的后面,将有一个完整的章节专门介绍“模板布局”,包括对片段表达式的更深入的说明。
2.文字
- 文本文字:‘one text’,‘Another one!’,…
- 号码文字:0,34,3.0,12.3,…
- 布尔文字:true,false
- 空文字: null
- 文字标记:one,sometext,main,…
1.文本文字
文本文字只是在单引号之间指定的字符串。它们可以包含任何字符,但是您应该使用来对其中的任何单引号进行转义’。

2.数字文字
数字文字就是:数字。

3.布尔文字
布尔文字是true和false。例如:

在此示例中,== falsey是写在花括号外的,因此Thymeleaf负责处理。如果将其写在花括号内,则OGNL / SpringEL引擎应负责:

4.空文字
该null文本也可用于:

5.文字代币
实际上,数字,布尔值和null文字是文字标记的一种特殊情况。
这些标记允许在标准表达式中进行一些简化。它们的工作方式与文本文字(’…’)完全相同,但是它们仅允许使用字母(A-Z和a-z),数字(0-9),方括号([和]),点(.),连字符(-)和下划线(_)。因此,没有空格,没有逗号等。
好的部分?令牌不需要任何引号。因此,我们可以这样做:

代替:

3.文字操作
- 字符串串联: +
- 文字替换: |The name is ${name}|
1.附加文字
文本,无论是文字还是评估变量或消息表达式的结果,都可以使用+运算符轻松附加:

2.文字替代
文字替换可以轻松格式化包含变量值的字符串,而无需在文字后面附加’…’ + ‘…’。
这些替换项必须用竖线(|)包围,例如:

等效于:

文字替换可以与其他类型的表达式结合使用:

唯一的变量/消息表达式(${…},*{…},#{…})被允许内部|…|字面取代。没有其他文字(’…’),布尔/数字标记,条件表达式等。
4.算术运算
- 二元运算符:+,-,*,/,%
- 减号(一元运算符): -
一些算术运算也可用:+,-,*,/和%。

请注意,这些运算符也可以在OGNL变量表达式内部应用(在这种情况下,将由OGNL代替Thymeleaf标准表达式引擎执行):

请注意,其中一些运算符存在文本别名:div(/),mod(%)。
5.布尔运算
- 二元运算符:and,or
- 布尔否定(一元运算符): !,not
6.比较和平等
- 比较:>,<,>=,<=(gt,lt,ge,le)
- 等号运算符:==,!=(eq,ne)
在表达式中的值可以与进行比较>,<,>=和<=符号,以及==和!=运营商可以被用来检查是否相等(或缺乏)。请注意,XML规定,不得在属性值中使用<和>符号,因此应将其替换为<and >。

一个更简单的替代方法可能是使用以下某些运算符存在的文本别名:gt(>),lt(<),ge(>=),le(<=),not(!)。还有eq(==),neq/ ne(!=)。
7.条件运算符
- 如果-则: (if) ? (then)
- 如果-则-否则: (if) ? (then) : (else)
- 默认: (value) ?: (defaultvalue)
1.条件表达式
条件表达式旨在仅根据两个条件的求值结果来求值(它本身就是另一个表达式)。
让我们来看一个例子片段(引入另一个属性修改器,th:class):

条件表达式的所有三个部分(condition,then和else)本身的表达式,这意味着它们可以是变量(${…},*{…}),消息(#{…}),网址(@{…})或文字(’…’)。
也可以使用括号嵌套条件表达式:

其他表达式也可以省略,在这种情况下,如果条件为false,则返回null值:

2.默认表达式(Elvis运算符)
一个默认的表情是一种特殊的条件值的没有那么一部分。它等效于某些语言(如Groovy)中出现的Elvis运算符,可让您指定两个表达式:如果第一个表达式的计算结果不为null,则使用第一个表达式;如果第二个表达式使用,则使用第二个表达式。
让我们在用户个人资料页面中看到它的实际效果:

如您所见,运算符为?:,并且仅当求*{age}值结果为null时,才在此处使用它来指定名称的默认值(在这种情况下为文字值)。因此,这等效于:

与条件值一样,它们可以在括号之间包含嵌套表达式:

8.特殊令牌
- 无操作: _
No-Operation令牌由下划线符号(_)表示。
该标记背后的想法是指定表达式的期望结果什么也不做,即完全像可处理属性(例如th:text)根本不存在一样。
除其他可能性外,这还使开发人员可以将原型文本用作默认值。例如,代替:

…我们可以直接将“未经用户身份验证”用作原型文本,从设计的角度来看,这使得代码既简洁又通用:

3.表达式演示
success.html
<body>
    <!--th:text 会转译 -->
    <div th:text="${hello}"></div>
    <!--th:utext 不会转译 -->
    <div th:utext="${hello}"></div><hr>

    <!--th:each每一次遍历都会生成这个标签:也就是3个h1-->
    <h1 th:text="${user}" th:each="user:${users}"></h1><hr>
    <h1>
        <!--表达式内联写法,具体操作可以参照Thymeleaf文档。-->
        <span th:each="user:${users}">[[${user}]]</span>
    </h1>
</body>
HelloController
@Controller
public class HelloController {
    @RequestMapping("/hello")
    public String sayHello(Map<String,Object> map){
        //默认会存到request域中
        map.put("hello","<h1>你好<h1>");
        map.put("users", Arrays.asList("zhangsan","lisi","wangwu"));
        return "success";
    }
}
测试结果

4.SpringMVC自动配置
springMVC自动配置文档:https://www.springcloud.cc/spring-boot.html#boot-features-spring-mvc-auto-configuration
1.Spring MVC auto-configuration
Spring Boot为Spring MVC提供了自动配置,适用于大多数应用程序。
自动配置在Spring的默认值之上添加了以下功能:
- 包含ContentNegotiatingViewResolver和BeanNameViewResolver beans。
自动配置了ViewResolver(视图解析器:根据方法的返回值得到视图对象(View),视图对象决定如何渲染(决定转发和重定向))
ContentNegotiatingViewResolver:组合所有的视图解析器的。
如何定制:我们可以自己给容器中添加一个视图解析器,自动的将其组合进来。
@SpringBootApplication
public class SpringbootThymeleafApplication {
    public static void main(String[] args) {
        SpringApplication.run(SpringbootThymeleafApplication.class, args);
    }
	//自定义视图解析器
    @Bean
    public MyResolveView myResolveView(){
        return new MyResolveView();
    }
    private static class MyResolveView implements ViewResolver {
        @Override
        public View resolveViewName(String viewName, Locale locale) throws Exception {
            return null;
        }
    }
}

- 支持提供静态资源,包括对WebJars的支持( 本文档稍后介绍))。
- 自动注册Converter,GenericConverter和Formatter beans。
Converter:转换器,public String hello(User user),类型转换使用Converter。
Formatter 格式化器:2017.12.17 -> Date。
 自己添加的格式化器转换器,我们只需要放在容器中即可。
 - 支持HttpMessageConverters( 本文档稍后部分)。
HttpMessageConverters:SpringMVC用来转换Http请求和响应的,User—Json。
HttpMessageConverters:是从容器中确定(把自定义转换注册到容器到),获取所有的HttpMessageConverter,自己给容器中添加HttpMessageConverters,只需要将自己的组件注册容器中 (使用@Bean或者@Component)

- 自动注册MessageCodesResolver( 本文档后面部分)。
定义错误代码生成规则。 - 静态index.html支持。
- 自定义Favicon支持(本文档稍后介绍)。(图标)
- 自动使用ConfigurableWebBindingInitializer bean(本文 后面会介绍)。
我们可以配置一个ConfigurableWebBindingInitializer来替换默认的(添加到容器)


1.我有疑问就是有的时候在配置类中注册,需要实现一个接口,有的则不需要 why?

2.扩展SpringMVC
配置拦截器:
<mvc:view‐controller path="/hello" view‐name="success"/>
<mvc:interceptors>
	<mvc:interceptor>
		<mvc:mapping path="/hello"/>
		<bean></bean>
	</mvc:interceptor>
</mvc:interceptors>
编写一个配置类(@Configuration),是WebMvcConfigurerAdapter类型,不能标注@EnableWebMvc。
既保留了所有的自动配置,也能用我们扩展的配置。


1.扩展SpringMVC扩展配原理
- 1、WebMvcAutoConfiguration是SpringMVC的自动配置类
- 2、在做其他自动配置时会导入,@Import(EnableWebMvcConfiguration.class)

- 3、容器中所有的WebMvcConfigurer都会一起起作用。
- 4、我们的配置类也会被调用。
效果:SpringMVC的自动配置和我们的扩展配置都会起作用。
3.全面接管SpringMVC
SpringBoot对SpringMVC的自动配置不需要了,所有都是我们自己配置,所有的SpringMVC的自动配置就失效了。
我们需要在配置类中添加@EnableWebMvc即可。
//使用WebMvcConfigurerAdapter可以来扩展SpringMVC的功能 @EnableWebMvc
@EnableWebMvc
@Configuration
public class MyMvcConfig extends WebMvcConfigurerAdapter {
    @Override
    public void addViewControllers(ViewControllerRegistry registry) {
        //super.addViewControllers(registry);
        //浏览器发送 /haha 请求来到 success
        registry.addViewController("/haha").setViewName("success");
    }
}
1.全面接管SpringMVC原理
为什么@EnableWebMvc自动配置就失效了?
- 1、@EnableWebMvc的核心

2、

3、
 4、@EnableWebMvc 将 WebMvcConfigurationSupport 组件导入进来
5、导入的 WebMvcConfigurationSupport 只是 SpringMVC 最基本的功能
4.如何修改SpringBoot的默认配置
模式:
1、SpringBoot在自动配置组件的时候,先看容器中有没有用户自己配置的(@Bean、@Component)如果有就用用户配置的,如果没有,才自动配置。如果有些组件可以有多个(ViewResolver)将用户配置的和默认配置的组合起来。
2、在SpringBoot中会有非常多的 xxxConfigurer 帮助我们进行扩展配置(重点、重点、重点)
 扩展配置三种方式:只要是 WebMvcConfigurer 类型即可
// 使用WebMvcConfigurerAdapter可以来扩展SpringMVC的功能
// @EnableWebMvc 不要接管SpringMVC
@Configuration
public class MyMvcConfig extends WebMvcConfigurerAdapter {

    //扩展配置第一种方式
    //添加视图控制配置
    @Override
    public void addViewControllers(ViewControllerRegistry registry) {
        //super.addViewControllers(registry);
        //浏览器发送 /haha 请求来到 success
        //如果是直接到页面就可以使用这种方,这样就不用因为跳转到一个页面而去下一个空方法。
        registry.addViewController("/haha").setViewName("success");
    }

    //扩展配置第二种方式
    //所有的 WebMvcConfigurer类型 组件都会一起起作用
    @Bean//将组件注册到容器
    public WebMvcConfigurerAdapter myWebMvcConfigurerAdapter(){
        return new WebMvcConfigurerAdapter() {
            @Override
            public void addViewControllers(ViewControllerRegistry registry) {
                //super.addViewControllers(registry);
                registry.addViewController("/").setViewName("login");
            }
        };
    }

    //扩展配置第三种方式
    //所有的 WebMvcConfigurer类型 组件都会一起起作用
    @Bean//将组件注册到容器
    public WebMvcConfigurer myWebMvcConfigurer(){
        return new WebMvcConfigurer(){
            @Override
            public void addViewControllers(ViewControllerRegistry registry) {
                registry.addViewController("/index.html").setViewName("login");
            }
        };
    }
}
测试结果
 3、在SpringBoot中会有很多的 xxxCustomizer 帮助我们进行定制配置
5.RestfulCRUD
1.默认访问首页
 thymeleaf映射规则(应该是 ViewResolver 映射规则)
//方式1
@Controller
public class HelloController {
    @RequestMapping({"/","/index.html"})
    public String index(){
        return "index";
    }
}

//方式2(推荐)因为没有任何数据
// 使用WebMvcConfigurerAdapter可以来扩展SpringMVC的功能
// @EnableWebMvc 不要接管SpringMVC
@Configuration
public class MyMvcConfig extends WebMvcConfigurerAdapter {
    //扩展配置第一种方式
    //添加视图控制配置
    @Override
    public void addViewControllers(ViewControllerRegistry registry) {
        //super.addViewControllers(registry);
        //浏览器发送 /haha 请求来到 success
        //如果是直接到页面就可以使用这种方,这样就不用因为跳转到一个页面而去下一个空方法。
        registry.addViewController("/").setViewName("index");
        registry.addViewController("/index.html").setViewName("index");
    }
}

2.国际化
步骤:
1、编写国际化配置文件。
2、使用 ResourceBundleMessageSource 管理国际化资源文件 。
3、在页面使用 fmt:message 取出国际化内容。
1、编写国际化配置文件,抽取页面需要显示的国际化消息

 2、SpringBoot自动配置好了管理国际化资源文件的组件
@Configuration
@ConditionalOnMissingBean(value = MessageSource.class, search = SearchStrategy.CURRENT)
@AutoConfigureOrder(Ordered.HIGHEST_PRECEDENCE)
@Conditional(ResourceBundleCondition.class)
@EnableConfigurationProperties
public class MessageSourceAutoConfiguration {

	@Bean
	@ConfigurationProperties(prefix = "spring.messages")
	public MessageSourceProperties messageSourceProperties() {
		return new MessageSourceProperties();
		/**
		 * 基名的逗号分隔列表(本质上是完全合格的类路径位置),每个都遵循ResourceBundle约定,
		 * 并轻松支持基于斜杠的位置,如果它不包含包限定符(例如“ org.mypackage”),
		 * 它将从类路径根目录中解析。
		 */
		// MessageSourceProperties 中的 messages 属性
		// 默认的国际化资源文件的基础名,放在类路径下(messages.properties)就能自动识别,上面有介绍。
		private String basename = "messages";
	}

	@Bean
	public MessageSource messageSource() {
		MessageSourceProperties properties = messageSourceProperties();
		ResourceBundleMessageSource messageSource = new ResourceBundleMessageSource();
		if (StringUtils.hasText(properties.getBasename())) {
			//设置国际化资源文件的基础名(去掉语言国家代码的)-> login
			messageSource.setBasenames(StringUtils.commaDelimitedListToStringArray(
					StringUtils.trimAllWhitespace(properties.getBasename())));
		}
		if (properties.getEncoding() != null) {
			messageSource.setDefaultEncoding(properties.getEncoding().name());
		}
		messageSource.setFallbackToSystemLocale(properties.isFallbackToSystemLocale());
		Duration cacheDuration = properties.getCacheDuration();
		if (cacheDuration != null) {
			messageSource.setCacheMillis(cacheDuration.toMillis());
		}
		messageSource.setAlwaysUseMessageFormat(properties.isAlwaysUseMessageFormat());
		messageSource.setUseCodeAsDefaultMessage(properties.isUseCodeAsDefaultMessage());
		return messageSource;
	}
}
3、去页面获取国际化的值
<!DOCTYPE html>
<html lang="en" xmlns:th="http://www.thymeleaf.org">
<html lang="en">
	<head>
		<meta http-equiv="Content-Type" content="text/html; charset=UTF-8">
		<meta name="viewport" content="width=device-width, initial-scale=1, shrink-to-fit=no">
		<meta name="description" content="">
		<meta name="author" content="">
		<title>Signin Template for Bootstrap</title>
		<!-- Bootstrap core CSS -->
		<link href="asserts/css/bootstrap.min.css" rel="stylesheet">
		<!-- Custom styles for this template -->
		<link href="asserts/css/signin.css" rel="stylesheet">
	</head>

	<body class="text-center">
		<form class="form-signin" action="dashboard.html">
			<img class="mb-4" src="asserts/img/bootstrap-solid.svg" alt="" width="72" height="72">
			<h1 class="h3 mb-3 font-weight-normal" th:text="#{login.tip}">Please sign in</h1>
			<label class="sr-only" th:text="#{login.username}">Username</label>
			<input type="text" class="form-control" th:placeholder="#{login.username}" required="" autofocus="">
			<label class="sr-only" th:text="#{login.password}">Password</label>
			<input type="password" class="form-control" th:placeholder="#{login.password}" required="">
			<div class="checkbox mb-3">
				<label>
					<input type="checkbox" value="remember-me" > [[#{login.rememberme}]]
				</label>
			</div>
			<button class="btn btn-lg btn-primary btn-block" type="submit" th:text="#{login.signin}">Sign in</button>
			<p class="mt-5 mb-3 text-muted">© 2017-2018</p>
			<a class="btn btn-sm">中文</a>
			<a class="btn btn-sm">English</a>
		</form>
	</body>
</html>
效果:根据浏览器语言设置的信息切换了国际化。
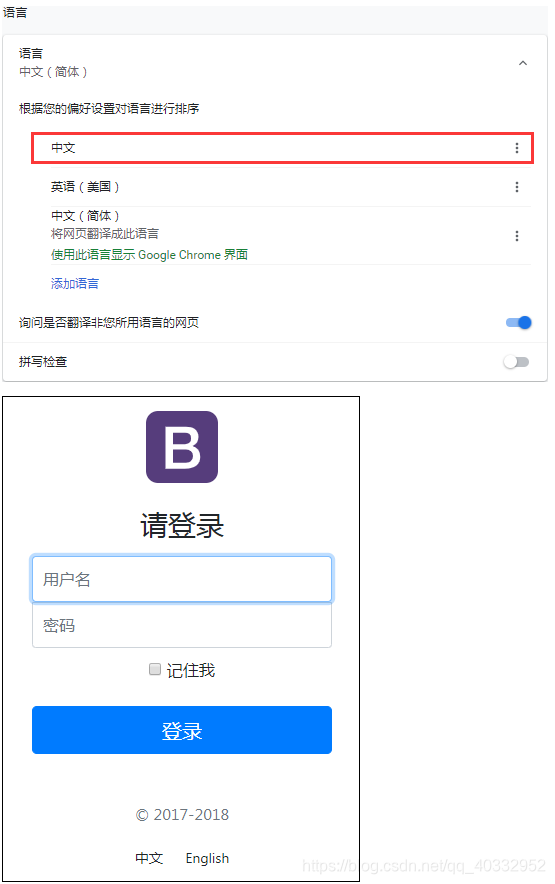
原理: 国际化Locale(区域信息对象),LocaleResolver(获取区域信息对象)。
springboot有默认的国际化配置,会根据客户端请求头中包含的信息,如果是中文就显示中文,如果是英文就是现实英文。

//默认的就是根据请求头带来的区域信息获取Locale进行国际化
@Bean
@ConditionalOnMissingBean
@ConditionalOnProperty(prefix = "spring.mvc", name = "locale")
public LocaleResolver localeResolver() {
	if (this.mvcProperties.getLocaleResolver() == WebMvcProperties.LocaleResolver.FIXED) {
		return new FixedLocaleResolver(this.mvcProperties.getLocale());
	}
	AcceptHeaderLocaleResolver localeResolver = new AcceptHeaderLocaleResolver();
	localeResolver.setDefaultLocale(this.mvcProperties.getLocale());
	return localeResolver;
}
4、点击链接切换国际化
<a class="btn btn-sm" th:href="@{/index.html(l=zh_CN)}">中文</a>
<a class="btn btn-sm" th:href="@{/index.html(l=en_US)}">English</a>
/**
 * 可以在连接上携带区域信息
 */
public class MyLocaleResolver implements LocaleResolver {
    @Override
    public Locale resolveLocale(HttpServletRequest request) {
        String l = request.getParameter("l");
        Locale locale = Locale.getDefault();
        if (!StringUtils.isEmpty(l)) {
            String[] ls = l.split("_");
            locale = new Locale(ls[0], ls[1]);
        }
        return locale;
    }

    @Override
    public void setLocale(HttpServletRequest request, HttpServletResponse response, Locale locale) {

    }
}

// 使用WebMvcConfigurerAdapter可以来扩展SpringMVC的功能
// @EnableWebMvc 不要接管SpringMVC
@Configuration
public class MyMvcConfig extends WebMvcConfigurerAdapter {

    //扩展配置第一种方式
    //添加视图控制配置
    @Override
    public void addViewControllers(ViewControllerRegistry registry) {
        //super.addViewControllers(registry);
        //浏览器发送 /haha 请求来到 success
        //如果是直接到页面就可以使用这种方,这样就不用因为跳转到一个页面而去下一个空方法。
        registry.addViewController("/").setViewName("login");
        registry.addViewController("/index.html").setViewName("login");
    }

	//将MyLocaleResolver注册到容器
    @Bean
    public MyLocaleResolver localeResolver(){
        return new  MyLocaleResolver();
    }
}
3.登录
开发期间模板引擎页面修改以后,要实时生效。
禁用模板引擎的缓存,页面修改完成以后ctrl+f9,重新编译。
# 禁用缓存
spring.thymeleaf.cache=false
登陆错误消息的显示
<div style="color:red" th:text="${msg}" th:if="${not #strings.isEmpty(msg)}"></div>
登录功能
@Controller
public class LoginController {

    @RequestMapping(value = "/user/login", method = RequestMethod.POST)
    public String login(@RequestParam("username") String username,
                        @RequestParam("password") String password,
                        HttpServletRequest request,
                        Map<String, String> map) {
        if (!StringUtils.isEmpty(username) && "123456".equals(password)) {
            //登录成功
            User user = new User();
            user.setUsername(username);
            user.setPassword(password);
            request.getSession().setAttribute("user", user);
            //这里有一个问题就是,为什么不能重定向到dashboard。要重定向到main.html
            //因为springboot有默认的映射规则,从定向后会从默认文件夹下找dashboard.html,
            //根本找不到,要想找到/templates/dashboard.html要定义 ViewResolver 的映射规则。
            return "redirect:/main.html";
            //return "dashboard";
        } else {
            map.put("msg", "用户名或密码错误!");
            return "login";
        }
    }
}
4.拦截器进行登陆检查
拦截器
/**
 * 登录检查
 */
public class LoginHandlerInterceptor implements HandlerInterceptor {
    @Override
    public boolean preHandle(HttpServletRequest request, HttpServletResponse response, Object handler) throws Exception {
        User user = (User) request.getSession().getAttribute("user");
        if (user == null) {
            //未登录,返回登录页面
            request.setAttribute("msg", "没有权限请先登录");
            //转发到登录页面
            request.getRequestDispatcher("/index.html").forward(request, response);
            return false;
        } else {
            //放行
            return true;
        }
    }
}
注册拦截器
1.注册拦截器疑问为什么注册拦截器是添加的方式而不是@Bean方式

// 使用WebMvcConfigurerAdapter可以来扩展SpringMVC的功能
// @EnableWebMvc 不要接管SpringMVC
@Configuration
public class MyMvcConfig extends WebMvcConfigurerAdapter {

    //扩展配置第一种方式
    //添加视图控制配置
    @Override
    public void addViewControllers(ViewControllerRegistry registry) {
        //super.addViewControllers(registry);
        //浏览器发送 /haha 请求来到 success
        //如果是直接到页面就可以使用这种方,这样就不用因为跳转到一个页面而去下一个空方法。
        registry.addViewController("/").setViewName("login");
        registry.addViewController("/index.html").setViewName("login");
        registry.addViewController("/main.html").setViewName("dashboard");
    }

    @Override
    public void addInterceptors(InterceptorRegistry registry) {
        //super.addInterceptors(registry);
        //静态资源, *.css , *.js。
        //SpringBoot已经做好了静态资源映射(我使用的springboot2.0.1,静态资源也会被拦截掉,所以静态资源还是要放行的)
        registry.addInterceptor(new LoginHandlerInterceptor())
                .addPathPatterns("/**")//拦截任意目录下文件夹下的文件
                .excludePathPatterns("/", "/index.html", "/user/login", "/asserts/**");//放行
    }
}
5.CRUD-员工列表
实验要求:
RestfulCRUD:CRUD满足Rest风格
URI: /资源名称/资源标识 HTTP请求方式区分对资源CRUD操作
| 查询 | 普通CRUD(uri来区分操作) | RestfulCRUD |
|---|---|---|
| 查询 | getEmp | emp—GET |
| 添加 | addEmp?xxx | emp—POST |
| 修改 | updateEmp?id=xxx&xxx=xx | emp/{id}—PUT |
| 删除 | deleteEmp?id=1 | emp/{id}—DELETE |
实验的请求架构
| 实验功能 | 请求URI | 请求方式 |
|---|---|---|
| 查询所有员工 | emps | GET |
| 查询某个员工(来到修改页面) | emp/1 | GET |
| 来到添加页面 | emp | GET |
| 添加员工 | emp | POST |
| 来到修改页面(查出员工进行信息回显) | emp/1 | GET |
| 修改员工 | emp | PUT |
| 删除员工 | emp/1 | DELETE |
1.thymeleaf公共页面元素抽取
1、抽取公共片段
<div th:fragment="copy">
© 2011 The Good Thymes Virtual Grocery
</div>
2、引入公共片段
<div th:insert="~{footer :: copy}"></div>
~{templatename::selector}:模板名::选择器(模版名就是页面名称,这个公共片段在哪个模板页面,会经过thymeleaf解析去掉前后缀。)
~{templatename::fragmentname}:模板名::片段名
3、默认效果:insert的公共片段在div标签中
如果使用th:insert等属性进行引入,可以不用写~{}。
行内写法可以加上:[[~{}]];[(~{})];
三种引入公共片段的th属性:
th:insert:将公共片段整个插入到声明引入的元素中
th:replace:将声明引入的元素替换为公共片段
th:include:将被引入的片段的内容包含进这个标签中
因此,HTML片段如下所示:

在
 结果:
结果:

可参数化的片段签名

1.抽取CRUD-员工列表公共页面示例
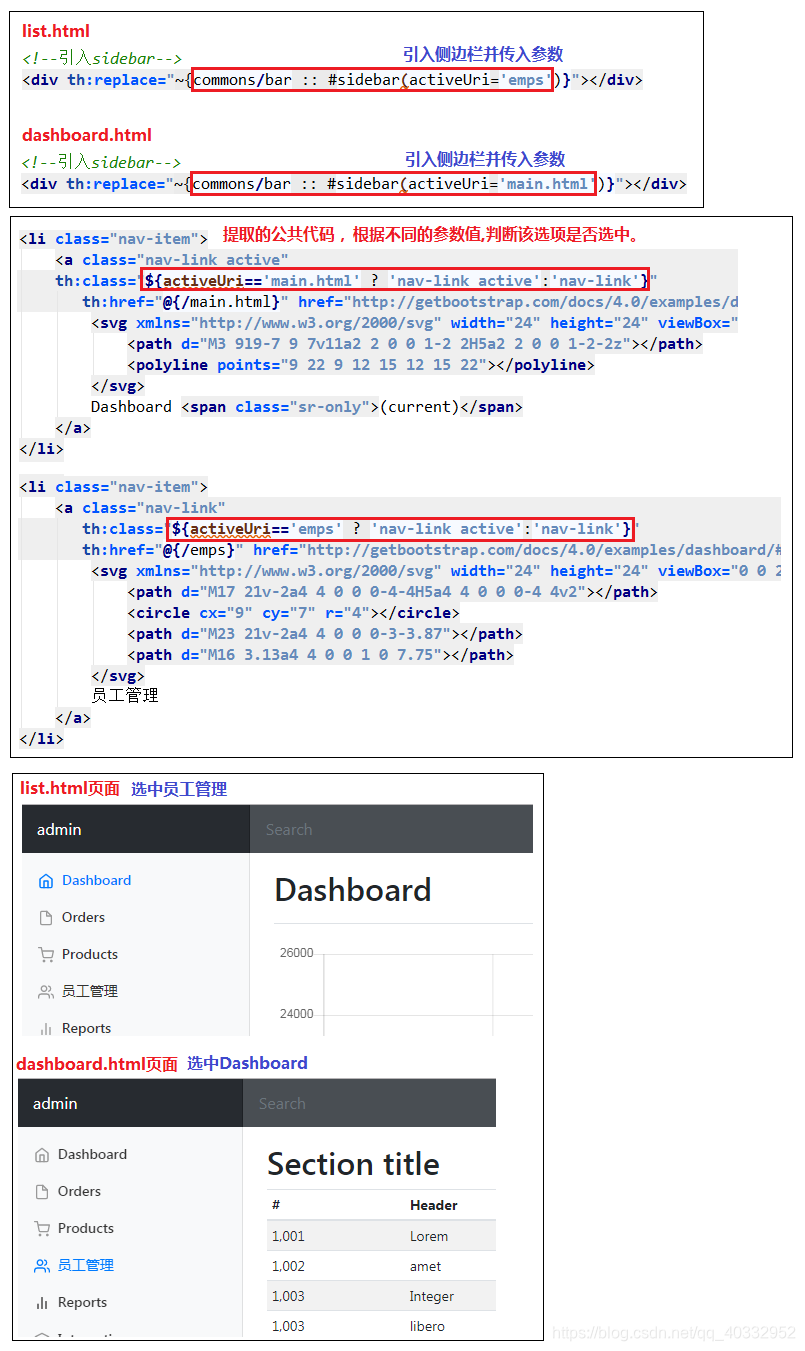
抽取topbar和sidebar
 在list.html页面引入topbar和sidebar

2.侧边栏选中高亮显示
6.CRUD-员工添加和修改合一
修改添加二合一表单
<!DOCTYPE html>
<!-- saved from url=(0052)http://getbootstrap.com/docs/4.0/examples/dashboard/ -->
<html lang="en" xmlns:th="http://www.thymeleaf.org">

<head>
    <meta http-equiv="Content-Type" content="text/html; charset=UTF-8">
    <meta name="viewport" content="width=device-width, initial-scale=1, shrink-to-fit=no">
    <meta name="description" content="">
    <meta name="author" content="">

    <title>Dashboard Template for Bootstrap</title>
    <!-- Bootstrap core CSS -->
    <link href="asserts/css/bootstrap.min.css" th:href="@{/webjars/bootstrap/4.0.0/css/bootstrap.css}" rel="stylesheet">

    <!-- Custom styles for this template -->
    <link href="asserts/css/dashboard.css" th:href="@{/asserts/css/dashboard.css}" rel="stylesheet">
    <style type="text/css">
        /* Chart.js */

        @-webkit-keyframes chartjs-render-animation {
            from {
                opacity: 0.99
            }
            to {
                opacity: 1
            }
        }

        @keyframes chartjs-render-animation {
            from {
                opacity: 0.99
            }
            to {
                opacity: 1
            }
        }

        .chartjs-render-monitor {
            -webkit-animation: chartjs-render-animation 0.001s;
            animation: chartjs-render-animation 0.001s;
        }
    </style>
</head>

<body>
<!--引入抽取的topbar-->
<!--模板名:会使用thymeleaf的前后缀配置规则进行解析-->
<div th:replace="commons/bar::topbar"></div>

<div class="container-fluid">
    <div class="row">
        <!--引入侧边栏-->
        <div th:replace="commons/bar::#sidebar(activeUri='emps')"></div>
        <main role="main" class="col-md-9 ml-sm-auto col-lg-10 pt-3 px-4">

            <!--需要区分是员工修改还是添加。-->
            <form th:action="@{/emp}" method="post">
                <!--发送put请求修改员工数据-->
                <!--
                    1、SpringMVC中配置HiddenHttpMethodFilter;(SpringBoot自动配置好的)
                    2、页面创建一个post表单(因为是根据Rest风格开发)
                    3、创建一个input项,name="_method",值就是我们指定的请求方式。
                -->
                <input type="hidden" name="_mehotd" value="put" th:if="${emp!=null}">
                <input type="hidden" th:value="${emp.id}" th:if="${emp!=null}">

                <div class="form-group">
                    <label>LastName</label>
                    <input name="lastName" type="text" class="form-control" placeholder="zhangsan" th:value="${emp!=null} ? ${emp.lastName}">
                </div>
                <div class="form-group">
                    <label>Email</label>
                    <input name="email" type="text" class="form-control" placeholder="zhangsan@qq.com" th:value="${emp!=null} ? ${emp.email}">
                </div>
                <div class="form-group">
                    <label>Gender</label><br/>
                    <div class="form-check form-check-inline">
                        <input class="form-check-input" type="radio" name="gender" value="1" th:checked="${emp!=null} ? ${emp.gender==1}">
                        <label class="form-check-label">男</label>
                    </div>
                    <div class="form-check form-check-inline">
                        <input class="form-check-input" type="radio" name="gender" value="0" th:checked="${emp!=null} ? ${emp.gender==0}">
                        <label class="form-check-label">女</label>
                    </div>
                </div>
                <div class="form-group">
                    <label>Department</label>
                    <!--提交的是部门的id-->
                    <select class="form-control" name="department.id">
                        <option th:each="dep:${deps}" th:value="${dep.id}" th:selected="${emp!=null} ? ${emp.department.id==dep.id}">[[${dep.departmentName}]]</option>
                    </select>
                </div>
                <div class="form-group">
                    <label>Birth</label>
                    <input name="birth" type="text" class="form-control" placeholder="2020-01-01" th:value="${emp!=null} ? ${#dates.format(emp.birth,'yyyy-MM-dd HH:mm')}">
                </div>
                <button type="submit" class="btn btn-primary" th:text="${emp!=null ? '修改':'添加'}">添加</button>
            </form>
        </main>
    </div>
</div>

<!-- Bootstrap core JavaScript
================================================== -->
<!-- Placed at the end of the document so the pages load faster -->
<script type="text/javascript" src="asserts/js/jquery-3.2.1.slim.min.js"
        th:src="@{/webjars/jquery/3.3.1/jquery.js}"></script>
<script type="text/javascript" src="asserts/js/popper.min.js"
        th:src="@{/webjars/popper.js/1.11.1/dist/popper.js}"></script>
<script type="text/javascript" src="asserts/js/bootstrap.min.js"
        th:src="@{/webjars/bootstrap/4.0.0/js/bootstrap.js}"></script>

<!-- Icons -->
<script type="text/javascript" src="asserts/js/feather.min.js" th:src="@{/asserts/js/feather.min.js}"></script>
<script>
    feather.replace()
</script>
</body>
</html>
@Controller
public class EmployeeController {

    @Autowired
    EmployeeDao employeeDao;

    @Autowired
    DepartmentDao departmentDao;

    /**
     *  查询所有员工返回列表页面
     * @param model
     * @return
     */
    @GetMapping("/emps")
    public String emps(Model model) {
        Collection<Employee> emps = employeeDao.getAll();
        //放在请求域中
        model.addAttribute("emps", emps);
        // thymeleaf默认就会拼串
        // classpath:/templates/xxxx.html
        return "emp/list";
    }

    /**
     * 去添加员工页面
     * @param model
     * @return
     */
    @GetMapping("/emp")
    public String toAddPage(Model model) {
        //来到添加页面,查出所有的部门,在页面显示
        Collection<Department> deps = departmentDao.getDepartments();
        model.addAttribute("deps", deps);
        return "emp/add";
    }

    /**
     *
     * 员工添加
     * SpringMVC自动将请求参数和入参对象的属性进行一一绑定,
     * 要求请求参数的名字和javaBean入参的对象里面的属性名是一样的.
     * @param employee
     * @return
     */
    @PostMapping("/emp")
    public String addEmp(Employee employee) {
        //来到员工列表页面
        //保存员工
        // redirect: 表示重定向到一个地址  /代表当前项目路径
        // forward: 表示转发到一个地址
        employeeDao.save(employee);
        return "redirect:/emps";
    }

    /**
     *  来到修改页面,查出当前员工,在页面回显
     * @return
     */
    @GetMapping("/emp/{id}")
    public String editEmp(@PathVariable("id") Integer id,Model model) {
        Employee emp = employeeDao.get(id);
        model.addAttribute("emp",emp);

        //页面要显示所有的部门列表
        Collection<Department> deps = departmentDao.getDepartments();
        model.addAttribute("deps",deps);
        //回到修改页面(add是一个修改添加二合一的页面);
        return "emp/add";
    }

    /**
     * 员工修改,需要提交员工id。
     * @param employee
     * @return
     */
    @PutMapping("/emp")
    public String updateEmp(Employee employee){
        employeeDao.save(employee);
        return "redirect:/emps";
    }
}
页面二合一遇到的问题:
怎么判断是添加还是修改?

日期格式问题?
提交的数据格式不对,生日期, 2017-12-12、2017/12/12、2017.12.12。
日期的格式化,SpringMVC将页面提交的值需要转换为指定的类型,2017-12-1 ->Date 类型转换,格式化。
默认日期是按照 / 的方式。(可以修改默认格式)

因为使用的是Rest风格开发,添加是post提交方式,修改是put提交方式,但是表单只提供2中提交方式get和post,那put提交方式怎么解决呢?

添加和修改页面合一开发流程
先把添加页面功能开发好,在把修改页面功能开发好后,这时候点击添加页面可能会出现问题,这样只要把添加页面调整号就完成了。
7.CRUD-员工删除


list.html
<!DOCTYPE html>
<!-- saved from url=(0052)http://getbootstrap.com/docs/4.0/examples/dashboard/ -->
<html lang="en" xmlns:th="http://www.thymeleaf.org">
<head>
    <meta http-equiv="Content-Type" content="text/html; charset=UTF-8">
    <meta name="viewport" content="width=device-width, initial-scale=1, shrink-to-fit=no">
    <meta name="description" content="">
    <meta name="author" content="">

    <title>Dashboard Template for Bootstrap</title>
    <!-- Bootstrap core CSS -->
    <link href="asserts/css/bootstrap.min.css" th:href="@{/asserts/css/bootstrap.min.css}" rel="stylesheet">

    <!-- Custom styles for this template -->
    <link href="asserts/css/dashboard.css" th:href="@{/asserts/css/dashboard.css}" rel="stylesheet">
    <style type="text/css">
        /* Chart.js */

        @-webkit-keyframes chartjs-render-animation {
            from {
                opacity: 0.99
            }
            to {
                opacity: 1
            }
        }

        @keyframes chartjs-render-animation {
            from {
                opacity: 0.99
            }
            to {
                opacity: 1
            }
        }

        .chartjs-render-monitor {
            -webkit-animation: chartjs-render-animation 0.001s;
            animation: chartjs-render-animation 0.001s;
        }
    </style>
</head>

<body>
<!--引入topbar,不应该包含div所以不能使用th:insert-->
<!--<div th:insert="~{commons/bar :: topbar}"></div>-->
<div th:replace="~{commons/bar :: topbar}"></div>
<div class="container-fluid">
    <div class="row">
        <!--引入sidebar-->
        <div th:replace="~{commons/bar :: #sidebar(activeUri='emps')}"></div>
        <main role="main" class="col-md-9 ml-sm-auto col-lg-10 pt-3 px-4">
            <h1>
                <a class="btn btn-sm btn-success" th:href="@{/emp}">添加</a>
            </h1>
            <div class="table-responsive">
                <table class="table table-striped table-sm">
                    <thead>
                    <tr>
                        <th>ID</th>
                        <th>lastName</th>
                        <th>email</th>
                        <th>gender</th>
                        <th>department</th>
                        <th>birth</th>
                        <th>操作</th>
                    </tr>
                    </thead>
                    <tbody>
                    <tr th:each="emp : ${emps}">
                        <td th:text="${emp.id}"></td>
                        <td th:text="${emp.lastName}"></td>
                        <td th:text="${emp.email}"></td>
                        <td th:text="${emp.gender}==0 ? '女':'男'"></td>
                        <td th:text="${emp.department.departmentName}"></td>
                        <td th:text="${#dates.format(emp.birth,'yyyy-MM-dd HH:mm')}"></td>
                        <td>
                            <a class="btn btn-sm btn-primary" th:href="@{/emp/}+${emp.id}">编辑</a>
                            <button type="submit" th:attr="delUri=@{/emp/}+${emp.id}" class="btn btn-sm btn-danger deleteBtn">删除</button>
                        </td>
                    </tr>
                    <!--提取出来删除表单-->
                    <form id="deleteForm" method="post">
                        <input type="hidden" name="_method" value="delete">
                    </form>
                    </tbody>
                </table>
            </div>
        </main>
    </div>
</div>

<!-- Bootstrap core JavaScript
================================================== -->
<!-- Placed at the end of the document so the pages load faster -->
<script type="text/javascript" th:src="@{/asserts/js/jquery-3.2.1.slim.min.js}"
        src="asserts/js/jquery-3.2.1.slim.min.js"></script>
<script type="text/javascript" th:src="@{/asserts/js/popper.min.js}" src="asserts/js/popper.min.js"></script>
<script type="text/javascript" th:src="@{/asserts/js/bootstrap.min.js}" src="asserts/js/bootstrap.min.js"></script>

<!-- Icons -->
<script type="text/javascript" th:src="@{/asserts/js/feather.min.js}" src="asserts/js/feather.min.js"></script>
<script>
    feather.replace()
</script>
<script>
    $(".deleteBtn").click(function () {
        var delUri = $(this).attr("delUri");
        // 删除当前员工的
        $("#deleteForm").attr("action", delUri).submit();
    })
</script>

<!-- Graphs -->
<script type="text/javascript" th:src="@{/asserts/js/Chart.min.js}" src="asserts/js/Chart.min.js"></script>
<script>
    var ctx = document.getElementById("myChart");
    var myChart = new Chart(ctx, {
        type: 'line',
        data: {
            labels: ["Sunday", "Monday", "Tuesday", "Wednesday", "Thursday", "Friday", "Saturday"],
            datasets: [{
                data: [15339, 21345, 18483, 24003, 23489, 24092, 12034],
                lineTension: 0,
                backgroundColor: 'transparent',
                borderColor: '#007bff',
                borderWidth: 4,
                pointBackgroundColor: '#007bff'
            }]
        },
        options: {
            scales: {
                yAxes: [{
                    ticks: {
                        beginAtZero: false
                    }
                }]
            },
            legend: {
                display: false,
            }
        }
    });
</script>
</body>
</html>
EmployeeController
@Controller
public class EmployeeController {

    @Autowired
    EmployeeDao employeeDao;

    @Autowired
    DepartmentDao departmentDao;
    /**
     * 删除员工
     * @param id
     * @return
     */
    @DeleteMapping("/emp/{id}")
    public String deleteEmp(@PathVariable("id") Integer id){
        employeeDao.delete(id);
        return "redirect:/emps";
    }
}
6.错误处理机制
1.SpringBoot默认的错误处理机制
1.浏览器返回一个默认的错误页面

优先响应:text/html

2.如果是其他客户端默认响应一个json数据


3.springboot错误处理机制原理
可以参照 ErrorMvcAutoConfiguration 错误处理的自动配置中给容器中添加了以下组件:
1.ErrorPageCustomizer:错误页面定制器
/**
 * 错误控制器的路径。
 */
@Value("${error.path:/error}")
private String path = "/error";
2.BasicErrorController:基本错误控制器
@Bean
@ConditionalOnMissingBean(value = ErrorController.class, search = SearchStrategy.CURRENT)
public BasicErrorController basicErrorController(ErrorAttributes errorAttributes) {
	return new BasicErrorController(errorAttributes, this.serverProperties.getError(),
			this.errorViewResolvers);
}

@Controller
@RequestMapping("${server.error.path:${error.path:/error}}")
public class BasicErrorController extends AbstractErrorController {
	@RequestMapping(produces = "text/html")//产生html类型的数,浏览器发送的请求来到这个方法处理。
	public ModelAndView errorHtml(HttpServletRequest request,HttpServletResponse response) {
		HttpStatus status = getStatus(request);
		Map<String, Object> model = Collections.unmodifiableMap(getErrorAttributes(
				request, isIncludeStackTrace(request, MediaType.TEXT_HTML)));
		response.setStatus(status.value());
		//去哪个页面作为错误页面,包含页面地址和页面内容。
		ModelAndView modelAndView = resolveErrorView(request, response, status, model);
		return (modelAndView == null ? new ModelAndView("error", model) : modelAndView);
	}

	@RequestMapping //产生json数据,其他客户端来到这个方法处理
	@ResponseBody
	public ResponseEntity<Map<String, Object>> error(HttpServletRequest request) {
		Map<String, Object> body = getErrorAttributes(request,
				isIncludeStackTrace(request, MediaType.ALL));
		HttpStatus status = getStatus(request);
		return new ResponseEntity<>(body, status);
	}
}
3.DefaultErrorViewResolver:默认错误视图解析器
public class DefaultErrorViewResolver implements ErrorViewResolver, Ordered {
	@Override
	public ModelAndView resolveErrorView(HttpServletRequest request, HttpStatus status,
			Map<String, Object> model) {
		// 得到ModelAndView
		ModelAndView modelAndView = resolve(String.valueOf(status), model);
		if (modelAndView == null && SERIES_VIEWS.containsKey(status.series())) {
			modelAndView = resolve(SERIES_VIEWS.get(status.series()), model);
		}
		return modelAndView;
	}

	private ModelAndView resolve(String viewName, Map<String, Object> model) {
		//默认SpringBoot可以去找到一个页面 error/404.html
		String errorViewName = "error/" + viewName;
		//模板引擎可以解析这个页面地址就用模板引擎解析
		TemplateAvailabilityProvider provider = this.templateAvailabilityProviders
				.getProvider(errorViewName, this.applicationContext);
		if (provider != null) {
			//模板引擎可用的情况下返回到 errorViewName 指定的视图地址
			return new ModelAndView(errorViewName, model);
		}
		//模板引擎不可用,就在静态资源文件夹下找 errorViewName 对应的页面 error/404.html
		return resolveResource(errorViewName, model);
	}
}
4.DefaultErrorAttributes:默认错误属性
@Order(Ordered.HIGHEST_PRECEDENCE)
public class DefaultErrorAttributes implements ErrorAttributes, HandlerExceptionResolver, Ordered {
	//帮我们在页面共享信息
	@Override
	public Map<String, Object> getErrorAttributes(WebRequest webRequest,
			boolean includeStackTrace) {
		Map<String, Object> errorAttributes = new LinkedHashMap<>();
		errorAttributes.put("timestamp", new Date());
		addStatus(errorAttributes, webRequest);
		addErrorDetails(errorAttributes, webRequest, includeStackTrace);
		addPath(errorAttributes, webRequest);
		return errorAttributes;
	}
}
5.错误处理机制步骤
一但系统出现 4xx(客户端错误) 或者 5xx(服务器错误) 之类的错误, ErrorPageCustomizer(错误页面定制器) 就会生效定制错误的响应规则,就会来到 /error 请求,/error请求就会被 BasicErrorController(基本错误控制器) 处理。
响应页面,去哪个页面是由 DefaultErrorViewResolver(默认错误视图解析器) 解析得到的。
@Override
public ModelAndView resolveErrorView(HttpServletRequest request, HttpStatus status,
		Map<String, Object> model) {
	// 得到ModelAndView
	ModelAndView modelAndView = resolve(String.valueOf(status), model);
	if (modelAndView == null && SERIES_VIEWS.containsKey(status.series())) {
		modelAndView = resolve(SERIES_VIEWS.get(status.series()), model);
	}
	return modelAndView;
}
帮我们在页面共享信息是由 DefaultErrorAttributes(默认错误属性) 得到的。
@Order(Ordered.HIGHEST_PRECEDENCE)
public class DefaultErrorAttributes implements ErrorAttributes, HandlerExceptionResolver, Ordered {
	//帮我们在页面共享信息
	@Override
	public Map<String, Object> getErrorAttributes(WebRequest webRequest,
			boolean includeStackTrace) {
		Map<String, Object> errorAttributes = new LinkedHashMap<>();
		errorAttributes.put("timestamp", new Date());
		addStatus(errorAttributes, webRequest);
		addErrorDetails(errorAttributes, webRequest, includeStackTrace);
		addPath(errorAttributes, webRequest);
		return errorAttributes;
	}
}
2.如果定制错误响应
1.如何定制错误的页面
1.有模版引擎的情况下
有模板引擎(我是用的是Thymeleaf)的情况下,error/状态码。【将错误页面命名为 错误状态码.html 放在模板引擎文件夹(templates)里面的 error文件夹下】,发生此状态码的错误就会来到 对应的页面。
当然可以使用 4xx 和 5xx 作为错误页面的文件名来匹配这种类型的所有错误,精确优先(优先寻找精确的 状态码.html)。
页面能获取的信息:
	timestamp:时间戳
	status:状态码
	error:错误提示
	exception:异常对象
	message:异常消息
	errors:JSR303数据校验的错误都在这里
2.没有模版引擎的情况下
没有模板引擎(模板引擎找不到这个错误页面),就在springboot默映射规则的静态资源文件夹下找错误页面。
3.以上都没有错误页面
以上都没有错误页面,就是默认来到SpringBoot默认的错误提示页面。
2.如何定制错误的json数据
1.自定义异常处理&返回定制json数据
自定义异常
public class UserNotExistException extends RuntimeException {
    public UserNotExistException(String msg){
        super(msg);
    }
}
LoginController 触发自定义异常
@Controller
public class LoginController {
    @RequestMapping("/hello")
    @ResponseBody
    public String hello(@RequestParam("user") String user){
        if("aaa".equals(user)){
           throw new UserNotExistException("用户名不存在!");
        }
        return "hello wolrd";
    }
}
自定义异常处理器
但是没有自适应效果(根据客户端的不同响应也不同)
@ControllerAdvice //要想成为异常处理器,要加上该注解。
public class MyExceptionHandler{
    // 使用 @ExceptionHandler 注解捕获到 UserNotExistException ,
    // 将添加的数据以字符串形式返回。
    @ExceptionHandler(UserNotExistException.class)
    @ResponseBody
    public Map<String,Object> exceptionHandler(Exception e){
        Map<String,Object> map = new HashMap<>();
        map.put("code", "user.notexist");
        map.put("msg",e.getMessage());
        return map;
    }
}
测试结果

2.转发到/error进行自适应响应效果处理
为什么转发到 /error 就可以自适应呢? 是因为使用 BasicErrorController 处理 /error 请求.这个具体可以参照springboot错误处理机制原理。

转发到/error进行自适应响应效果处理
@ControllerAdvice //要想成为异常处理器,要加上该注解。
public class MyExceptionHandler{

    @ExceptionHandler(UserNotExistException.class)
    public String exceptionHandler(Exception e){
        Map<String,Object> map = new HashMap<>();
        map.put("code", "user.notexist");
        map.put("msg",e.getMessage());
        //转发到/error
        return "forward:/error";
    }
}

转发到/error进行自适应响应效果处理,设置响应状态码。(但是不能携带自己的数据)
如何设置设置状态码原理

@ControllerAdvice //要想成为异常处理器,要加上该注解。
public class MyExceptionHandler {

    @ExceptionHandler(UserNotExistException.class)
    public String exceptionHandler(Exception e, HttpServletRequest request) {

        //传入我们自己的错误状态码 4xx 5xx,否则就不会进入定制错误页面的解析流程
        /***
         * Integer statusCode = (Integer) request.getAttribute("javax.servlet.error.status_code");
         */
        request.setAttribute("javax.servlet.error.status_code",500 );
        Map<String, Object> map = new HashMap<>();
        map.put("code", "user.notexist");
        map.put("msg", e.getMessage());
        //转发到/error
        return "forward:/error";
    }
}
新建一个获取500.html页面
 <main role="main" class="col-md-9 ml-sm-auto col-lg-10 pt-3 px-4">
        <h1>status:[[${status}]]</h1>
        <h2>timestamp:[[${timestamp}]]</h2>
        <h2>exception:[[${exception}]]</h2>
        <h2>message:[[${message}]]</h2>
      <!--  <h2>ext:[[${ext.code}]]</h2>
        <h2>ext:[[${ext.message}]]</h2>-->
</main>
测试结果

3.将我们的定制数据携带出去
出现错误以后,会来到/error请求,会被BasicErrorController处理,响应出去可以获取的数据是由 getErrorAttributes得到的(是AbstractErrorController(ErrorController)规定的方法)。
定制数据携带出去原理:

定制数据携带方法
- 完全来编写一个ErrorController的实现类【或者是编写AbstractErrorController的子类】,放在容器中。(太麻烦)
- 页面上能用的数据,或者是json返回能用的数据都是通过 errorAttributes.getErrorAttributes 得到,容器中DefaultErrorAttributes.getErrorAttributes(),默认进行数据处理的。
自定义ErrorAttributes
@Component
public class MyErrorAttributes extends DefaultErrorAttributes {
    @Override
    public Map<String, Object> getErrorAttributes(WebRequest webRequest, boolean includeStackTrace) {
        Map<String, Object> map = super.getErrorAttributes(webRequest, includeStackTrace);
        //携带自定义数据
        map.put("compay", "ginger");
        return map;
    }
}
测试结果

如何将异常处理器中的定义信息也携带出去呢?
自定义的异常处理器
@ControllerAdvice //要想成为异常处理器,要加上该注解。
public class MyExceptionHandler {

    @ExceptionHandler(UserNotExistException.class)
    public String exceptionHandler(Exception e, HttpServletRequest request) {

        //传入我们自己的错误状态码 4xx 5xx,否则就不会进入定制错误页面的解析流程
        /***
         * Integer statusCode = (Integer) request.getAttribute("javax.servlet.error.status_code");
         */
        request.setAttribute("javax.servlet.error.status_code",500 );
        Map<String, Object> map = new HashMap<>();
        map.put("code", "user.notexist");
        map.put("msg", e.getMessage());

        //将自定义异常处理器中的数据存到,那为什么后面会获取到数据呢?因为是转发到 /error ,就是由
        //BasicErrorController来处理请求。
        request.setAttribute("zidingyiMap",map );
        //转发到/error
        return "forward:/error";
    }
}
MyErrorAttributes 将异常处理器也中的数据也携带出去
@Component
public class MyErrorAttributes extends DefaultErrorAttributes {
    @Override
    public Map<String, Object> getErrorAttributes(WebRequest webRequest, boolean includeStackTrace) {
        Map<String, Object> map = super.getErrorAttributes(webRequest, includeStackTrace);
        map.put("compay", "ginger");
        //从request域中获取,map值。
        Map<String,Object> zidingyiMap = ( Map<String,Object>) webRequest.getAttribute("zidingyiMap", 0);
        map.put("zidingyiMap", zidingyiMap);
        return map;
    }
}
测试结果

7.配置嵌入式Servlet容器
SpringBoot默认使用Tomcat作为嵌入式的Servlet容器。

1.如何定制和修改Servlet容器的相关配置
1、修改和server有关的配置(ServerProperties【也是ConfigurableServletWebServerFactory】)
server.port=8081
server.context‐path=/crud
server.tomcat.uri‐encoding=UTF‐8

//通用的Servlet容器设置
server.xxx
//Tomcat的设置
server.tomcat.xxx
2、编写一个ConfigurableServletWebServerFactory:嵌入式的Servlet容器的定制器,来修改Servlet容器的 配置。
@Component//一定要将这个定制器加入到容器中
public class MyWebServerFactoryCustomizer implements WebServerFactoryCustomizer<ConfigurableServletWebServerFactory> {

	//定制嵌入式的Servlet容器相关的规则
    @Override
    public void customize(ConfigurableServletWebServerFactory factory) {
        factory.setPort(8889);
    }
}
测试结果

2.注册Servlet三大组件【Servlet、Filter、Listener】
由于SpringBoot默认是以jar包的方式启动嵌入式的Servlet容器来启动SpringBoot的web应用,没有web.xml文 件。
注册三大组件用以下方式
ServletRegistrationBean
//@WebServlet("/myServlet")
public class MyServlet extends HttpServlet {
    protected void doPost(HttpServletRequest request, HttpServletResponse response) throws ServletException, IOException {
        System.out.println("MyServlet....");
        response.getWriter().write("MyServlet....");
    }
    protected void doGet(HttpServletRequest request, HttpServletResponse response) throws ServletException, IOException {
        this.doPost(request, response);
    }
}

//注册三大组件
//注册servlet
@Bean
public ServletRegistrationBean myServlet() {
    ServletRegistrationBean srb = new ServletRegistrationBean(new MyServlet(), "/myServlet");
    return srb;
}
FilterRegistrationBean
public class MyFilter implements Filter {
    @Override
    public void doFilter(ServletRequest request, ServletResponse response, FilterChain chain) throws IOException, ServletException {
        System.out.println("MyFilter....");
        chain.doFilter(request,response );
    }
    @Override
    public void init(FilterConfig filterConfig) throws ServletException {}
    @Override
    public void destroy() {}
}

//注册过滤器
@Bean
public FilterRegistrationBean myFilter() {
    FilterRegistrationBean frb = new FilterRegistrationBean();
    frb.setFilter(new MyFilter());
    frb.setUrlPatterns(Arrays.asList("/myServlet"));
    return frb;
}
ServletListenerRegistrationBean
public class MyListener implements ServletContextListener {
    @Override
    public void contextInitialized(ServletContextEvent sce) {
        System.out.println("MyListener....");
    }
    @Override
    public void contextDestroyed(ServletContextEvent sce) {

    }
}

//注册监听器
@Bean
public ServletListenerRegistrationBean myListener() {
    ServletListenerRegistrationBean slrb = new ServletListenerRegistrationBean();
    slrb.setListener(new MyListener());
    return slrb;
}
SpringBoot自动配置SpringMVC的时候,自动的注册SpringMVC的前端控制器,DIspatcherServlet, DispatcherServletAutoConfiguration中。
@Bean(name = DEFAULT_DISPATCHER_SERVLET_REGISTRATION_BEAN_NAME)
@ConditionalOnBean(value = DispatcherServlet.class, name = DEFAULT_DISPATCHER_SERVLET_BEAN_NAME)
public ServletRegistrationBean<DispatcherServlet> dispatcherServletRegistration(
		DispatcherServlet dispatcherServlet) {
	ServletRegistrationBean<DispatcherServlet> registration = new ServletRegistrationBean<>(
			dispatcherServlet,
			//默认拦截:/ 拦截所有请求,包静态资源,但是不拦截jsp请求 /* 会拦截jsp。
			//可以通过 server.servletPath 来修改SpringMVC前端控制器默认拦截的请求路径。
			this.serverProperties.getServlet().getServletMapping());
	registration.setName(DEFAULT_DISPATCHER_SERVLET_BEAN_NAME);
	registration.setLoadOnStartup(
			this.webMvcProperties.getServlet().getLoadOnStartup());
	if (this.multipartConfig != null) {
		registration.setMultipartConfig(this.multipartConfig);
	}
	return registration;
}
3.替换为其他嵌入式Servlet容器

默认支持: Tomcat(默认使用)
引入web模块默认就是使用嵌入式的Tomcat作为Servlet容器
<dependency>
	<groupId>org.springframework.boot</groupId>
	<artifactId>spring‐boot‐starter‐web</artifactId>
</dependency>
Jetty
<!‐‐ 引入web模块 ‐‐>
<dependency>
    <groupId>org.springframework.boot</groupId>
    <artifactId>spring‐boot‐starter‐web</artifactId>
    <exclusions>
        <exclusion>
            <artifactId>spring‐boot‐starter‐tomcat</artifactId>
            <groupId>org.springframework.boot</groupId>
        </exclusion>
    </exclusions>
</dependency>
<!‐‐引入其他的Servlet容器‐‐>
<dependency>
    <artifactId>spring‐boot‐starter‐jetty</artifactId>
    <groupId>org.springframework.boot</groupId>
</dependency>
Undertow
<!‐‐ 引入web模块 ‐‐>
<dependency>
    <groupId>org.springframework.boot</groupId>
    <artifactId>spring‐boot‐starter‐web</artifactId>
    <exclusions>
        <exclusion>
            <artifactId>spring‐boot‐starter‐tomcat</artifactId>
            <groupId>org.springframework.boot</groupId>
        </exclusion>
    </exclusions>
</dependency>
<!‐‐引入其他的Servlet容器‐‐>
<dependency>
    <artifactId>spring‐boot‐starter‐undertow</artifactId>
    <groupId>org.springframework.boot</groupId>
</dependency>
4.嵌入式Servlet容器自动配置原理
1、EmbeddedWebServerFactoryCustomizerAutoConfiguration:嵌入式Web服务器出厂自定义程序自动配置。
@Configuration
@EnableConfigurationProperties(ServerProperties.class)
public class EmbeddedWebServerFactoryCustomizerAutoConfiguration {

	@ConditionalOnClass({ Tomcat.class, UpgradeProtocol.class })判断当前是否引入了Tomcat依赖
	public static class TomcatWebServerFactoryCustomizerConfiguration {

		@Bean
		public TomcatWebServerFactoryCustomizer tomcatWebServerFactoryCustomizer(
				Environment environment, ServerProperties serverProperties) {
			return new TomcatWebServerFactoryCustomizer(environment, serverProperties);
		}

	}

	/**
	 * Nested configuration if Jetty is being used.
	 */
	@Configuration
	@ConditionalOnClass({ Server.class, Loader.class, WebAppContext.class })
	public static class JettyWebServerFactoryCustomizerConfiguration {

		@Bean
		public JettyWebServerFactoryCustomizer jettyWebServerFactoryCustomizer(
				Environment environment, ServerProperties serverProperties) {
			return new JettyWebServerFactoryCustomizer(environment, serverProperties);
		}

	}

	/**
	 * Nested configuration if Undertow is being used.
	 */
	@Configuration
	@ConditionalOnClass({ Undertow.class, SslClientAuthMode.class })
	public static class UndertowWebServerFactoryCustomizerConfiguration {

		@Bean
		public UndertowWebServerFactoryCustomizer undertowWebServerFactoryCustomizer(
				Environment environment, ServerProperties serverProperties) {
			return new UndertowWebServerFactoryCustomizer(environment, serverProperties);
		}

	}

}
2、以TomcatServletWebServerFactory为例
@Override
	public WebServer getWebServer(ServletContextInitializer... initializers) {
		//创建一个Tomcat
		Tomcat tomcat = new Tomcat();

	    //配置Tomcat的基本环节
		File baseDir = (this.baseDirectory != null ? this.baseDirectory
				: createTempDir("tomcat"));
		tomcat.setBaseDir(baseDir.getAbsolutePath());
		Connector connector = new Connector(this.protocol);
		tomcat.getService().addConnector(connector);
		customizeConnector(connector);
		tomcat.setConnector(connector);
		tomcat.getHost().setAutoDeploy(false);
		configureEngine(tomcat.getEngine());
		for (Connector additionalConnector : this.additionalTomcatConnectors) {
			tomcat.getService().addConnector(additionalConnector);
		}
		prepareContext(tomcat.getHost(), initializers);
	    //将配置好的Tomcat传入进去,返回一个 WebServer 并且启动Tomcat服务器。
		return getTomcatWebServer(tomcat);
	}
3、对嵌入式容器的配置修改是怎么生效?
ServerProperties、ConfigurableServletWebServerFactory
ConfigurableServletWebServerFactory:定制器帮我们修改了Servlet容器的配置。
容器中导入WebServerFactoryCustomizerBeanPostProcessor
5.嵌入式Servlet容器启动原理
什么时候创建嵌入式的Servlet容器工厂,什么时候获取嵌入式的Servlet容器并启动Tomcat。
获取嵌入式的Servlet容器工厂:
-
1、SpringBoot应用启动运行run方法。
-
2、refreshContext(context),SpringBoot刷新IOC容器【创建IOC容器对象,并初始化容器,创建容器中的每一个组件】
Web环境默认使用的应用程序上下文的类:AnnotationConfigServletWebServerApplicationContext、
默认情况下用于响应式Web环境的应用程序上下文的类:AnnotationConfigReactiveWebServerApplicationContext、
在非Web环境中默认使用的应用程序上下文的类:AnnotationConfigApplicationContext。 -
3、refresh(context),刷新刚才创建好的ioc容器。
@Override
public void refresh() throws BeansException, IllegalStateException {
	synchronized (this.startupShutdownMonitor) {
		// Prepare this context for refreshing.
		prepareRefresh();
		// Tell the subclass to refresh the internal bean factory.
		ConfigurableListableBeanFactory beanFactory = obtainFreshBeanFactory();
		// Prepare the bean factory for use in this context.
		prepareBeanFactory(beanFactory);
		try {
			// Allows post-processing of the bean factory in context subclasses.
			postProcessBeanFactory(beanFactory);
			// Invoke factory processors registered as beans in the context.
			invokeBeanFactoryPostProcessors(beanFactory);
			// Register bean processors that intercept bean creation.
			registerBeanPostProcessors(beanFactory);
			// Initialize message source for this context.
			initMessageSource();
			// Initialize event multicaster for this context.
			initApplicationEventMulticaster();
			// Initialize other special beans in specific context subclasses.
			onRefresh();
			// Check for listener beans and register them.
			registerListeners();
			// Instantiate all remaining (non-lazy-init) singletons.
			finishBeanFactoryInitialization(beanFactory);
			// Last step: publish corresponding event.
			finishRefresh();
		}
		catch (BeansException ex) {
			if (logger.isWarnEnabled()) {
				logger.warn("Exception encountered during context initialization - " +
						"cancelling refresh attempt: " + ex);
			}
			// Destroy already created singletons to avoid dangling resources.
			destroyBeans();
			// Reset 'active' flag.
			cancelRefresh(ex);
			// Propagate exception to caller.
			throw ex;
		}
		finally {
			// Reset common introspection caches in Spring's core, since we
			// might not ever need metadata for singleton beans anymore...
			resetCommonCaches();
		}
	}
}
4、web ioc容器会创建嵌入式的Servlet容器,createWebServer()。

5、获取嵌入式的Servlet容器工厂

从ioc容器中获取 ServletWebServerFactory 组件,TomcatServletWebServerFactory创建对象,后置处理器一看是这个对象,就获取所有的定制器来先定制Servlet容器的相关配置。
6、使用容器工厂获取嵌入式的Servlet容器:this.webServer = factory.getWebServer(getSelfInitializer())。(返回TomcatWebServer)
7、嵌入式的Servlet容器创建对象并启动Servlet容器
先启动嵌入式的Servlet容器,再将ioc容器中剩下没有创建出的对象获取出来。
IOC容器启动创建嵌入式的Servlet容器

8.使用外置的Servlet容器
嵌入式Servlet容器,应用打成可执行的jar。
优点:简单、便携。
缺点:默认不支持JSP、优化定制比较复杂(使用定制器【ServerProperties、自定义 WebServerFactoryCustomizer】,自己编写嵌入式Servlet容器的创建工厂 【ConfigurableServletWebServerFactory】)。
外置的Servlet容器:外面安装Tomcat—应用war包的方式打包。
1.步骤
1、必须创建一个war项目(利用idea创建好目录结构)。
2、将嵌入式的Tomcat指定为provided。
<dependency>
	<groupId>org.springframework.boot</groupId>
	<artifactId>spring‐boot‐starter‐tomcat</artifactId>
	<scope>provided</scope>
</dependency>
3、必须编写一个 SpringBootServletInitializer 的子类,并调用configure方法。
public class ServletInitializer extends SpringBootServletInitializer {
	@Override
	protected SpringApplicationBuilder configure(SpringApplicationBuilder application) {
	 //传入SpringBoot应用的主程序
	 return application.sources(SpringBoot04WebJspApplication.class);
	}
}
4、启动服务器就可以使用
2. 原理
jar包:执行SpringBoot主类的main方法,启动ioc容器,创建嵌入式的Servlet容器。
war包:启动服务器,服务器启动SpringBoot应用【SpringBootServletInitializer】,启动ioc容器。
servlet3.0(Spring注解版),第8.2.4 Shared libraries / runtimes pluggability 章节
规则:
1、服务器启动(web应用启动)会创建当前web应用里面每一个jar包里面 ServletContainerInitializer 实例。
2、 ServletContainerInitializer 的实现放在jar包的META-INF/services文件夹下,有一个名为 javax.servlet.ServletContainerInitializer的文件,内容就是 ServletContainerInitializer的 实现类的全类名。
3、还可以使用@HandlesTypes,在应用启动的时候加载我们感兴趣的类。
流程:
1、启动Tomcat
2、org\springframework\spring-web\4.3.14.RELEASE\spring-web-4.3.14.RELEASE.jar!\META- INF\services\javax.servlet.ServletContainerInitializer:Spring的web模块里面有这个文件:org.springframework.web.SpringServletContainerInitializer。
3、SpringServletContainerInitializer将@HandlesTypes(WebApplicationInitializer.class)标注的所有这个类型 的类都传入到onStartup方法的Set>;为这些WebApplicationInitializer类型的类创建实例。
4、每一个WebApplicationInitializer都调用自己的onStartup。

5、相当于我们的SpringBootServletInitializer的类会被创建对象,并执行onStartup方法。
6、SpringBootServletInitializer实例执行onStartup的时候会createRootApplicationContext,创建容器。
protected WebApplicationContext createRootApplicationContext(
			ServletContext servletContext) {
	//1、创建SpringApplicationBuilder
	SpringApplicationBuilder builder = createSpringApplicationBuilder();
	StandardServletEnvironment environment = new StandardServletEnvironment();
	environment.initPropertySources(servletContext, null);
	builder.environment(environment);
	builder.main(getClass());
	ApplicationContext parent = getExistingRootWebApplicationContext(servletContext);
	if (parent != null) {
		this.logger.info("Root context already created (using as parent).");
		servletContext.setAttribute(
				WebApplicationContext.ROOT_WEB_APPLICATION_CONTEXT_ATTRIBUTE, null);
		builder.initializers(new ParentContextApplicationContextInitializer(parent));
	}
	builder.initializers(
			new ServletContextApplicationContextInitializer(servletContext));
	builder.contextClass(AnnotationConfigServletWebServerApplicationContext.class);

	//调用configure方法,子类重写了这个方法,将SpringBoot的主程序类传入了进来
	builder = configure(builder);
	//使用builder创建一个Spring应用
	SpringApplication application = builder.build();
	if (application.getAllSources().isEmpty() && AnnotationUtils
			.findAnnotation(getClass(), Configuration.class) != null) {
		application.addPrimarySources(Collections.singleton(getClass()));
	}
	Assert.state(!application.getAllSources().isEmpty(),
			"No SpringApplication sources have been defined. Either override the "
					+ "configure method or add an @Configuration annotation");
	// Ensure error pages are registered
	if (this.registerErrorPageFilter) {
		application.addPrimarySources(
				Collections.singleton(ErrorPageFilterConfiguration.class));
	}
	//启动Spring应用
	return run(application);
}
7)、Spring的应用就启动并且创建IOC容器
public ConfigurableApplicationContext run(String... args) {
	StopWatch stopWatch = new StopWatch();
	stopWatch.start();
	ConfigurableApplicationContext context = null;
	Collection<SpringBootExceptionReporter> exceptionReporters = new ArrayList<>();
	configureHeadlessProperty();
	SpringApplicationRunListeners listeners = getRunListeners(args);
	listeners.starting();
	try {
		ApplicationArguments applicationArguments = new DefaultApplicationArguments(
				args);
		ConfigurableEnvironment environment = prepareEnvironment(listeners,
				applicationArguments);
		configureIgnoreBeanInfo(environment);
		Banner printedBanner = printBanner(environment);
		context = createApplicationContext();
		exceptionReporters = getSpringFactoriesInstances(
				SpringBootExceptionReporter.class,
				new Class[] { ConfigurableApplicationContext.class }, context);
		prepareContext(context, environment, listeners, applicationArguments,
				printedBanner);
		//刷新IOC容器
		refreshContext(context);
		afterRefresh(context, applicationArguments);
		stopWatch.stop();
		if (this.logStartupInfo) {
			new StartupInfoLogger(this.mainApplicationClass)
					.logStarted(getApplicationLog(), stopWatch);
		}
		listeners.started(context);
		callRunners(context, applicationArguments);
	}
	catch (Throwable ex) {
		handleRunFailure(context, ex, exceptionReporters, listeners);
		throw new IllegalStateException(ex);
	}

	try {
		listeners.running(context);
	}
	catch (Throwable ex) {
		handleRunFailure(context, ex, exceptionReporters, null);
		throw new IllegalStateException(ex);
	}
	return context;
}
启动Servlet容器,再启动SpringBoot应用。


 6451
6451


 被折叠的 条评论
为什么被折叠?
被折叠的 条评论
为什么被折叠?
 到【灌水乐园】发言


