


文章目录
分布式配置中心服务端
概述
创建一个工程名为 hello-spring-cloud-config 的项目,pom.xml 配置文件如下:
<?xml version="1.0" encoding="UTF-8"?>
<project xmlns="http://maven.apache.org/POM/4.0.0" xmlns:xsi="http://www.w3.org/2001/XMLSchema-instance"
         xsi:schemaLocation="http://maven.apache.org/POM/4.0.0 http://maven.apache.org/xsd/maven-4.0.0.xsd">
    <modelVersion>4.0.0</modelVersion>

    <parent>
        <groupId>com.funtl</groupId>
        <artifactId>hello-spring-cloud-dependencies</artifactId>
        <version>1.0.0-SNAPSHOT</version>
        <relativePath>../hello-spring-cloud-dependencies/pom.xml</relativePath>
    </parent>

    <artifactId>hello-spring-cloud-config</artifactId>
    <packaging>jar</packaging>

    <name>hello-spring-cloud-config</name>
    <url>http://www.funtl.com</url>
    <inceptionYear>2018-Now</inceptionYear>

    <dependencies>
        <!-- Spring Boot Begin -->
        <dependency>
            <groupId>org.springframework.boot</groupId>
            <artifactId>spring-boot-starter-web</artifactId>
        </dependency>
        <dependency>
            <groupId>org.springframework.boot</groupId>
            <artifactId>spring-boot-starter-tomcat</artifactId>
        </dependency>
        <dependency>
            <groupId>org.springframework.boot</groupId>
            <artifactId>spring-boot-starter-actuator</artifactId>
        </dependency>
        <dependency>
            <groupId>org.springframework.boot</groupId>
            <artifactId>spring-boot-starter-test</artifactId>
            <scope>test</scope>
        </dependency>
        <!-- Spring Boot End -->

        <!-- Spring Cloud Begin -->
        <dependency>
            <groupId>org.springframework.cloud</groupId>
            <artifactId>spring-cloud-config-server</artifactId>
        </dependency>
        <dependency>
            <groupId>org.springframework.cloud</groupId>
            <artifactId>spring-cloud-starter-netflix-eureka-server</artifactId>
        </dependency>
        <!-- Spring Cloud End -->
    </dependencies>

    <build>
        <plugins>
            <plugin>
                <groupId>org.springframework.boot</groupId>
                <artifactId>spring-boot-maven-plugin</artifactId>
                <configuration>
                    <mainClass>com.xyl.hello.spring.cloud.config.ConfigApplication</mainClass>
                </configuration>
            </plugin>
        </plugins>
    </build>
</project>
主要增加了 spring-cloud-config-server 依赖
<dependency>
    <groupId>org.springframework.cloud</groupId>
    <artifactId>spring-cloud-config-server</artifactId>
</dependency>
Application
通过 @EnableConfigServer 注解,开启配置服务器功能
package com.xyl.hello.spring.cloud.config;

import org.springframework.boot.SpringApplication;
import org.springframework.boot.autoconfigure.SpringBootApplication;
import org.springframework.cloud.config.server.EnableConfigServer;
import org.springframework.cloud.netflix.eureka.EnableEurekaClient;

@SpringBootApplication
@EnableConfigServer
@EnableEurekaClient
public class ConfigApplication {
    public static void main(String[] args) {
        SpringApplication.run(ConfigApplication.class, args);
    }
}
application.yml
增加 Config 相关配置,并设置端口号为:8888
spring:
  application:
    name: hello-spring-cloud-config
  cloud:
    config:
      label: master
      server:
        git:
          uri: https://github.com/topsale/spring-cloud-config
          search-paths: respo
          username:
          password:

server:
  port: 8888

eureka:
  client:
    serviceUrl:
      defaultZone: http://localhost:8761/eureka/
测试
浏览器端访问:http://localhost:8888/config-client/dev/master 显示如下
<Environment>
  <name>config-client</name>
  <profiles>
    <profiles>dev</profiles>
  </profiles>
  <label>master</label>
  <version>9646007f931753d7e96a6dcc9ae34838897a91df</version>
  <state/>
  <propertySources>
    <propertySources>
      <name>https://github.com/topsale/spring-cloud-config/respo/config-client-dev.yml</name>
      <source>
        <foo>foo version 1</foo>
        <demo.message>Hello Spring Config</demo.message>
      </source>
    </propertySources>
  </propertySources>
</Environment>
证明配置服务中心可以从远程程序获取配置信息
分布式配置中心客户端
概述
创建一个工程名为 hello-spring-cloud-config-client 的项目,pom.xml 文件配置如下:
<?xml version="1.0" encoding="UTF-8"?>
<project xmlns="http://maven.apache.org/POM/4.0.0" xmlns:xsi="http://www.w3.org/2001/XMLSchema-instance"
         xsi:schemaLocation="http://maven.apache.org/POM/4.0.0 http://maven.apache.org/xsd/maven-4.0.0.xsd">
    <modelVersion>4.0.0</modelVersion>

    <parent>
        <groupId>com.funtl</groupId>
        <artifactId>hello-spring-cloud-dependencies</artifactId>
        <version>1.0.0-SNAPSHOT</version>
        <relativePath>../hello-spring-cloud-dependencies/pom.xml</relativePath>
    </parent>

    <artifactId>hello-spring-cloud-config-client</artifactId>
    <packaging>jar</packaging>

    <name>hello-spring-cloud-config-client</name>
    <url>http://www.funtl.com</url>
    <inceptionYear>2018-Now</inceptionYear>

    <dependencies>
        <!-- Spring Boot Begin -->
        <dependency>
            <groupId>org.springframework.boot</groupId>
            <artifactId>spring-boot-starter-web</artifactId>
        </dependency>
        <dependency>
            <groupId>org.springframework.boot</groupId>
            <artifactId>spring-boot-starter-tomcat</artifactId>
        </dependency>
        <dependency>
            <groupId>org.springframework.boot</groupId>
            <artifactId>spring-boot-starter-actuator</artifactId>
        </dependency>
        <dependency>
            <groupId>org.springframework.boot</groupId>
            <artifactId>spring-boot-starter-test</artifactId>
            <scope>test</scope>
        </dependency>
        <!-- Spring Boot End -->

        <!-- Spring Cloud Begin -->
        <dependency>
            <groupId>org.springframework.cloud</groupId>
            <artifactId>spring-cloud-starter-config</artifactId>
        </dependency>
        <dependency>
            <groupId>org.springframework.cloud</groupId>
            <artifactId>spring-cloud-starter-netflix-eureka-server</artifactId>
        </dependency>
        <!-- Spring Cloud End -->
    </dependencies>

    <build>
        <plugins>
            <plugin>
                <groupId>org.springframework.boot</groupId>
                <artifactId>spring-boot-maven-plugin</artifactId>
                <configuration>
                    <mainClass>com.xyl.hello.spring.cloud.config.client.ConfigClientApplication</mainClass>
                </configuration>
            </plugin>
        </plugins>
    </build>
</project>
主要增加了 spring-cloud-starter-config 依赖

<dependency>
    <groupId>org.springframework.cloud</groupId>
    <artifactId>spring-cloud-starter-config</artifactId>
</dependency>
Application
入口类没有需要特殊处理的地方,代码如下:
package com.xyl.hello.spring.cloud.config;

import org.springframework.boot.SpringApplication;
import org.springframework.boot.autoconfigure.SpringBootApplication;
import org.springframework.cloud.config.server.EnableConfigServer;
import org.springframework.cloud.netflix.eureka.EnableEurekaClient;

@SpringBootApplication
@EnableConfigServer
@EnableEurekaClient
public class ConfigApplication {
    public static void main(String[] args) {
        SpringApplication.run(ConfigApplication.class, args);
    }
}
application.yml
增加 Config Client 相关配置,并设置端口号为:8889
spring:
  application:
    name: hello-spring-cloud-config-client
  cloud:
    config:
      uri: http://localhost:8888
      name: config-client
      label: master
      profile: dev

server:
  port: 8889

eureka:
  client:
    serviceUrl:
      defaultZone: http://localhost:8761/eureka/
相关配置说明,如下:
- spring.cloud.config.uri:配置服务中心的网址
- spring.cloud.config.name:配置文件名称的前缀
- spring.cloud.config.label:配置仓库的分支
- spring.cloud.config.profile:配置文件的环境标识
- dev:表示开发环境
- test:表示测试环境
- prod:表示生产环境
配置服务器的默认端口为8888,如果修改了默认端口,则客户端项目就不能在application.yml或application.properties中配置spring.cloud.config.uri,必须在bootstrap.yml或是bootstrap.properties中配置,原因是bootstrap开头的配置文件会被优先加载和配置,切记。
创建测试用 Controller
我们创建一个 Controller 来测试一下通过远程仓库的配置文件注入 foo 属性
package com.funtl.hello.spring.cloud.config.client.controller;

import org.springframework.beans.factory.annotation.Value;
import org.springframework.web.bind.annotation.RequestMapping;
import org.springframework.web.bind.annotation.RequestMethod;
import org.springframework.web.bind.annotation.RestController;

@RestController
public class TestConfigController {

    @Value("${foo}")
    private String foo;

    @RequestMapping(value = "/hi", method = RequestMethod.GET)
    public String hi() {
        return foo;
    }
}
一般情况下,能够正常启动服务就说明注入是成功的。
测试访问
浏览器端访问:http://localhost:8889/hi 显示如下:
foo version 1
附:开启 Spring Boot Profile
在做项目开发的时候,生产环境和测试环境的一些配置可能会不一样,有时候一些功能也可能会不一样,所以我们可能会在上线的时候手工修改这些配置信息。但是 Spring 中为我们提供了 Profile 这个功能。我们只需要在启动的时候添加一个虚拟机参数,激活自己环境所要用的 Profile 就可以了。
操作起来很简单,只需要为不同的环境编写专门的配置文件,如:application-dev.yml、application-prod.yml, 启动项目时只需要增加一个命令参数 --spring.profiles.active=环境配置 即可,启动命令如下:
java -jar hello-spring-cloud-web-admin-feign-1.0.0-SNAPSHOT.jar --spring.profiles.active=prod
Spring Cloud 服务追踪
本篇文章主要讲解服务追踪组件 ZipKin。
ZipKin 简介
ZipKin 是一个开放源代码的分布式跟踪系统,由 Twitter 公司开源,它致力于收集服务的定时数据,以解决微服务架构中的延迟问题,包括数据的收集、存储、查找和展现。它的理论模型来自于 Google Dapper 论文。
每个服务向 ZipKin 报告计时数据,ZipKin 会根据调用关系通过 ZipKin UI 生成依赖关系图,显示了多少跟踪请求通过每个服务,该系统让开发者可通过一个 Web 前端轻松的收集和分析数据,例如用户每次请求服务的处理时间等,可方便的监测系统中存在的瓶颈。
服务追踪说明
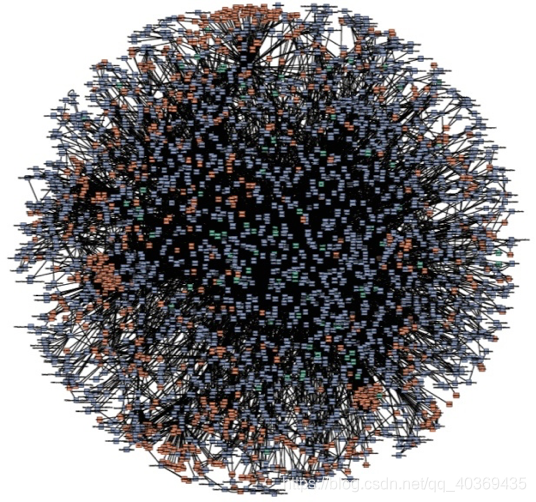
微服务架构是通过业务来划分服务的,使用 REST 调用。对外暴露的一个接口,可能需要很多个服务协同才能完成这个接口功能,如果链路上任何一个服务出现问题或者网络超时,都会形成导致接口调用失败。随着业务的不断扩张,服务之间互相调用会越来越复杂。

随着服务的越来越多,对调用链的分析会越来越复杂。它们之间的调用关系也许如下:
术语解释
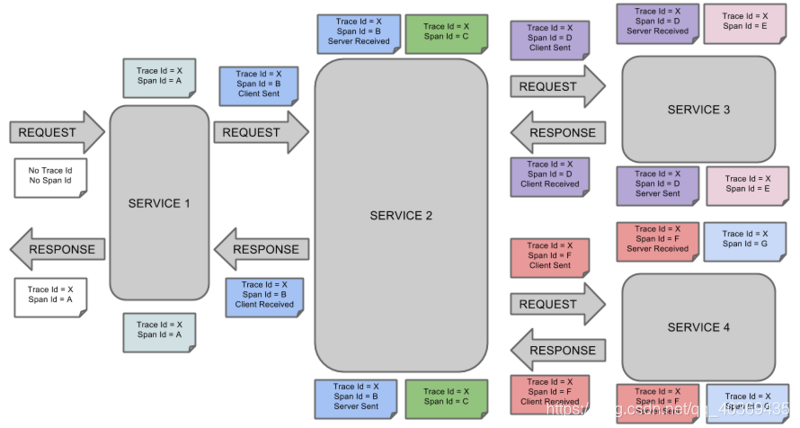
- Span:基本工作单元,例如,在一个新建的 Span 中发送一个 RPC 等同于发送一个回应请求给 RPC,Span 通过一个 64 位 ID 唯一标识,Trace 以另一个 64 位 ID 表示。
- Trace:一系列 Spans 组成的一个树状结构,例如,如果你正在运行一个分布式大数据工程,你可能需要创建一个 Trace。
- Annotation:用来即使记录一个事件的存在,一些核心 Annotations 用来定义一个请求的开始和结束
- cs:Client Sent,客户端发起一个请求,这个 Annotation 描述了这个 Span 的开始
- sr:Server Received,服务端获得请求并准备开始处理它,如果将其 sr 减去 cs 时间戳便可得到网络延迟
- ss:Server Sent 表明请求处理的完成(当请求返回客户端),如果 ss 减去 sr 时间戳便可得到服务端需要的处理请求时间
- cr:Client Received 表明 Span 的结束,客户端成功接收到服务端的回复,如果 cr 减去 cs 时间戳便可得到客户端从服务端获取回复的所有所需时间
将 Span 和 Trace 在一个系统中使用 Zipkin 注解的过程图形化:
创建 ZipKin 服务端
创建一个工程名为 hello-spring-cloud-zipkin 的项目,pom.xml文件如下:
<?xml version="1.0" encoding="UTF-8"?>
<project xmlns="http://maven.apache.org/POM/4.0.0" xmlns:xsi="http://www.w3.org/2001/XMLSchema-instance"
         xsi:schemaLocation="http://maven.apache.org/POM/4.0.0 http://maven.apache.org/xsd/maven-4.0.0.xsd">
    <modelVersion>4.0.0</modelVersion>

    <parent>
        <groupId>com.funtl</groupId>
        <artifactId>hello-spring-cloud-dependencies</artifactId>
        <version>1.0.0-SNAPSHOT</version>
        <relativePath>../hello-spring-cloud-dependencies/pom.xml</relativePath>
    </parent>

    <artifactId>hello-spring-cloud-zipkin</artifactId>
    <packaging>jar</packaging>


    <name>hello-spring-cloud-zipkin</name>
    <url>http://www.funtl.com</url>
    <inceptionYear>2018-Now</inceptionYear>

    <dependencies>
        <!-- Spring Boot Begin -->
        <dependency>
            <groupId>org.springframework.boot</groupId>
            <artifactId>spring-boot-starter-web</artifactId>
        </dependency>
        <dependency>
            <groupId>org.springframework.boot</groupId>
            <artifactId>spring-boot-starter-tomcat</artifactId>
        </dependency>
        <dependency>
            <groupId>org.springframework.boot</groupId>
            <artifactId>spring-boot-starter-actuator</artifactId>
        </dependency>
        <dependency>
            <groupId>org.springframework.boot</groupId>
            <artifactId>spring-boot-starter-test</artifactId>
            <scope>test</scope>
        </dependency>
        <!-- Spring Boot End -->

        <!-- Spring Cloud Begin -->
        <!-- https://mvnrepository.com/artifact/io.zipkin.java/zipkin -->
        <dependency>
            <groupId>io.zipkin.java</groupId>
            <artifactId>zipkin</artifactId>
            <version>2.9.1</version>
        </dependency>
        <!-- https://mvnrepository.com/artifact/io.zipkin.java/zipkin-server -->
        <dependency>
            <groupId>io.zipkin.java</groupId>
            <artifactId>zipkin-server</artifactId>
            <version>2.9.1</version>
        </dependency>
        <!-- https://mvnrepository.com/artifact/io.zipkin.java/zipkin-autoconfigure-ui -->
        <dependency>
            <groupId>io.zipkin.java</groupId>
            <artifactId>zipkin-autoconfigure-ui</artifactId>
            <version>2.11.12</version>
        </dependency>


        <dependency>
            <groupId>org.springframework.cloud</groupId>
            <artifactId>spring-cloud-starter-netflix-eureka-server</artifactId>
        </dependency>
        <!-- Spring Cloud End -->
    </dependencies>

    <build>
        <plugins>
            <plugin>
                <groupId>org.springframework.boot</groupId>
                <artifactId>spring-boot-maven-plugin</artifactId>
                <configuration>
                    <mainClass>com.xyl.hello.spring.cloud.zipkin.ZipKinApplication</mainClass>
                </configuration>
            </plugin>
        </plugins>
    </build>
</project>
主要增加了 3 个依赖,io.zipkin.java:zipkin、io.zipkin.java:zipkin-server、io.zipkin.java:zipkin-autoconfigure-ui
Application
通过 @EnableZipkinServer 注解开启 Zipkin Server 功能
package com.xyl.hello.spring.cloud.zipkin;

import org.springframework.boot.SpringApplication;
import org.springframework.boot.autoconfigure.SpringBootApplication;
import org.springframework.cloud.netflix.eureka.EnableEurekaClient;
import zipkin.server.internal.EnableZipkinServer;

@SpringBootApplication
@EnableEurekaClient
@EnableZipkinServer
public class ZipKinApplication {
    public static void main(String[] args) {
        SpringApplication.run(ZipKinApplication.class, args);
    }
}
application.yml
设置端口号为:9411,该端口号为 Zipkin Server 的默认端口号
spring:
  application:
    name: hello-spring-cloud-zipkin

server:
  port: 9411

eureka:
  client:
    serviceUrl:
      defaultZone: http://localhost:8761/eureka/

management:
  metrics:
    web:
      server:
        auto-time-requests: false
追踪服务
在 所有需要被追踪的项目 中增加 spring-cloud-starter-zipkin 依赖
<dependency>
    <groupId>org.springframework.cloud</groupId>
    <artifactId>spring-cloud-starter-zipkin</artifactId>
</dependency>
在这些项目的 application.yml 配置文件中增加 Zipkin Server 的地址即可
spring:
  zipkin:
    base-url: http://localhost:9411
测试追踪
启动全部项目,打开浏览器访问:http://localhost:9411/ 会出现以下界面:
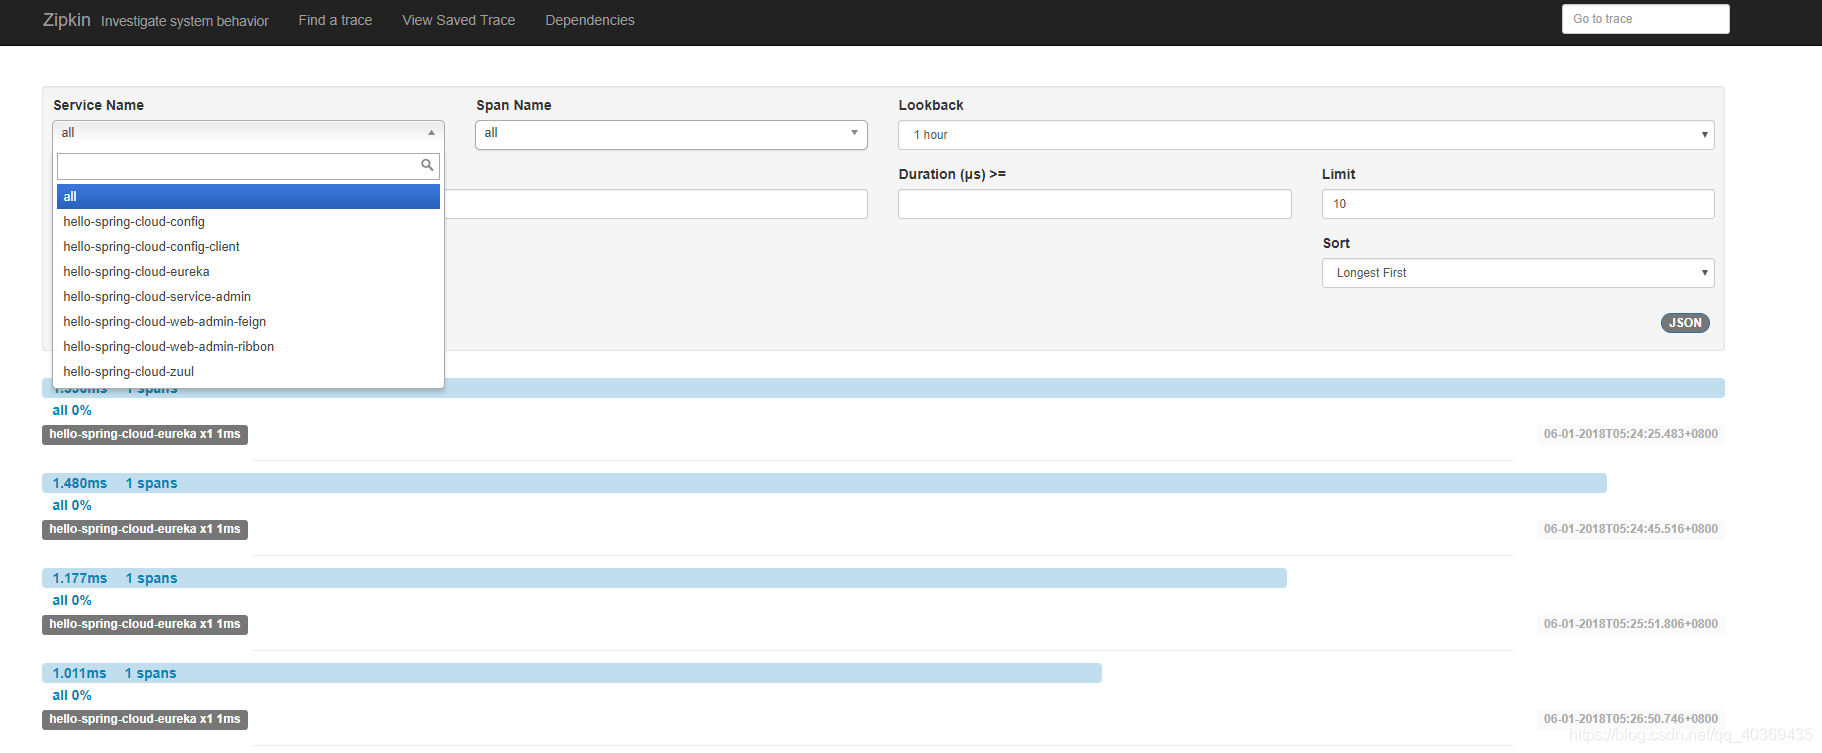
刷新之前项目中的全部测试接口(刷多几次)
点击 Find a trace,可以看到具体服务相互调用的数据
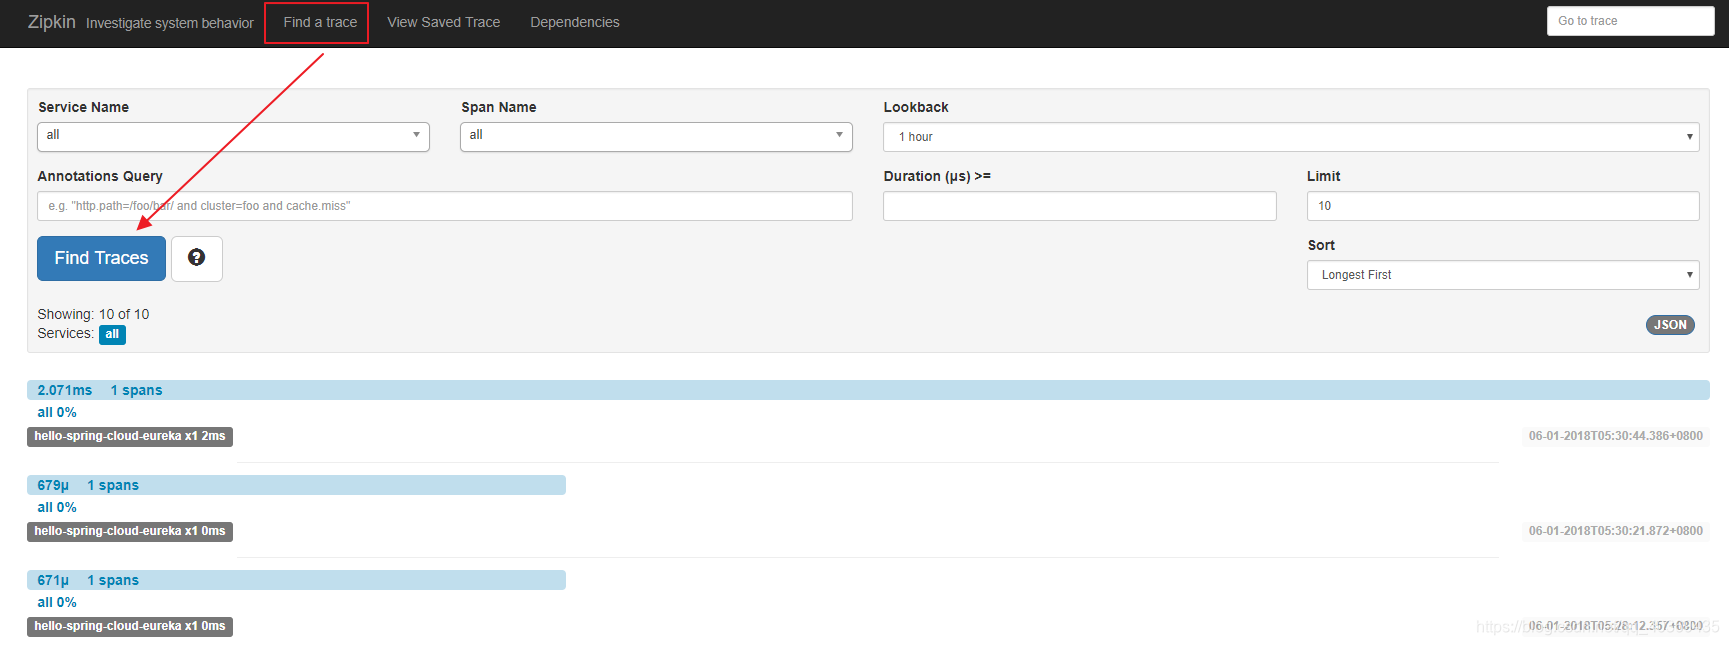
点击 Dependencies,可以发现服务的依赖关系
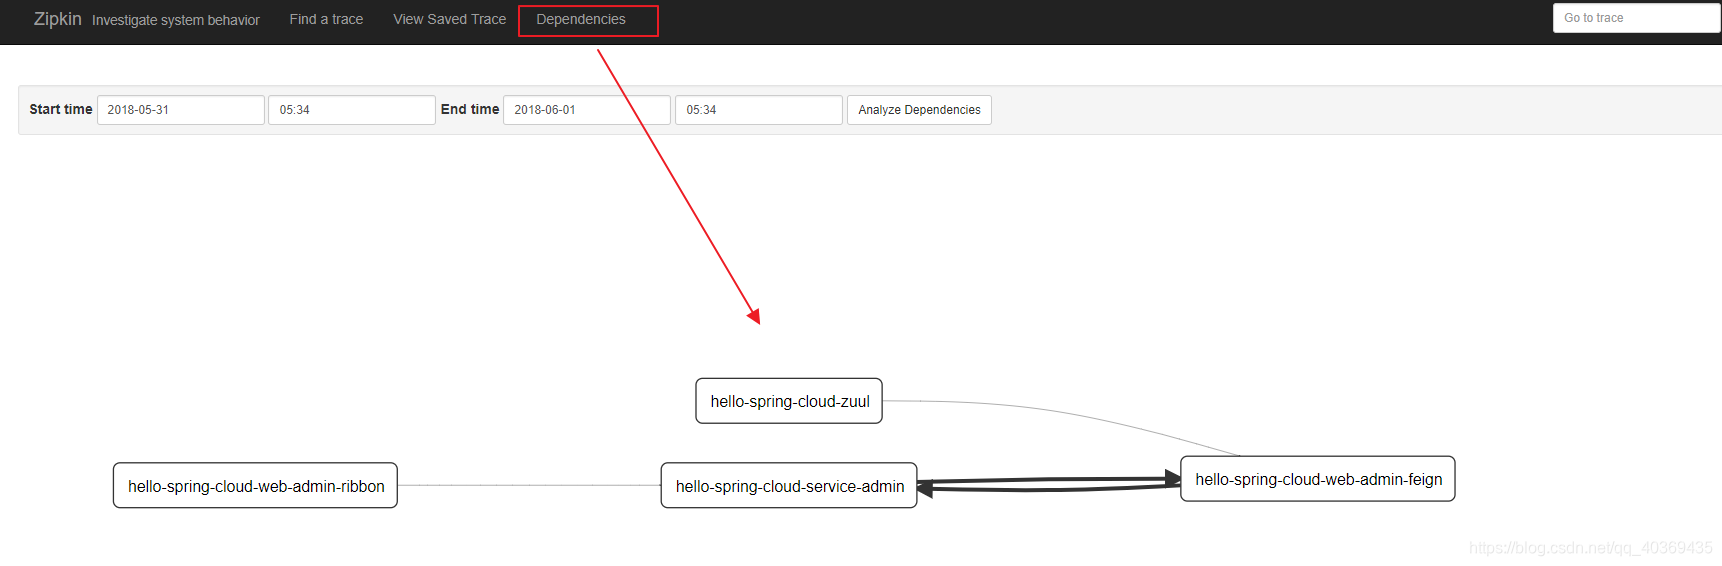
至此就代表 ZipKin 配置成功


 9689
9689


 被折叠的 条评论
为什么被折叠?
被折叠的 条评论
为什么被折叠?
 到【灌水乐园】发言


