


ngx_http_core_module 模块![]() http://tengine.taobao.org/nginx_docs/cn/docs/http/ngx_http_core_module.html
http://tengine.taobao.org/nginx_docs/cn/docs/http/ngx_http_core_module.html
目录
1前置依赖软件
解决依赖包pcre安装,命令:
sudo apt-get install libpcre3 libpcre3-dev
解决依赖包zlib安装,命令:
sudo apt-get install zlib1g-dev
解决依赖包openssl安装,命令:
sudo apt-get install openssl libssl-dev
其他:
Linux 安装 mysql jdk tomcat上传压缩文件 https://blog.csdn.net/qq_40529035/article/details/122011945?spm=1001.2014.3001.5501
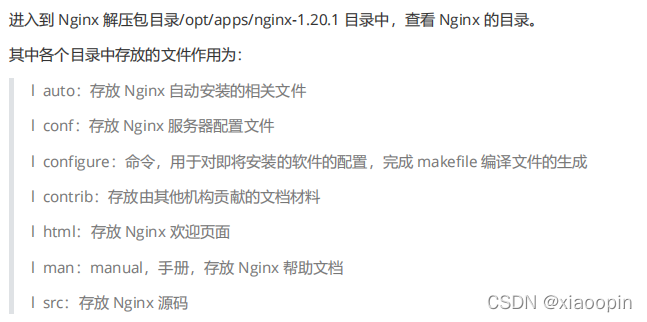
2 官网下载压缩包,解压
[root@node0 apps]# pwd
/opt/apps
[root@node0 apps]# ls
nginx-1.20.1.tar.gz
[root@node0 apps]# tar -zxvf nginx-1.20.1.tar.gz
[root@node0 apps]# cd nginx-1.20.1
3 通过配置configure生成make工程
(1)查看可配置参数
# ./configure --help
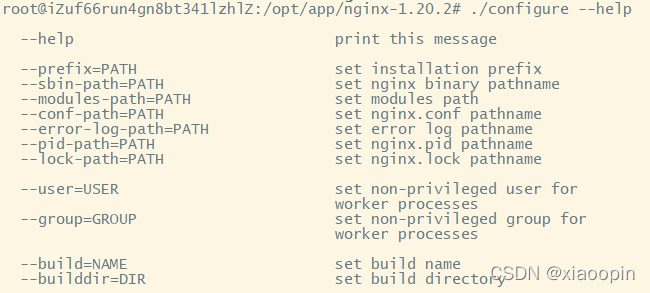
--prefix
:
Nginx
安装目录。注意,安装目录与解压目录不一样
--sbin-path
:
Nginx
命令文件
--modules-path
:
Nginx
模块存放路径
--conf-prefix
:
Nginx
配置文件存放路径
--pid-path
:
Nginx
的进程
id
文件
--error-log-path
:错误日志文件
--http-log-path
:
http
访问日志文件
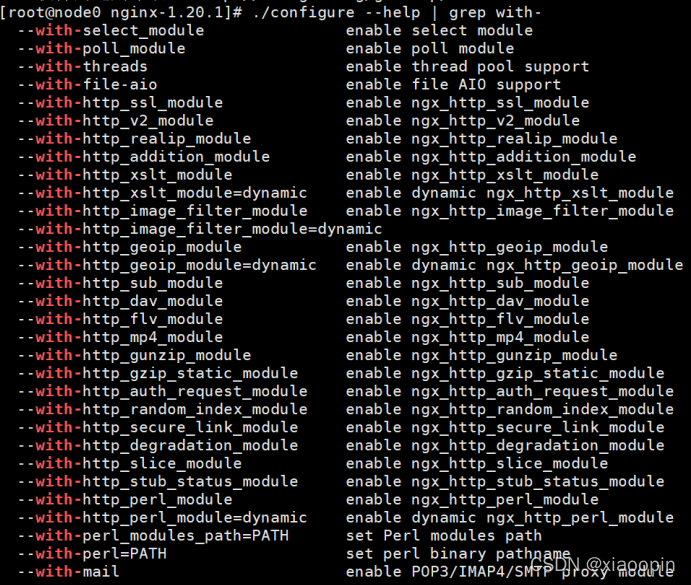
(2)查看可安装插件(默认不安装)
./configure --help |grep with-
(3)查看可卸载插件(已安装)
./configure --help |grep without-

(4)一般地,我们安装这些
<1> 在目录下创建一个client文件夹
mkdir -p /var/temp/nginx/client
<2> 常规安装配置
(反斜杠是换行,但是仍属于同一条指令)
./configure \
--prefix=/usr/local/nginx \
--pid-path=/usr/local/nginx/logs/nginx.pid \
--error-log-path=/usr/local/nginx/logs/error.log \
--http-log-path=/usr/local/nginx/logs/access.log \
--with-http_ssl_module \
--with-http_gzip_static_module \
--http-client-body-temp-path=/var/temp/nginx/client \
--http-proxy-temp-path=/var/temp/nginx/proxy \
--http-fastcgi-temp-path=/var/temp/nginx/fastcgi \
--http-uwsgi-temp-path=/var/temp/nginx/uwsgi
<3>编译并安装
make && make install
<4>查看安装目录/usr/local/nginx
cd /usr/local/nginx
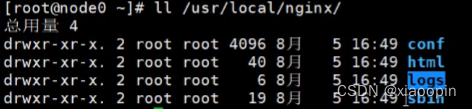
conf
目录
Nginx
所有配置文件的目录,极其重要。在该目录中包含一个
nginx.conf
配置文件。
html
目录
Nginx
的默认站点目录。
logs
目录
存放
Nginx
的日志文件。
access.log error.log
sbin
目录
Nginx
命令的目录,如
Nginx
的启动命令。
4 nginx的开启
<1>查看防火墙状态
[1]systemctl status firewalld.service
[2]systemctl list-unit-files |grep firewalld
<2>停止防火墙,系统重启后会重新打开
systemctl stopfirewalld.service
<3>金庸防火墙,系统重启后不会重新打开
systemctl disable firewalld.service
<4>在失去防火墙之后,可以运行nginx
cd sbin/
./nginx
<5>查看nginx进程(process=ps)运行状态
ps aux|grep nginx

浏览器访问你自己的ip(局域网 or 服务器),出现下图(nginx/html/index.html)说明启动成功

或者你也可以改成这样嘻嘻

5 关闭Nginx
1.
立即终止服务
这种方法比较强硬,无论进程是否在工作,都直接停止进程。
# ./nginx -s stop
2.
从容退出服务
这种方法较
stop
相比就比较温和一些了,需要进程完成当前工作后再停止。
./nginx -s quit
3.
killall
方法杀死进程
直接杀死进程,在上面无效的情况下使用,态度强硬,简单粗暴!绝杀!
killall nginx
6 设置开机自启动
1.
进到系统服务添加路径
:
# cd /usr/lib/systemd/system/
2.
建立服务文件
nginx.service
注意我的
nginx
的安装路径是:
/usr/local/nginx/, 请对应你自己的路径。
编辑文件
# vim nginx.service
填入内容
[Unit]
Description=nginx - high performance web server
After=network.target remote-fs.target nss-lookup.target
[Service]
Type=forking
ExecStart=/usr/local/nginx/sbin/nginx -c /usr/local/nginx/conf/nginx.conf
ExecReload=/usr/local/nginx/sbin/nginx -s reload
ExecStop=/usr/local/nginx/sbin/nginx -s stop
[Install]
WantedBy=multi-user.target
“翻译”(不要填入)
[Unit]
服务的说明
Description:
服务的简单描述
After:
依赖,仅当依赖的服务启动之后再启动自定义的服务单元
[Service]
服务运行参数的设置
Type=forking
是后台运行的形式
ExecStart
为服务的具体运行命令
ExecReload
为重启命令
ExecStop
为停止命令
注意:启动、重启、停止命令全部要求使用绝对路径
[Install]
服务安装的相关设置,可设置为多用户
3.
添加执行权限
以
755
的权限保存在目录:
/usr/lib/systemd/system
[root@node0 system]# chmod +x nginx.service
4.
设置开机自启动
可在任意目录下执行
[root@node0 system]# systemctl enable nginx.service
如果成功nginx.service应该会有字体变化
查看系统服务列表,并筛选出nginx相关内容,那么有nginx出现则成功了
[root@node0 system]# systemctl list-unit-files |grep nginx
nginx
.service enabled
7 其他命令 以下以nginx 为例
启动
nginx
服务
: systemctl start nginx.service
停止开机自启动
: systemctl disable nginx.service
查看服务当前状态
: systemctl status nginx.service
重新启动服务
: systemctl restart nginx.service
查看所有已启动的服务
: systemctl list-units --type=service


 5310
5310


 被折叠的 条评论
为什么被折叠?
被折叠的 条评论
为什么被折叠?
 到【灌水乐园】发言


